
Frankie and James
I went to Bridget and Michaels house today to photograph their new little babies – Frankie and James. Bridget just returned from New York City with the twins that Michael and her adopted. Each of them has their own personality. Frankie is more of the emotional one but he loves to hug and snuggle with his brother James. James is more calm, cool and collected and doesn’t like to be snuggled up against by his brother. When Frankie tries to hug him, he cries and pushes him away. And they are both super strong. James grabbed my finger when I was trying to move the blanket out of his face and he practically cut off the circulation to my hand. These little guys are very healthy and very strong.
Frankie is hugging James here, James probably doesn’t realize it because he is sleeping away. if he was awake it might be a different story.


Bridget kisses there feet. They have cute feet don’t they? I think their feet are so tiny.


Oliver says that he loves having two younger brothers. He is a great older brother and takes great care of his younger brothers.


Even if they sometimes scream and cry a little too loud for him.

Welcome home Frankie and James


15 Best Spots to Photograph San Diego
 I’m a local San Diego Amateur Photographer. My name is Frank McKenna. I grew up in San Diego and I love this city.
San Diego is one of the most beautiful cities in the world and millions of visitors, business travelers and tourist come here each year to take in the warm weather and beautiful scenes of the city. As a frequent traveler myself and one that really loves photography, I have found that traveling to a city to take pictures can be difficult. Being unfamiliar with a city, its really hard to know exactly where to go to find the best pictures. Since I live here in San Diego I thought I would put together something for travelers and photographers to help them take awesome pictures during their short time in San Diego.
If your looking to take day trips from San Diego to photograph cool locations, I put together a list of the best locations within 2 hours of San Diego that you can read here. 7 Best Photography Day Trips from San Diego.
If you are into Night Photography in San Diego, I put a guide of great locations here – 12 Best Places for Night Photography in San Diego.
Or if you want to check out my gallery of selected San Diego Photographs you can go here – San Diego Pictures.
First, Some Tips for Photographing San Diego Sunset is glorious in San Diego, take advantage of it – San Diego is nestled on the Pacific Ocean and has unobstructed views of sunset’s.
I recommend photographing around sunset. The golden hour here in San Diego is spectacular and your pictures will be so much better if taken at that time. Give yourself 30 minutes to walk and setup for each location .
Most of the best San Diego pictures you see on the internet and on postcards were probably taken with wide angle lens. I prefer anything 24mm or less for wide angle shots. For shots in San Diego I prefer to use 24mm for landscape and 35mm shots for the cityscapes.
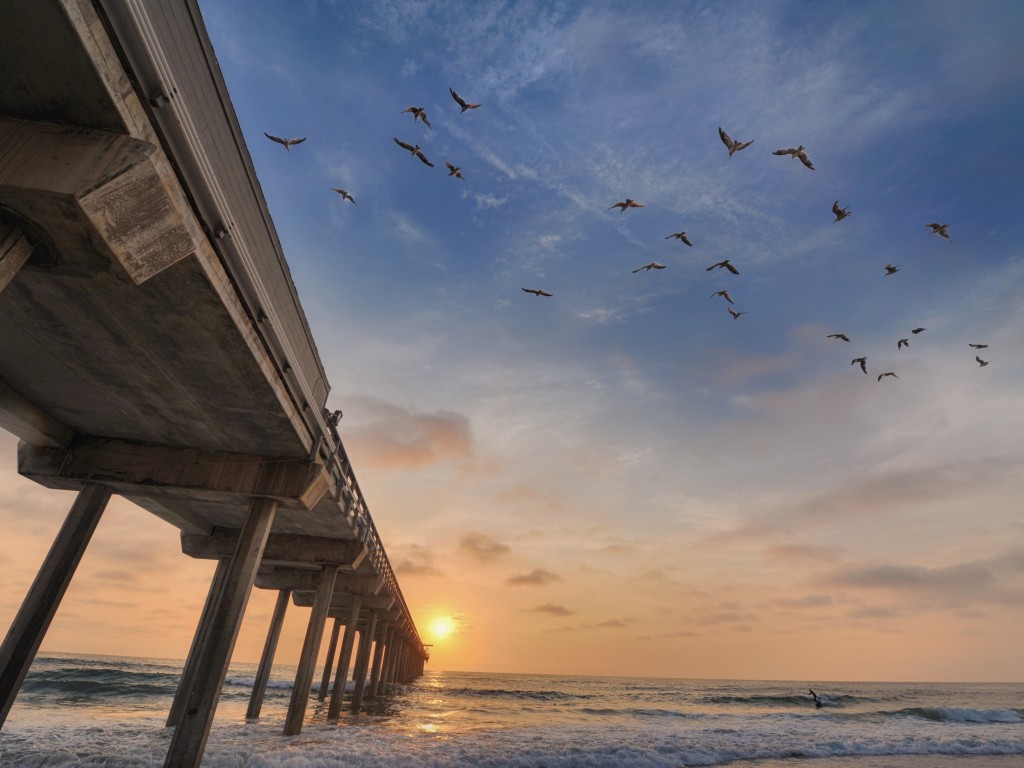
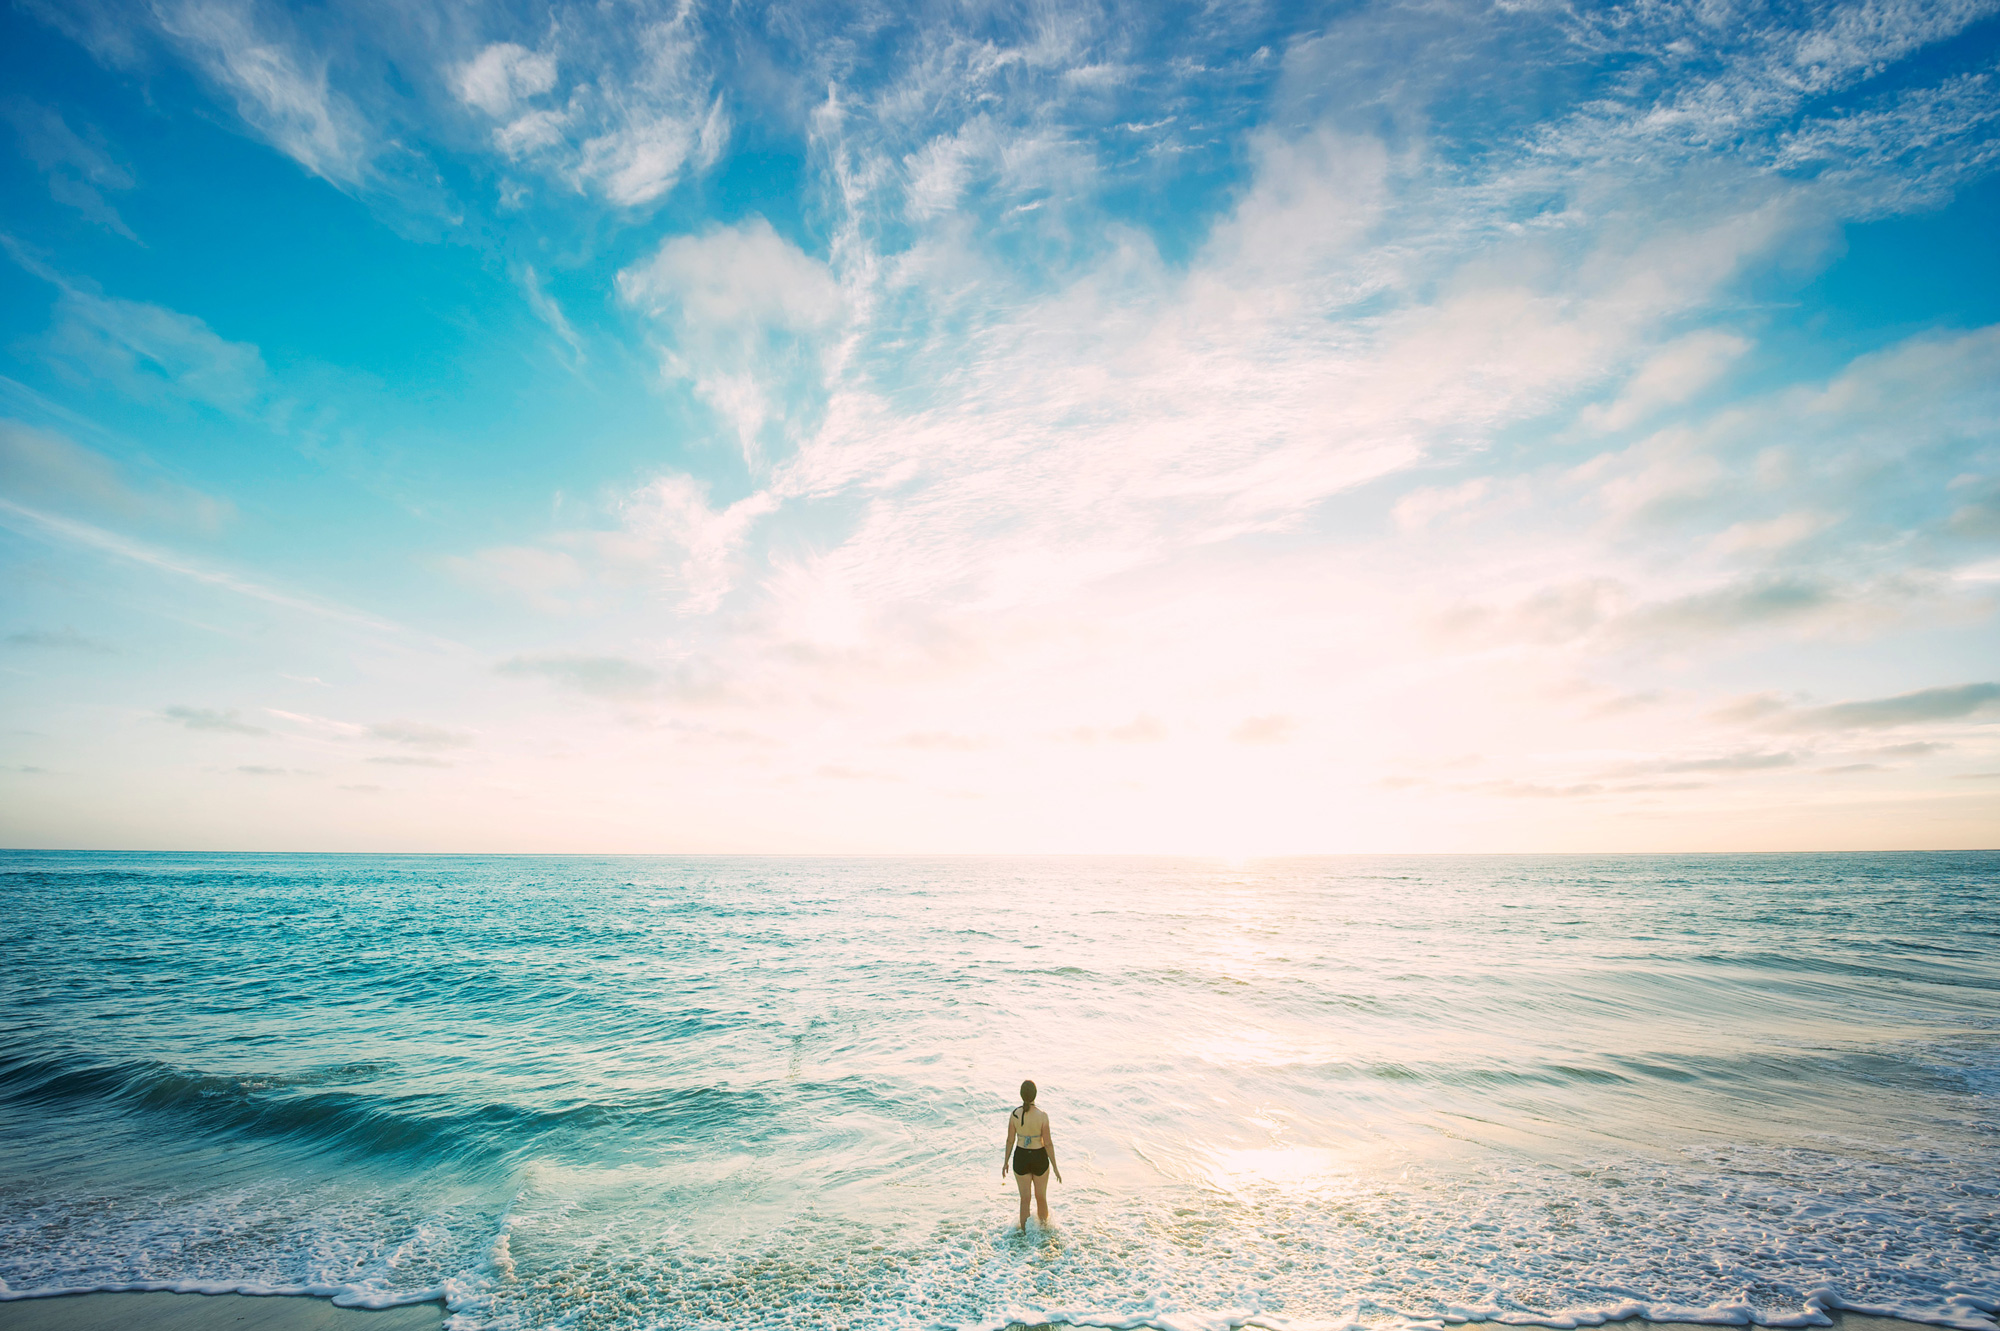
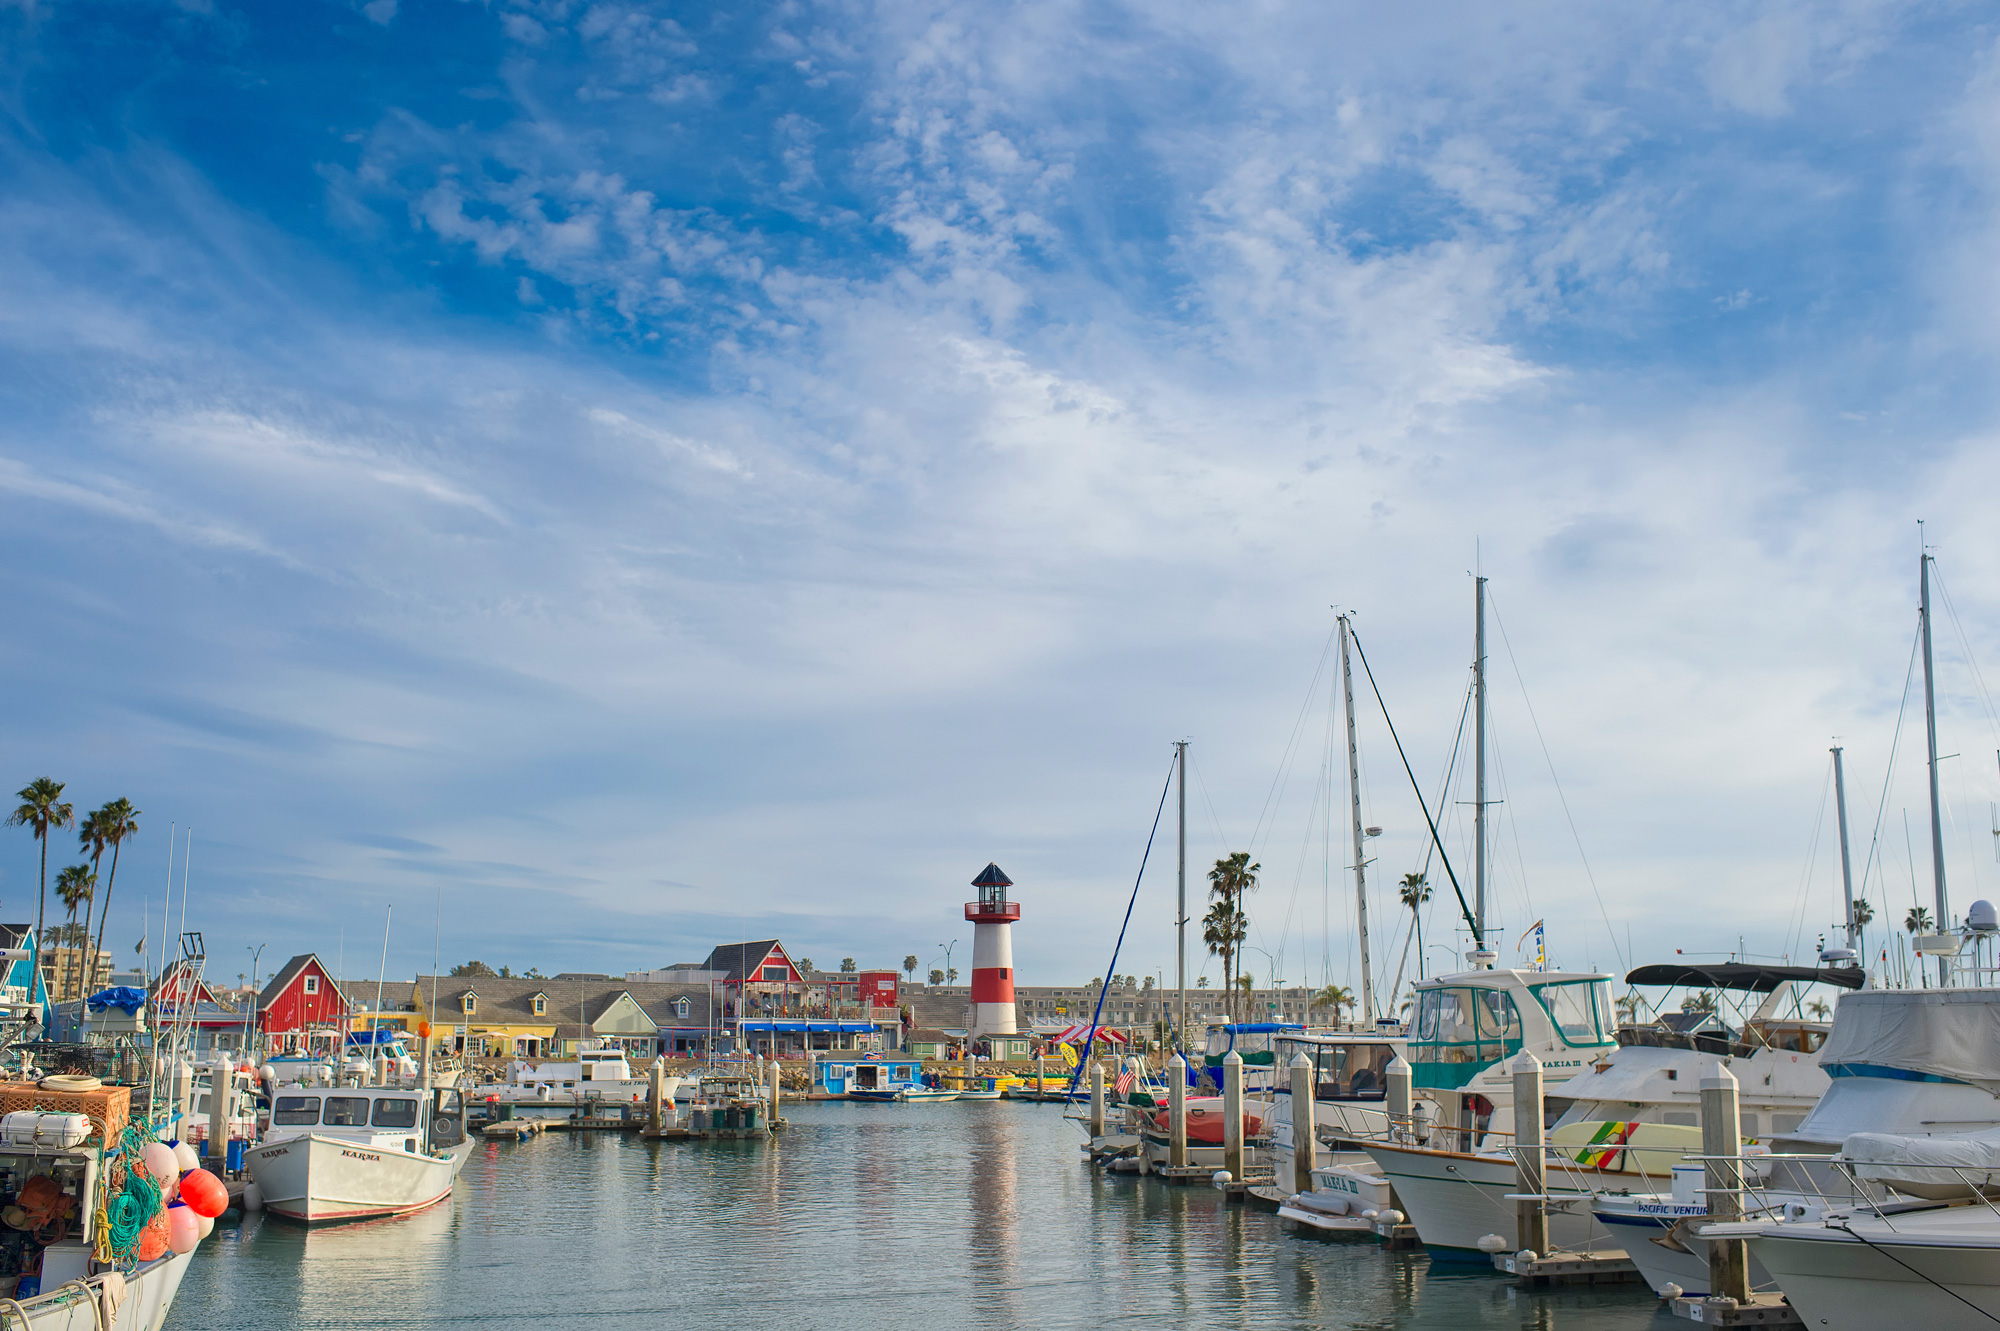
#1 Scripps Pier La Jolla (Google Map It)
My favorite spot in all of San Diego is Scripps Pier. Not only do you have the fantastic sunsets and the huge pier but there are loads of great shots to be taken of people and wildlife here. When you look around everything is a shot and everything is bathed in a beautiful golden glow. If you can get to Scripps on a day when the tide is low, the receding water just glistens on the sand and reflects everything like a mirror. This is the absolute best place in San Diego to take pictures. I have provided a map but I recommend parking at La Jolla Shores Beach and walking the half mile up the beach to just under the pier.

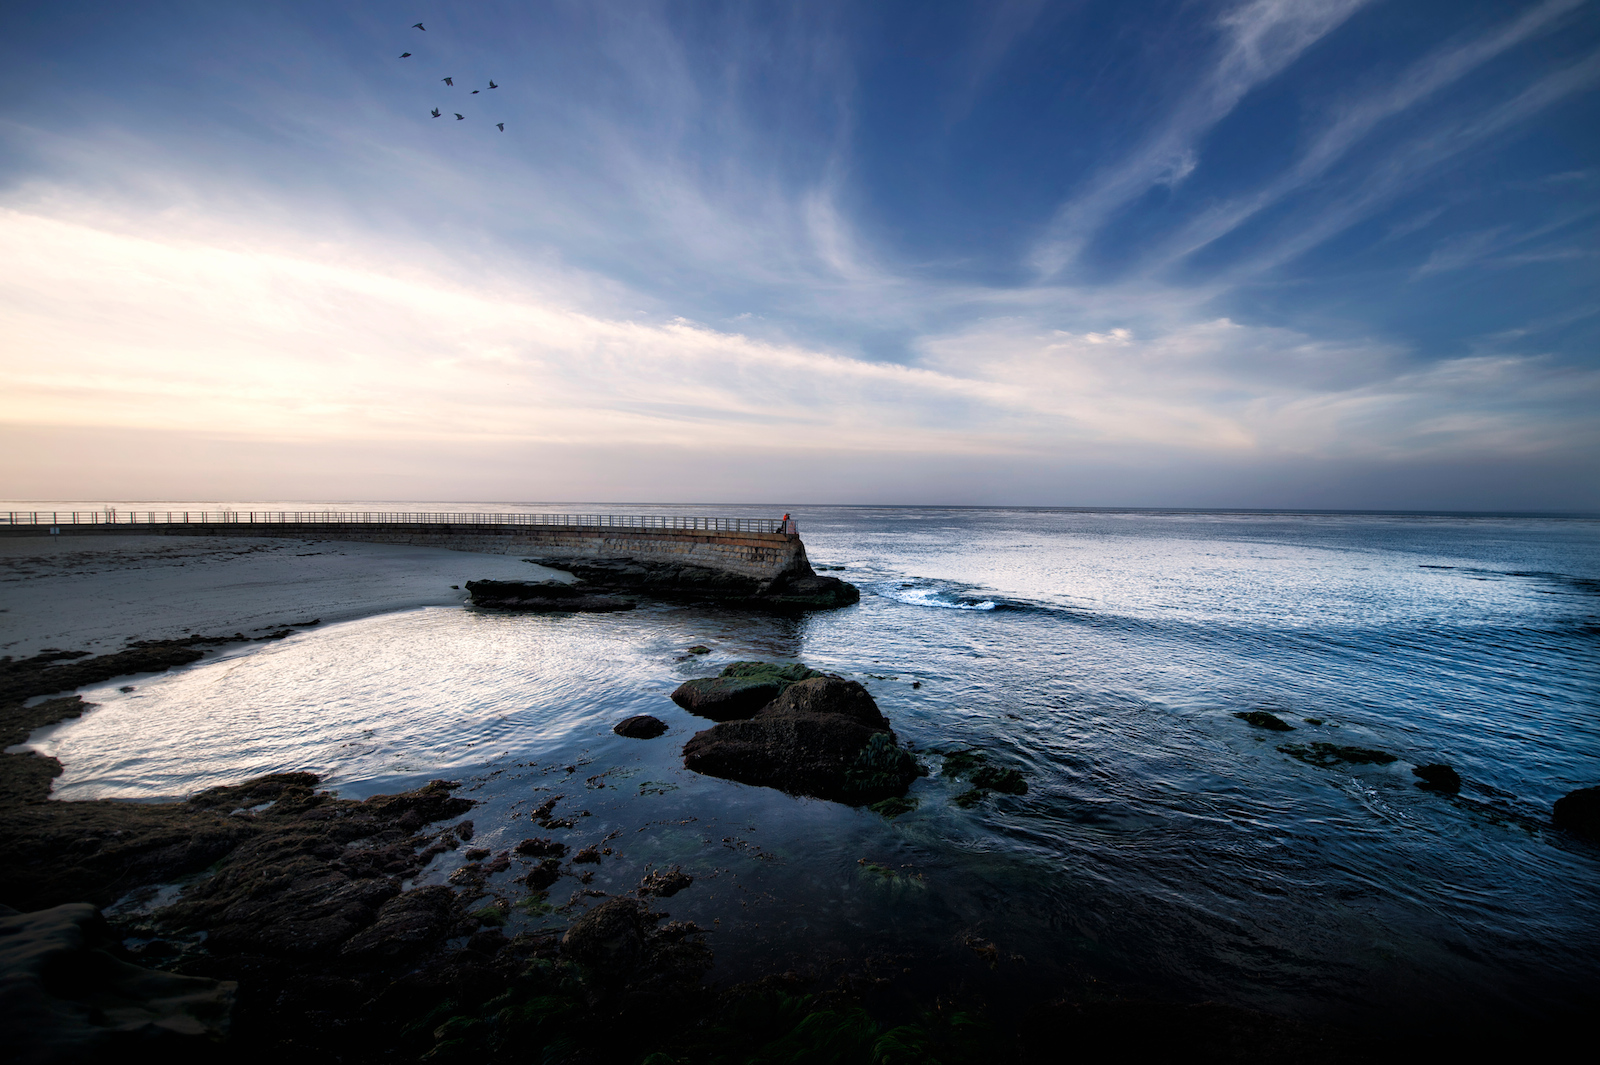
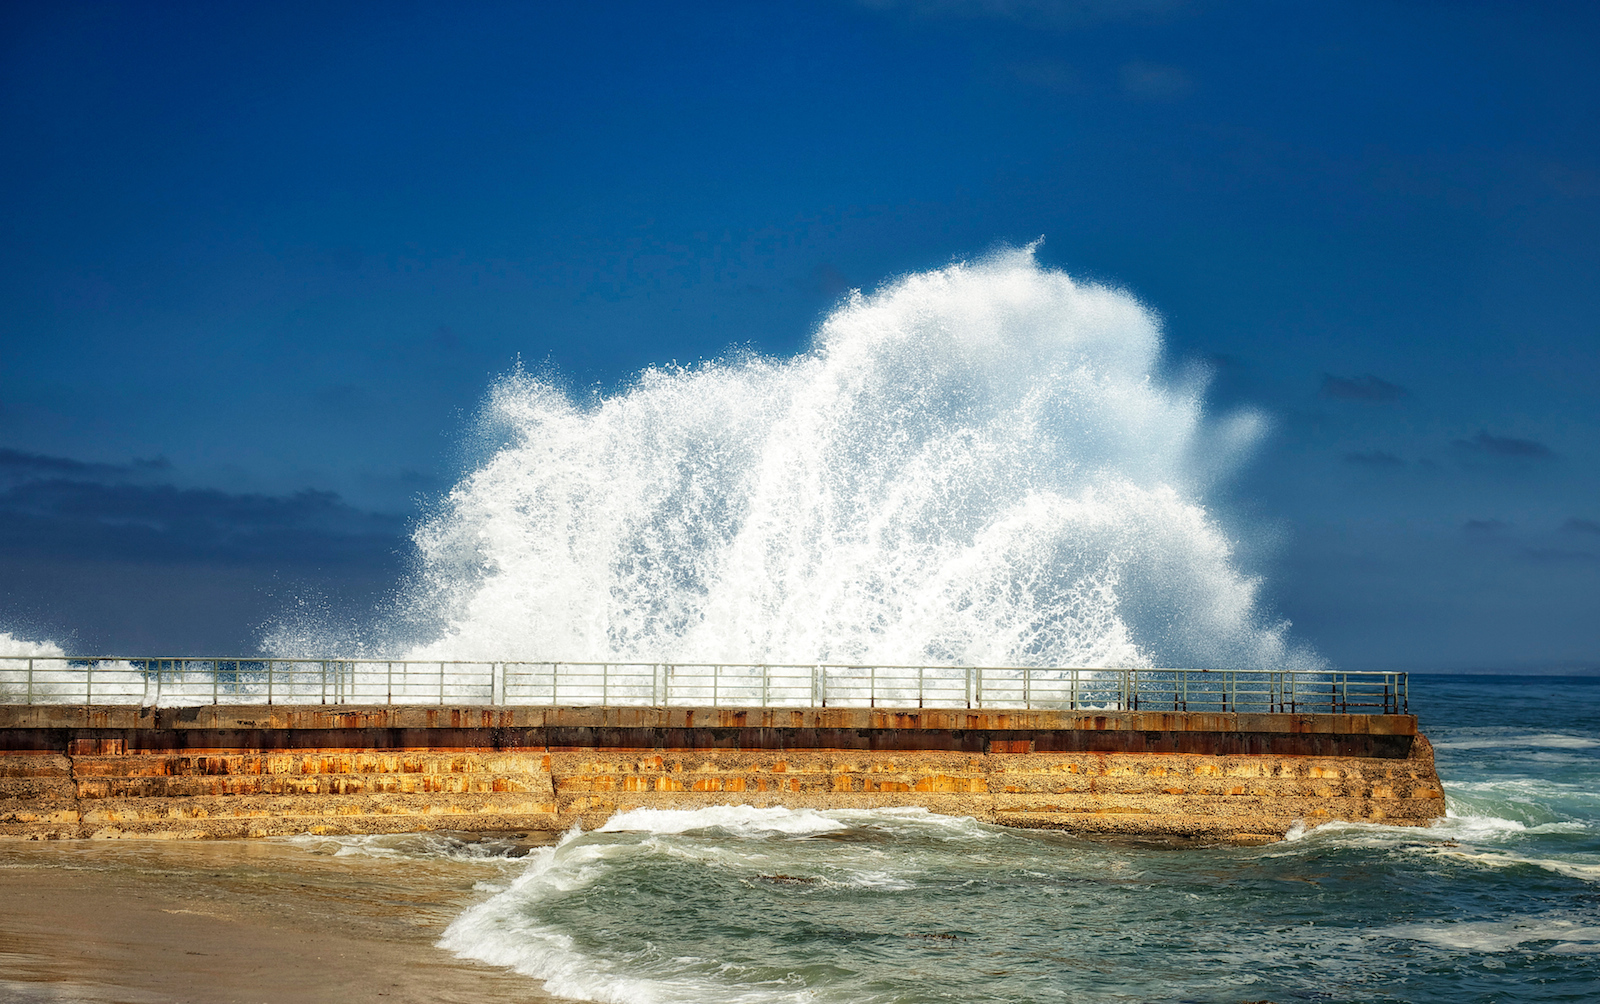
#2 Children’s Pool La Jolla (Google Map It)
The Children’s Pool is one of the most beautiful but most controversial places in San Diego. Originally built by Ellen Scripps as a place where kids could learn to swim it was quickly over-run by seals when the water got too contaminated to swim years ago. Now the battle rages on in courts to determine if the seals should stay or go. Regardless of the politics this is a beautiful place to photograph seals, people or just the landscape. If you get there on a day when the waves are big you can capture some pretty incredible photographs of the waves breaking over the breakwall or against the shore.

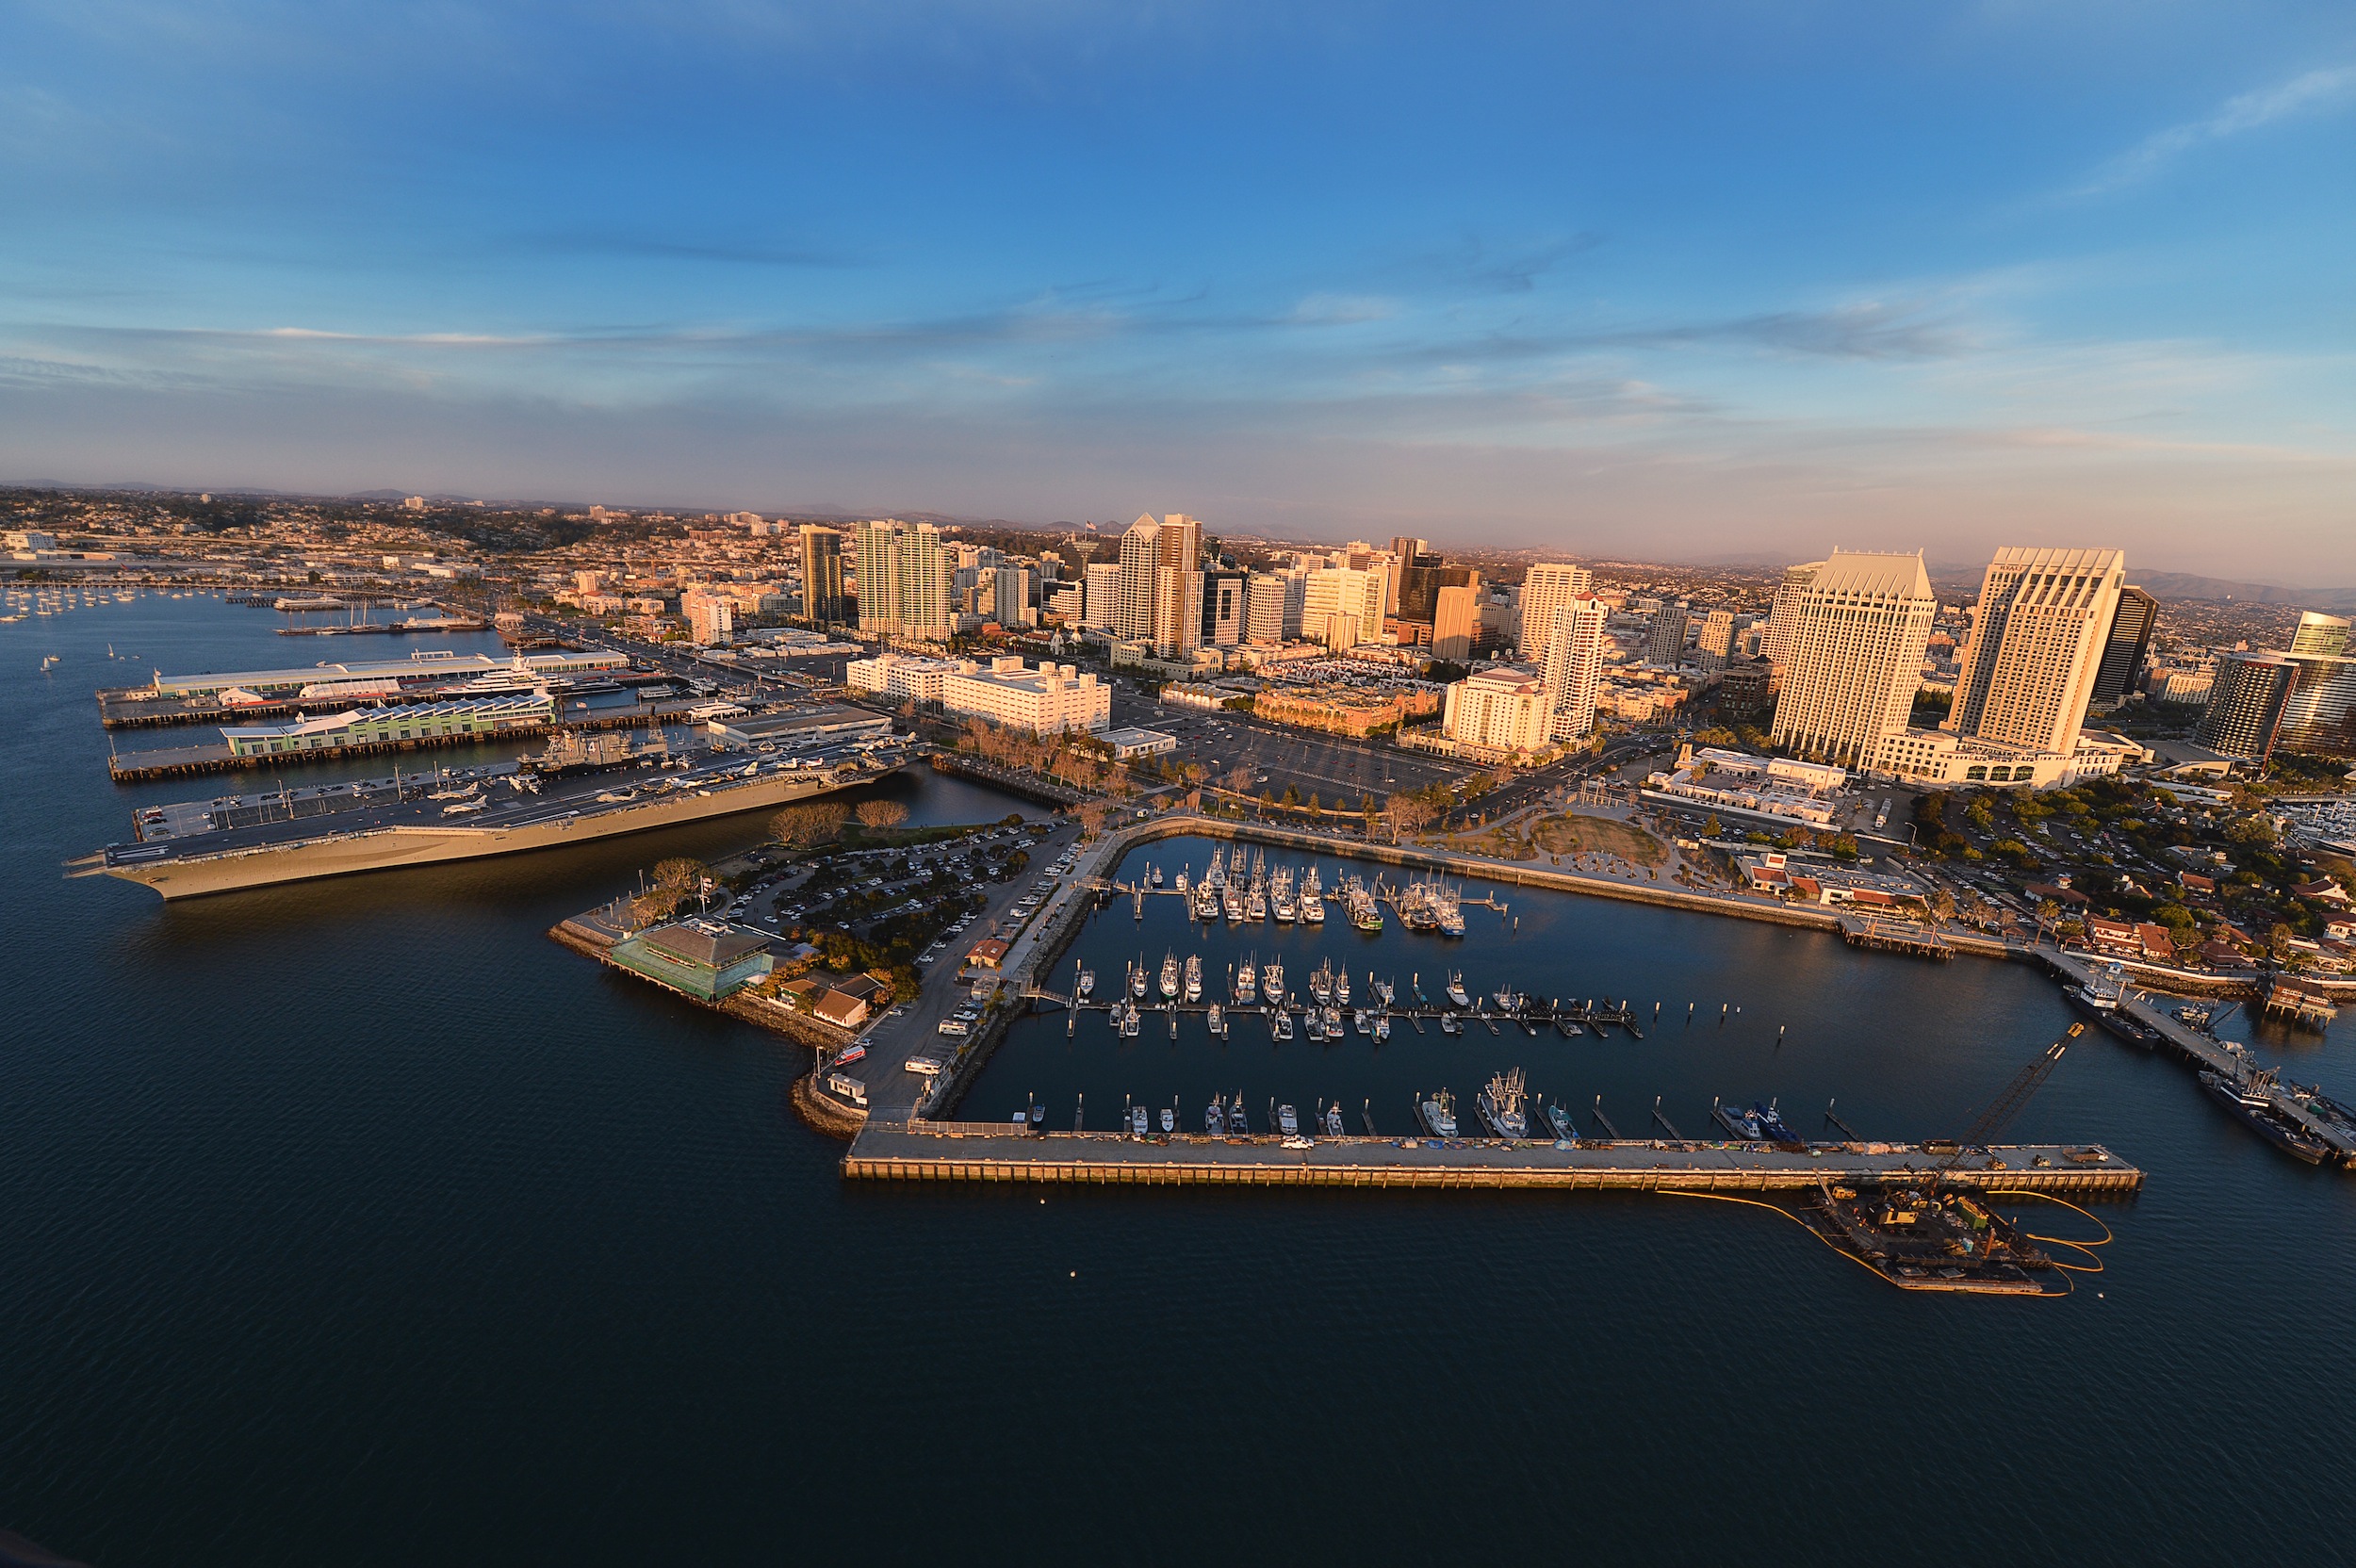
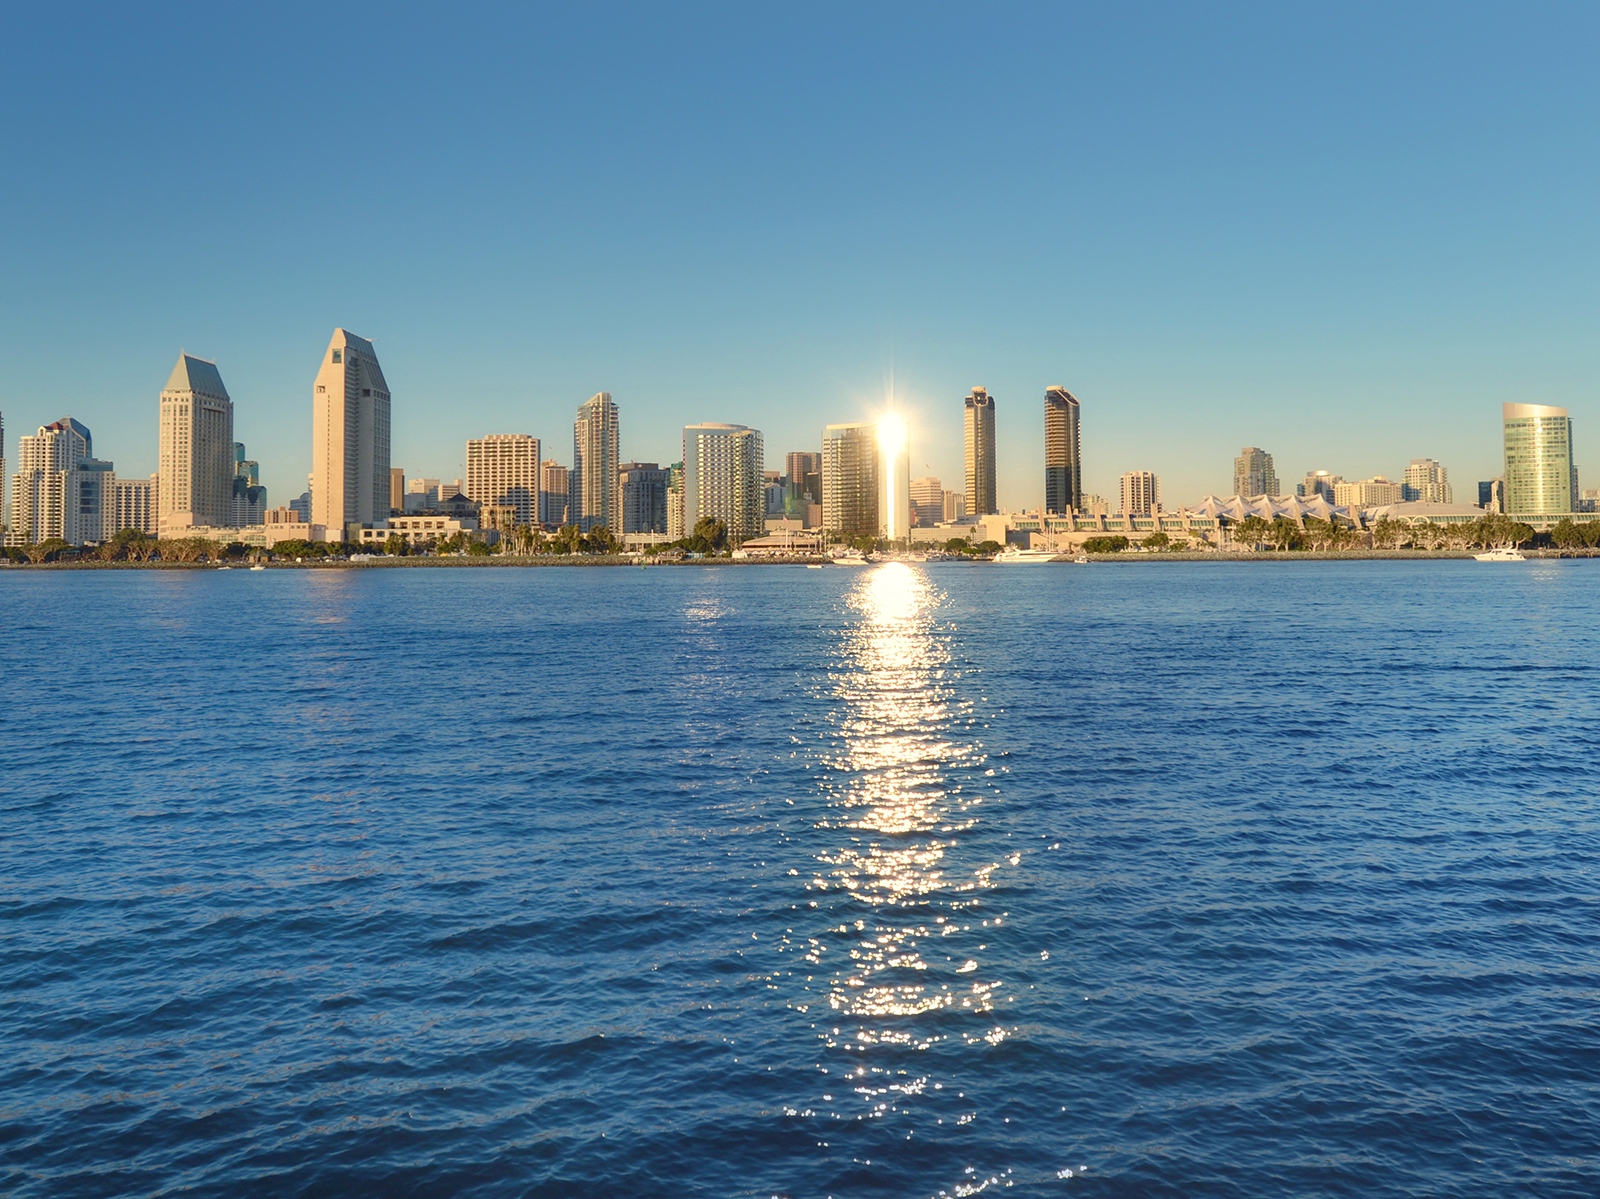
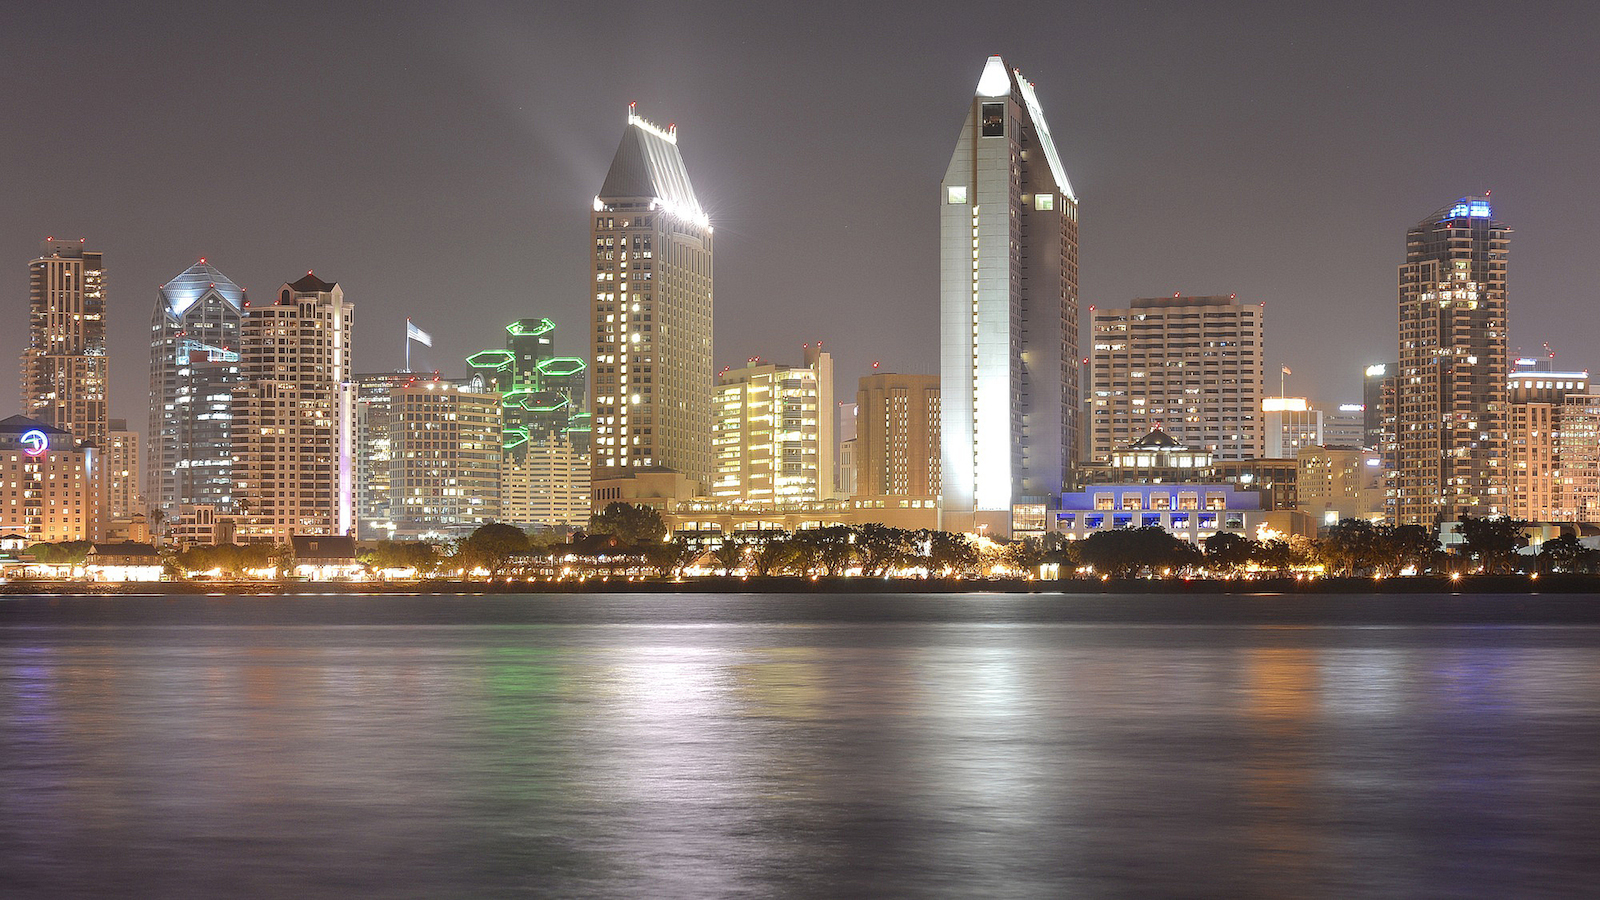
#3 Centennial Park Coronado (Google Map It)
This doesn’t seem like one of the parks that you have heard about in San Diego but it happens to be the location where most the best San Diego Cityscape photographs are taken. The park is located right on the bay and has panoramic views of the city of San Diego. You will need to park down the street at the public parking provided in the shopping center or on the street as this park does not have its own parking. For the best shots venture down to the beach located on the left hand side of the park and you can get unobstructed views of the entire city. This place is great for day or night shots.
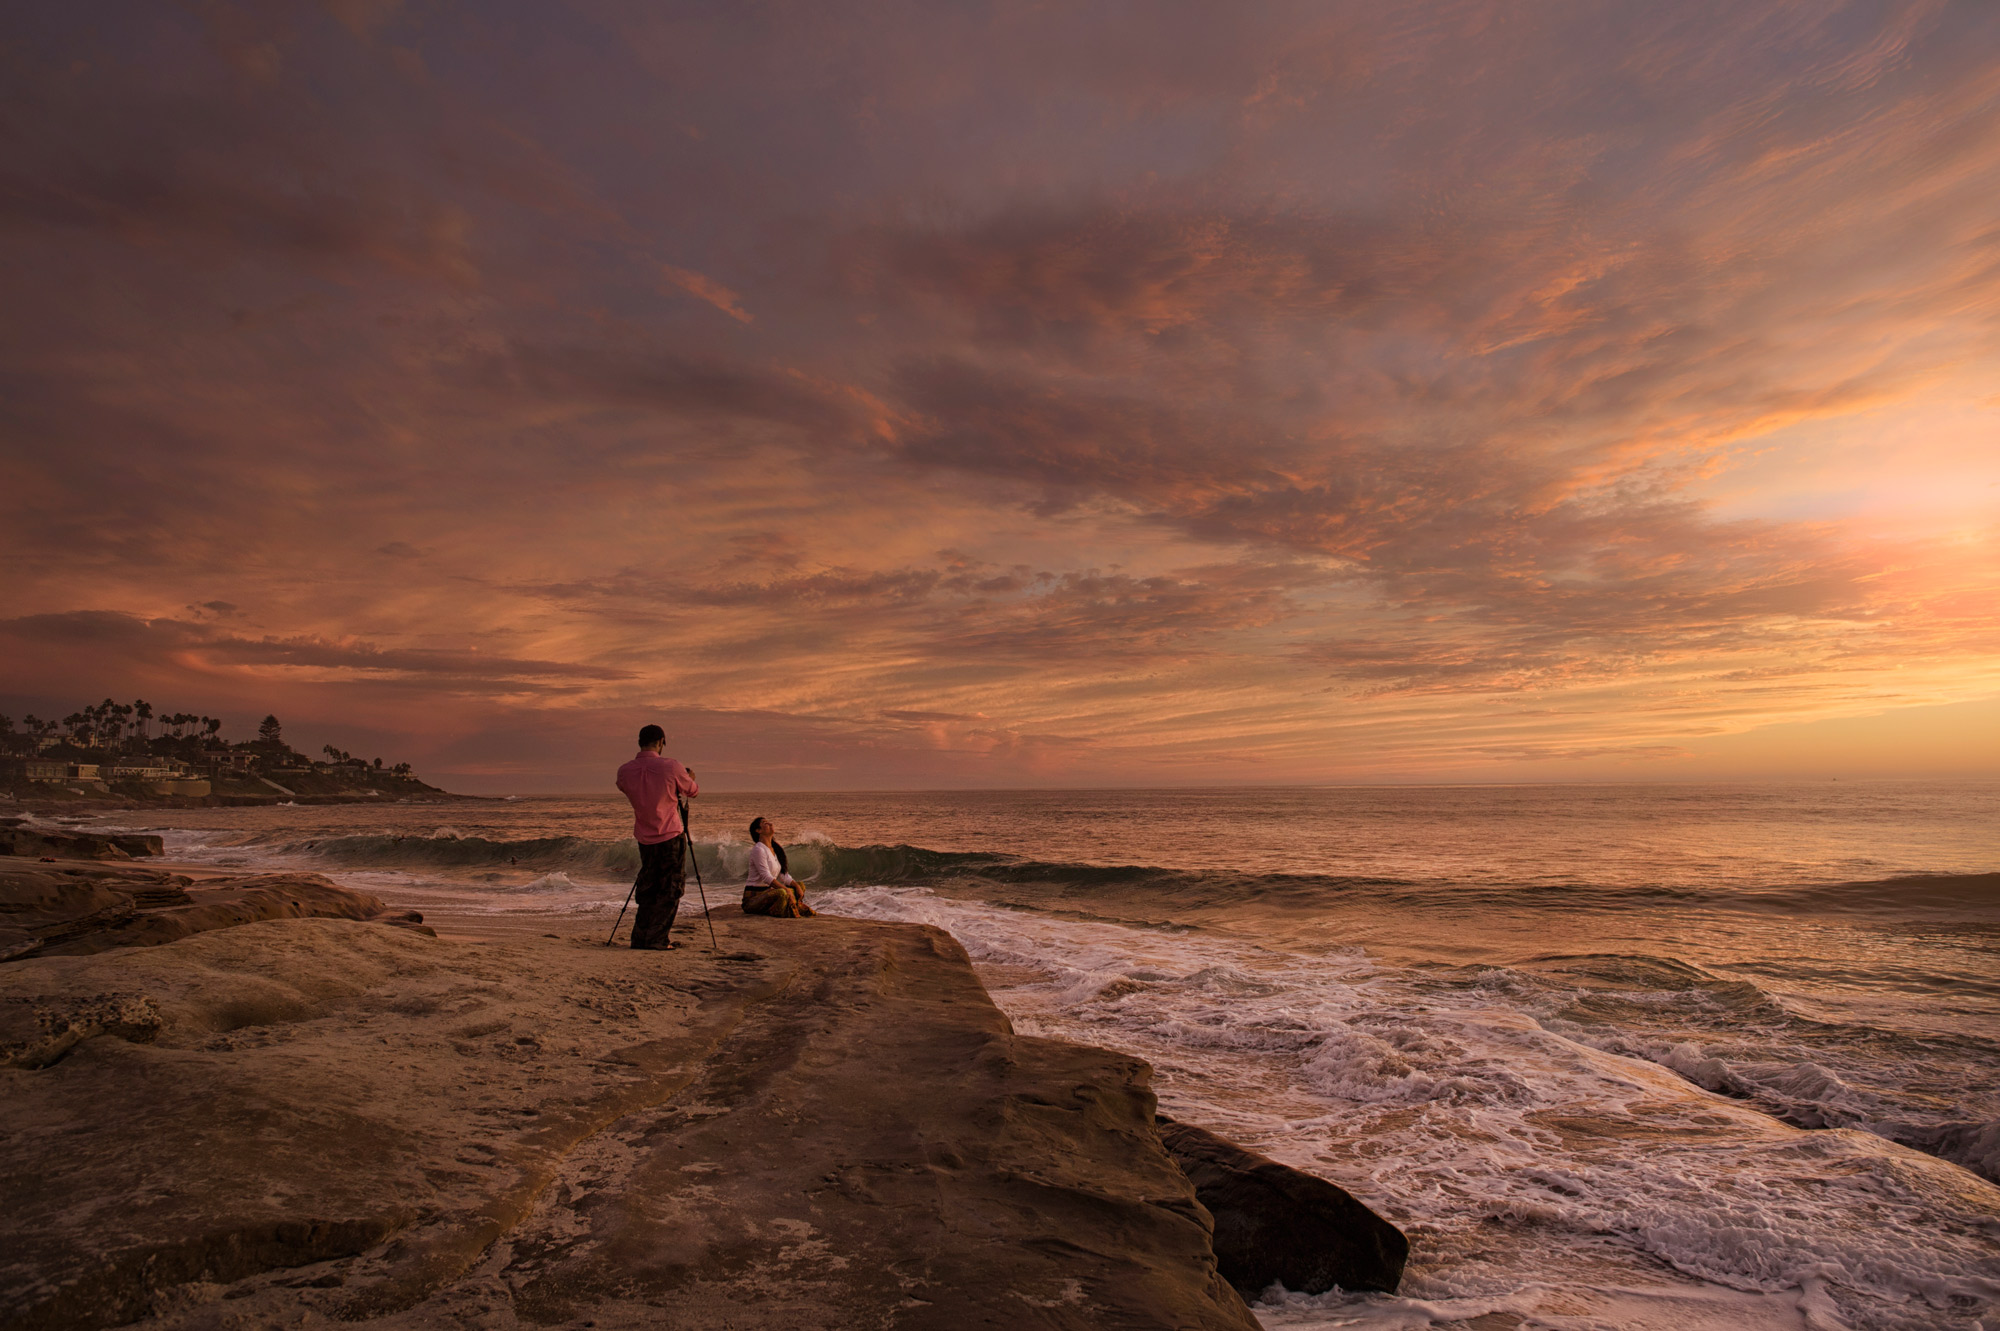
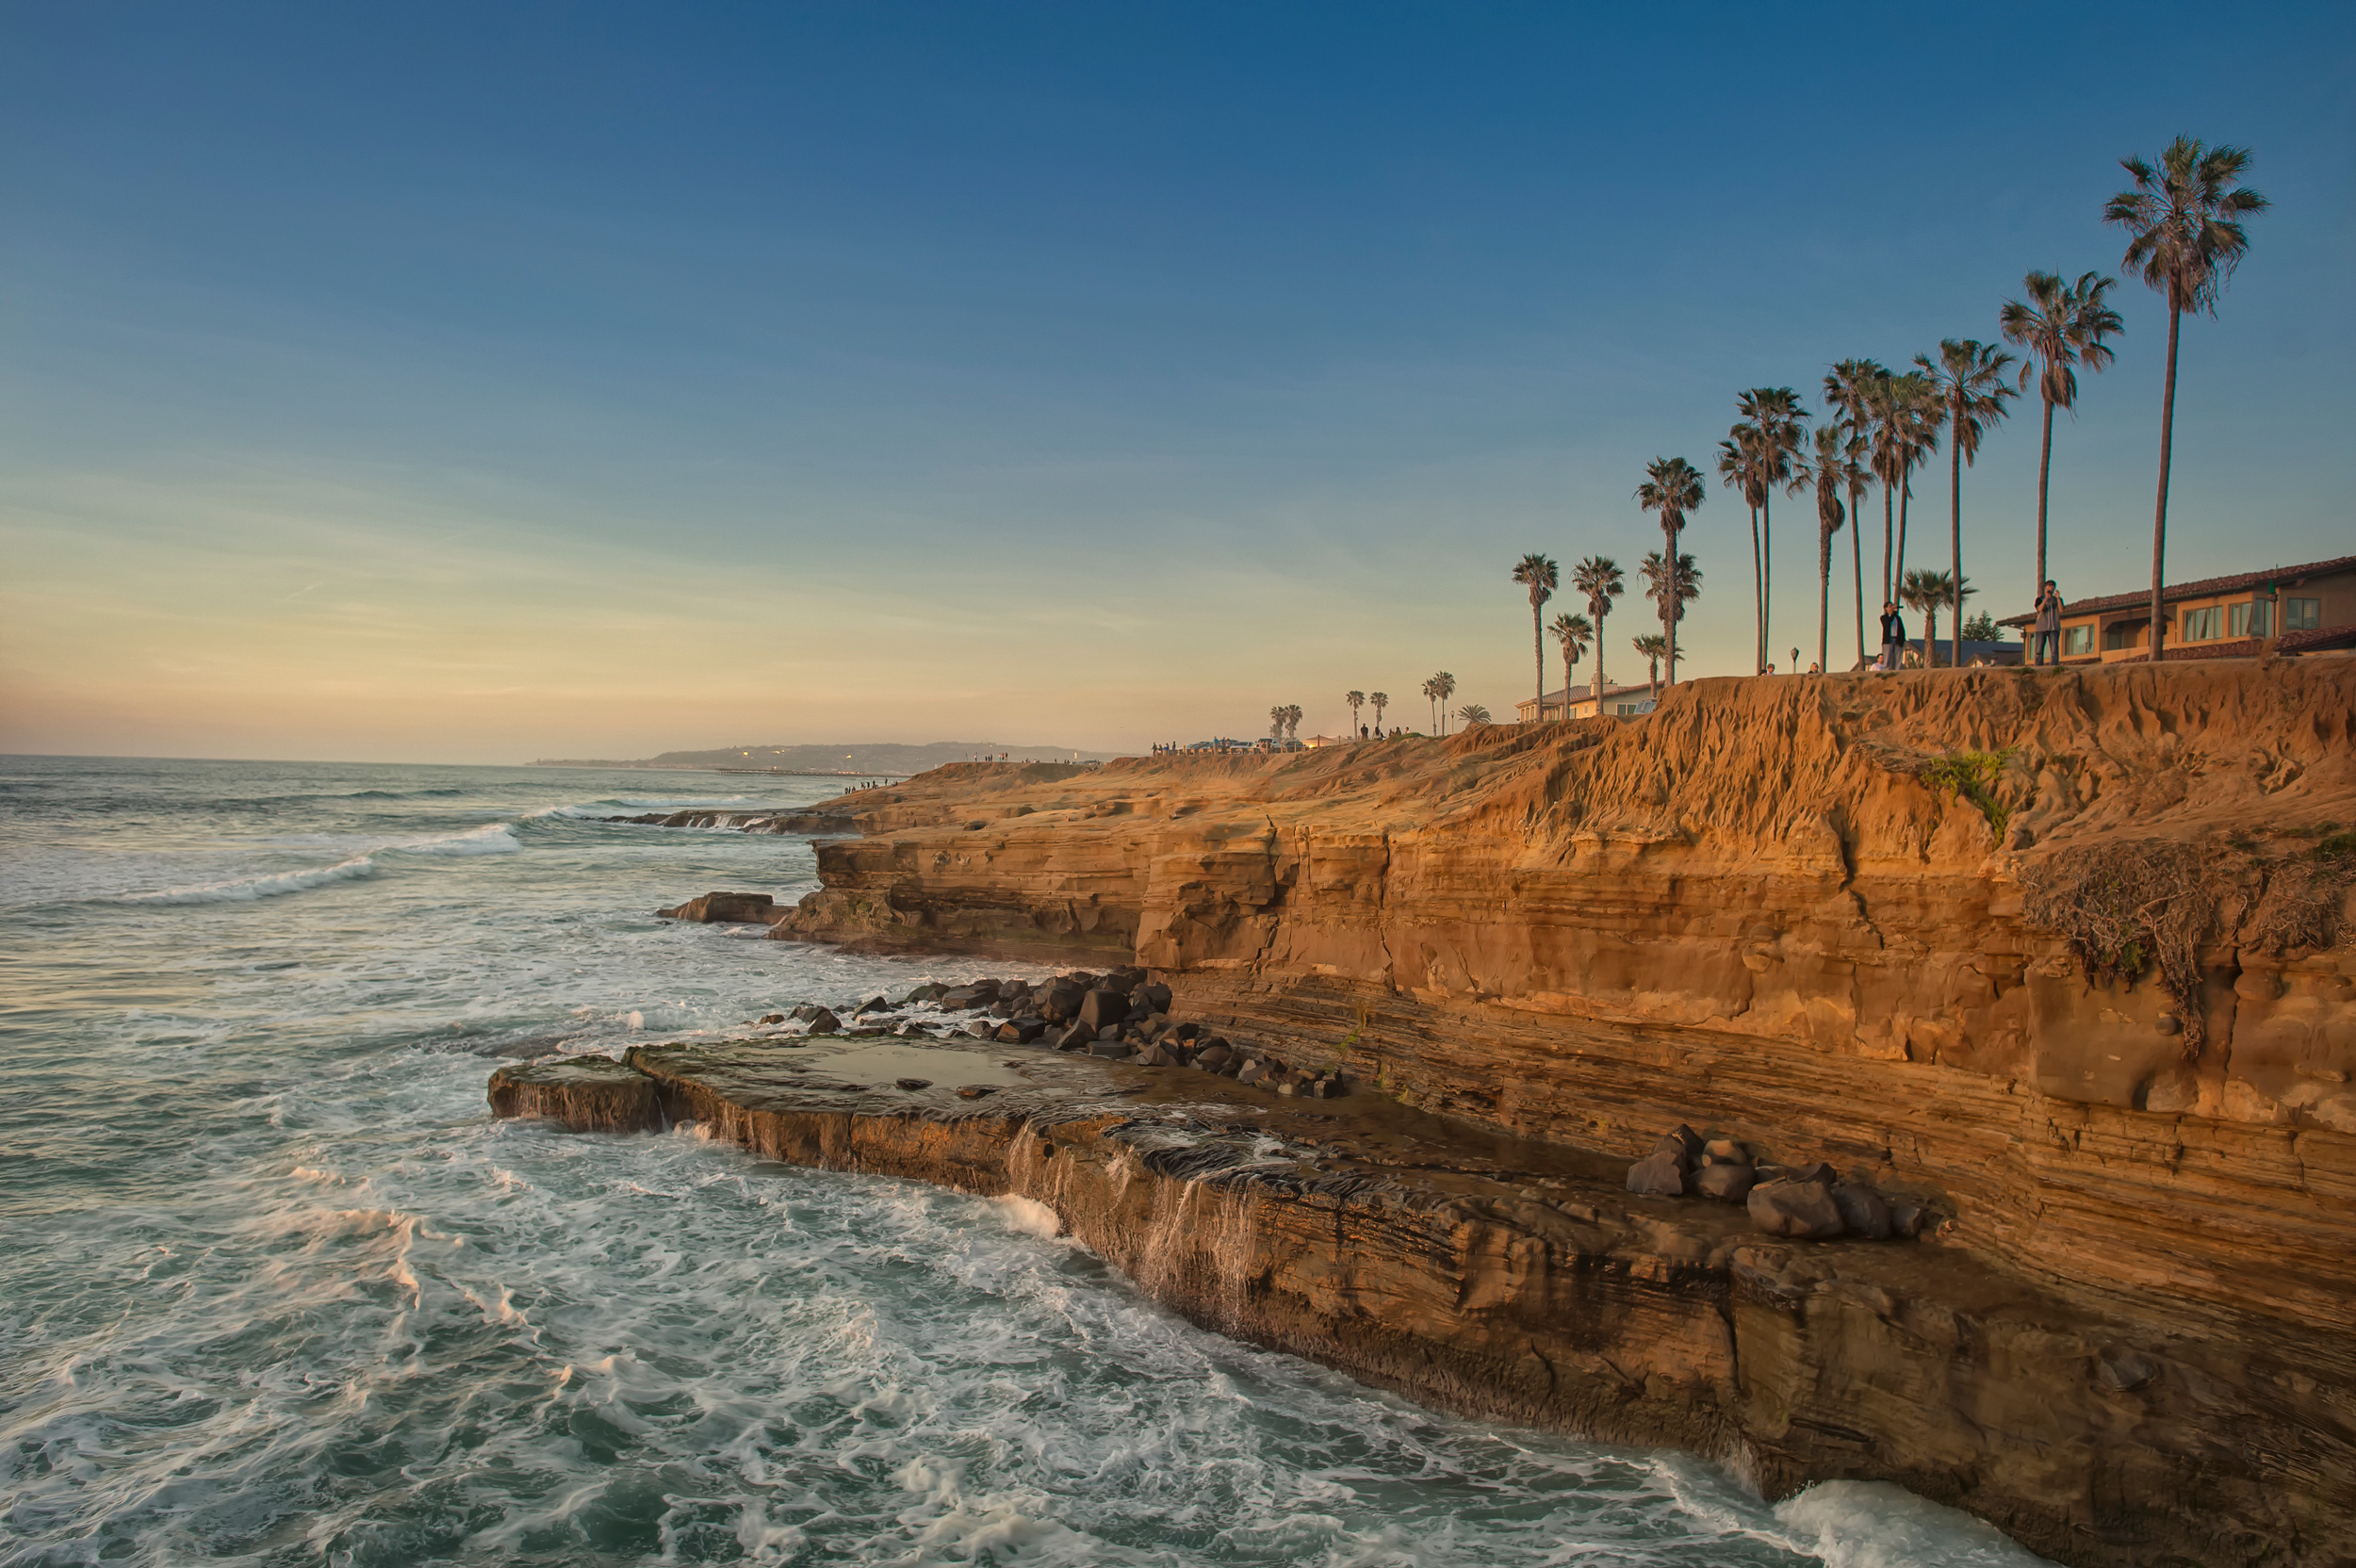
#4 Sunset Cliffs Ocean Beach (Google Map It)
Ocean Beach has one of the most underrated yet most beautiful coastlines in all of California. If you want to catch some amazing sunsets and great photos head out south of the pier to a place called Sunset Cliffs Park. Park your car at one of the lots where the cliffs jut out further into the water and it gives you a perfect place to photograph the water and the coastline. What makes this place excellent for sunset photos are the sandstone cliffs which turn golden in the sunset and look beautiful against the blue Pacific. Be careful if you are walking close to the cliffs as they can crumble and send you are your gear to the rocks below.
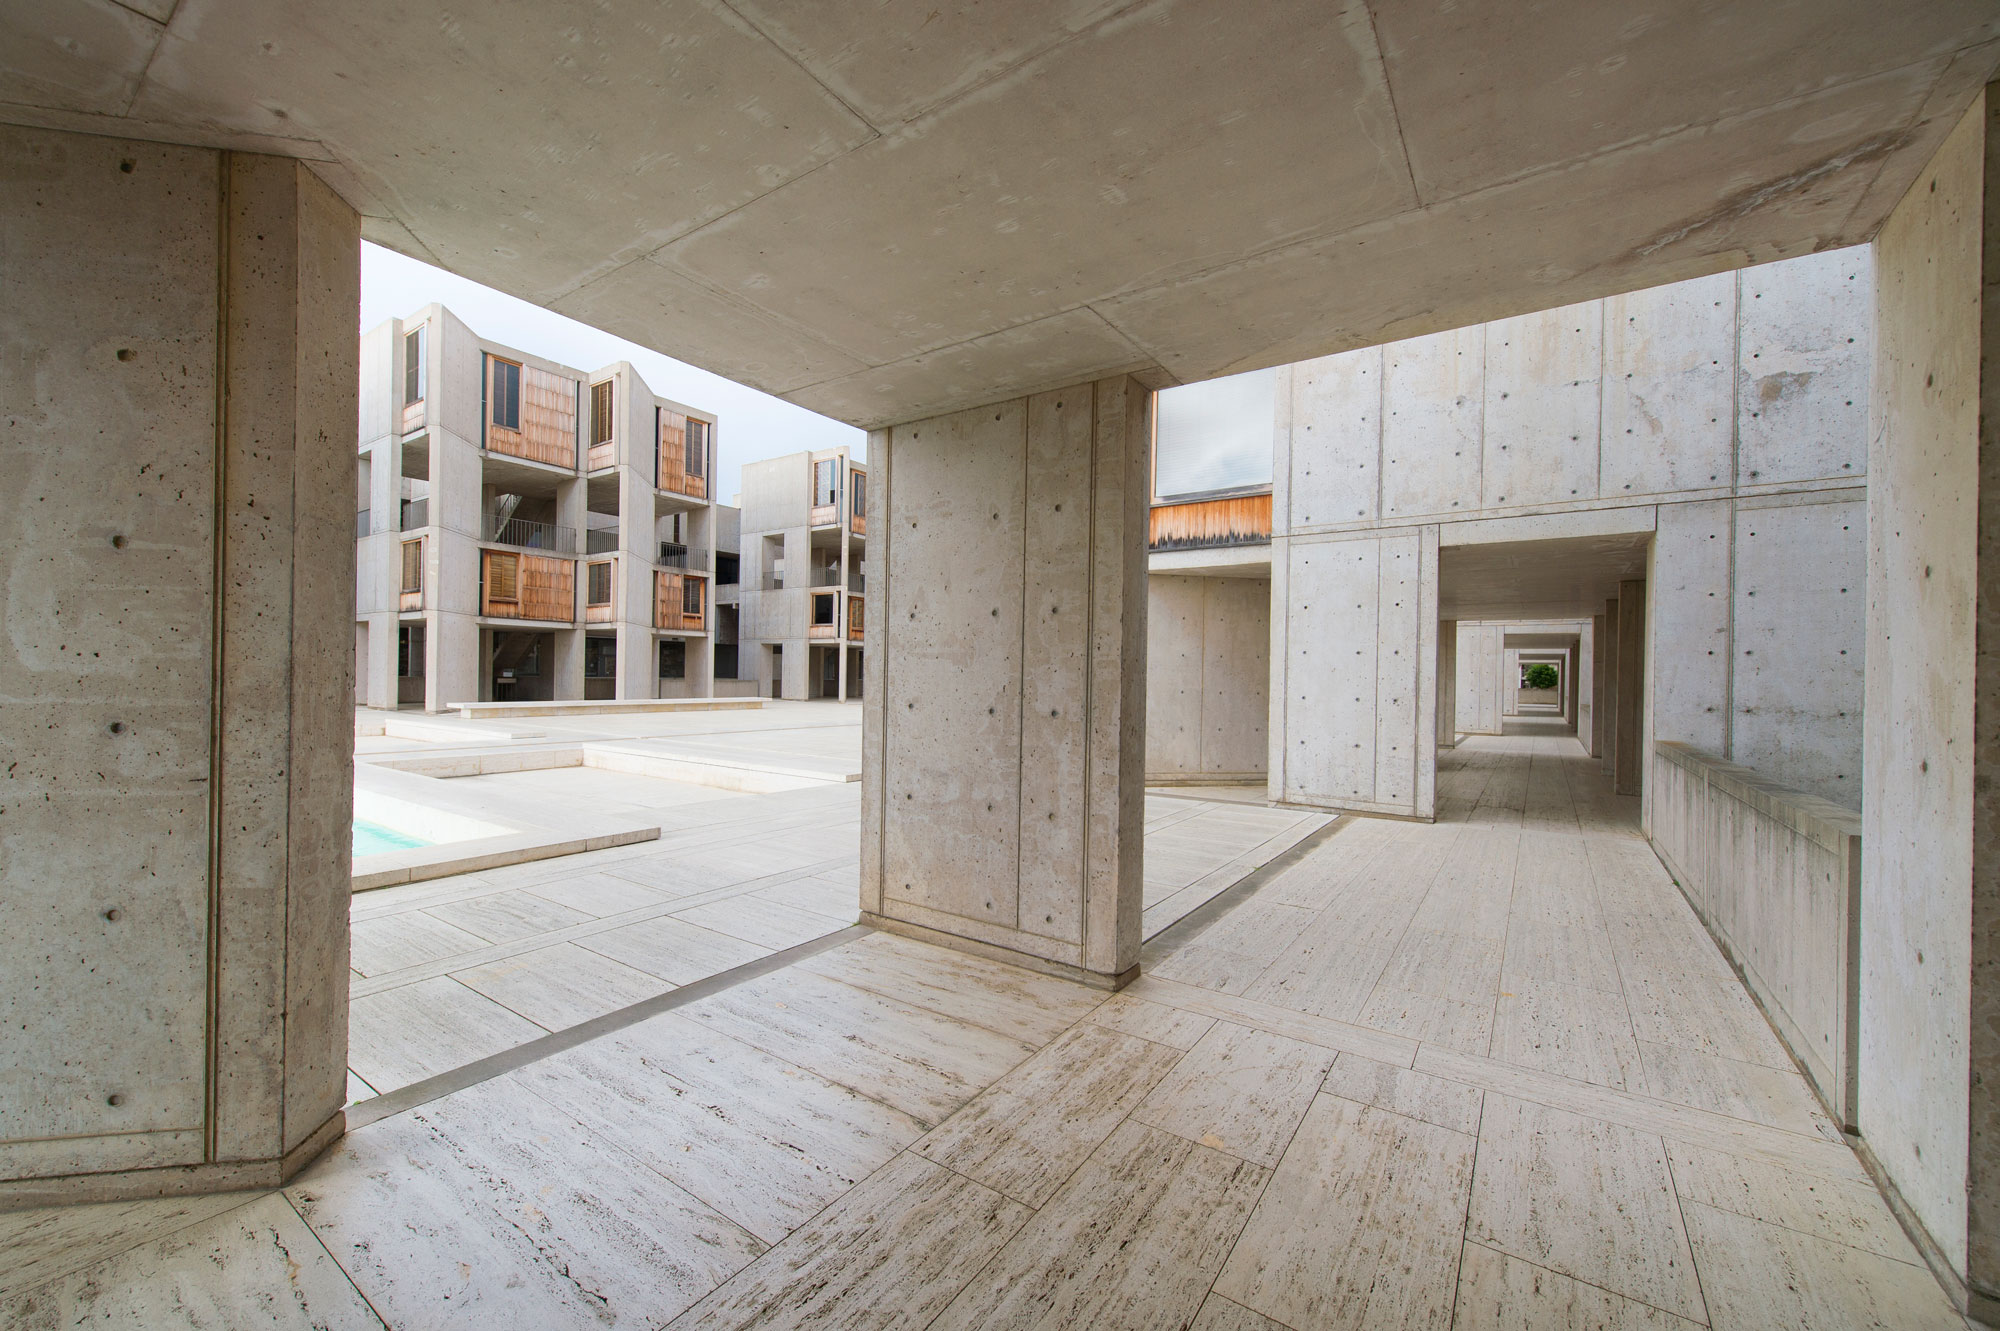
#5 – Salk Institute of La Jolla (Google Map it)
One of the most amazing architectural places in San Diego is the Salk Institute. It provides a photography opportunity in San Diego that is not your typical tourist destination. The only parking for the Salk Institute is on the street since the lots are reserved for employees. As a bonus, there is a gliding port next to the Salk Institute where you can take pictures of hand-gliders leaping off the cliffs and flying back and forth high above the coastline. I like the Salk Institute because you can take some great pictures of amazing San Diego architecture.


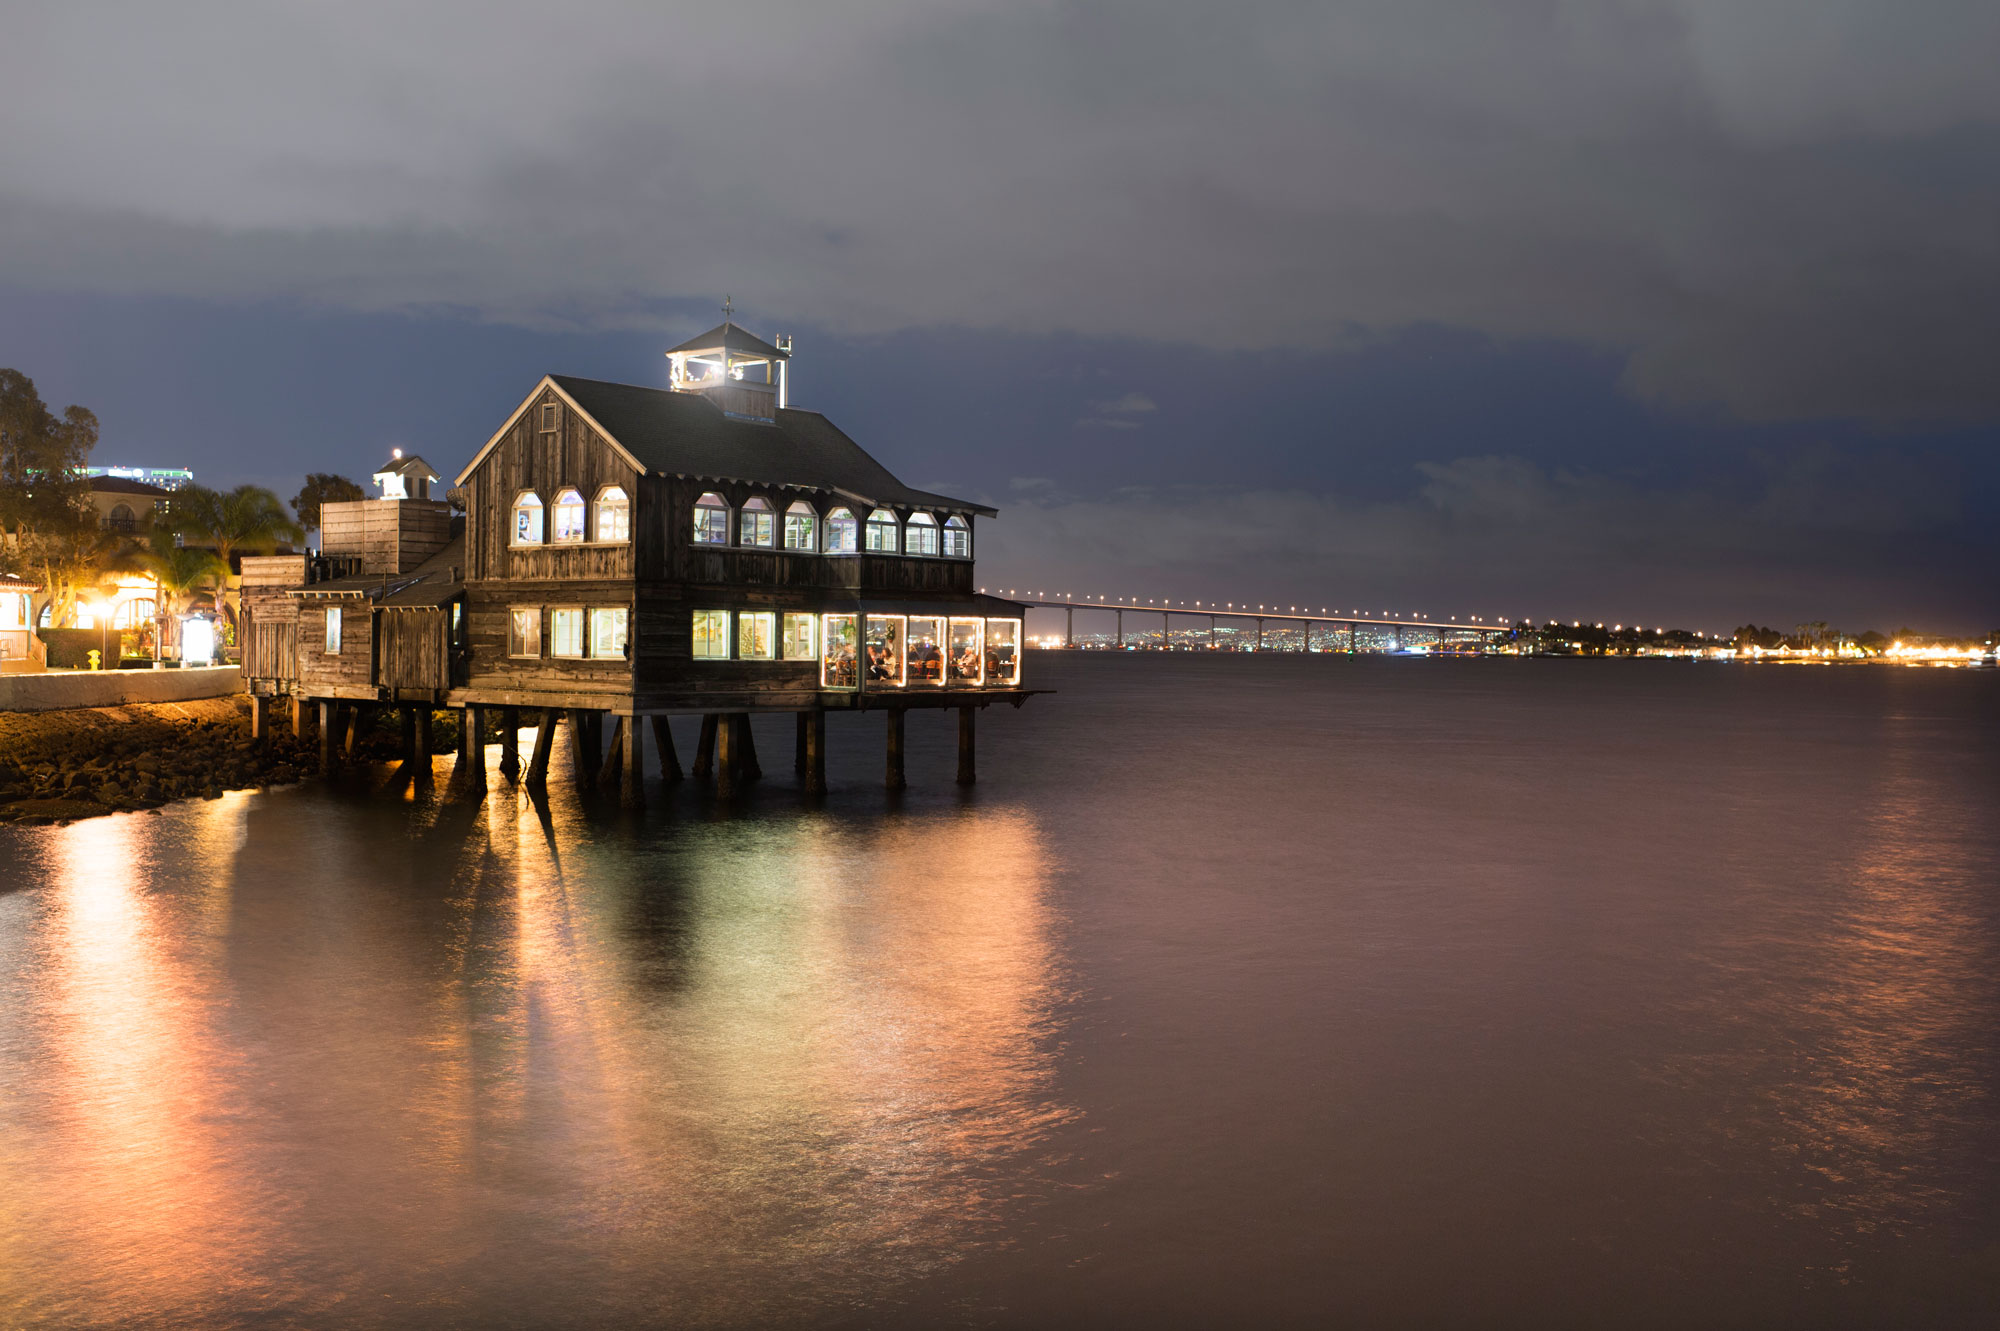
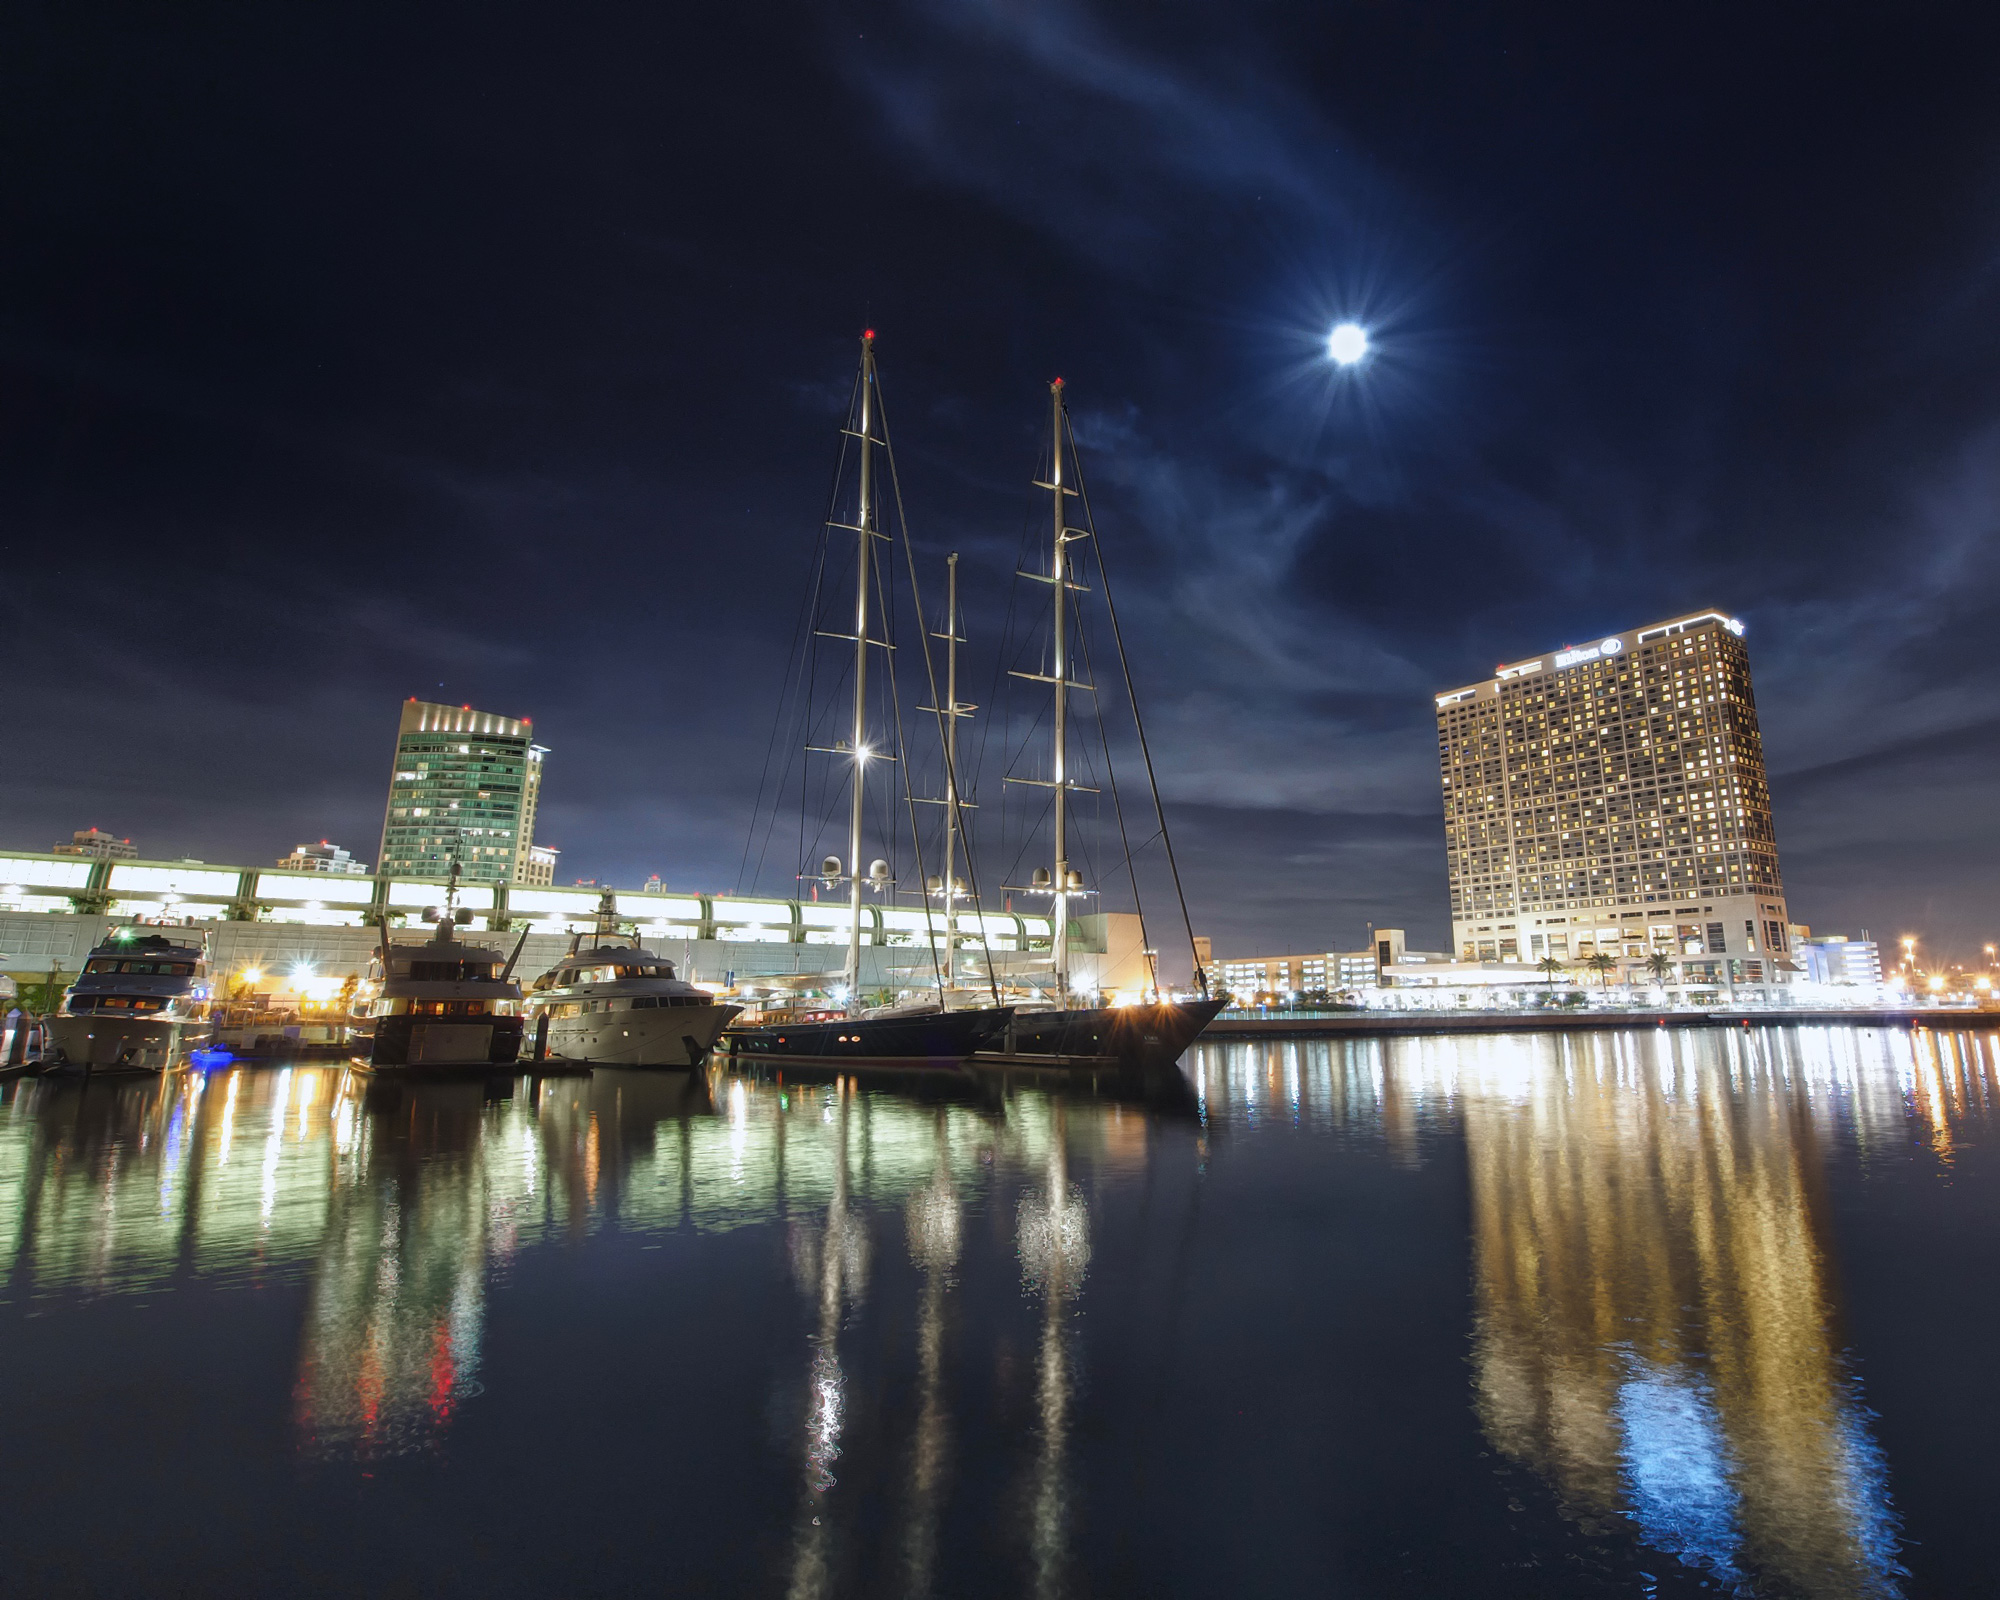
#6 SeaPort Village San Diego (Google Map it)
SeaPort Village is pretty much the #1 tourist destination in San Diego. You can buy any sort of San Diego T-Shirt, crazy hat or carnival type of food in this little tourist trap shopping mall. SeaPort Village however is a pretty cool place to capture night photos since it has lots of boats and structures that reflect against the calm and still waters of the bay. Bring your camera and tripod and set up for some long exposure shots around SeaPort Village. There is lots of parking in the lots there (which you need to pay for but it’s pretty cheap). I like to stroll down the bay and find interesting places to photograph there at night and it usually never disappoints.
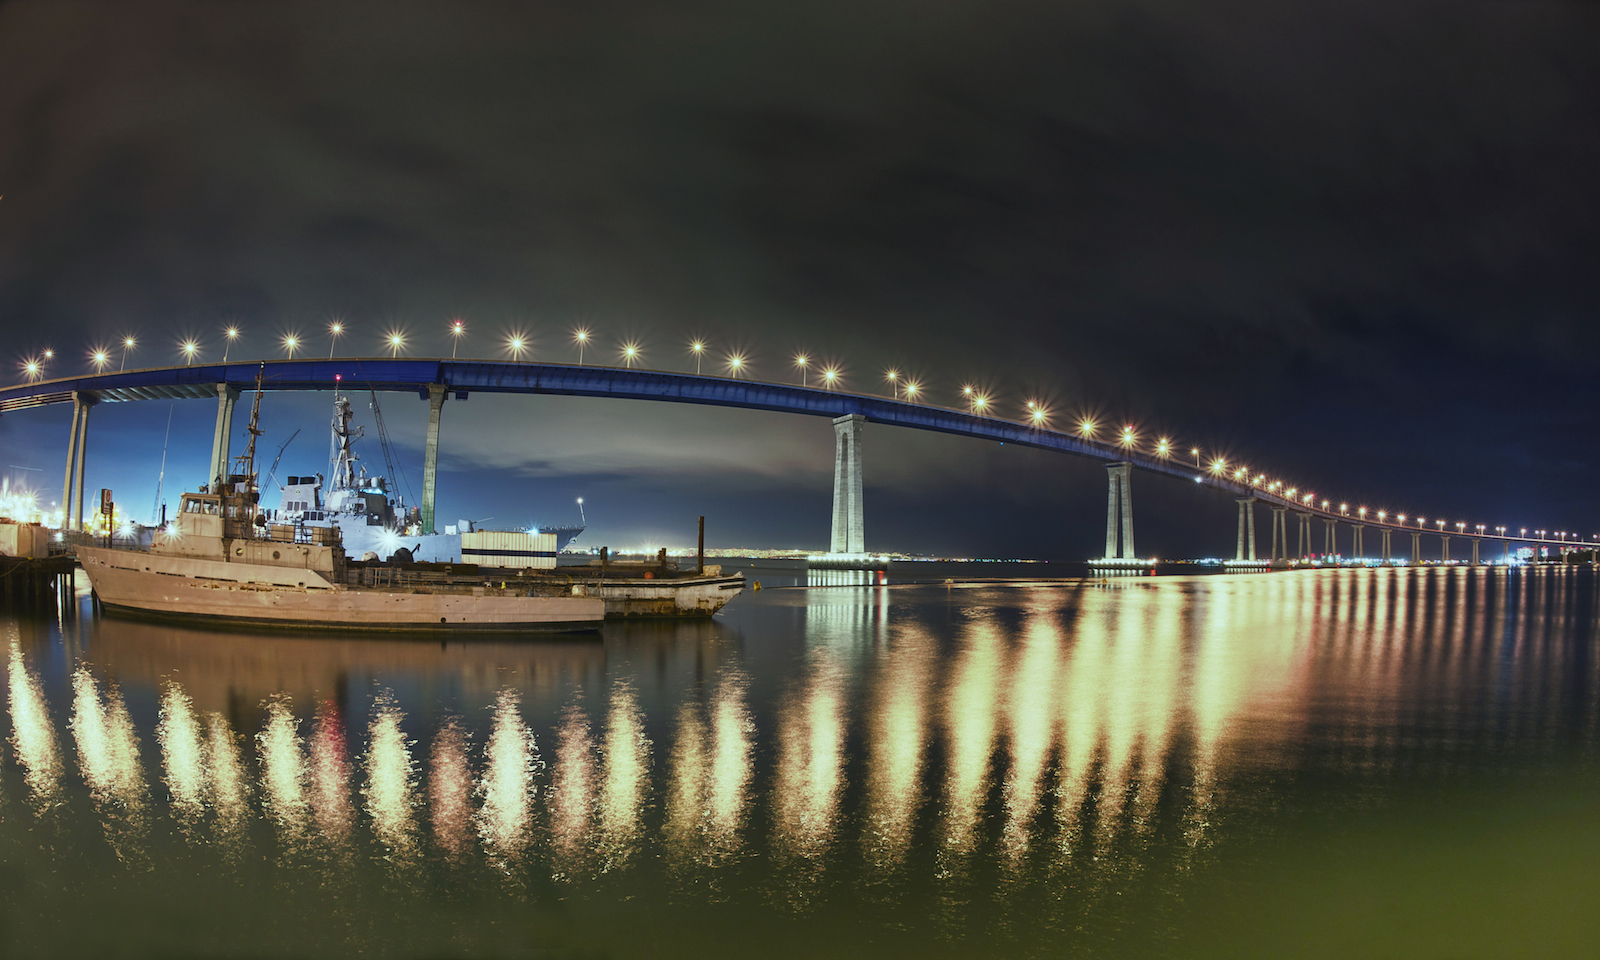
#7 – Crosby Street Park San Diego(Google Map It)
Crosby Street Park is a tiny little park that just happens to have a pier that extends way out into San Diego Bay which allows you to get some cool shots of the Coronado Bridge that most people may not have seen. Along the pier there are tug boats and military ships in the yards being fixed so it can give you some pretty interesting pictures. The park has lots of parking and this place is almost always deserted so you will probably have it all to yourself.
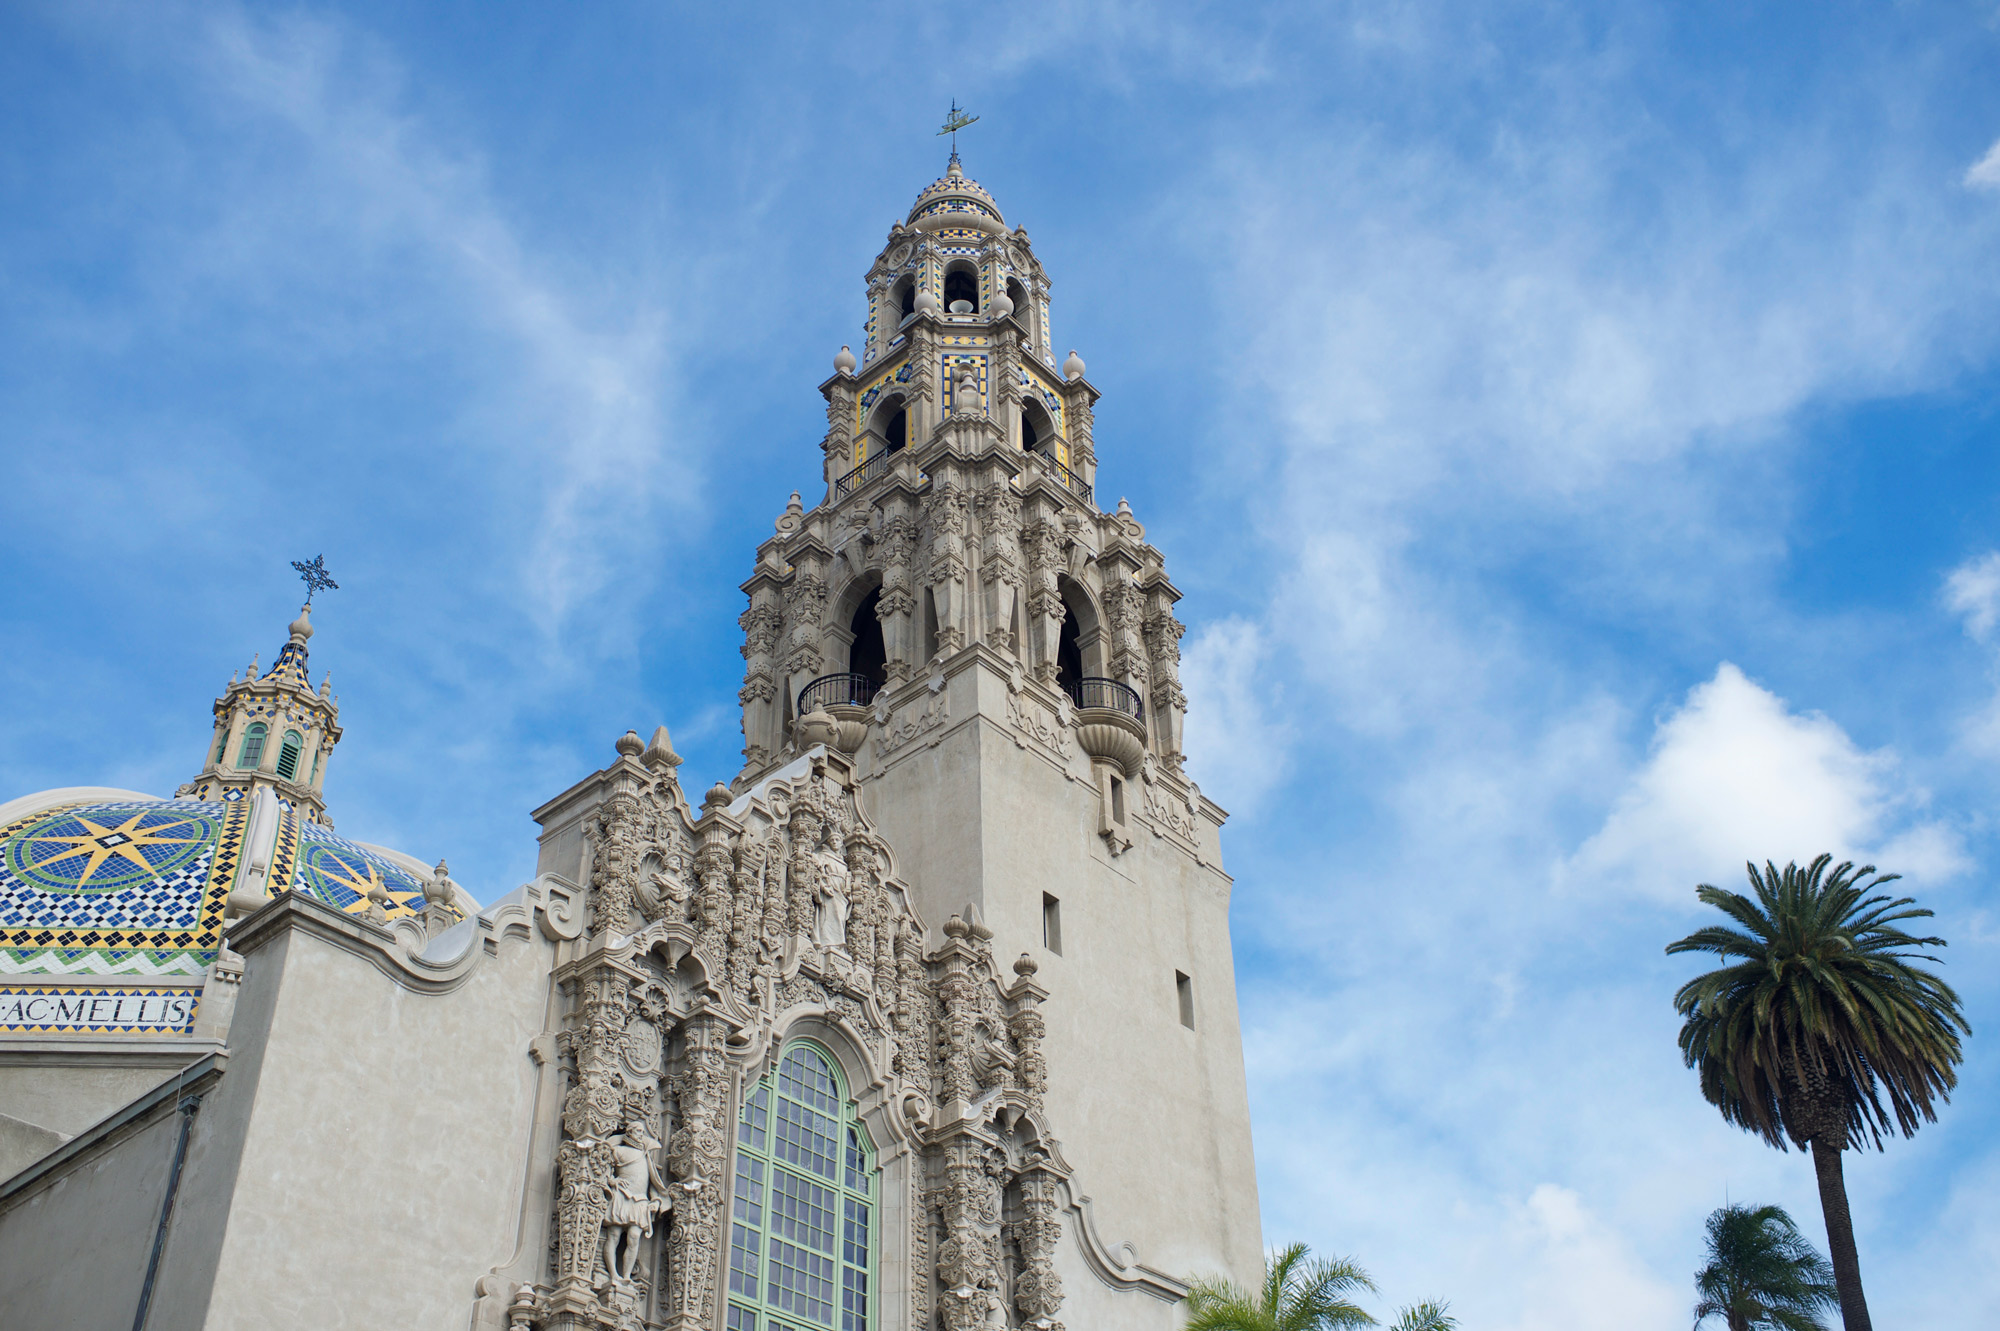
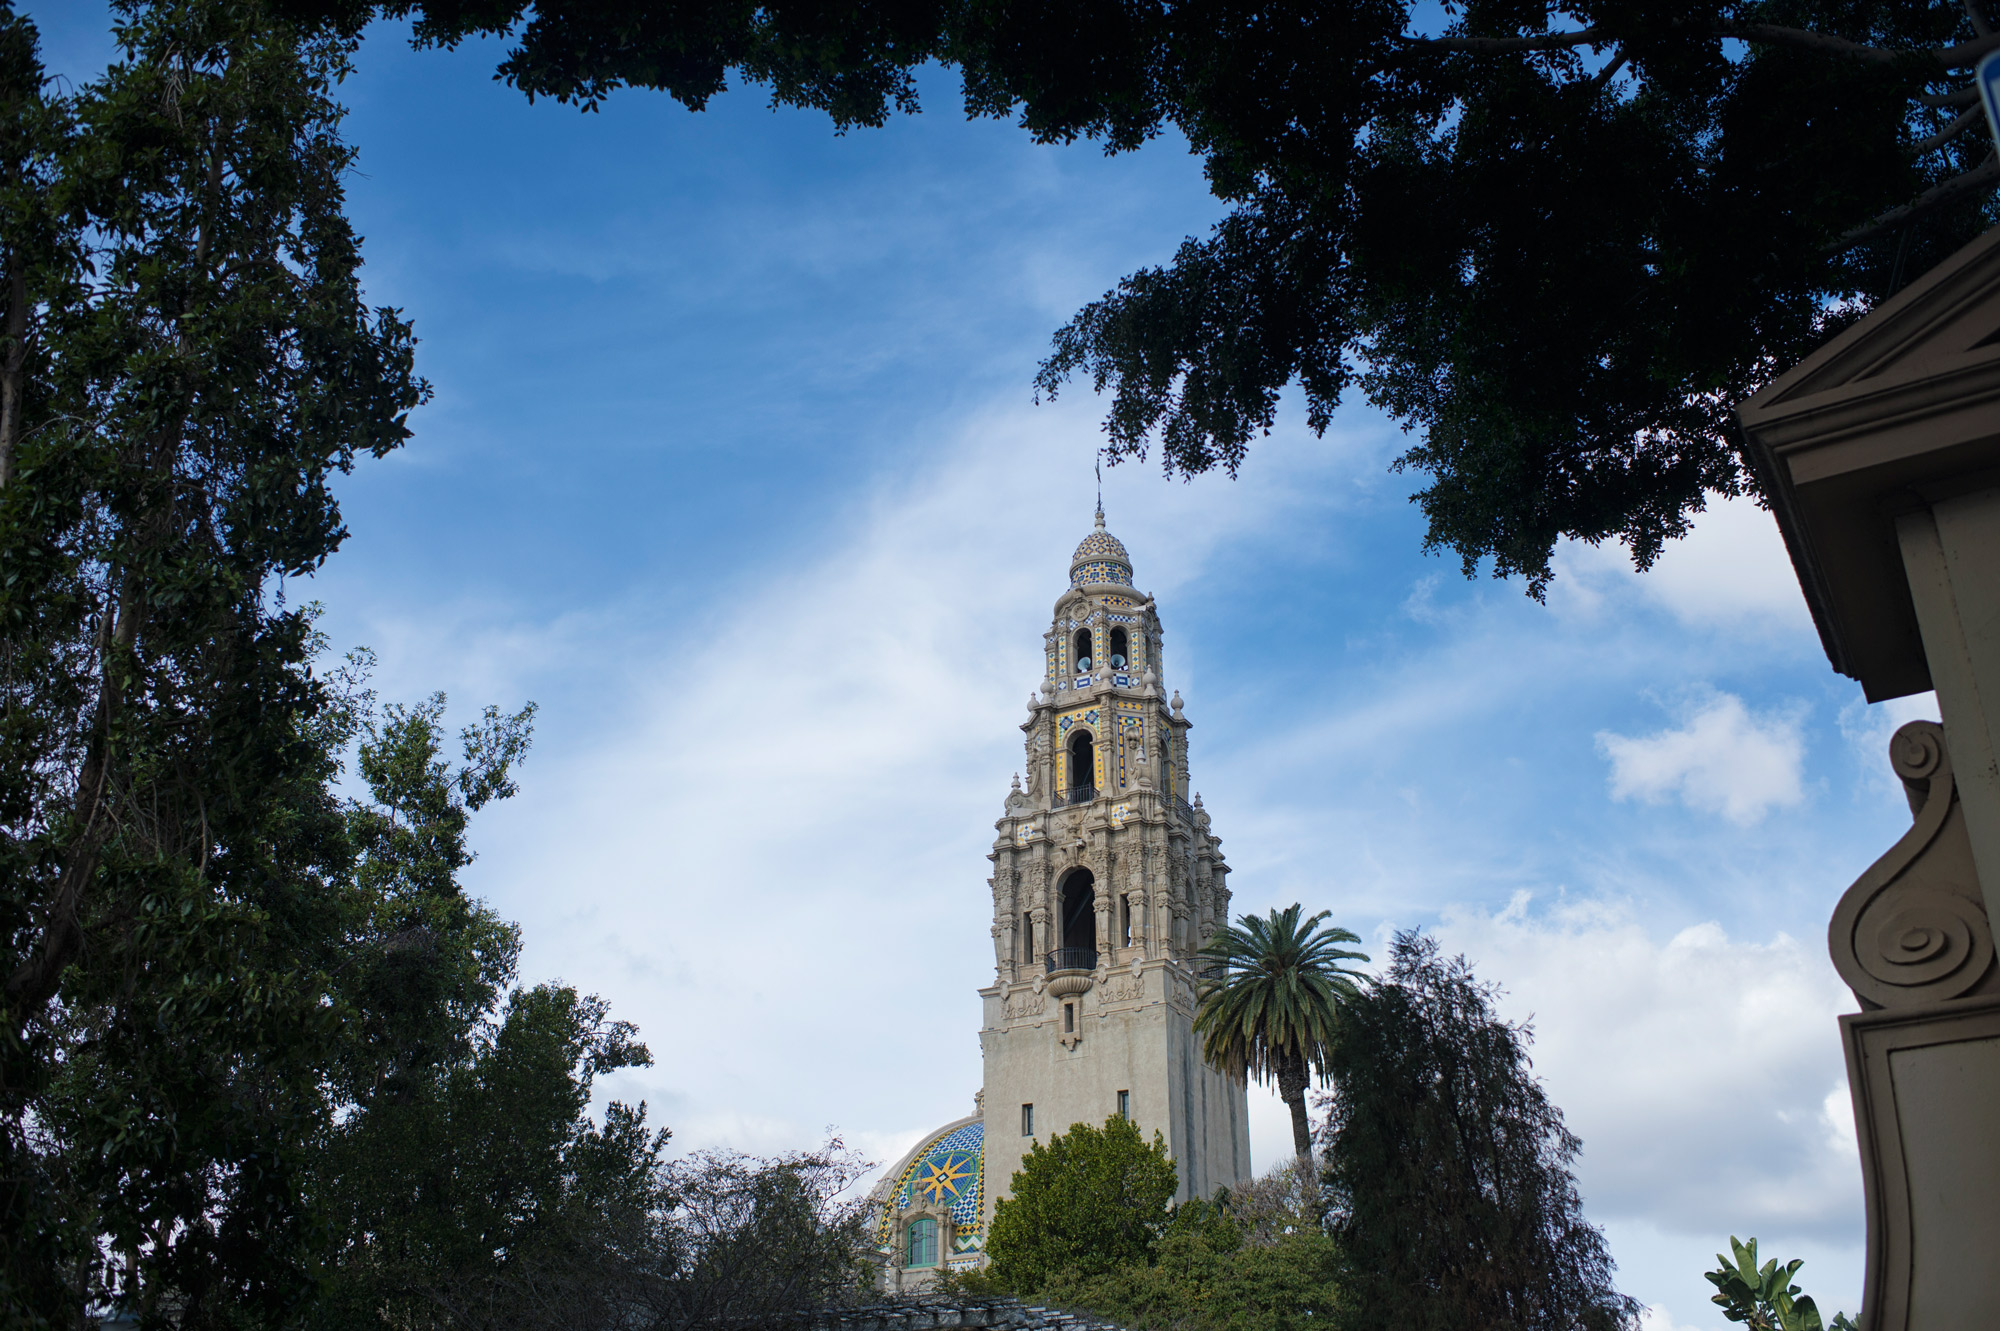
#8 The Church of Jesus Christ of Latter Day Saints La Jolla (Google Map It)
The Church of Jesus Christ of Latter Day Saints in La Jolla is one of those iconic spots that you have probably seen in pictures of San Diego. This church looks like something out of a Fairy Tale and it is bright white. It is really one of the most beautiful churches that I have ever seen. I have provided a map there because getting there is a little tricky since you have to go down a few roads. The best place to take pictures here is up at the church from the huge green lawns that sprawl around the front of the church. You can also shoot the temple at night as it is very well lit up and provides some pretty dramatic pictures but I prefer the day shots.


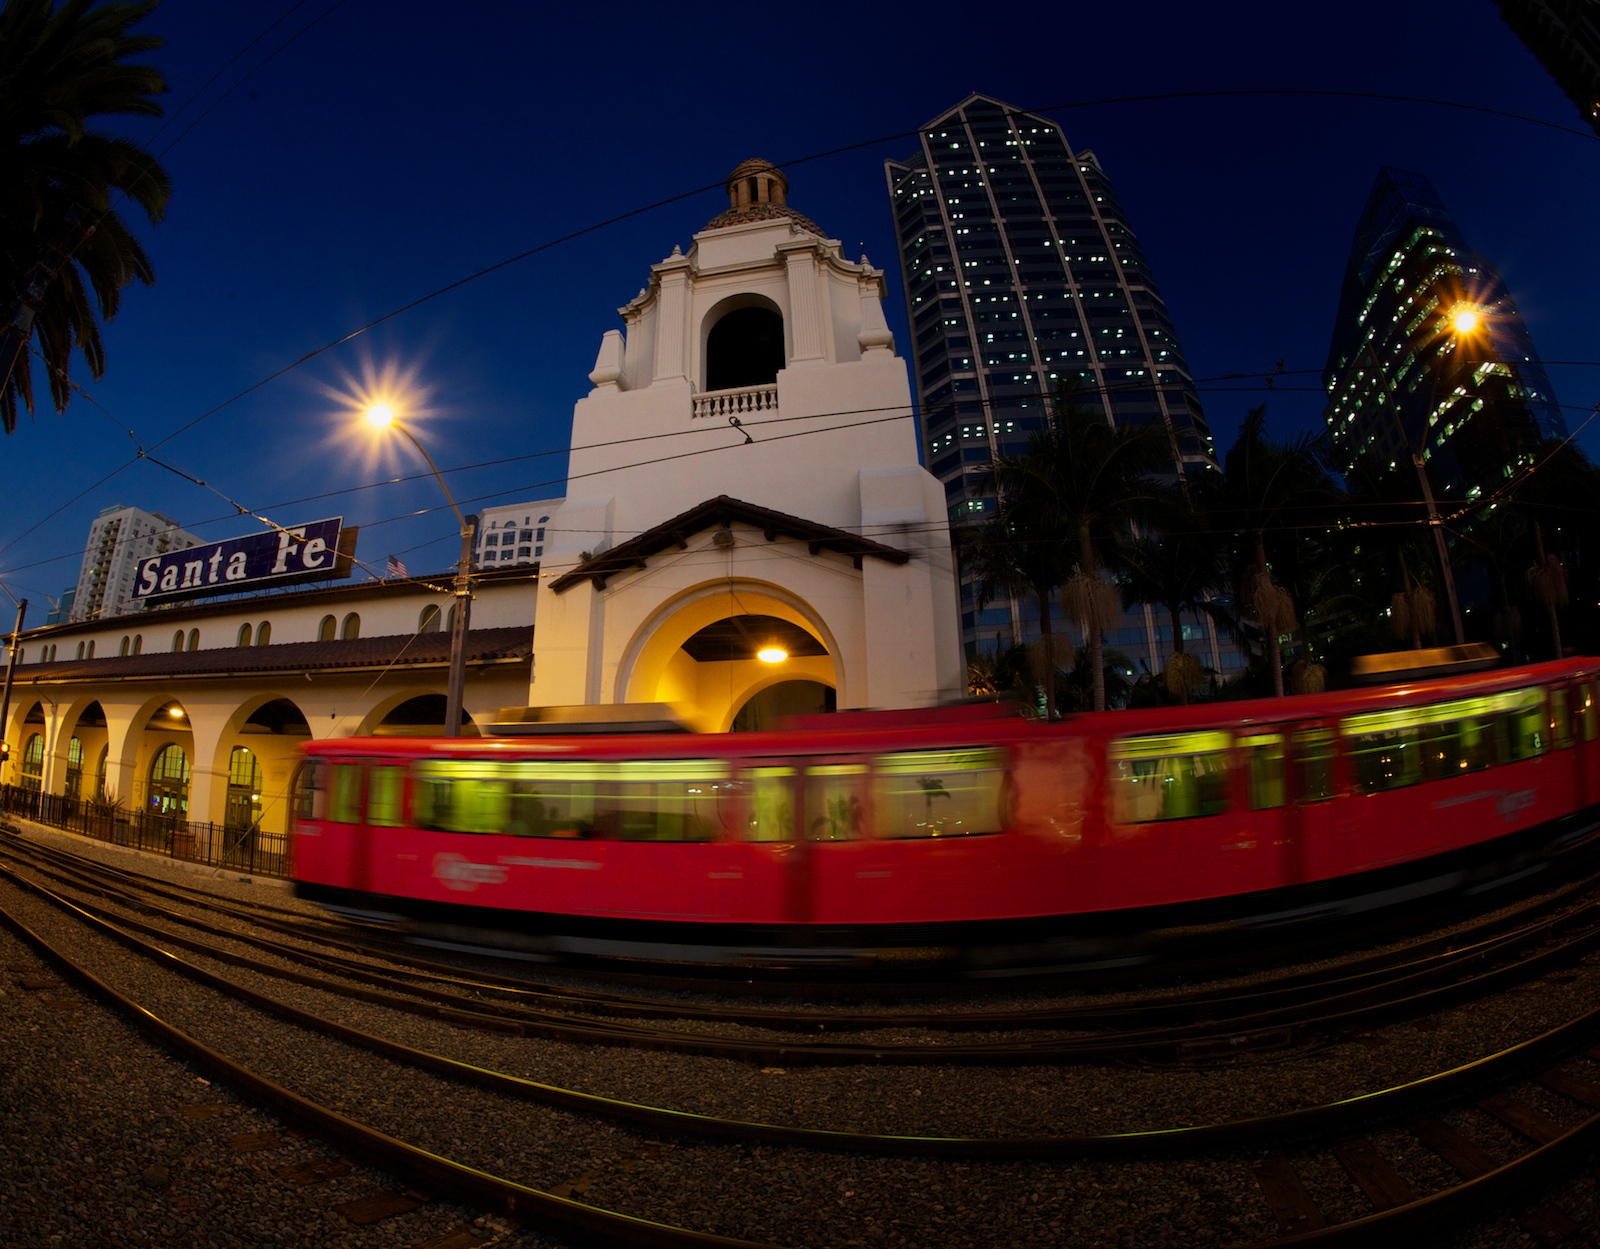
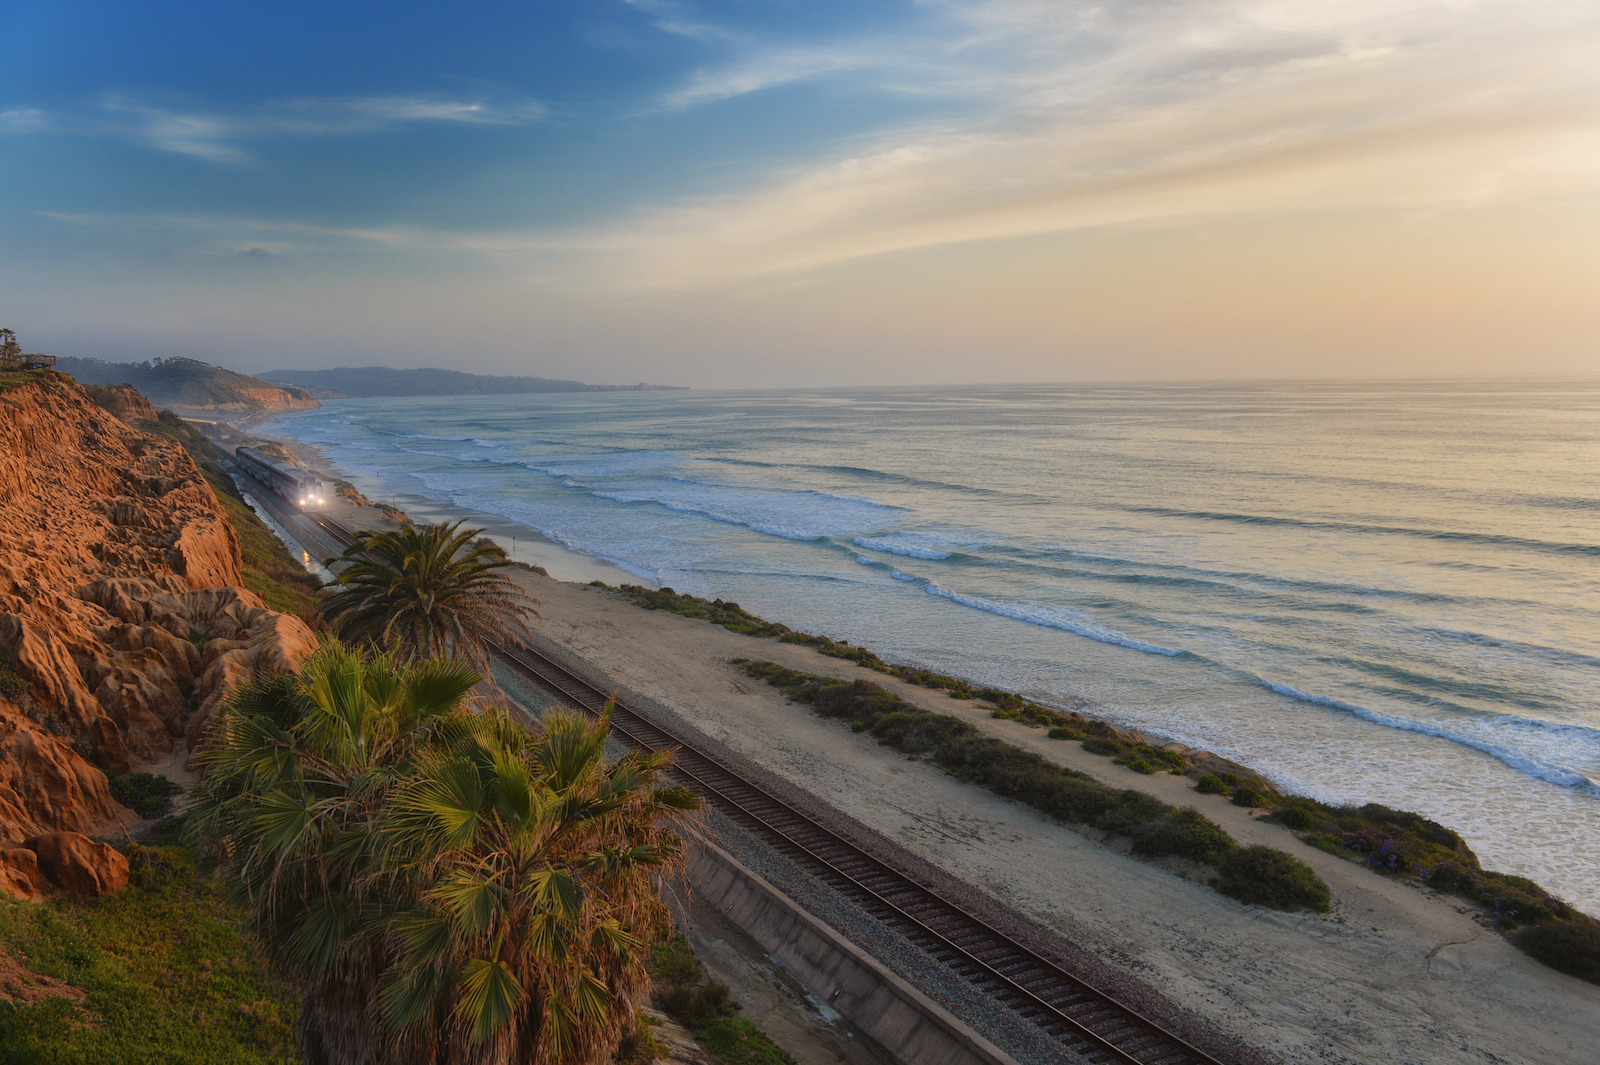
#9 – Santa Fe Train Depot Downtown San Diego (Google Map It)
The Santa Fe Train Depot in San Diego is one of the oldest and most historic places in Downtown San Diego. The old spanish style train depot was built in the 1920’s and it will take you back in time to when San Diego was just being incorporated. The train station is the main Amtrak station for San Diego and it even has some historic old train cars outside that you can take pictures of. You will need to park in the public lot located just west of the train station since street parking is limited. The train station is best photographed at night as you can really capture the movement of the trains and trolleys moving by against the backdrop of the station itself. This truly is one of the gems of San Diego.
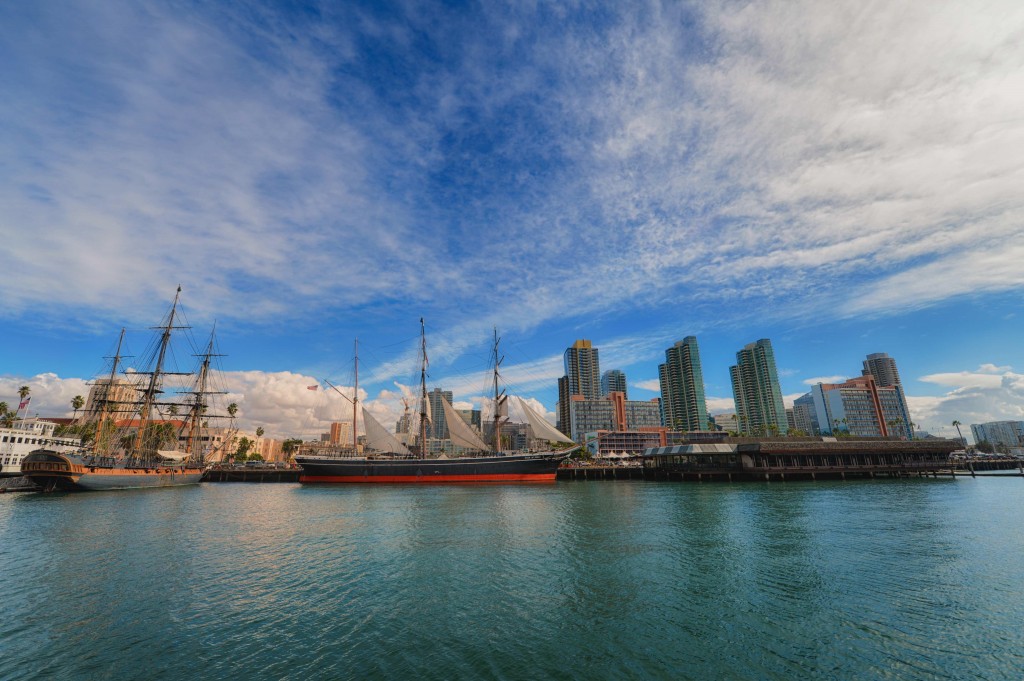
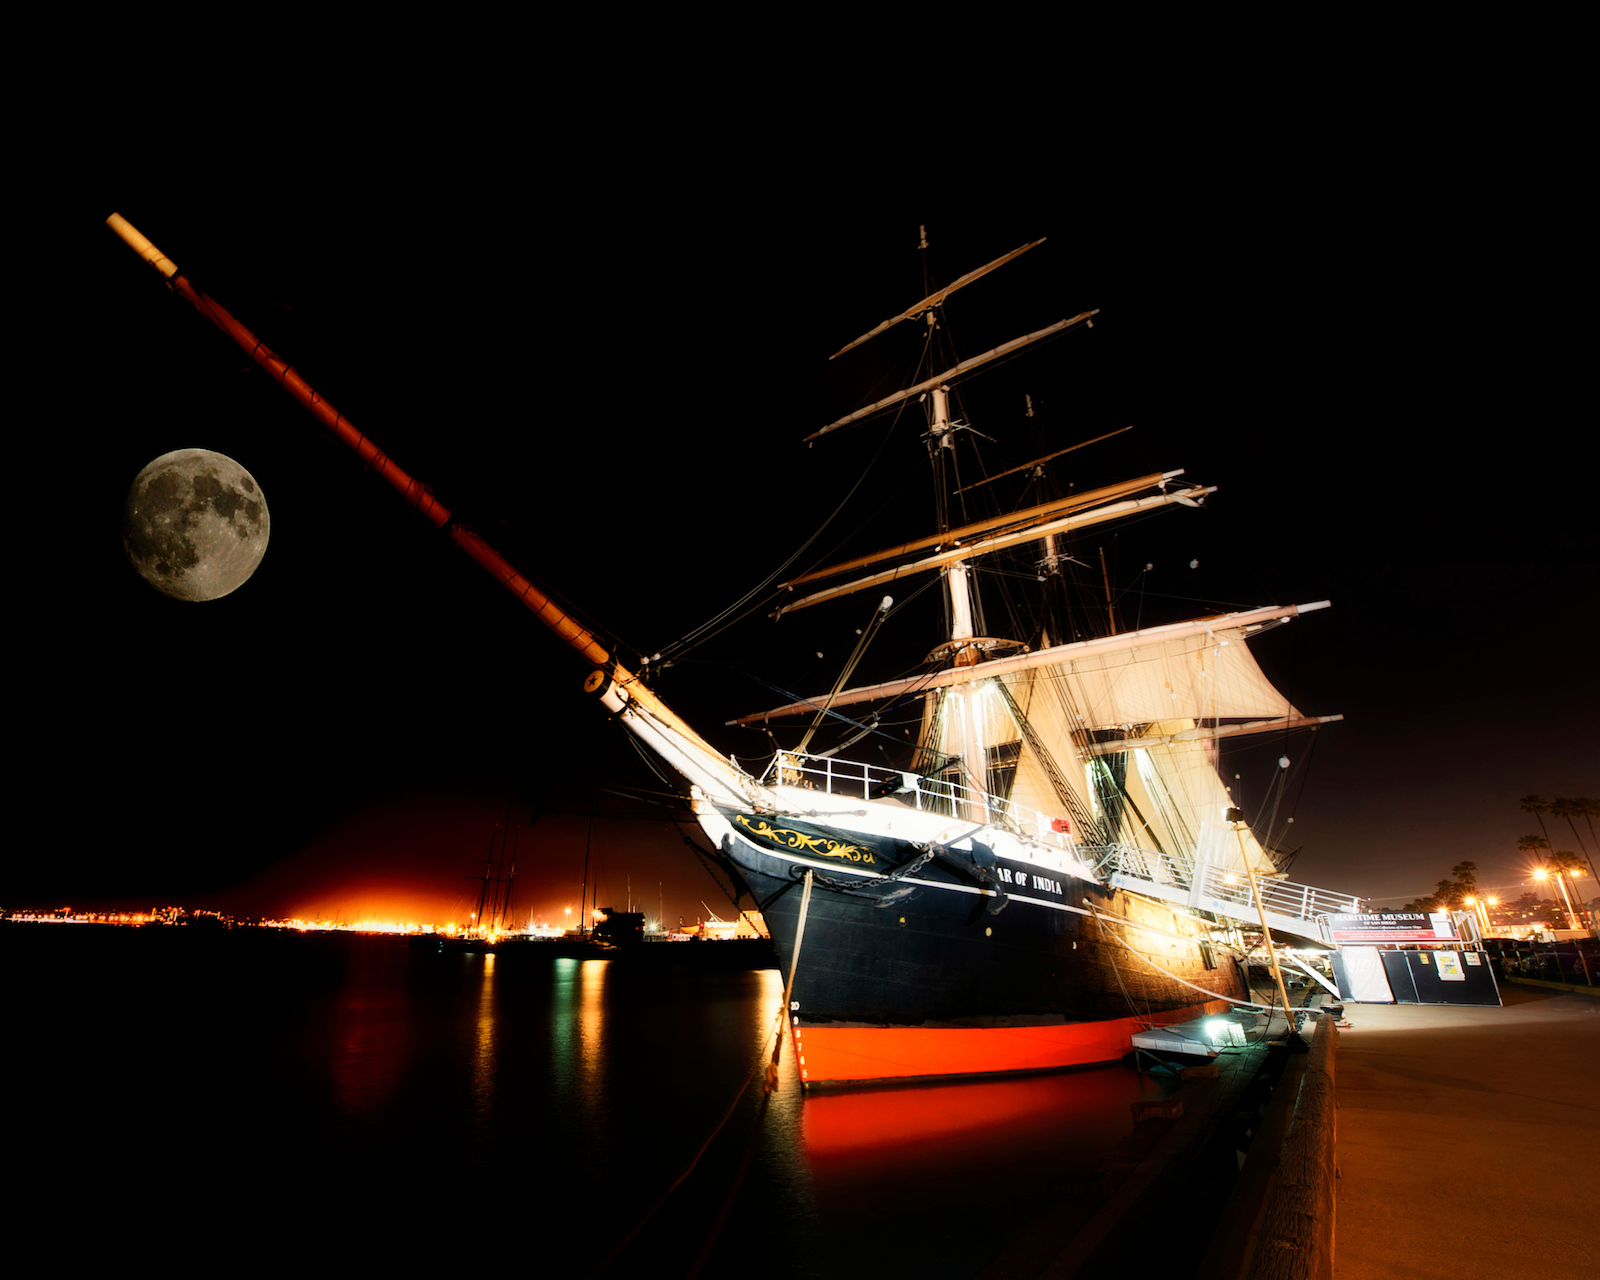
#10 – Star of India/San Diego Maritime Museum (Google Map It)
The Star of India is an old merchant ship that was in operations primarily around the turn of the century. This ship looks like something out of Pirates of the Caribbean and you can even board the ship and take lots of great pictures on it. When you buy tickets you get access to 4-5 other vessels including a russian submarine. There are a lot of great photos you can take in this place and it’s also a very interesting place to go and visit and just browse what life would have been like on these old time ships and submarines. When you head out to the pier to go to the Russian submarine, look behind you and you can capture some great views and pictures of the city as well. While you are there stroll down the harbor to catch lots of nice photos including pictures of an out of commission aircraft carrier – The Midway.
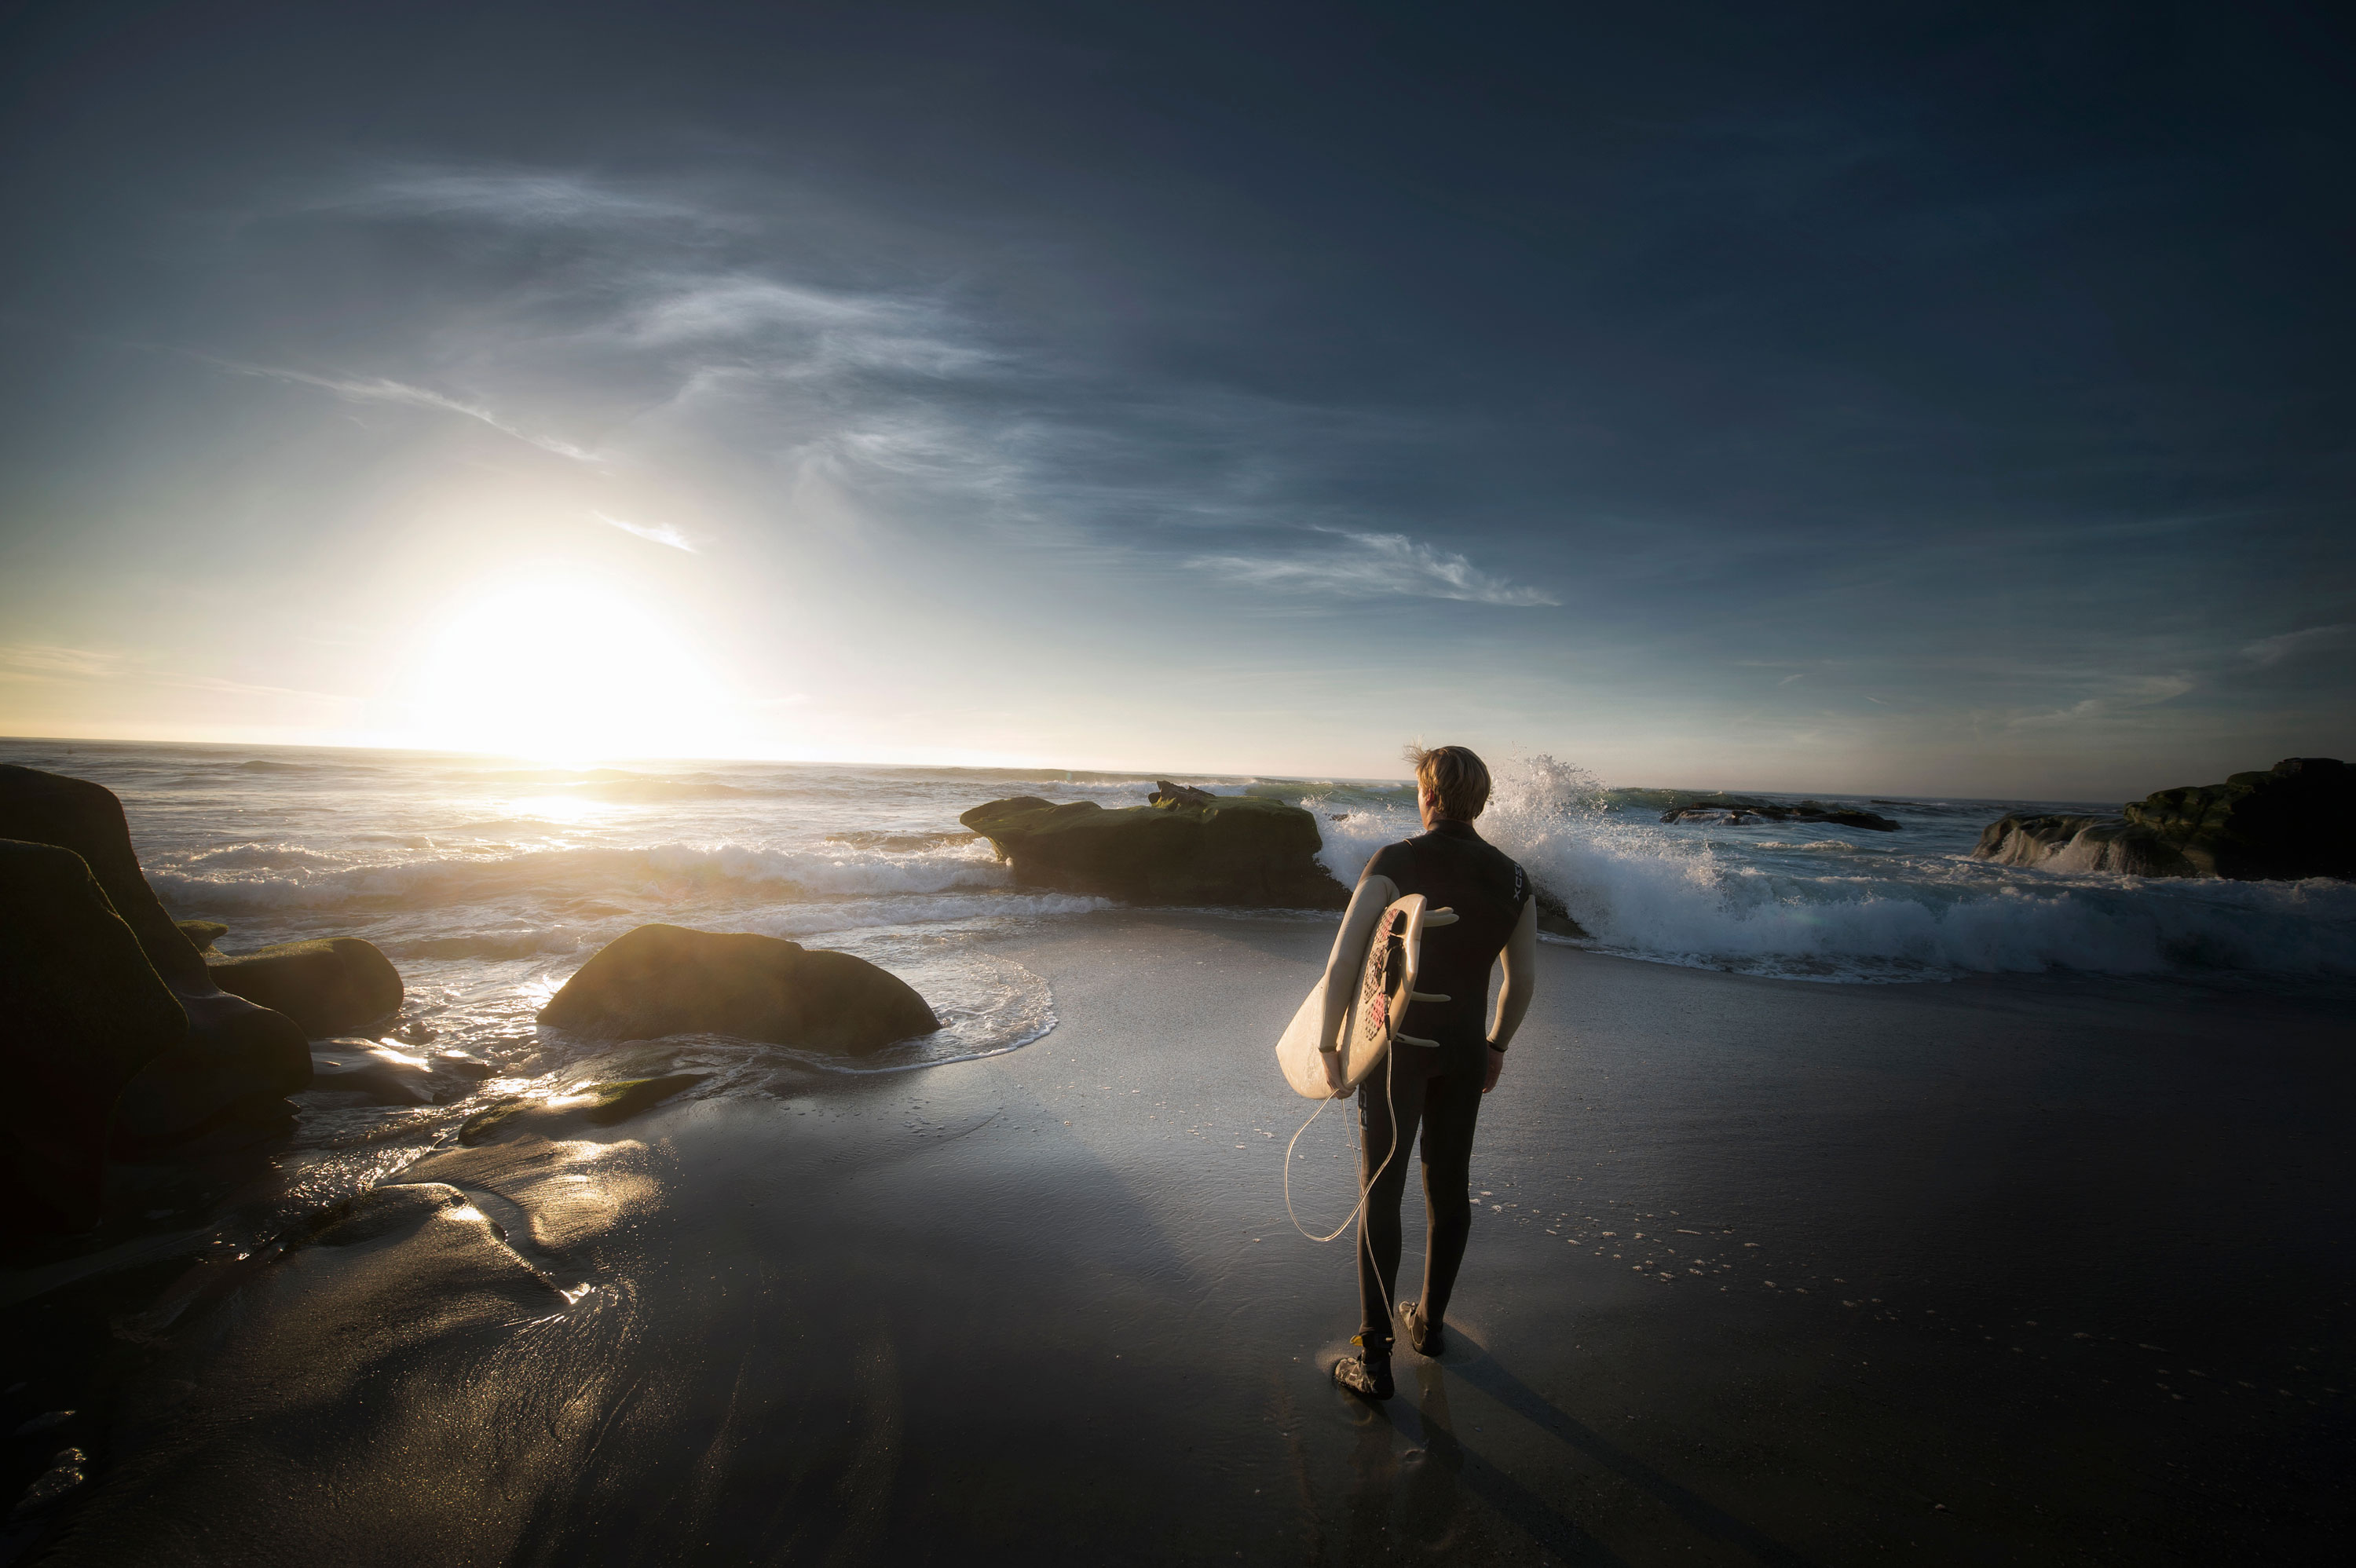
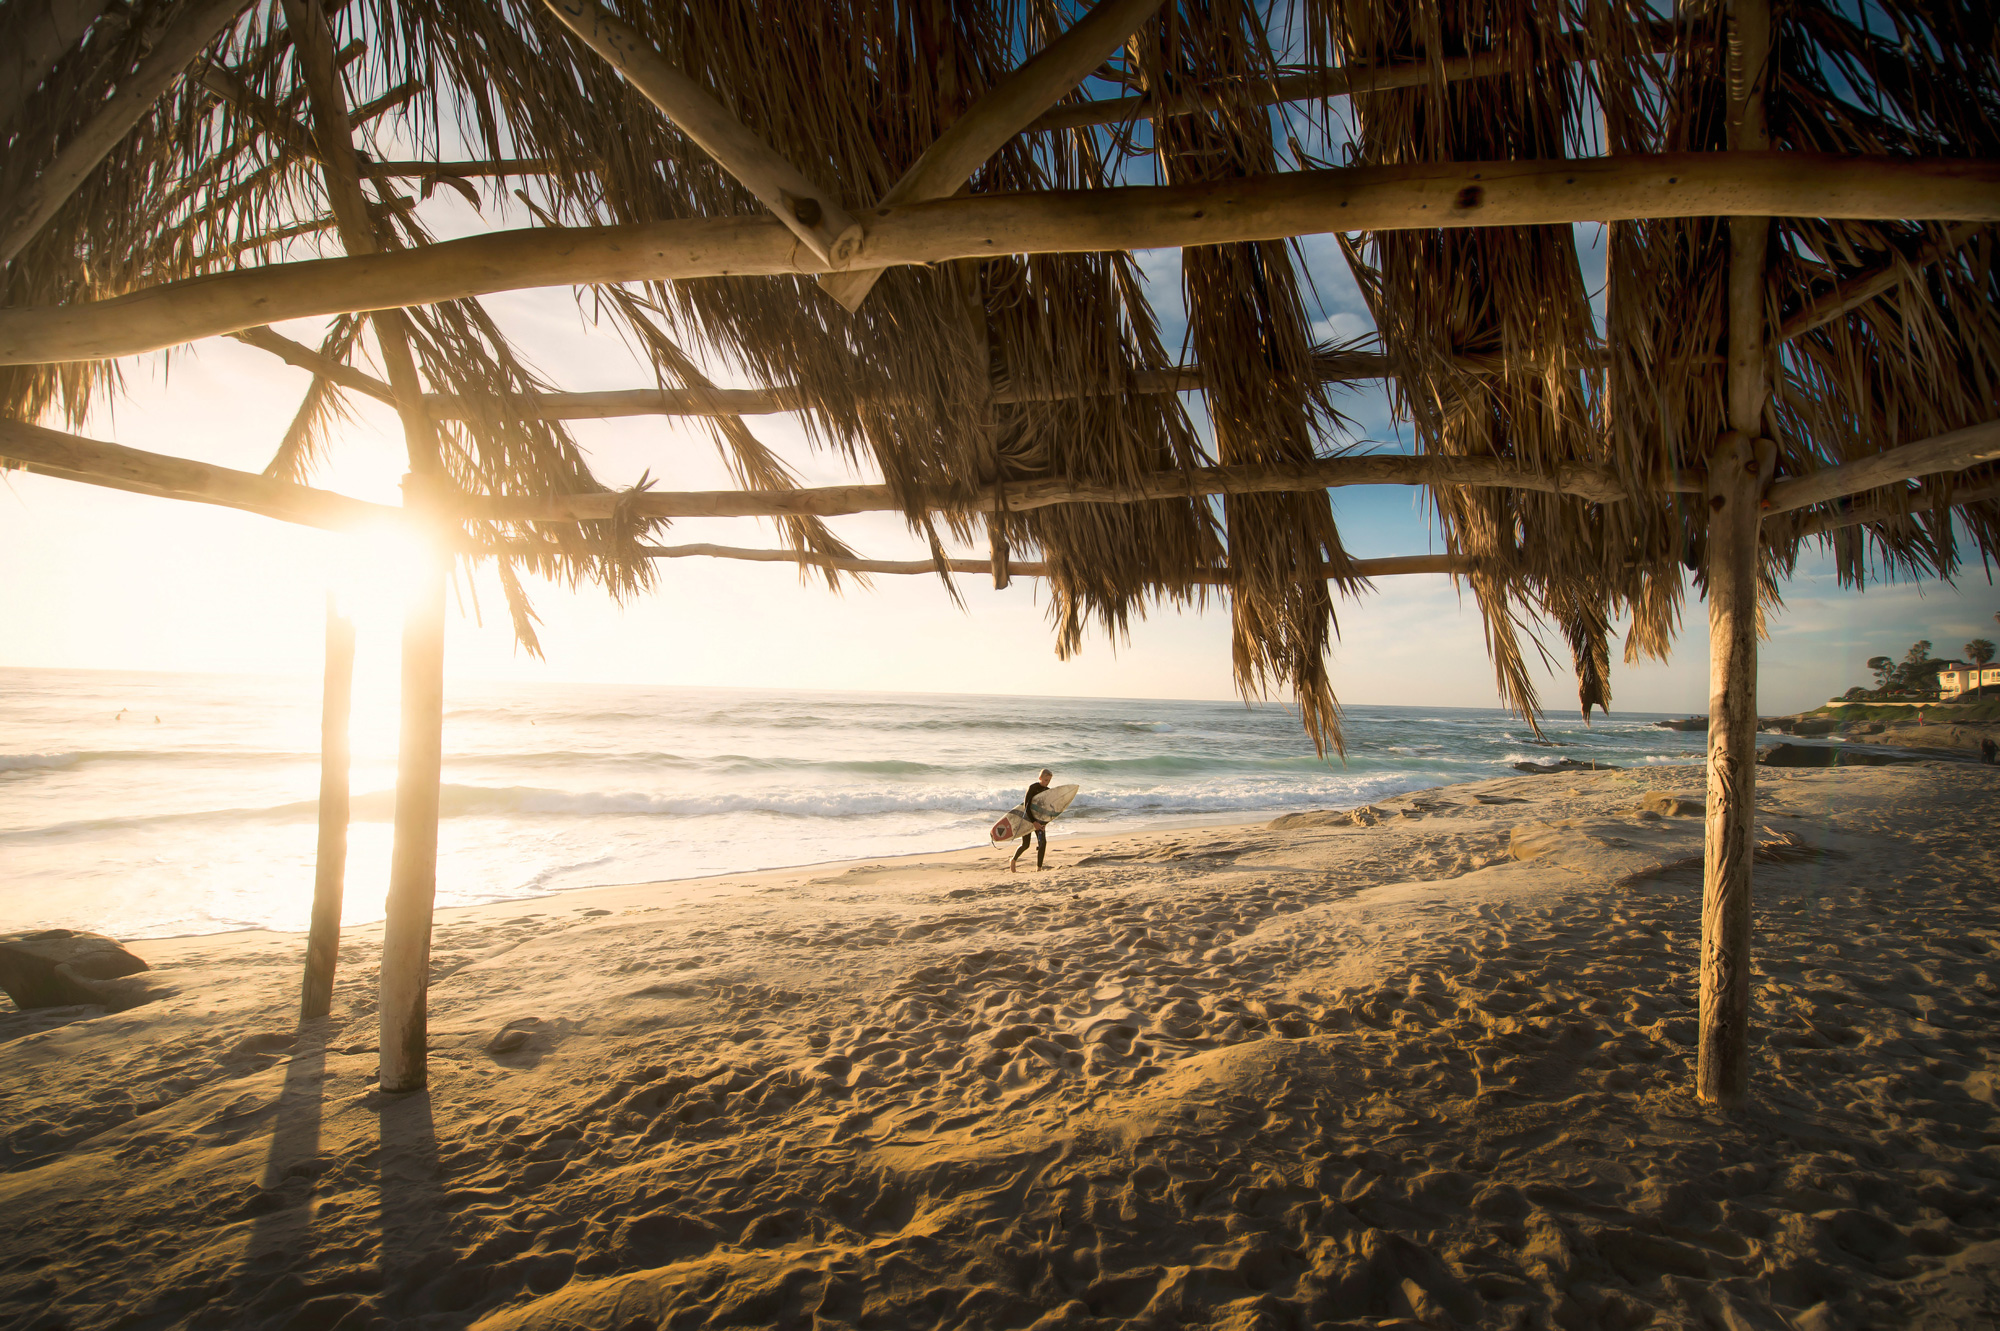
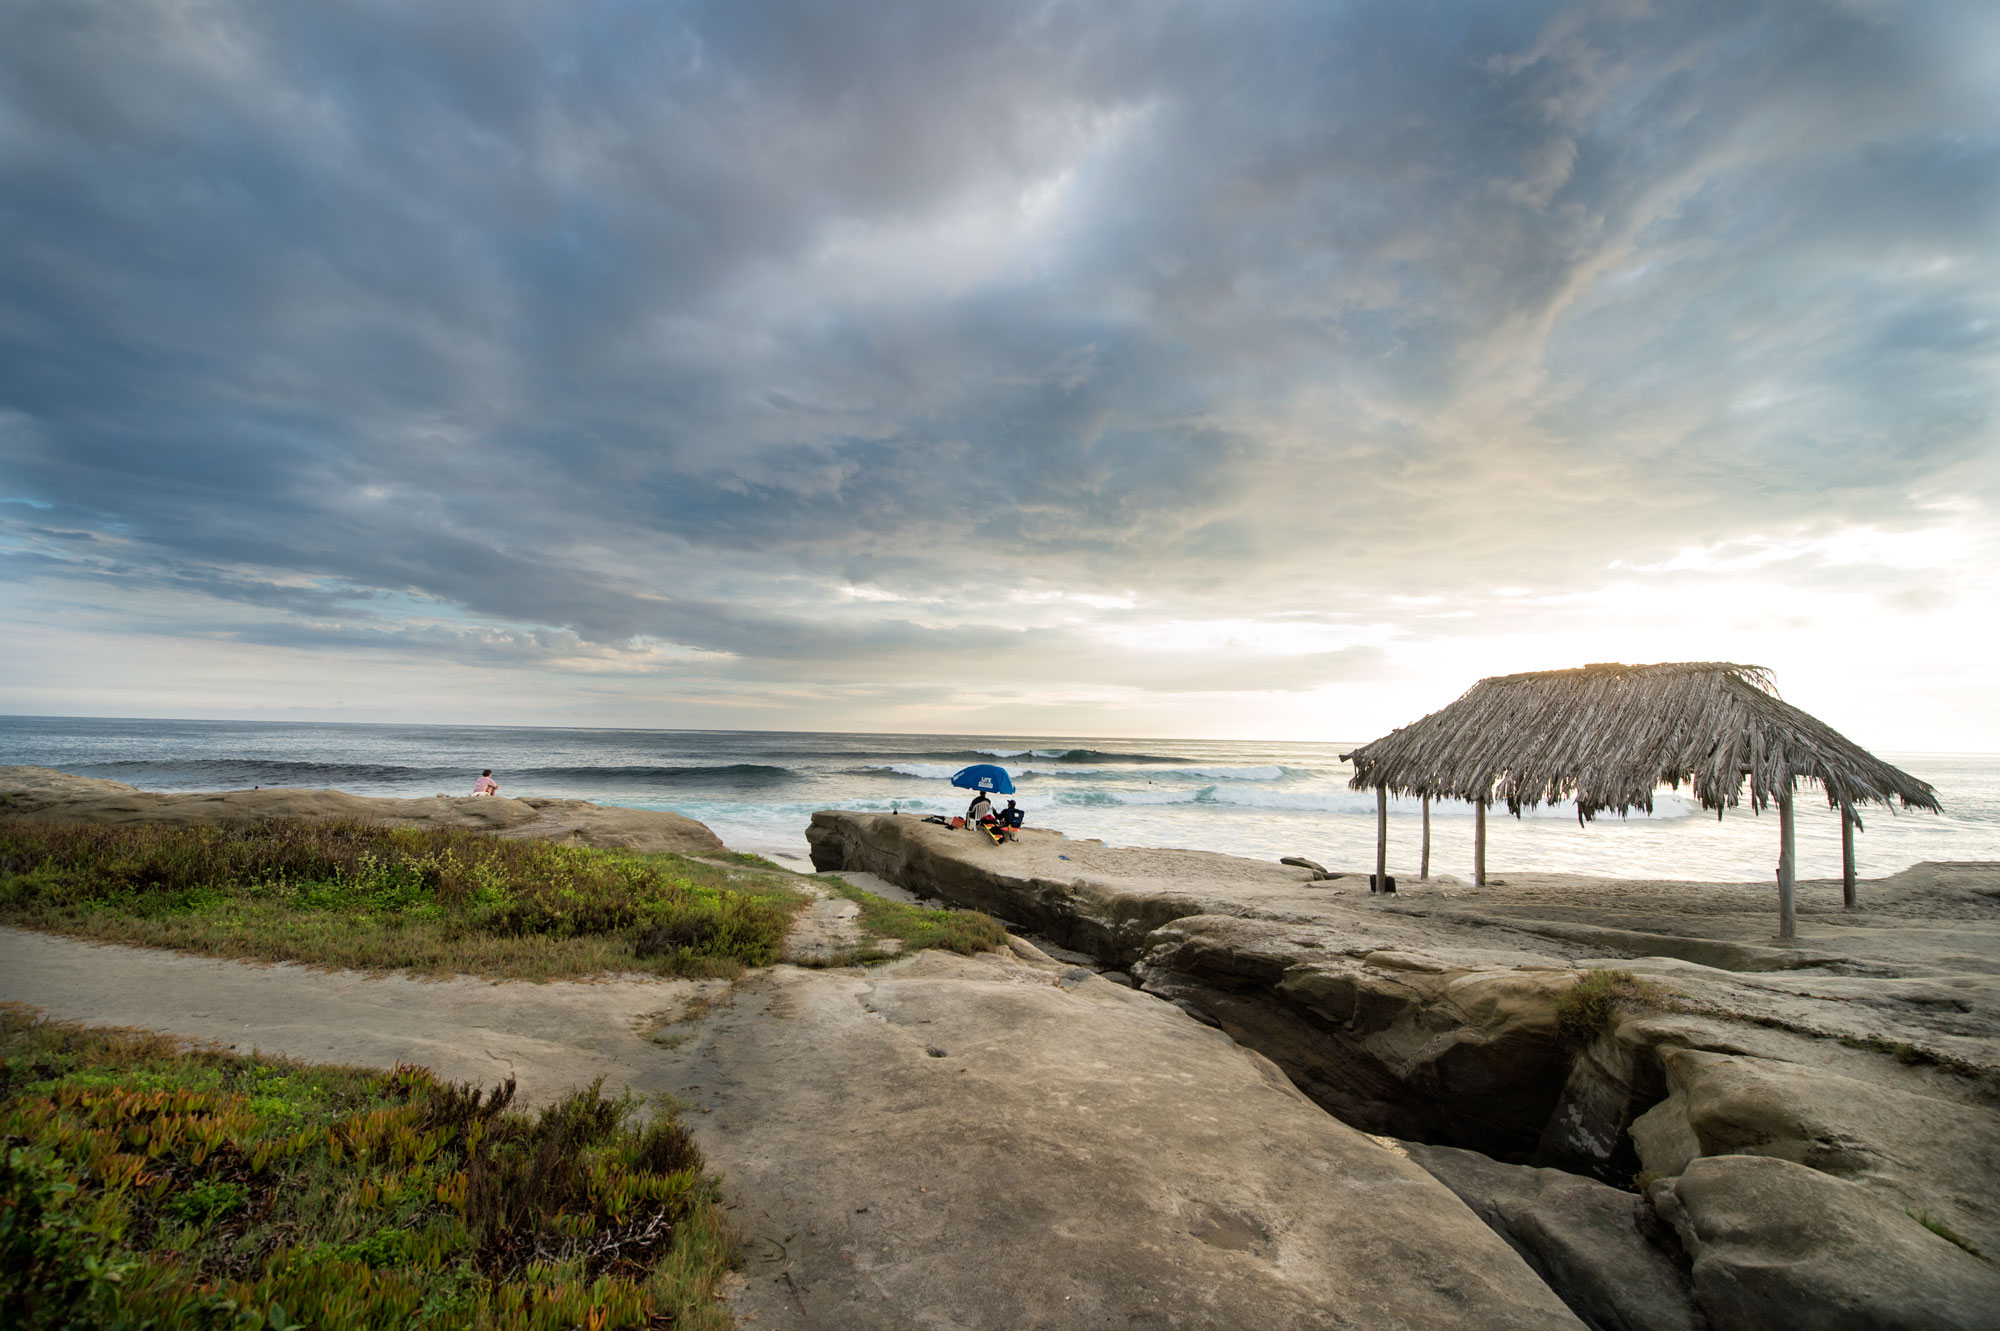
#11 – WindanSea Beach La Jolla (Google Map It)
WindanSea Beach is one of the most famous surfing beaches in the world. This place was featured in the surfing documentary, The Endless Summer, and the old palm thatched surf hut is still maintained by locals that make sure the palm fronds are replaced when they blow away.
This place is a great place to watch surfers off the coast catch some of the most perfectly shaped waves that you will ever see. This place is very popular with wedding and family photographers so expect that at sunset you will see lots of photographers with flashes taking engagement photos or photos of families.
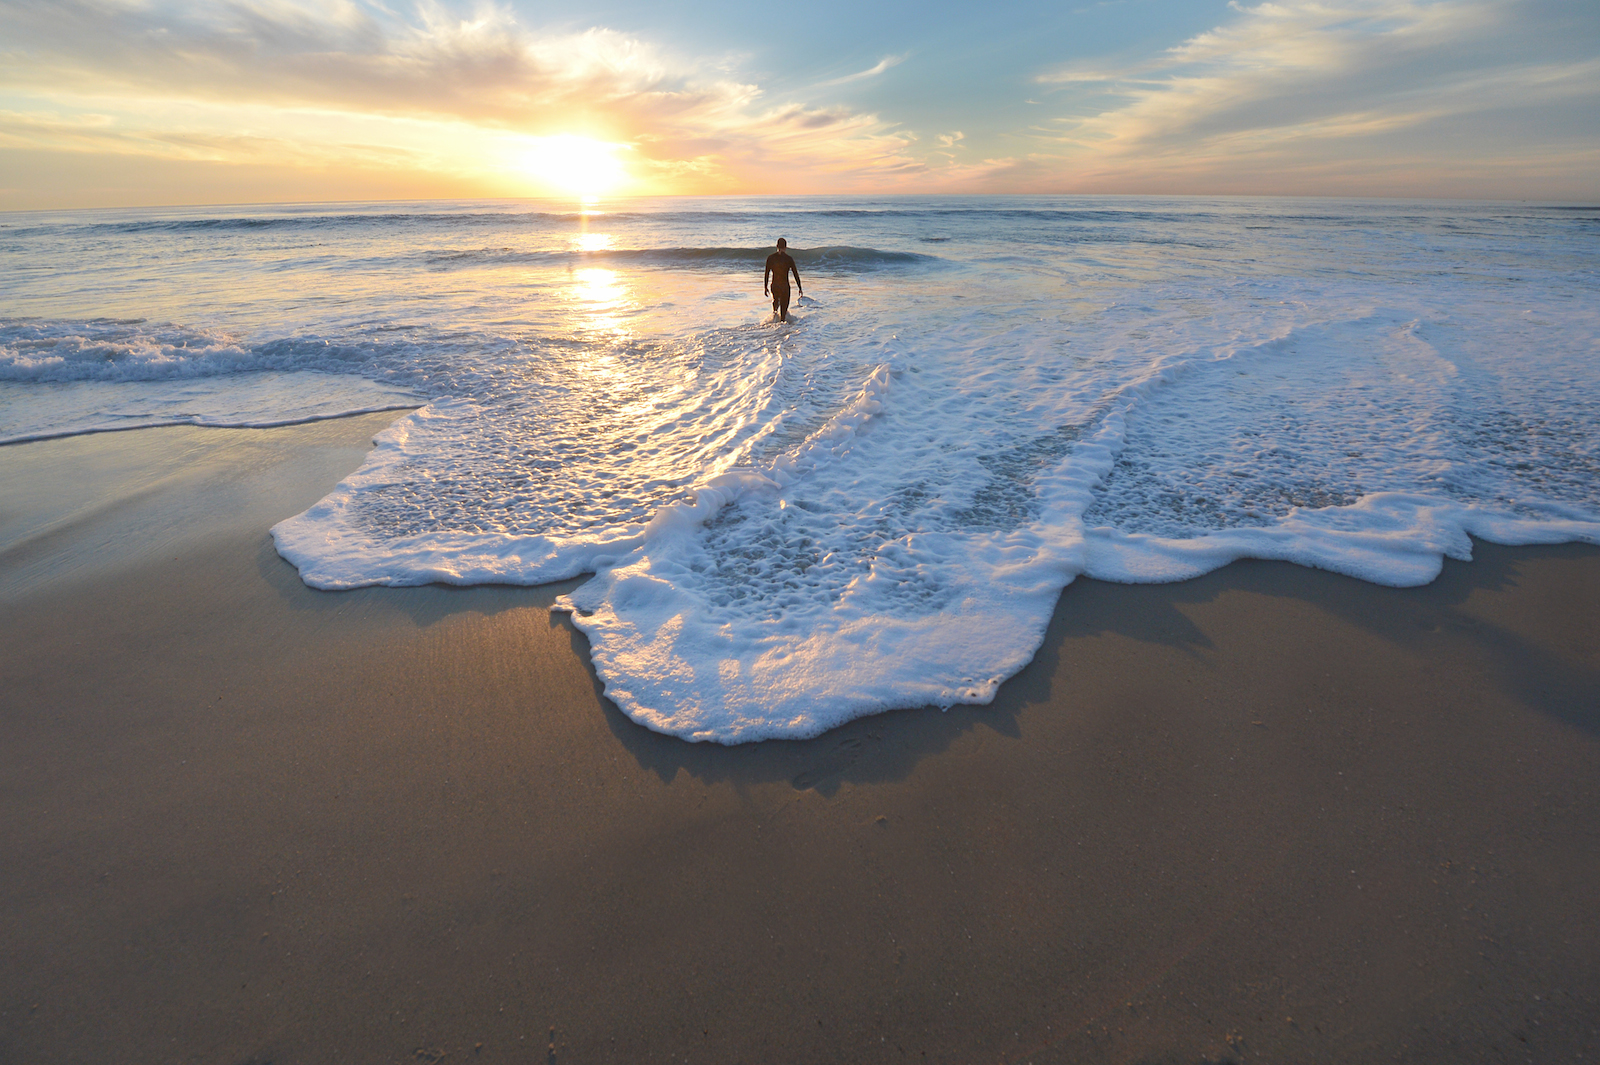
This is great place to take sunset pictures of people. To do it make sure that you take the photos as close to the sun setting as possible or even slightly after the sun has set. Place the subject to block any sun and use your flash to light up there face since the background can easily wash them out.
When you use a flash you can capture some amazing portaits since you will capture the brilliantly colored sky and clouds and the person in front. WindanSea is a must photograph location in San Diego.
#12 – Balboa Park San Diego (Google Map It)
Balboa Park is the largest urban park in the United States and it was built for the Worlds Fair. The buildings here still stand and it is home to one of the best zoos in the world too – The San Diego Zoo.
This is another location that is a favorite among photographers shooting engagement photos. The old buildings provide the perfect backdrop to that timeless old spanish colonial feel. There are so many great places to photograph here including some reflection pools where you can take really good night time photos.
There is plenty of parking around the park and if you have time you can check out the San Diego Historical Society and browse vintage photos of the various areas of San Diego. There are hundreds and thousands of photographs in books and you can even buy prints of the old photos. I have about 10 photos in my house which I had printed in poster size and then later framed. You can get pictures of old time portuguese fisherman and surfers from the 1920’s.
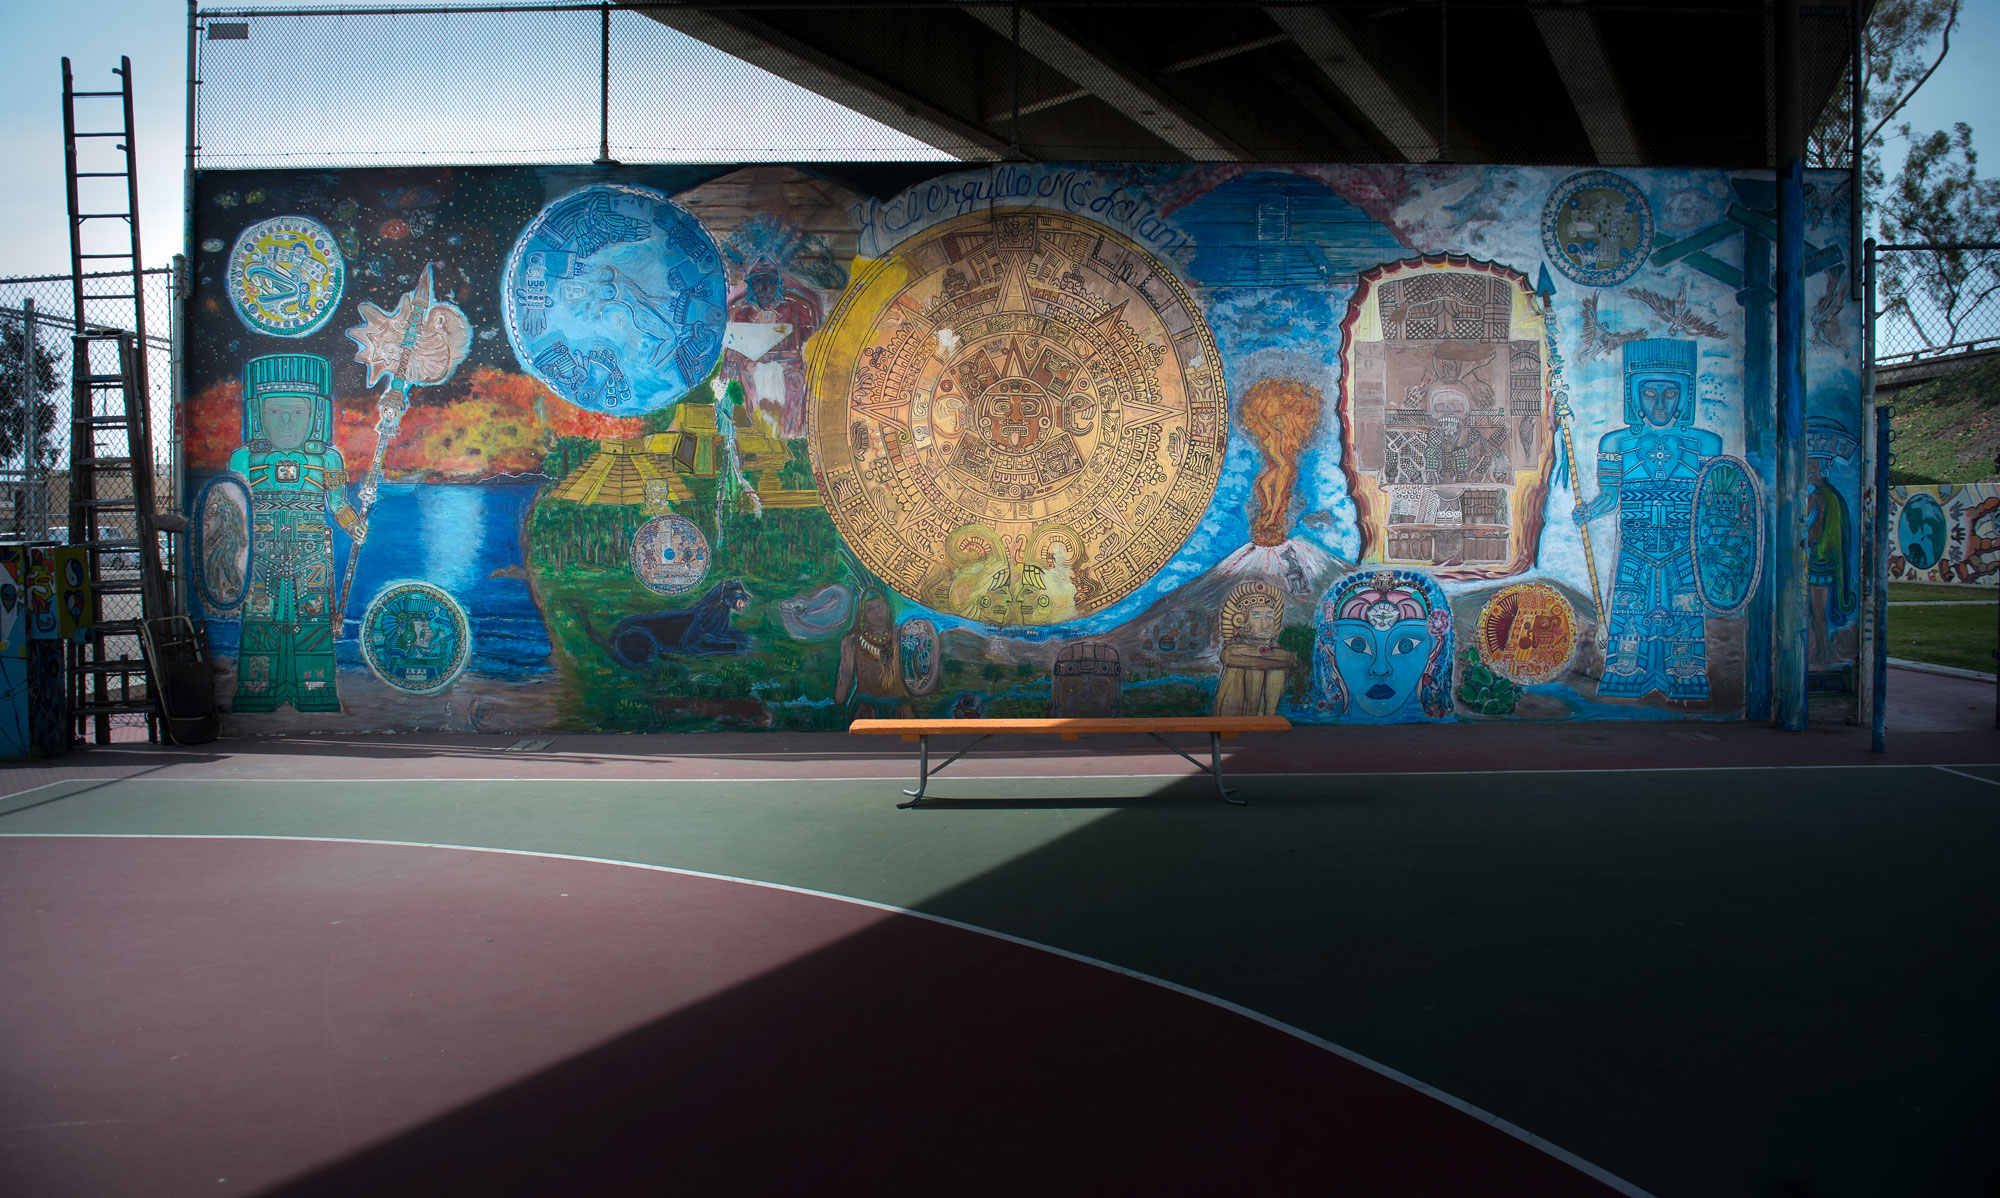
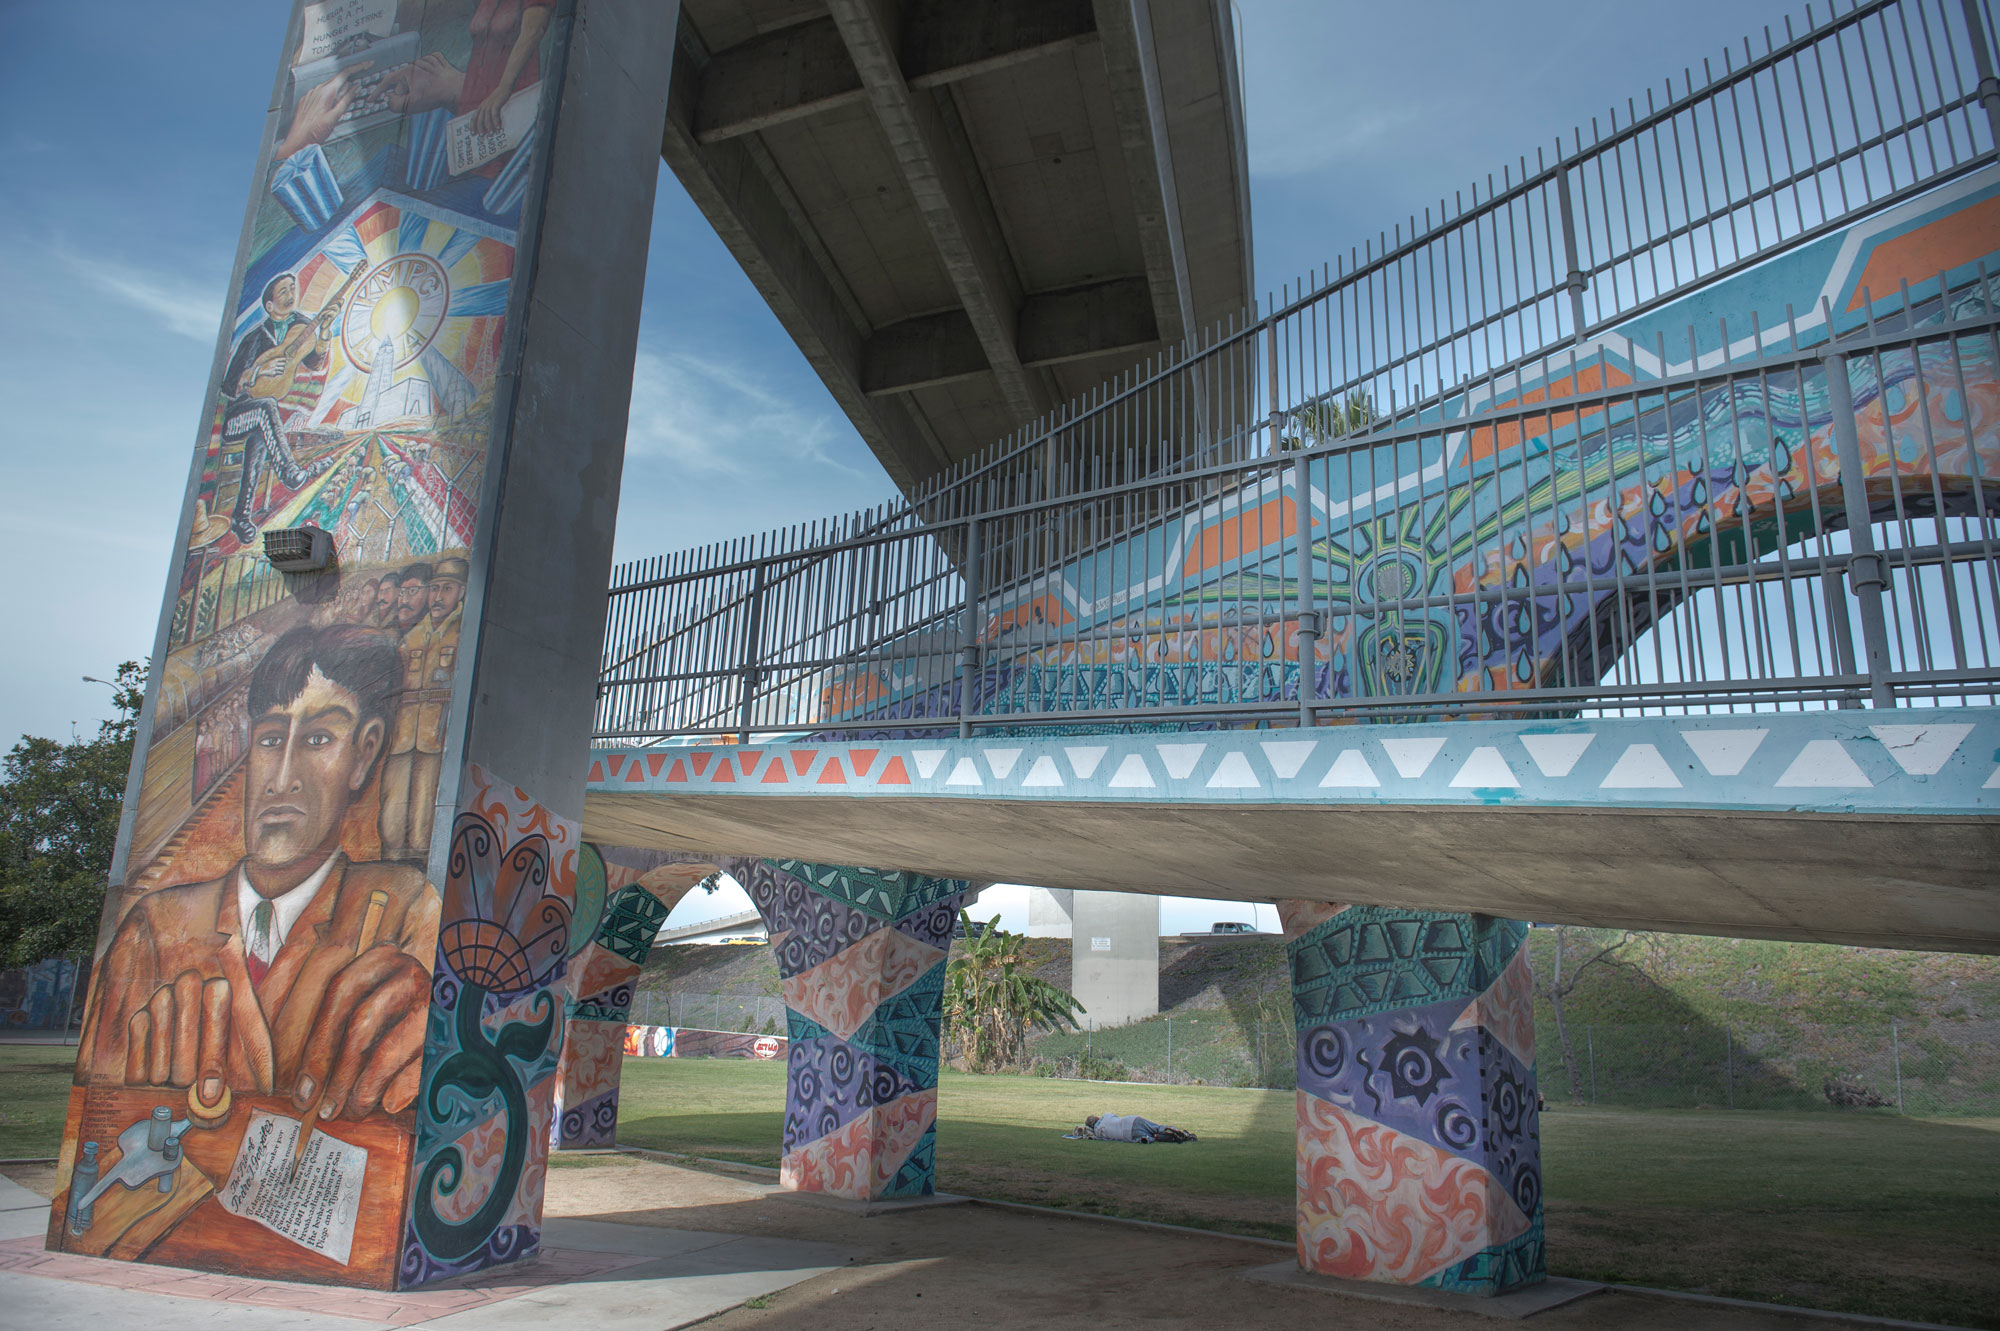
#13 – Chicano Park Logan Heights San Diego (Google Map It)
Chicano Park is not your typical tourist destination but it is home to some rich Latino history in San Diego. The park is located underneath the Coronado Bay Bridge and it has some of the most beautiful murals and art that are painted on the pillars and sides of the freeway. The murals are constantly being changed by local artist and they tell some amazing stories. This place is great as a backdrop for portraits but also to just photograph the fantastic art and murals.
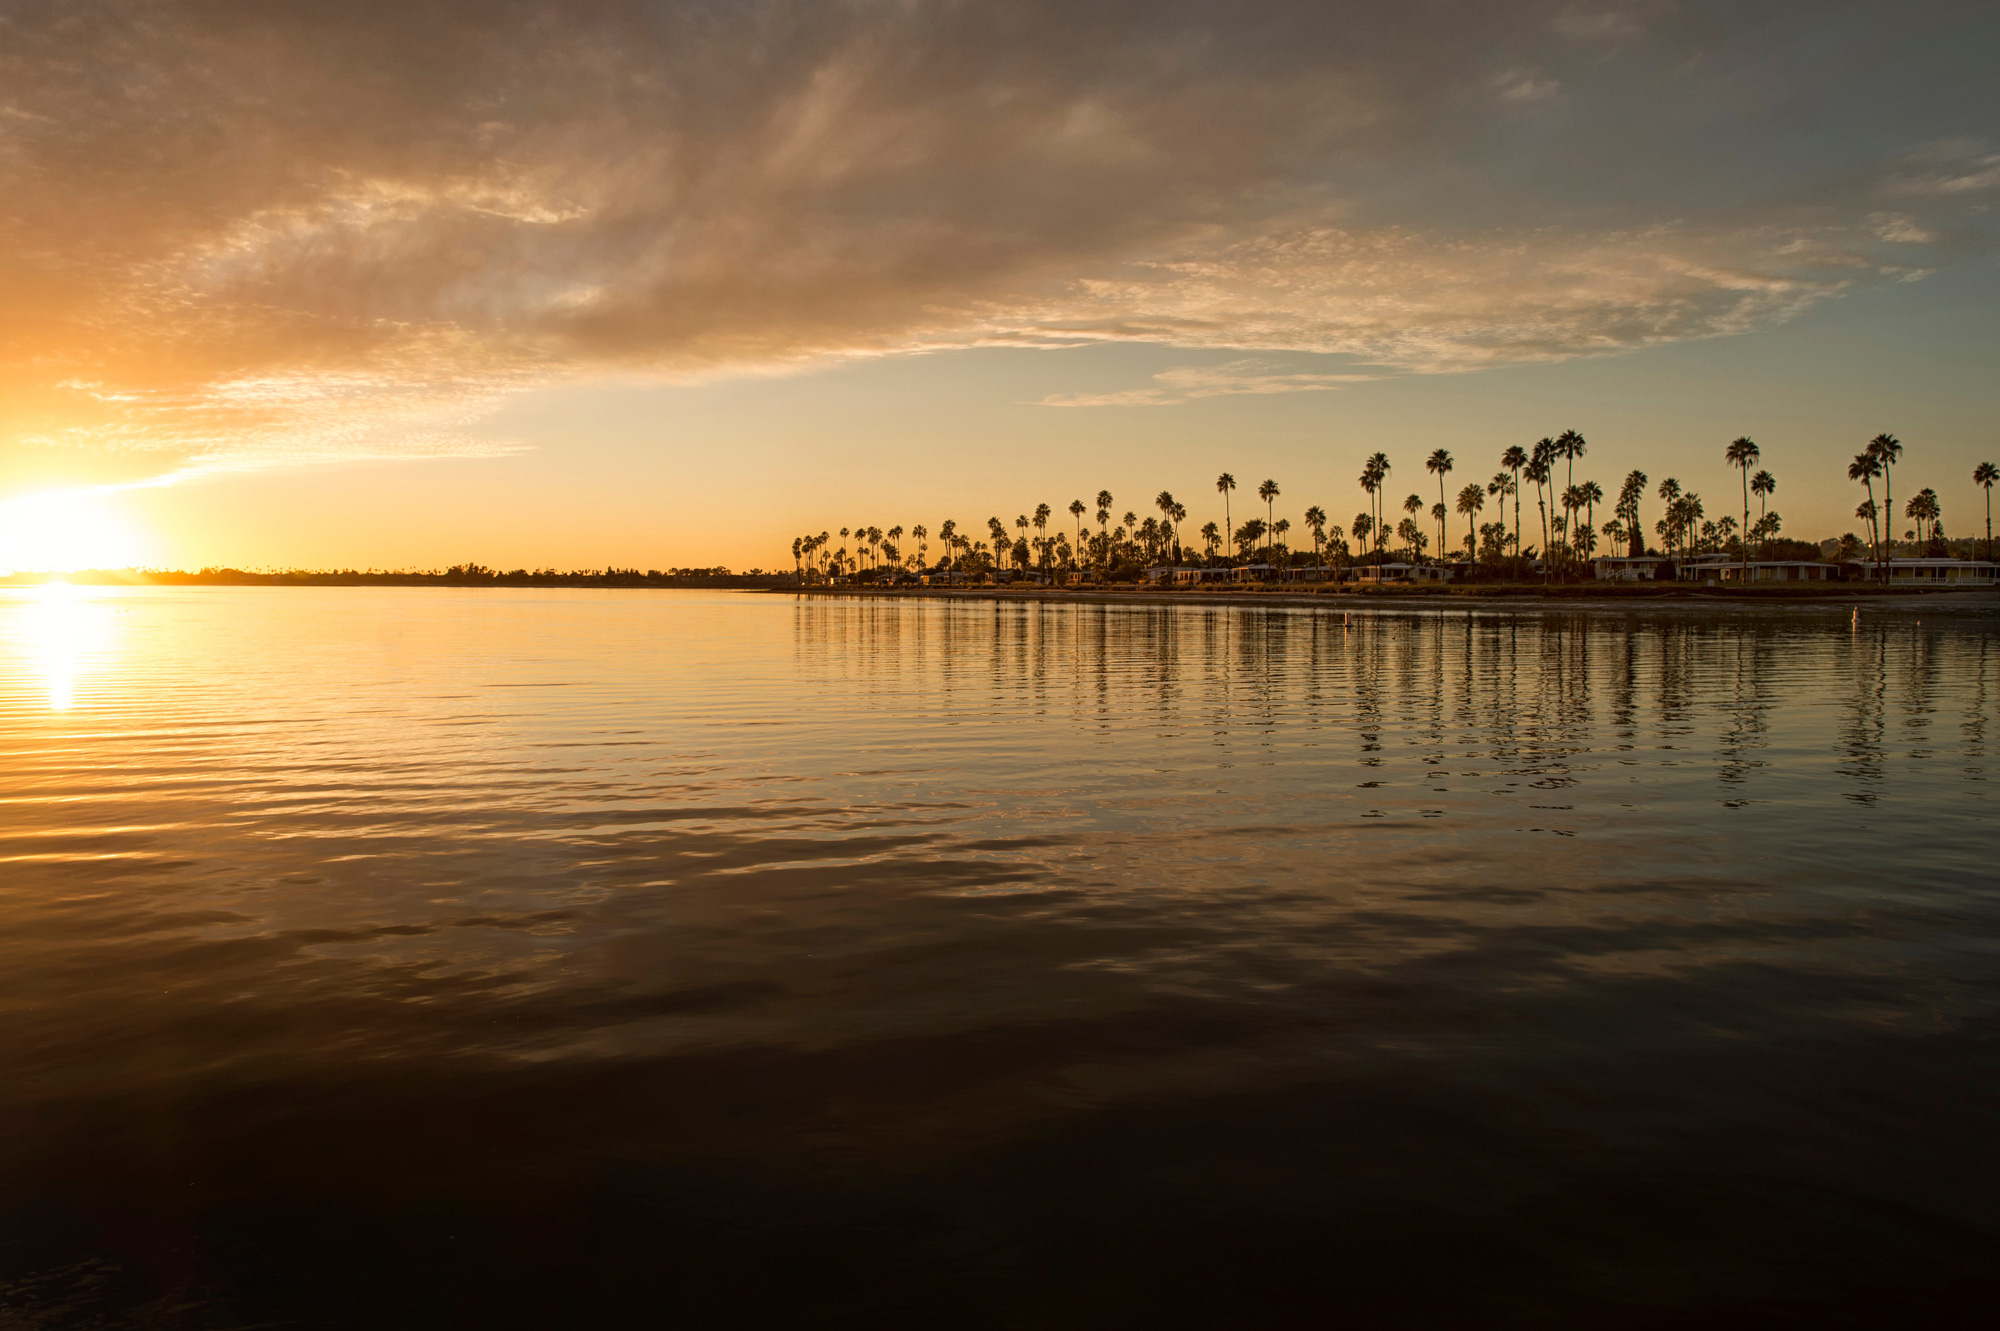
#14 – Mission Bay (Google Map It)
Mission Bay Park has some great places to take sunset photos. I always like to take sunset photos with some context and something in the foreground. This places provides a location where you can get nice palm trees, calm waters and even sailboats within the sunset picture. Its a great location.
#15 – Laurel Street Parking Garage San Diego (Google Map It)
The top deck of the Laurel Street Parking Garage has one of the most amazing views of large planes landing at San Diego International Airport. The parking structure is the very last building on the approach path before the big planes touch down just a couple of hundred feet away. The planes pass so close that the mist off the engines will seemingly trickle down right on top of you. You get an extraordinary perspective on the landing planes.
The only catch is that the parking structure does not allow photos on the roof so if you are going up there for that purpose they probably wont like that. There is a sign as you enter that says it. So you either need to be parking there or going on a trip. In any case if you find that you can’t get up there than the surrounding area is still a great place to capture pictures of planes coming in very close. San Diego airport is one of the only major airports in the US that are actually located right smack in the middle of the city.

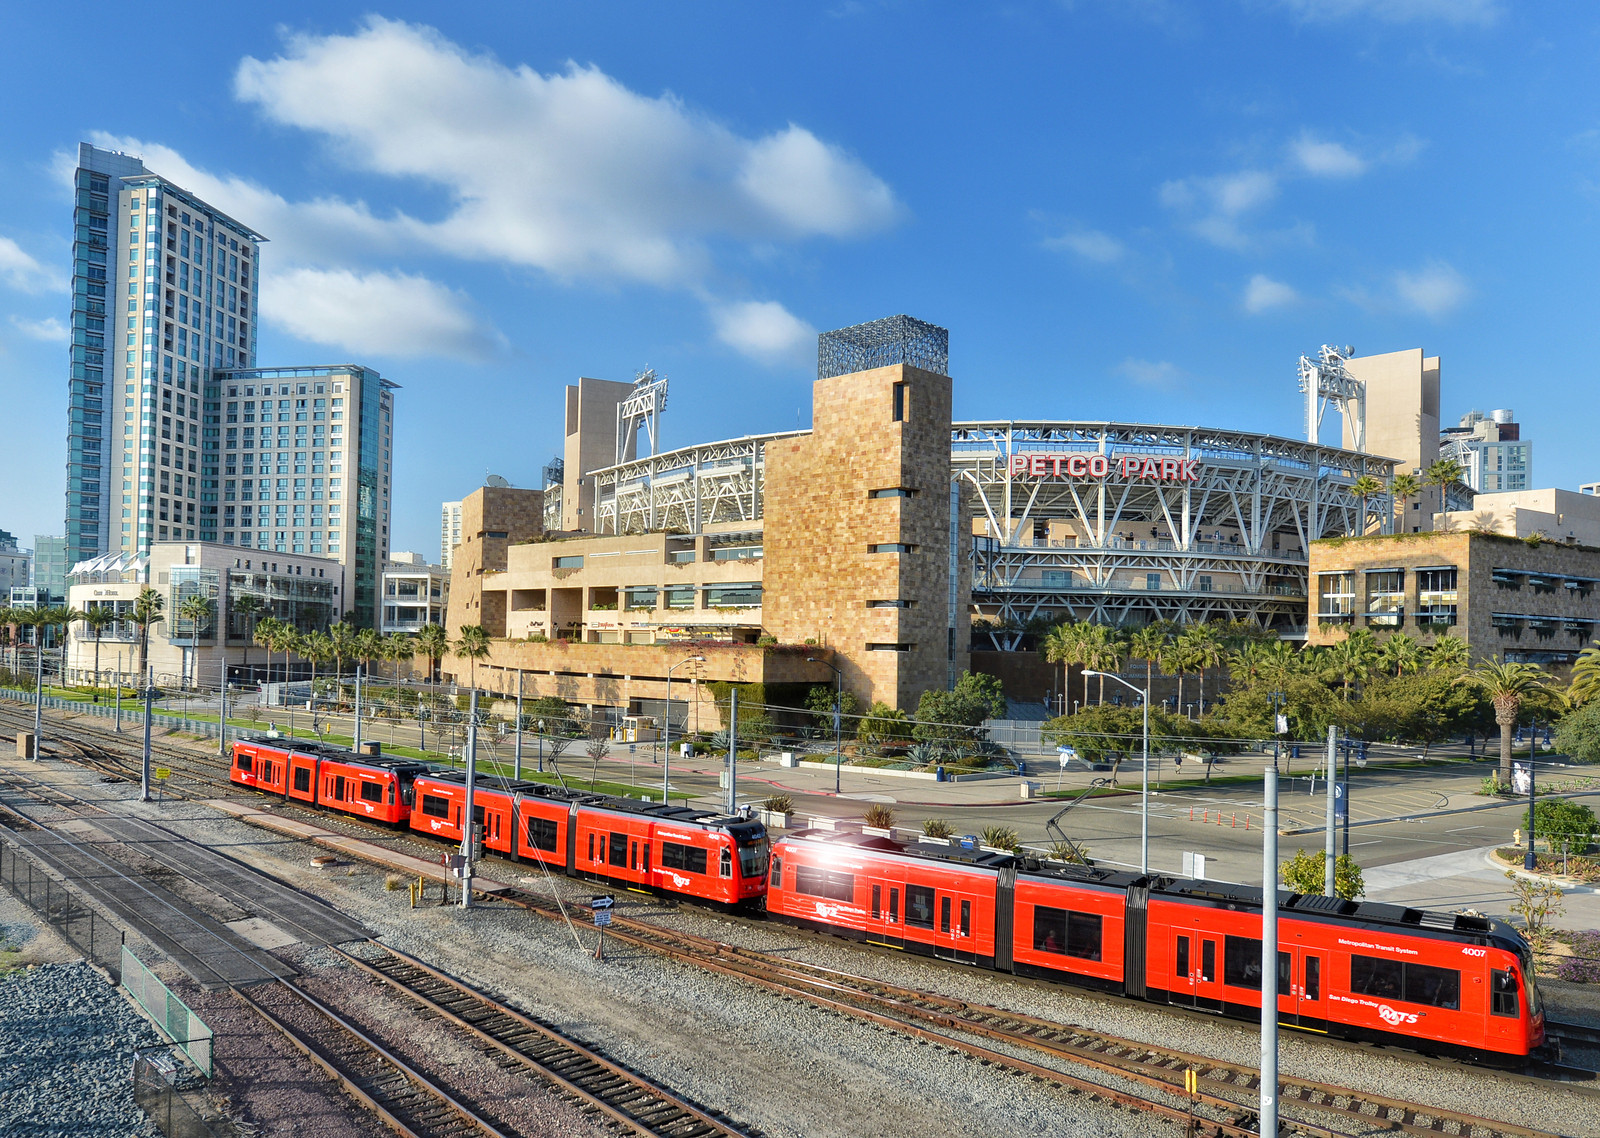
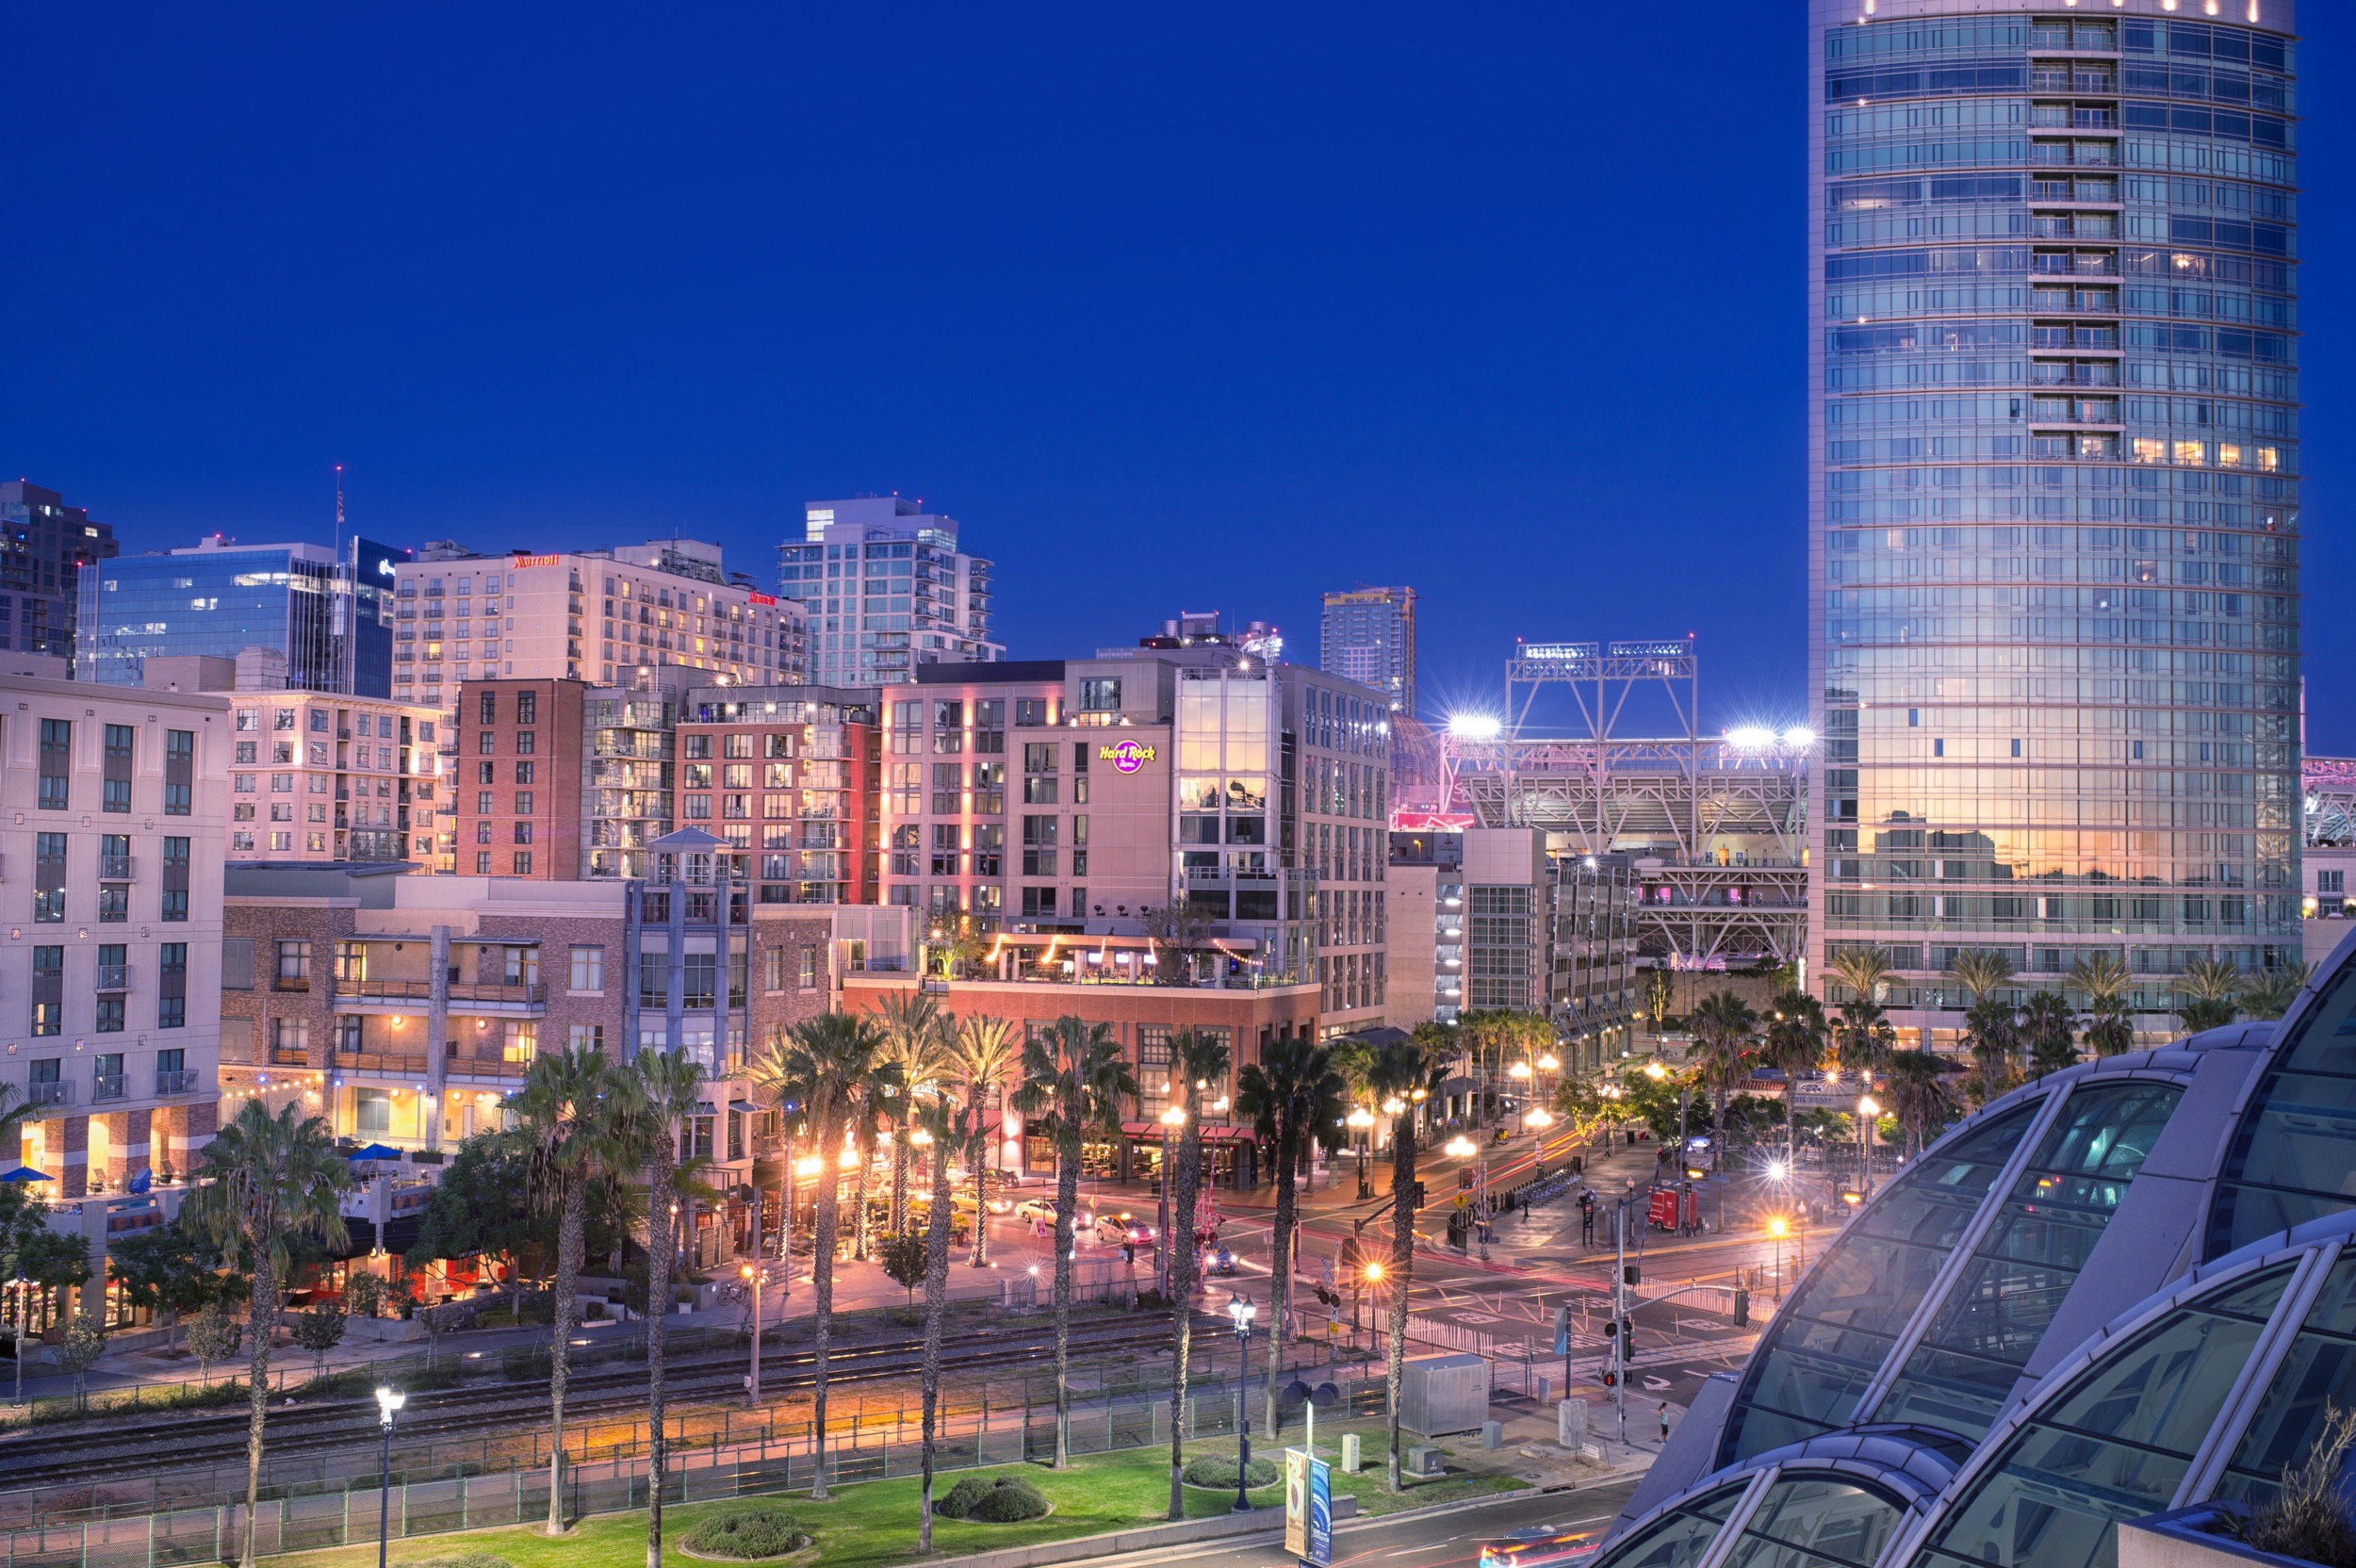
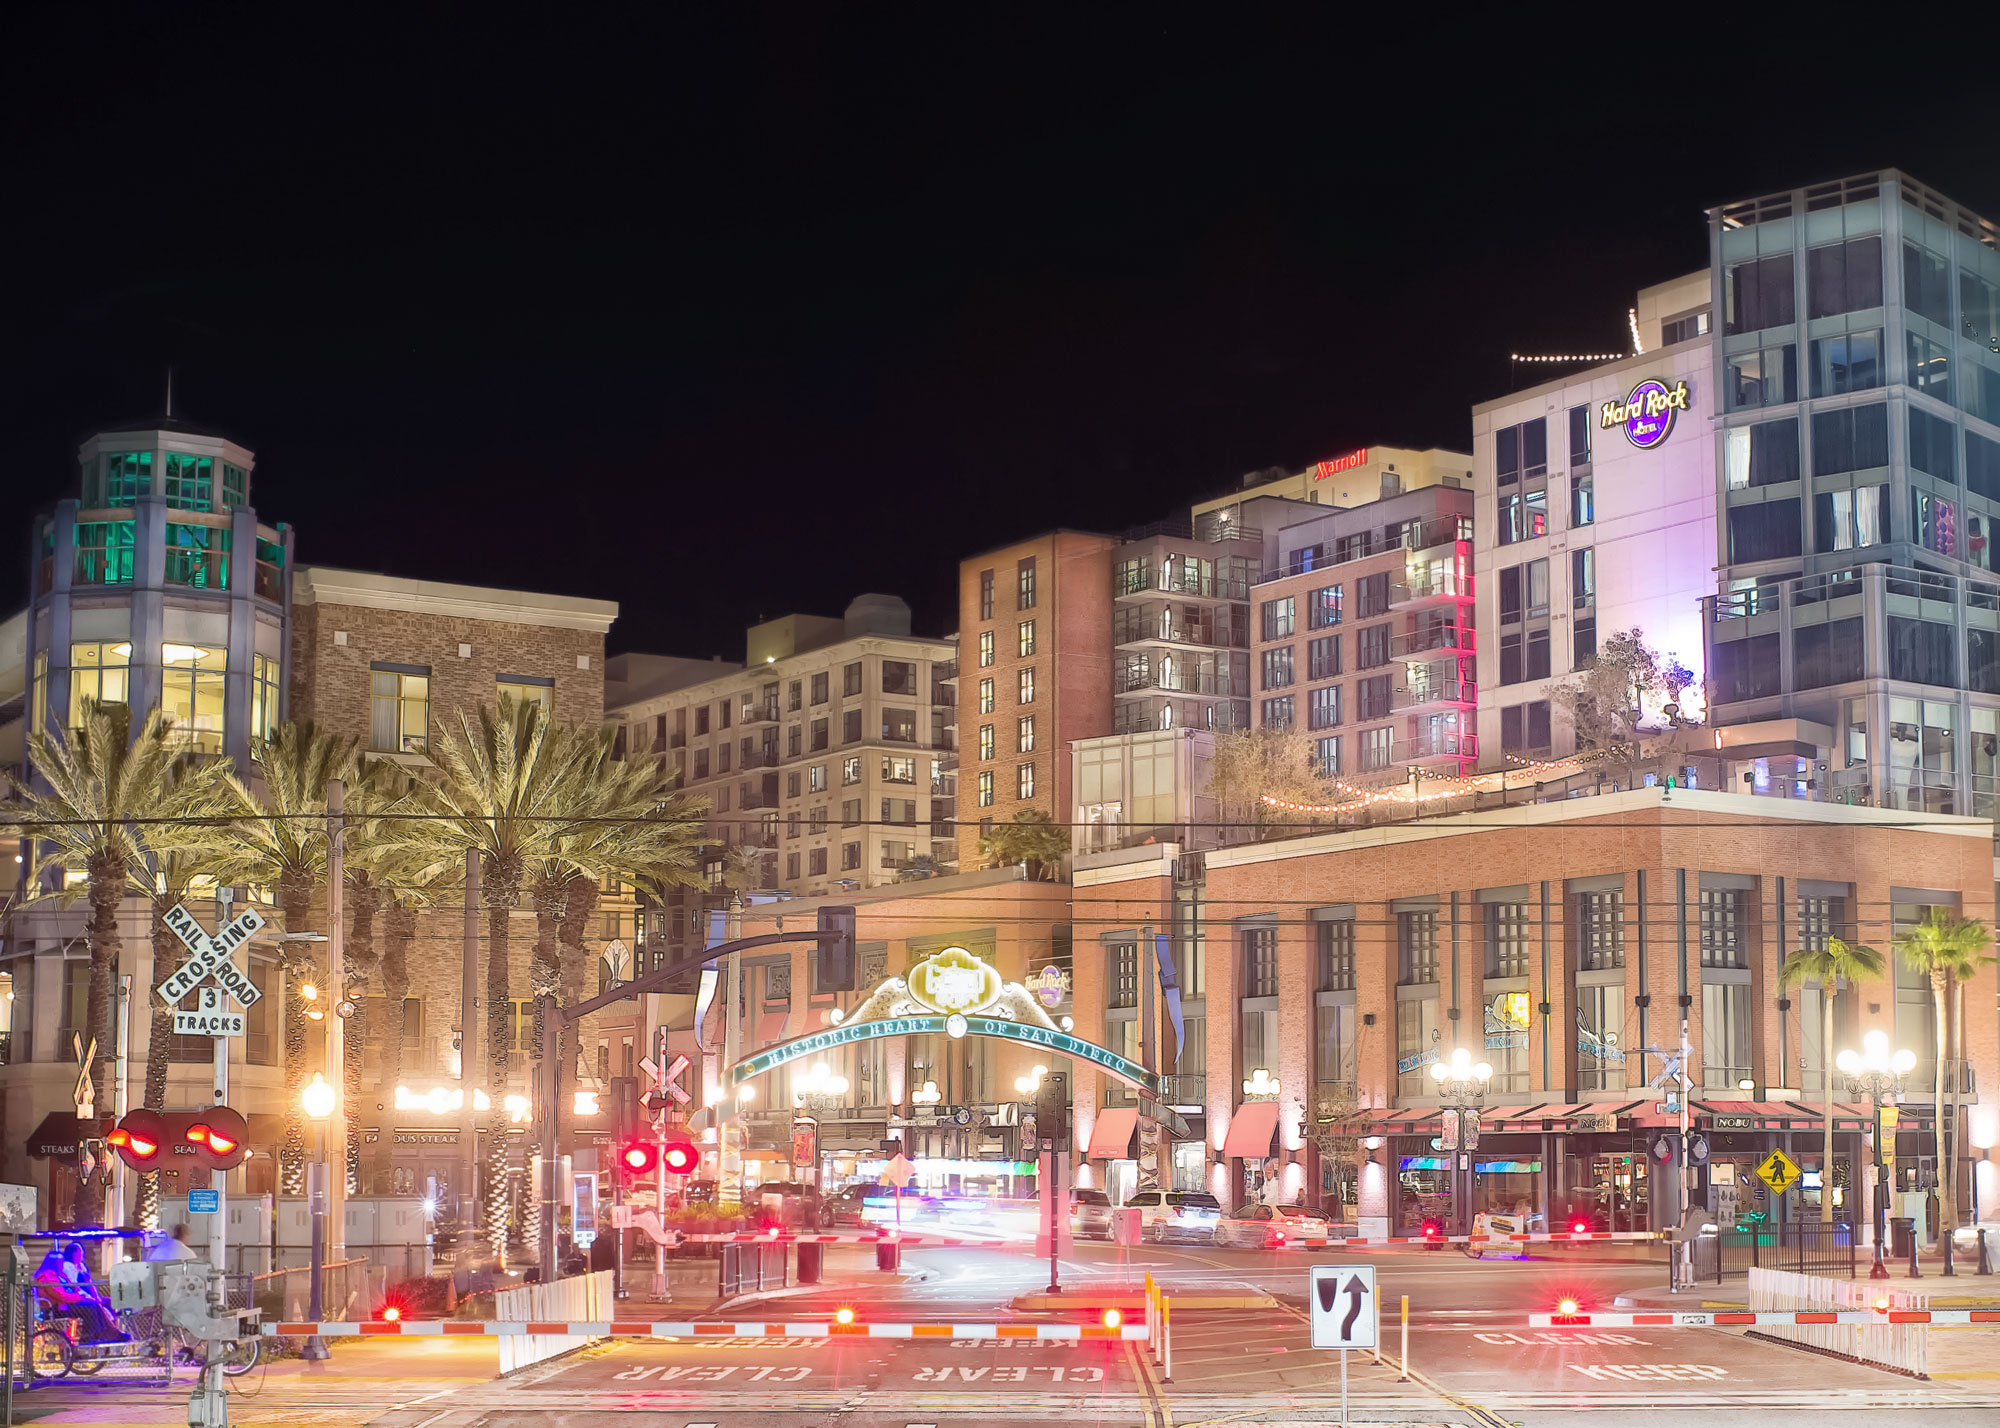
#16 Petco Park in Downtown (Google Map it)
Petco Park is right next to the Convention Center and it is a great place to get wide angle shots of the city, but also to capture the trolley line that runs right beneath the footbridge. If you love train watching, this is a great place to visit. If you are staying at any of the hotels downtown you are within minutes of the picturesque sights of the Petco area.
# 17 The Dr Seuss Tree in La Jolla (Google Map It)
The tree can be viewed in the park across from the La Jolla Cove Suites. If you can get on the roof of the hotel you can get some great panoramas too.
The tree can be viewed in the park across from the La Jolla Cove Suites. If you can get on the roof of the hotel you can get some great panoramas too.

#18 North Beach (Google Map It)

#19 San Diego Skyline from Point Loma (Google Map It)
This is a hidden place not many people know about. You will need to park your car and then look for the small hidden set of stair cases that are between two houses. From there you can setup and get a great view of the whole of downtown. Bring a zoom lens because that will give you the best result.
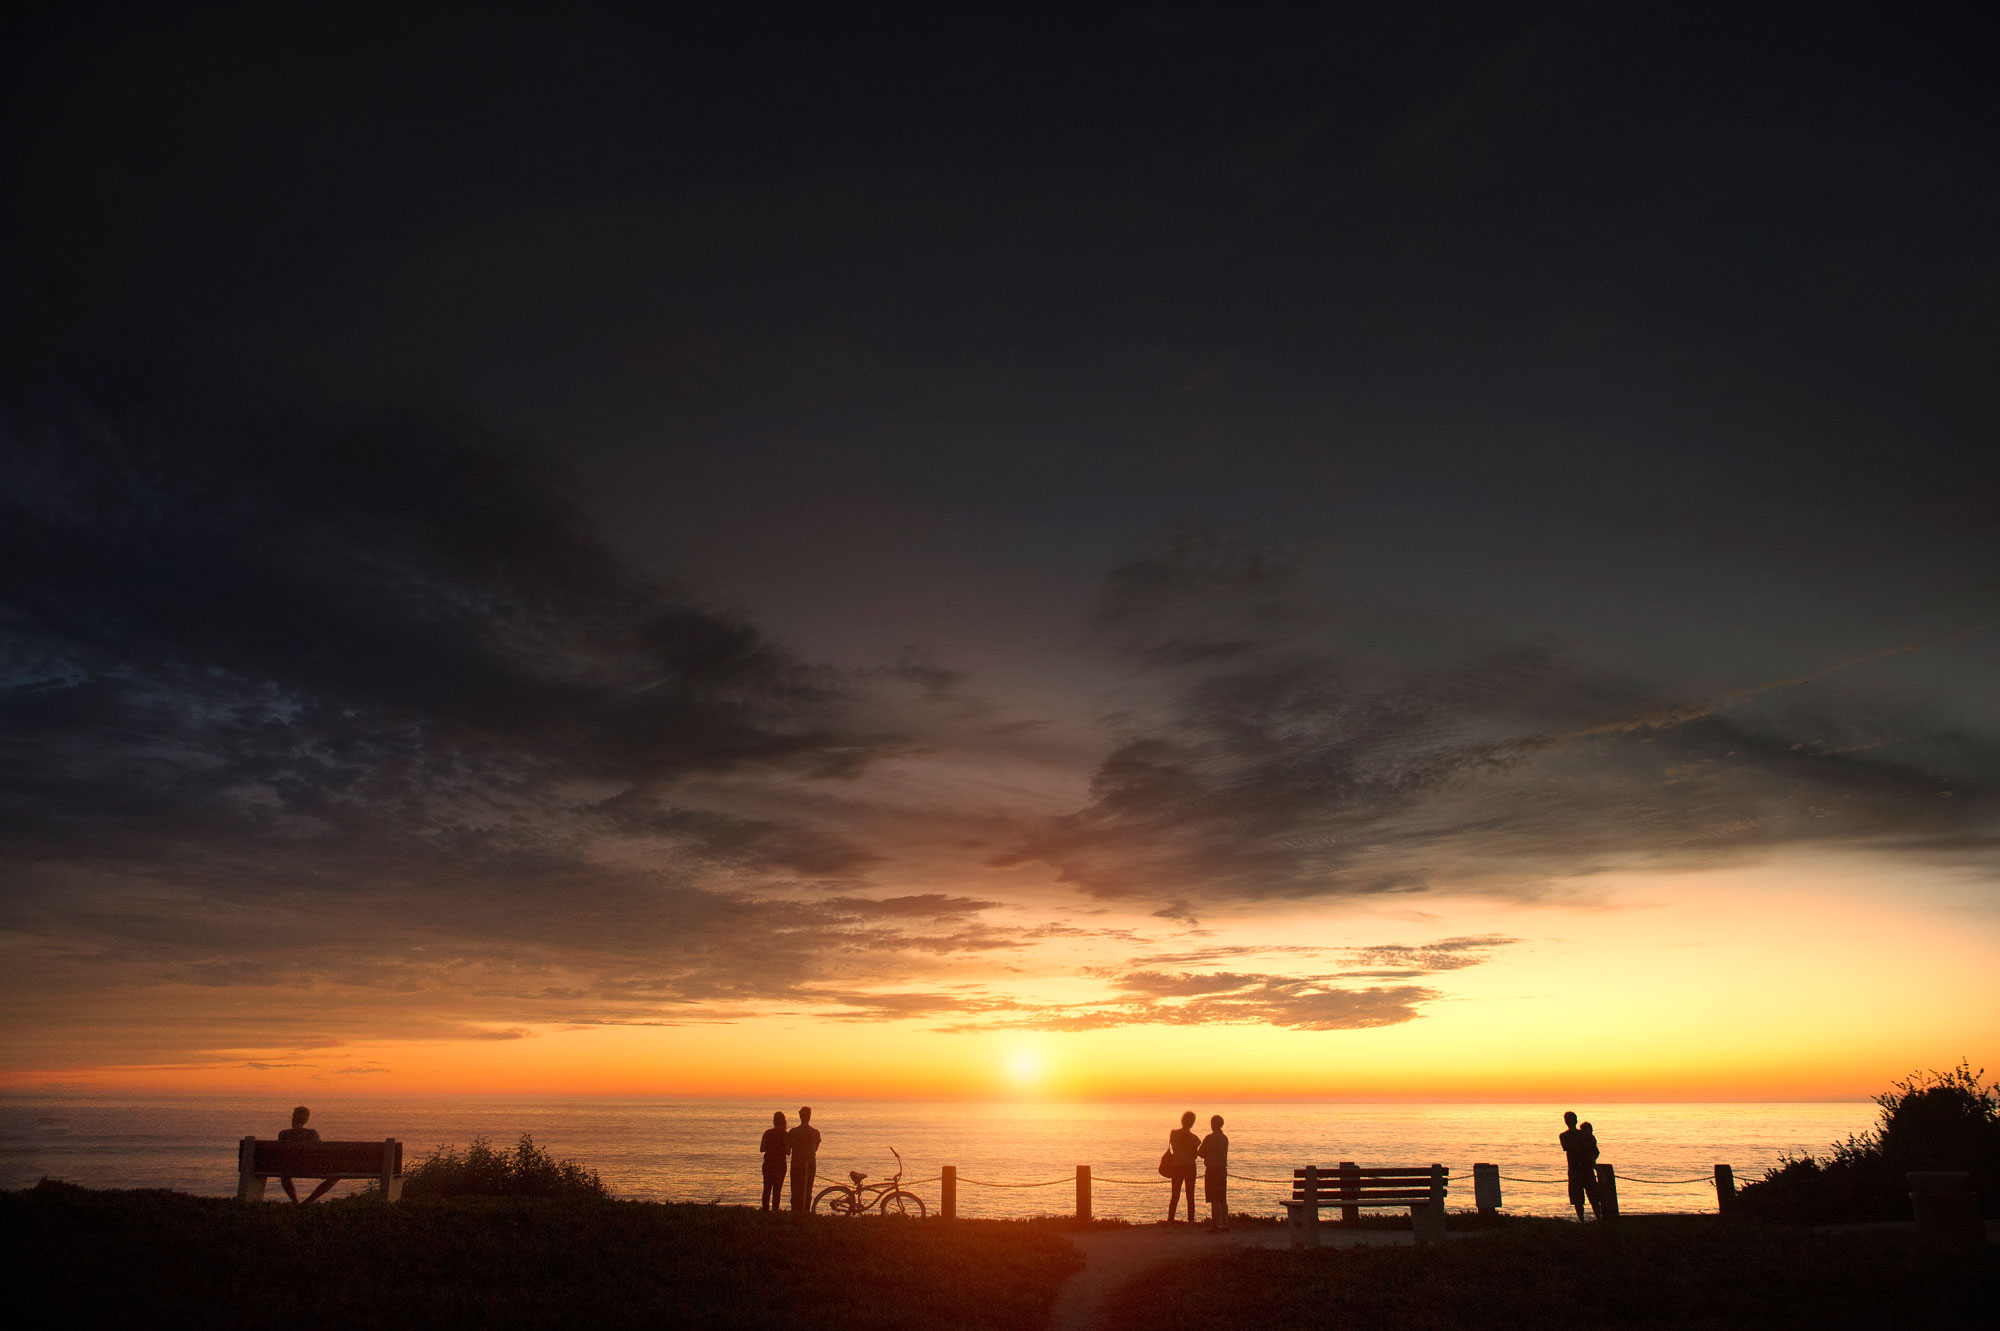
#20 Mount Soledad Cross La Jolla (Google Map It)
This can be a beautiful place to see the entire skyline of San Diego from way up high.

#21 Del Mar 4th Street Beach (Google Map It)
G0 to the end of 4th Beach in Del Mar. Take a walk along the cliffs, it is extraordinary at sunset.
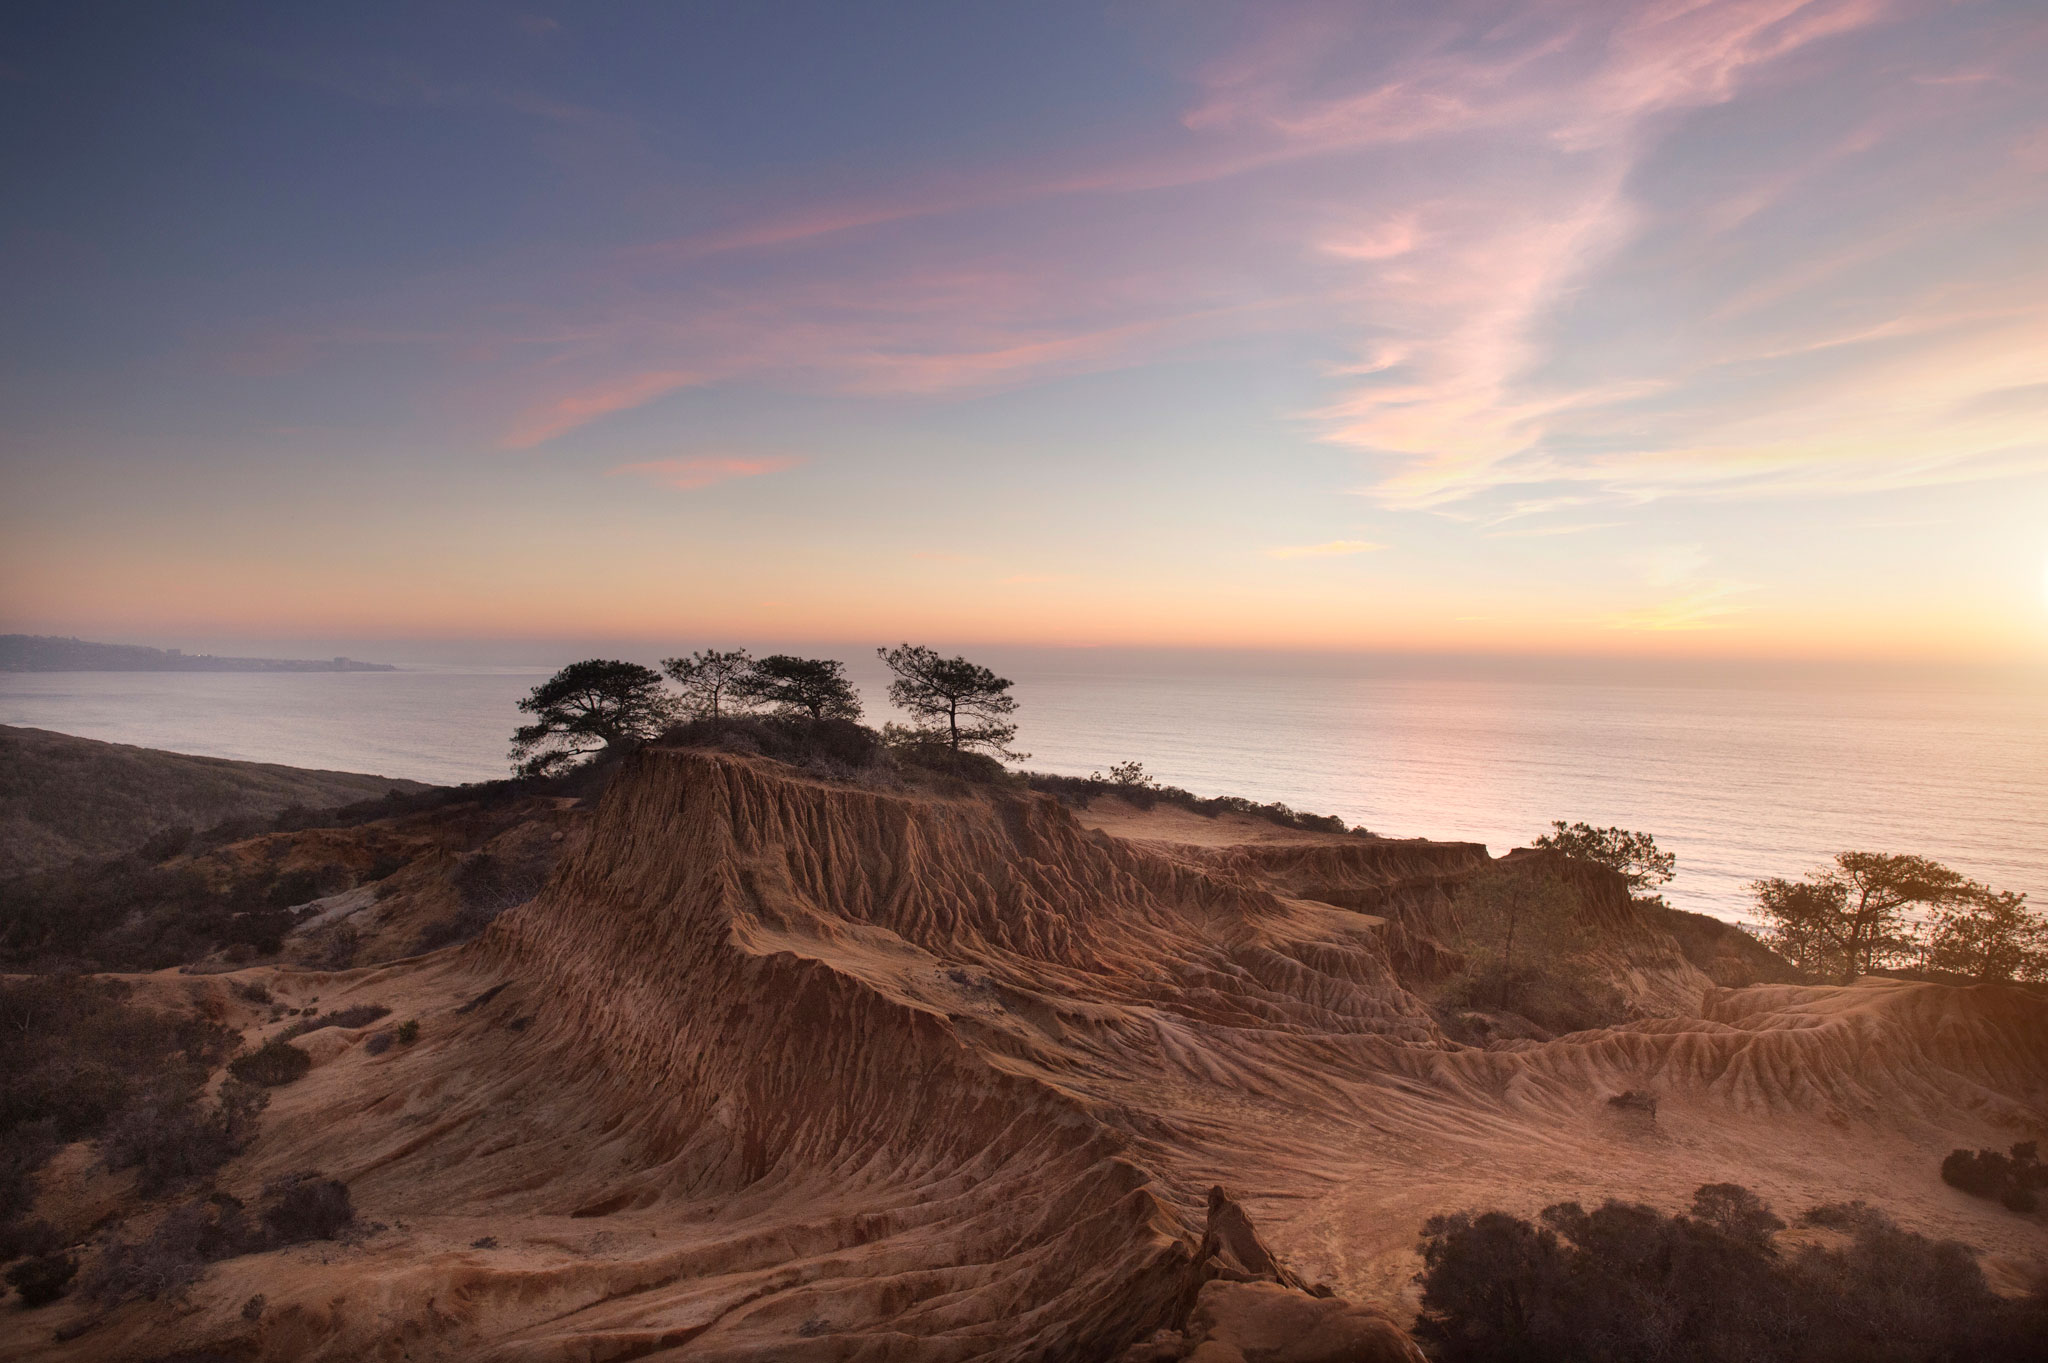
# 22 Broken Hill in Torrey Pines (Google Map It)
This place is pretty amazing if your looking for a nice location. It will take you a 15 minute hike to get there but it is worth it. Park at Torrey Pines Golf Course and walk the path to Broken Hill Trail in Torrey Pines (South Trail)
#23 Marian Bear Park (Google Map It)
This is a good place to take engagement photos or do a nature walk to take pictures. A very wooded and secluded area right off the 52 freeway.
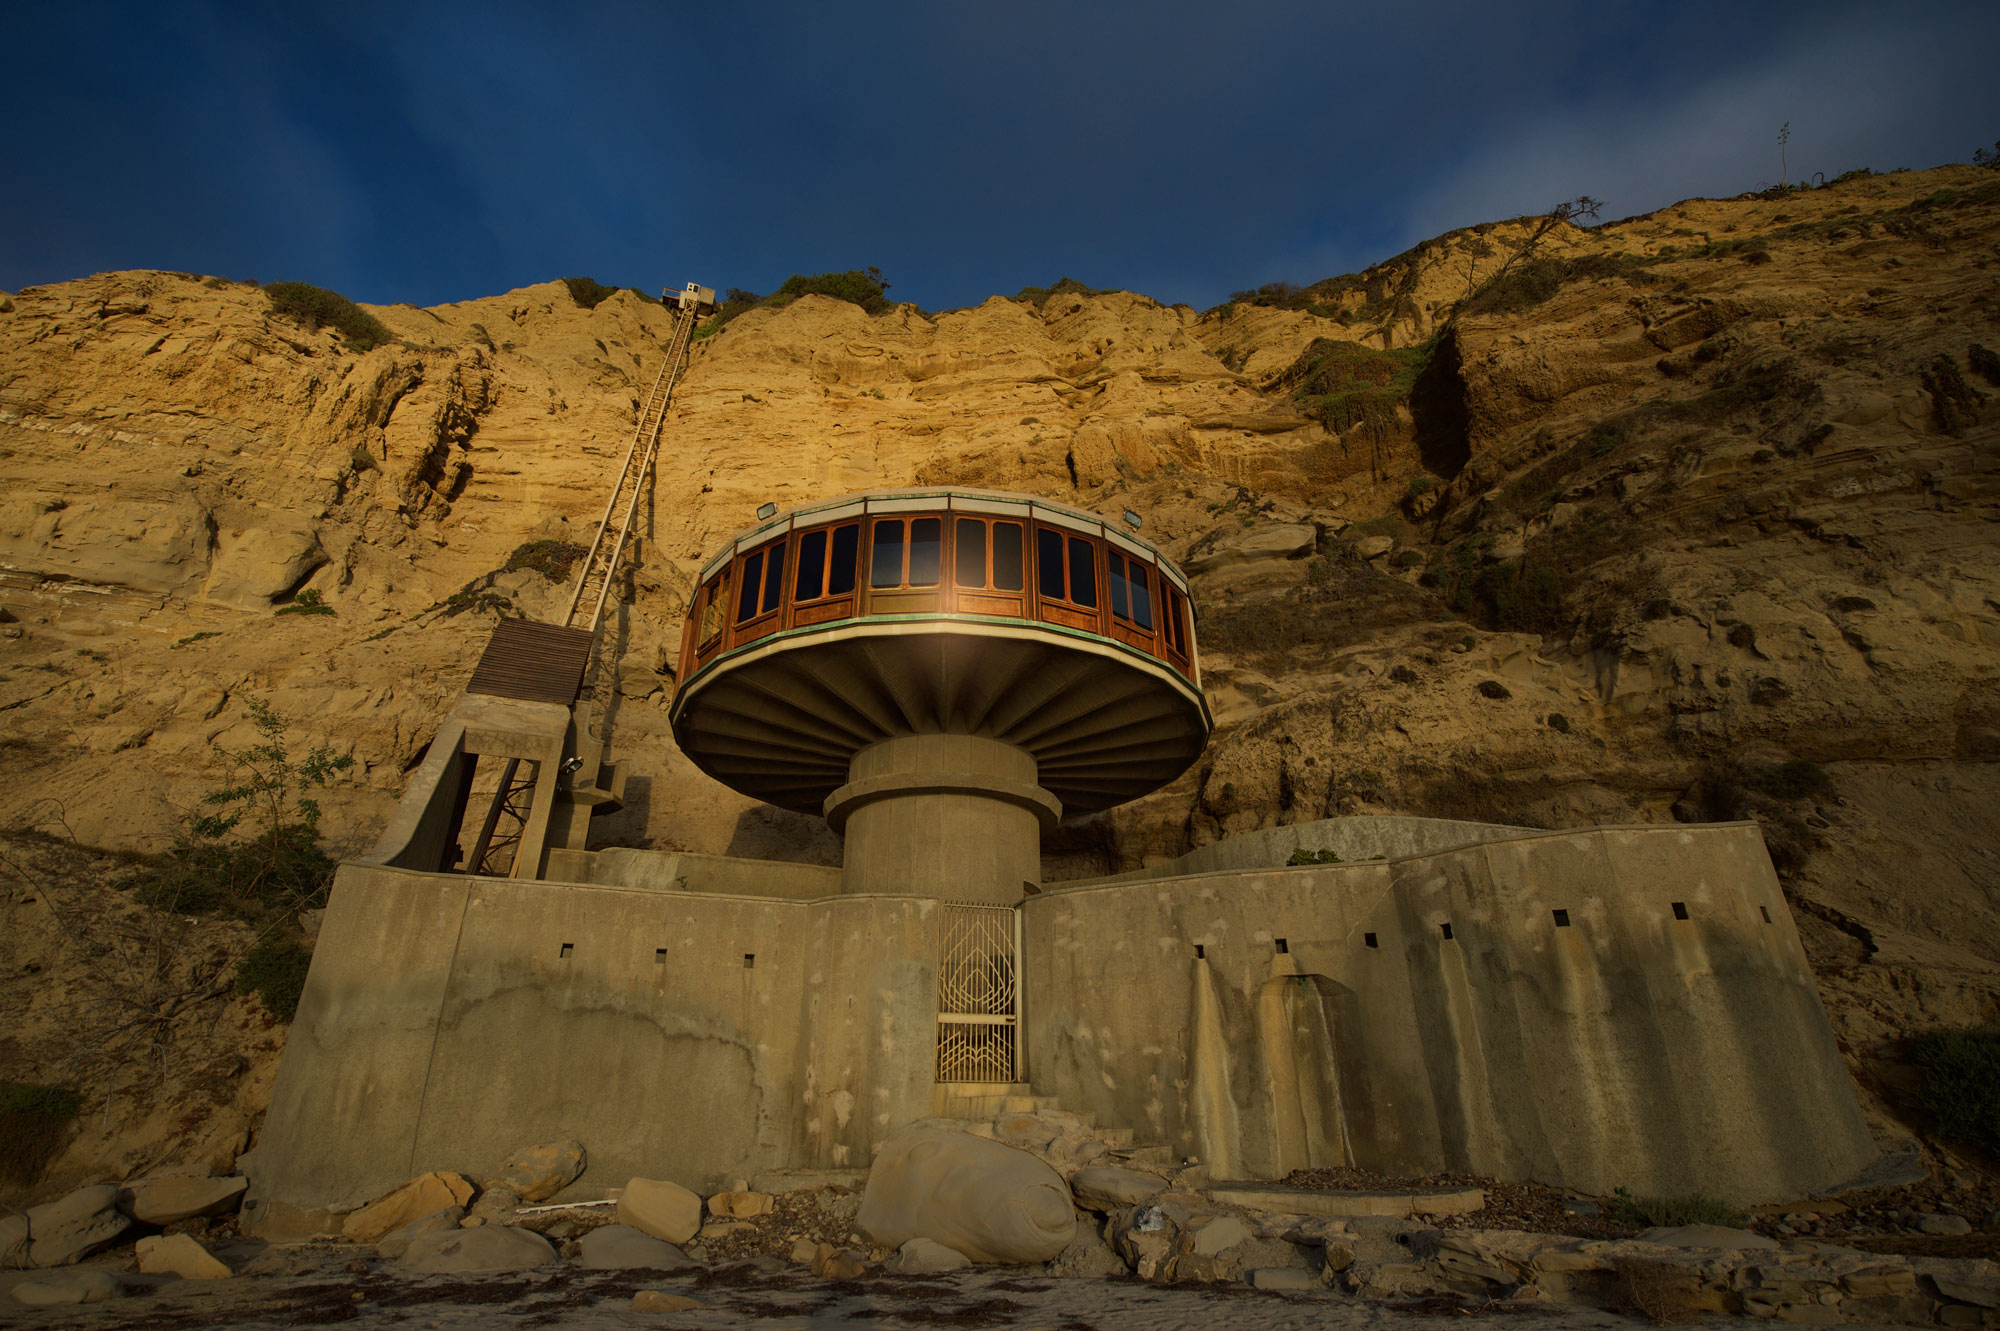
#24 The Mushroom House La Jolla (Google Map it)
There are 2 ways to get here. Walk along the coast up from Scripps Pier (about 10 minutes), or take the longer walk down the cliffs from the Glider Port through Blacks Beach
#25 Gas Lamp District from Convention Center (Google Map It)
This is a nice cityscape of Downtown San Diego and easy to get to. Go to the central steps of the Convention Center and go to the top of the steps and you will see a tram stop. That is the best vantage point for this photo.
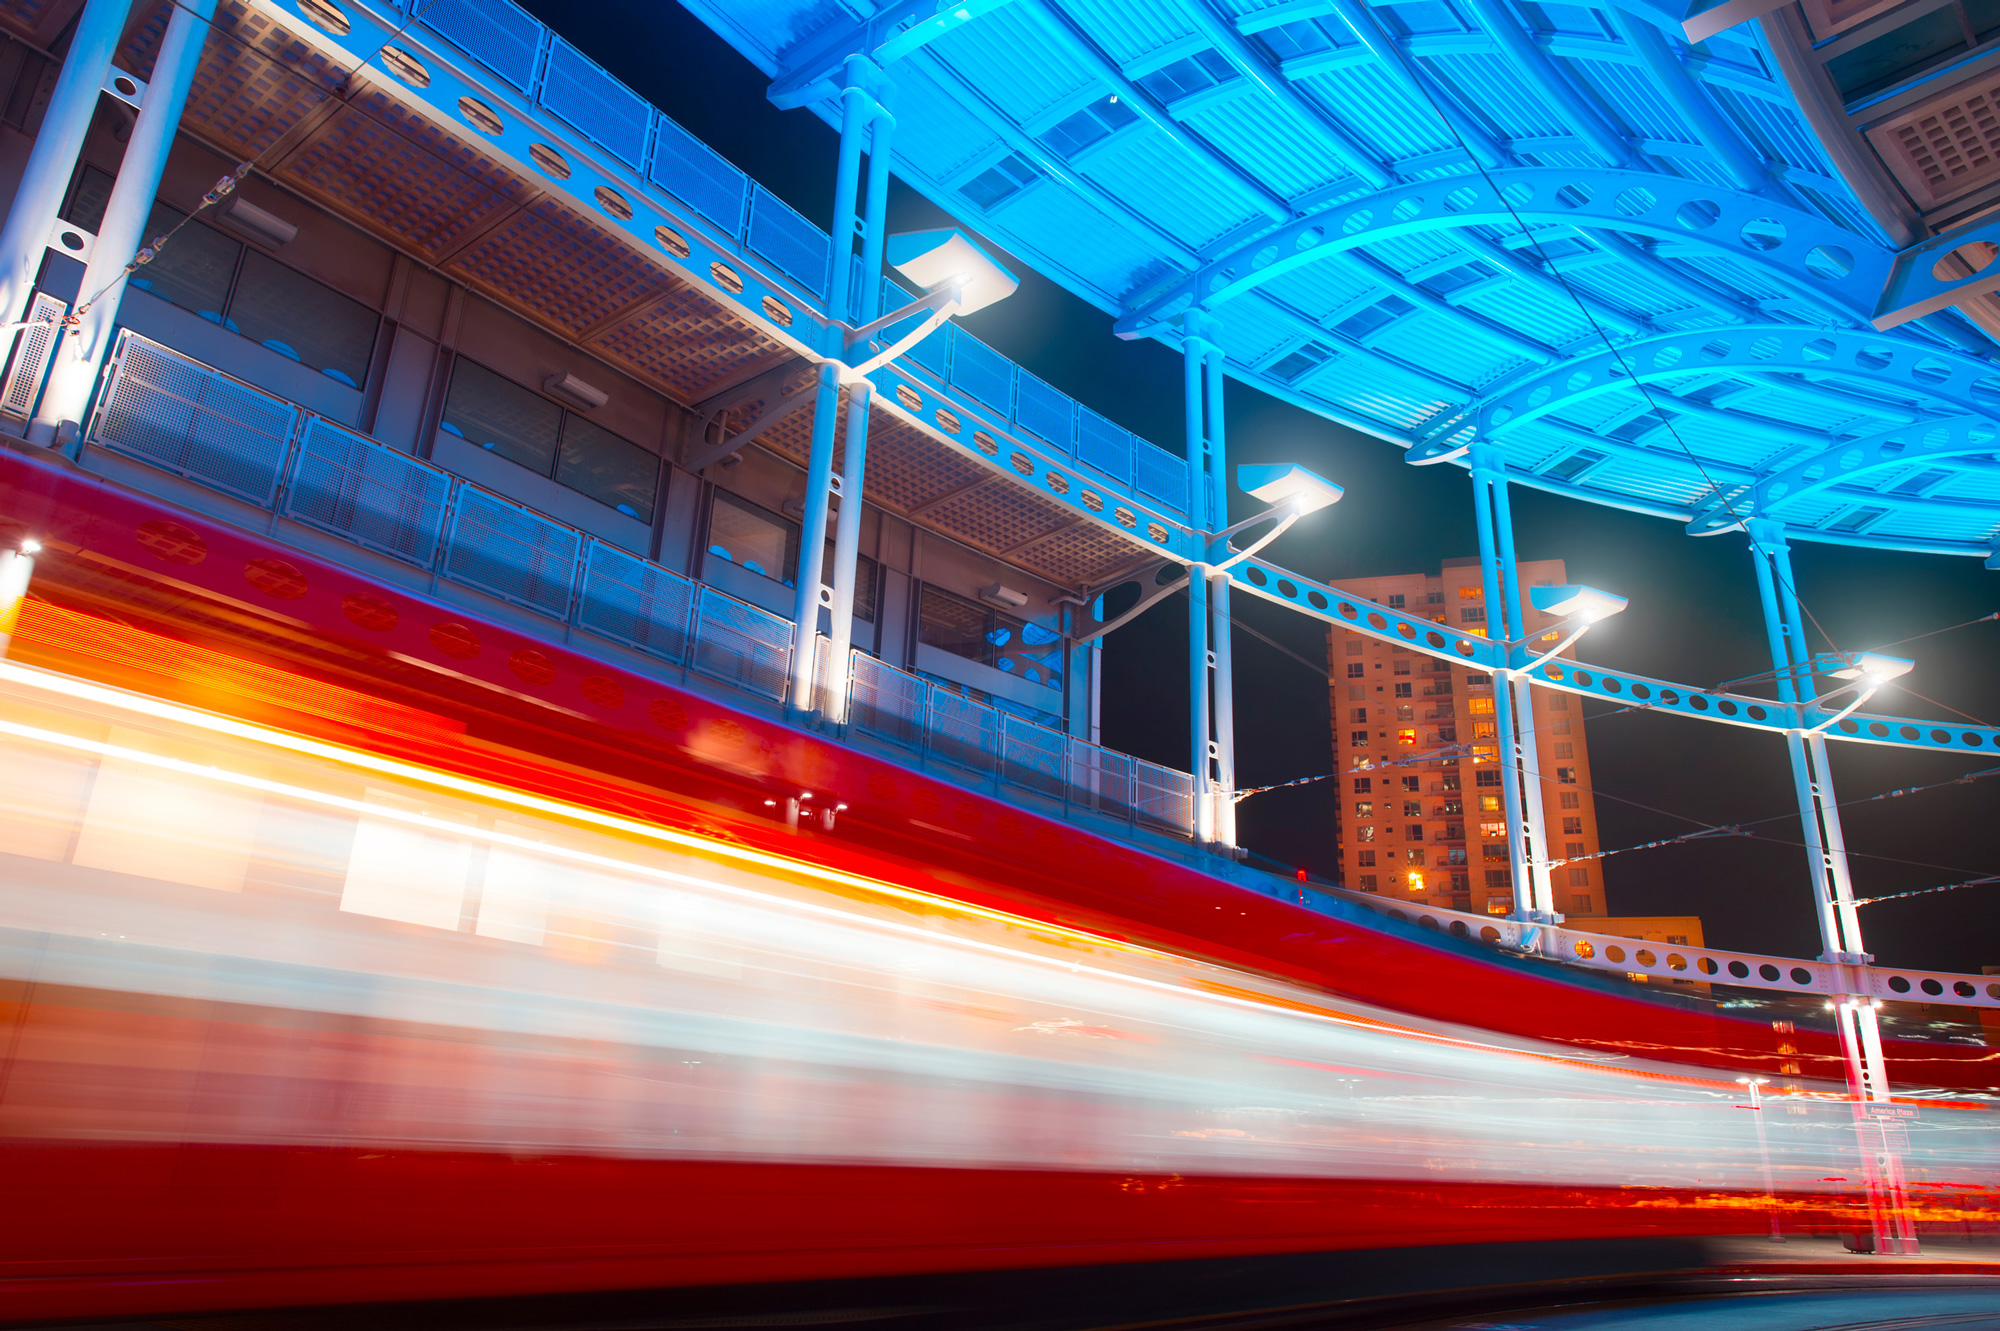
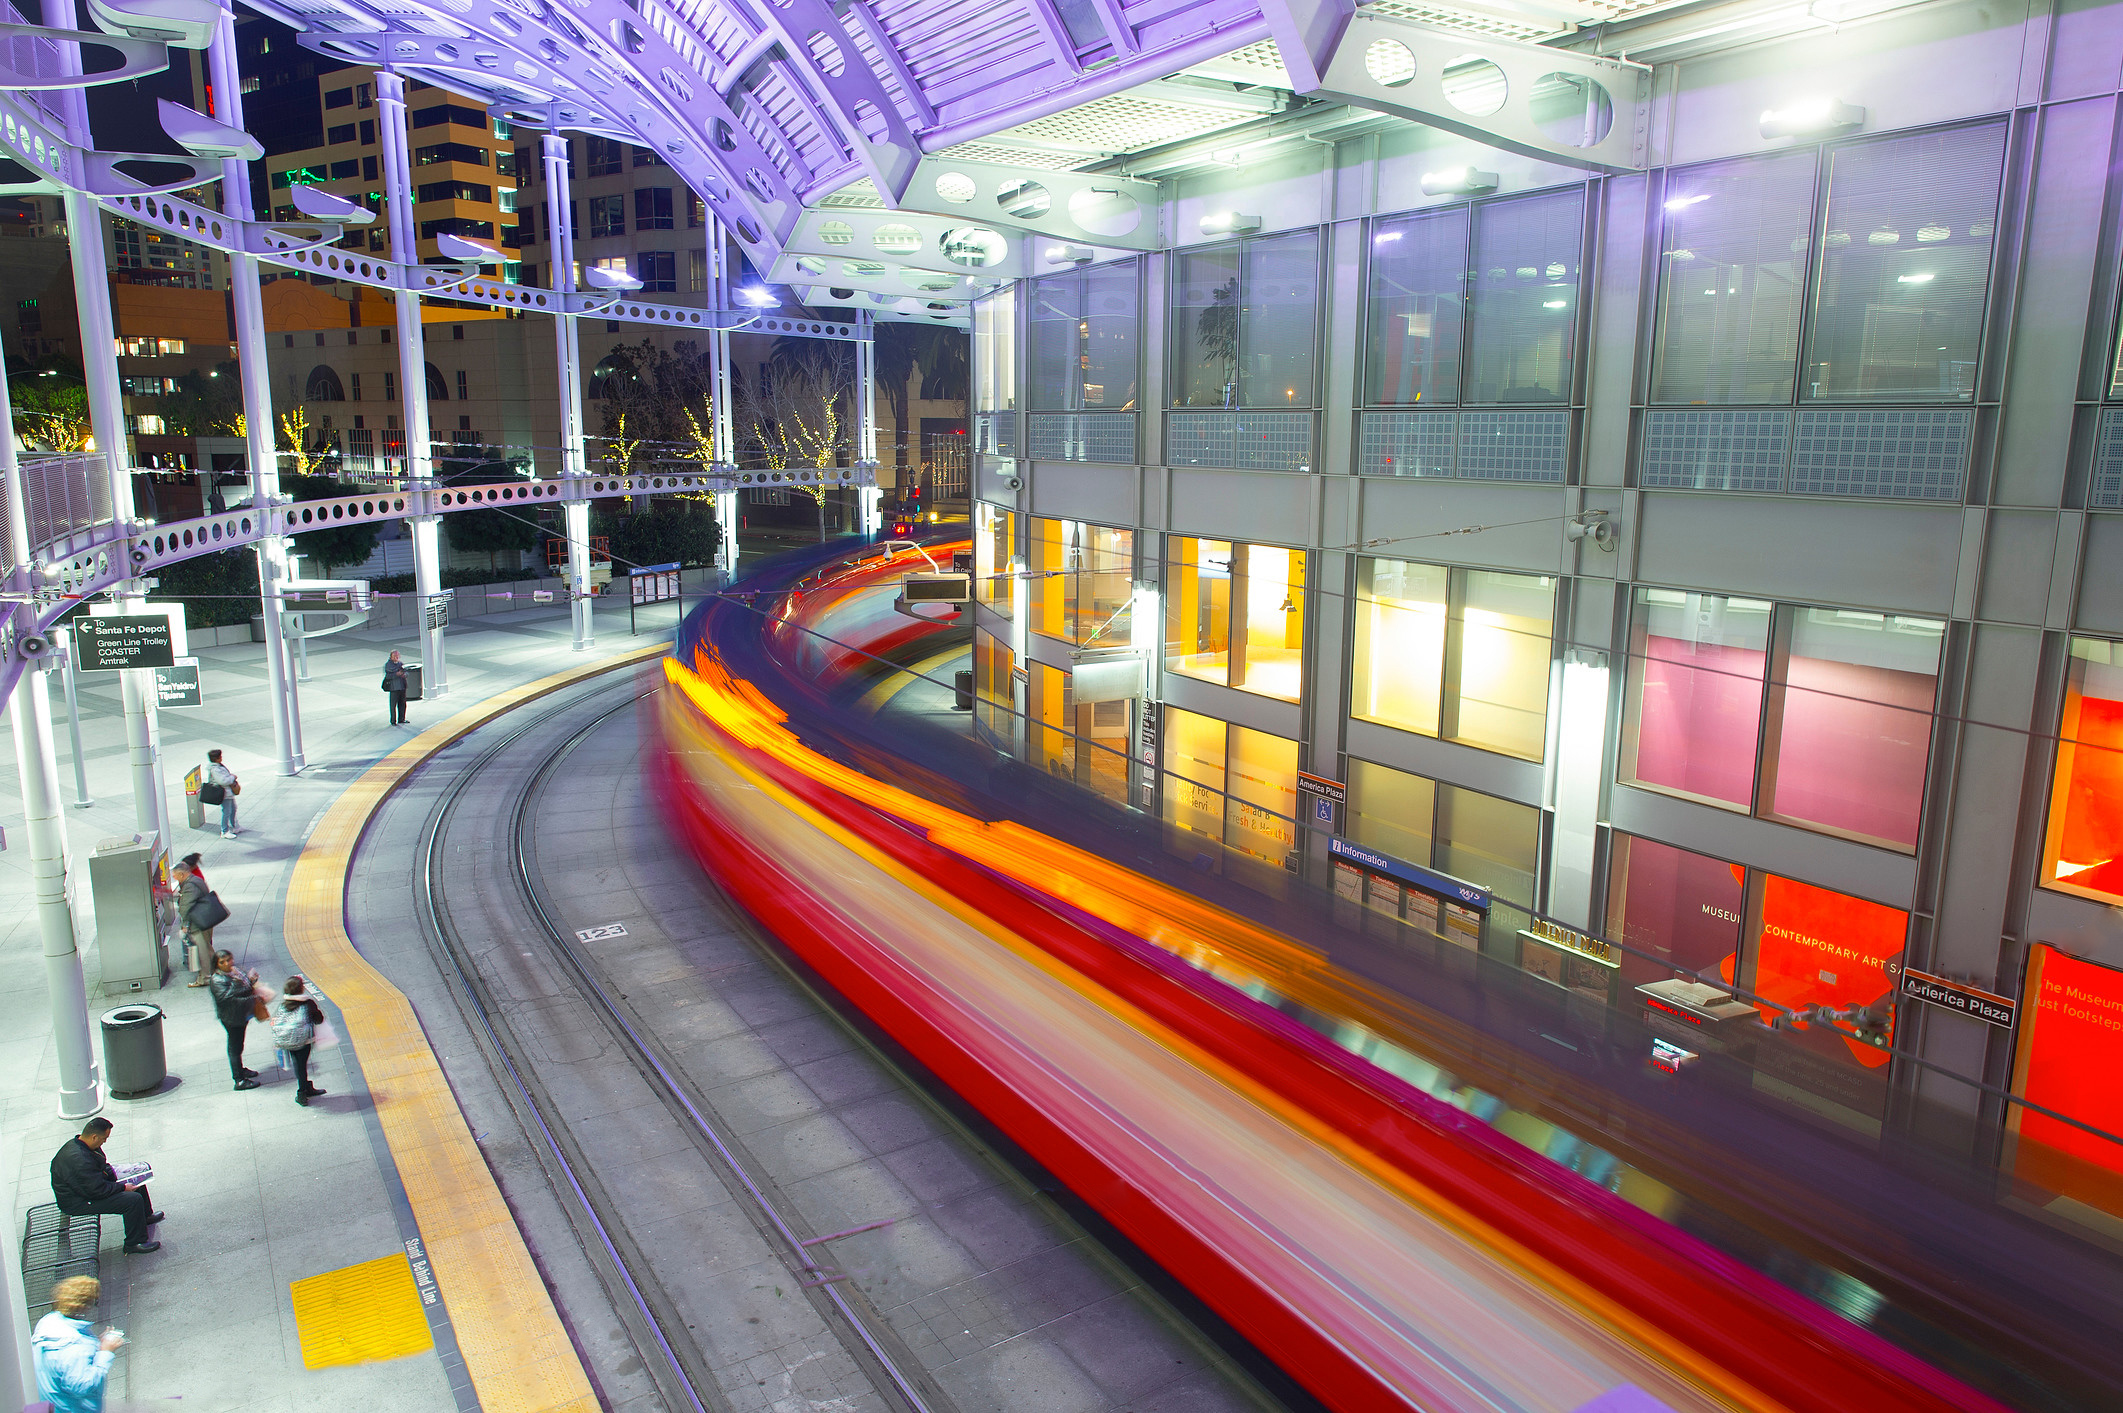
#26 American Plaza Trolley Station (Google Map It)
This is a very cool trolley station located in downtown San Diego. It is right near the Santa Fe Train Depot.
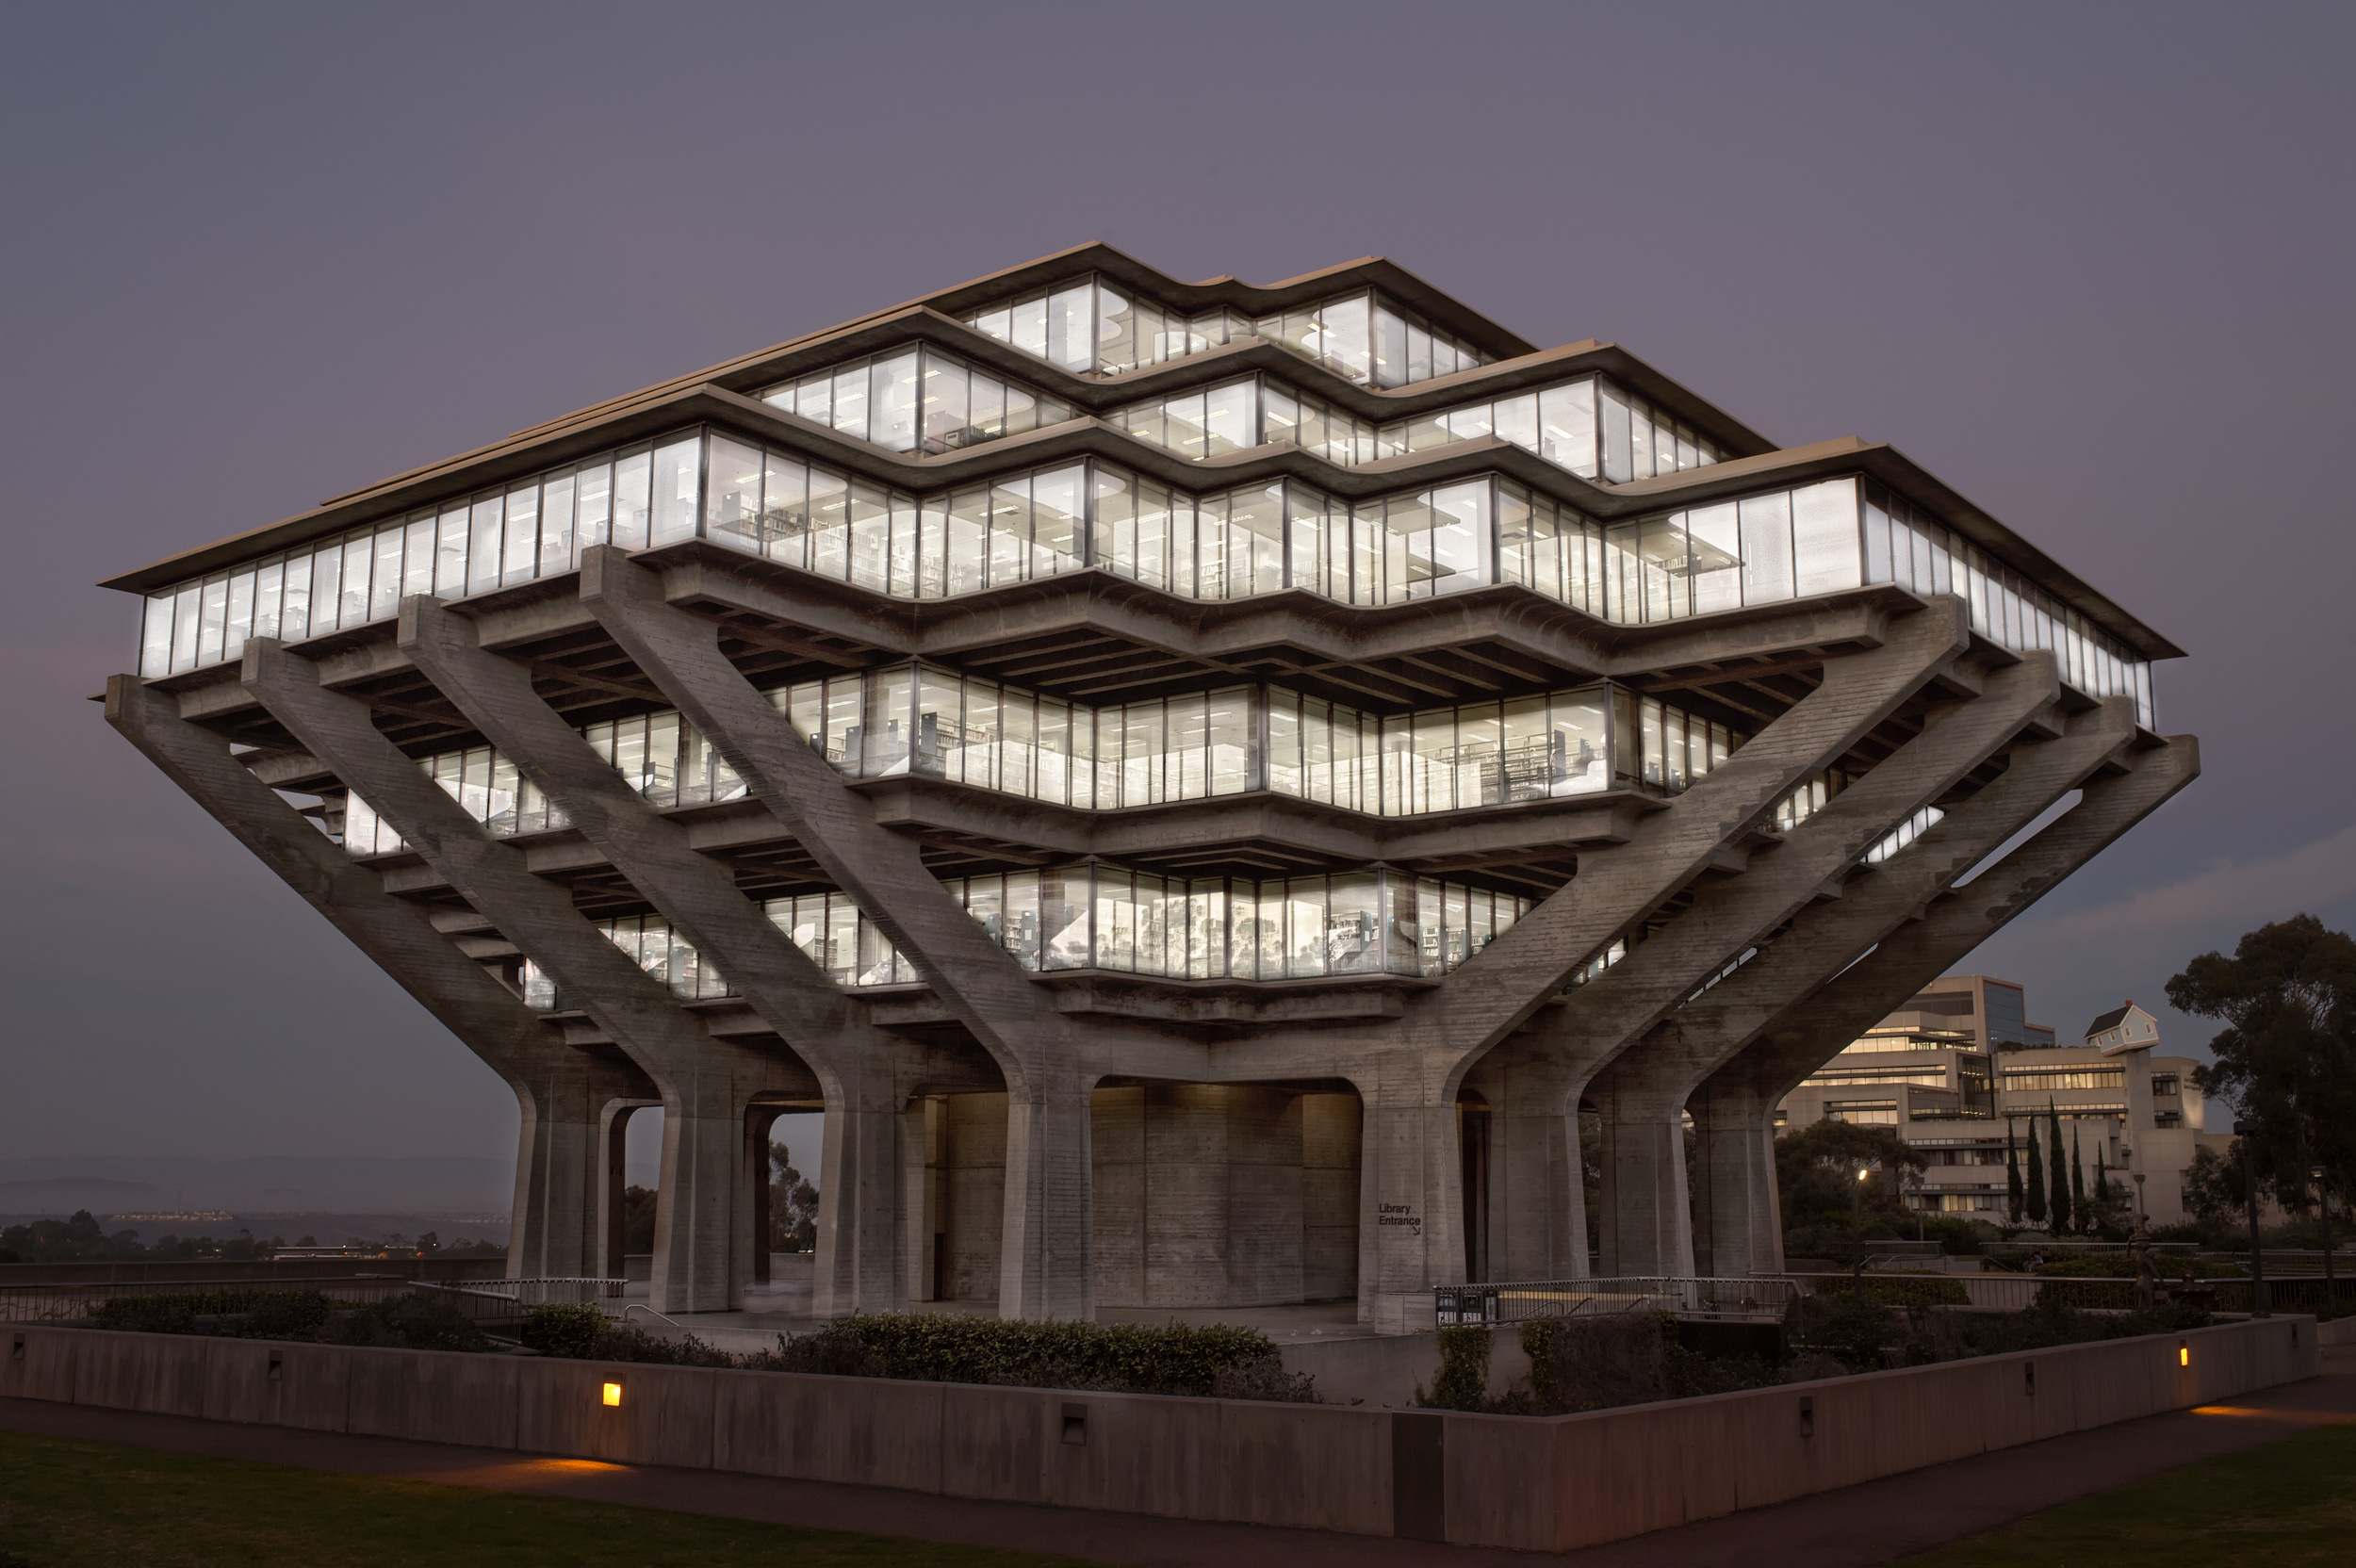
#27 – Geisel Library (Google Map it)
This is a beautiful library located on the campus of UCSD. For the best angles, go to the corners of the building to capture the whole architecture. This place reminds me of a big diamond ring.
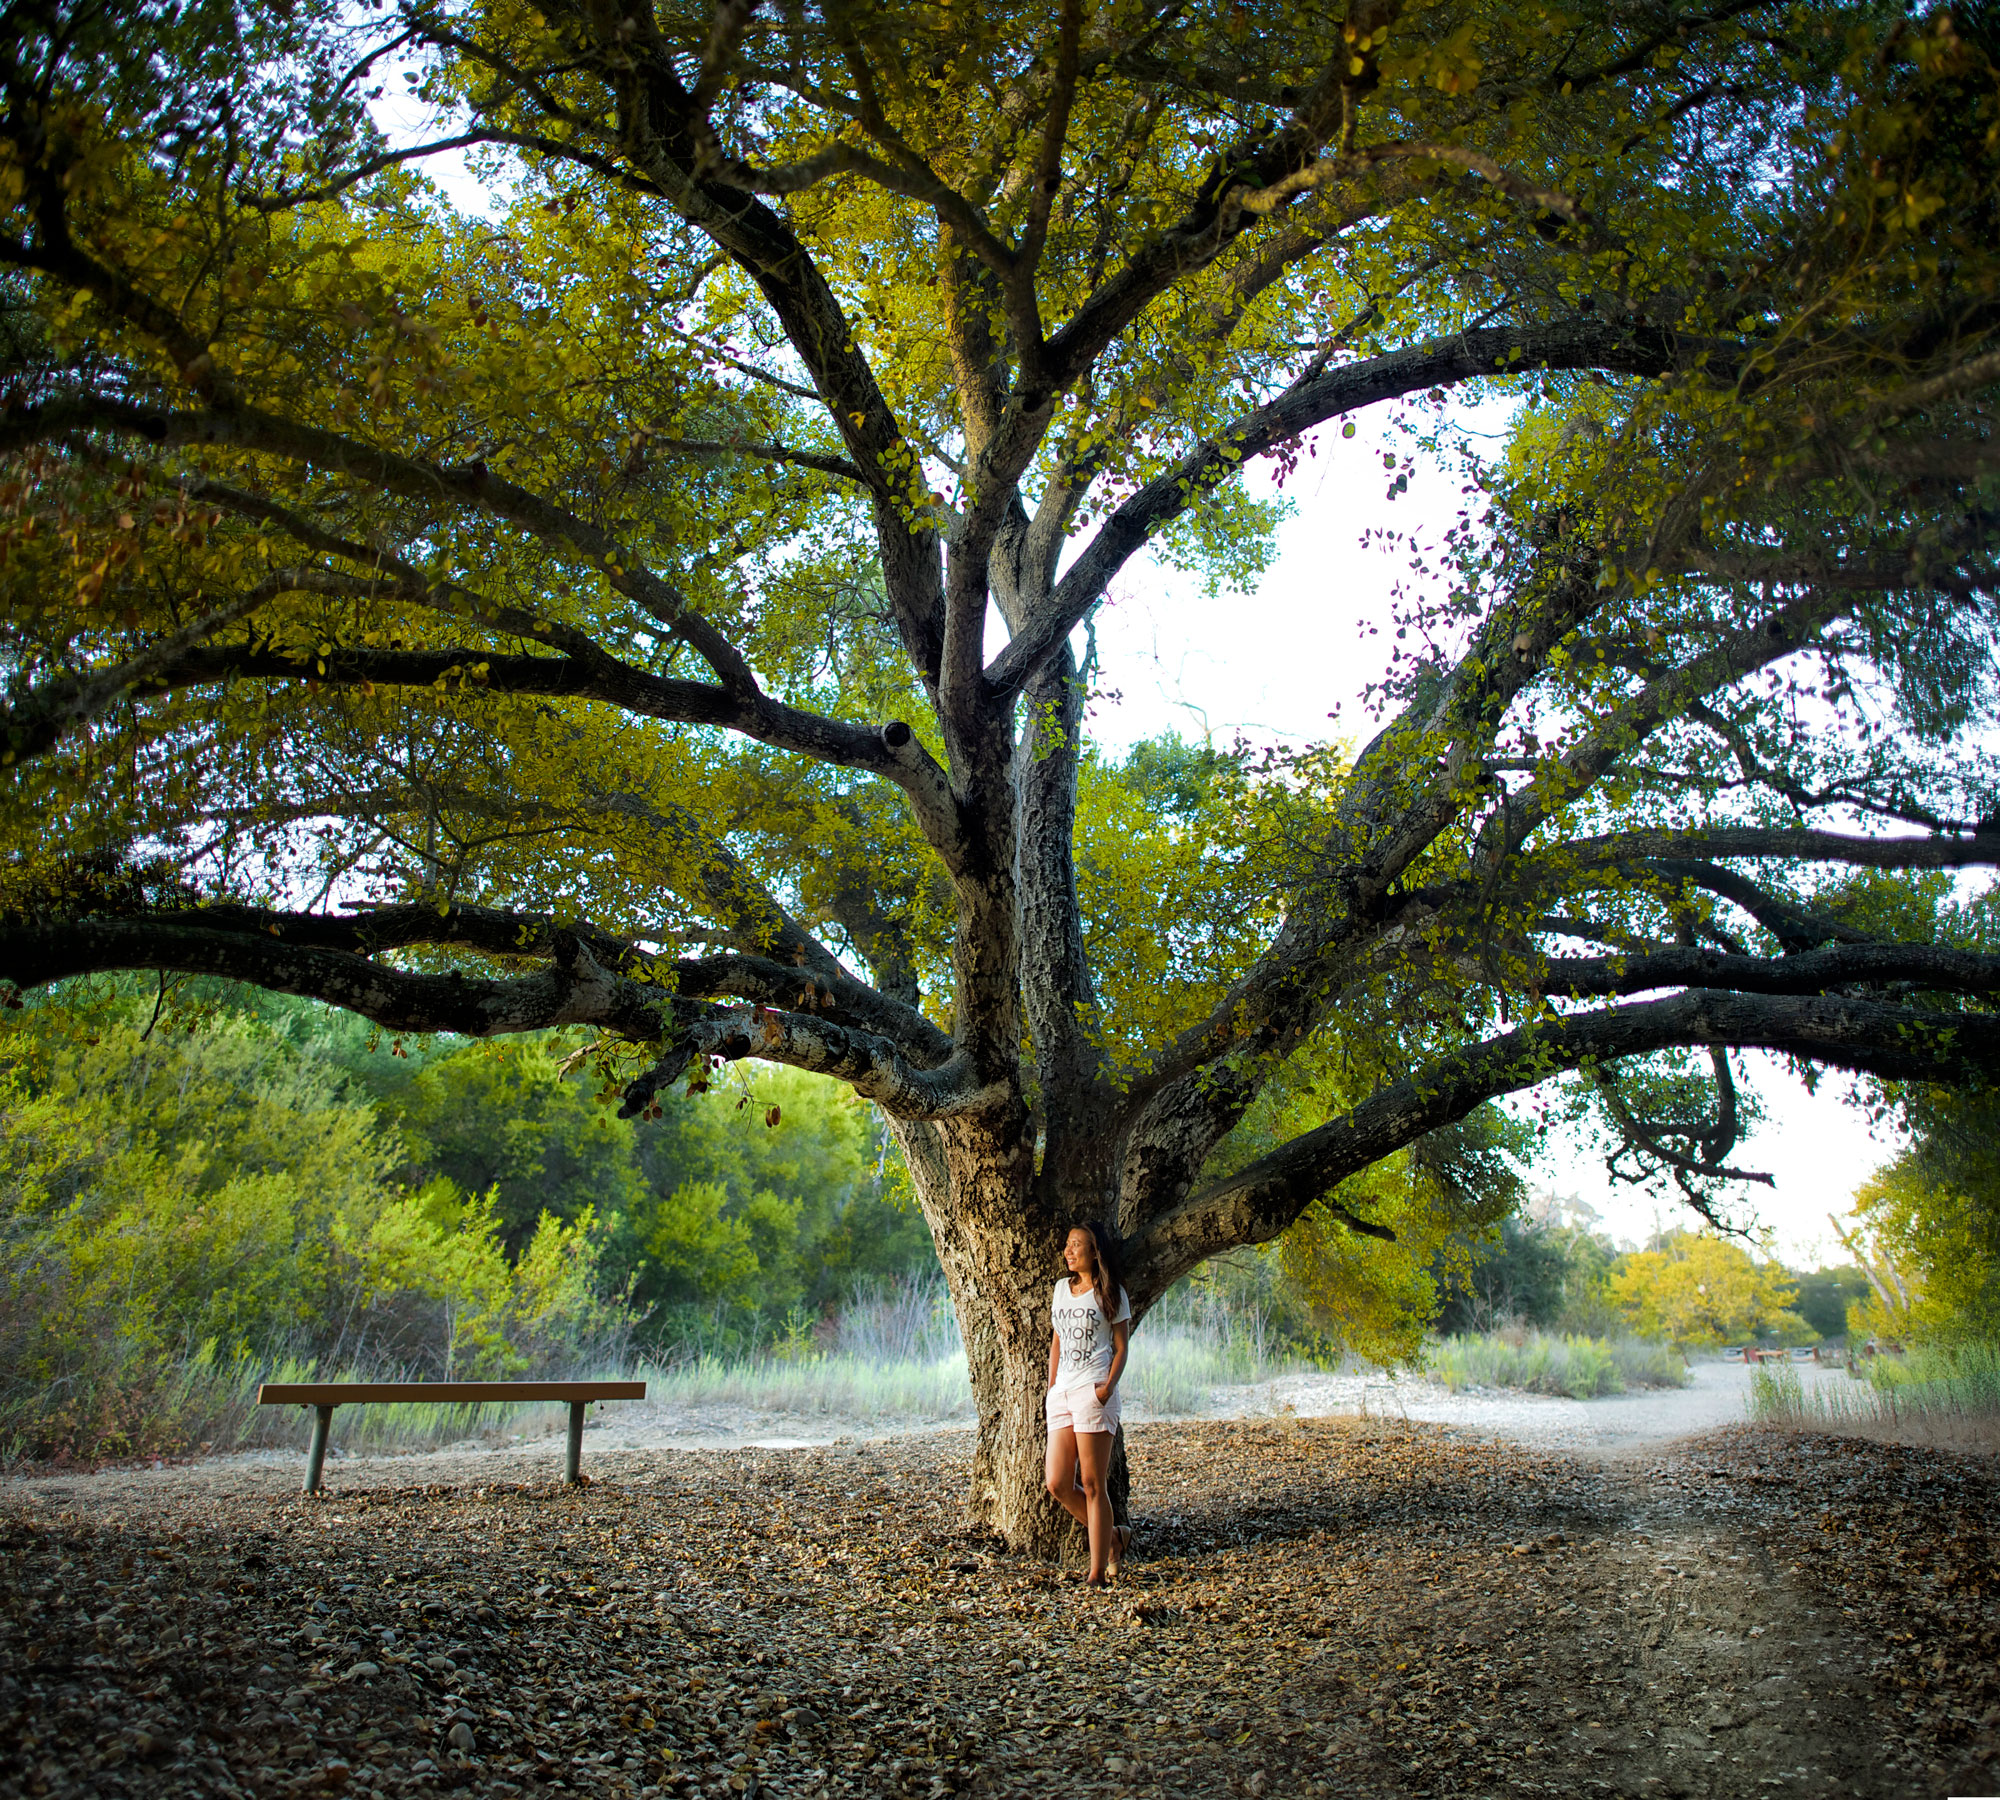
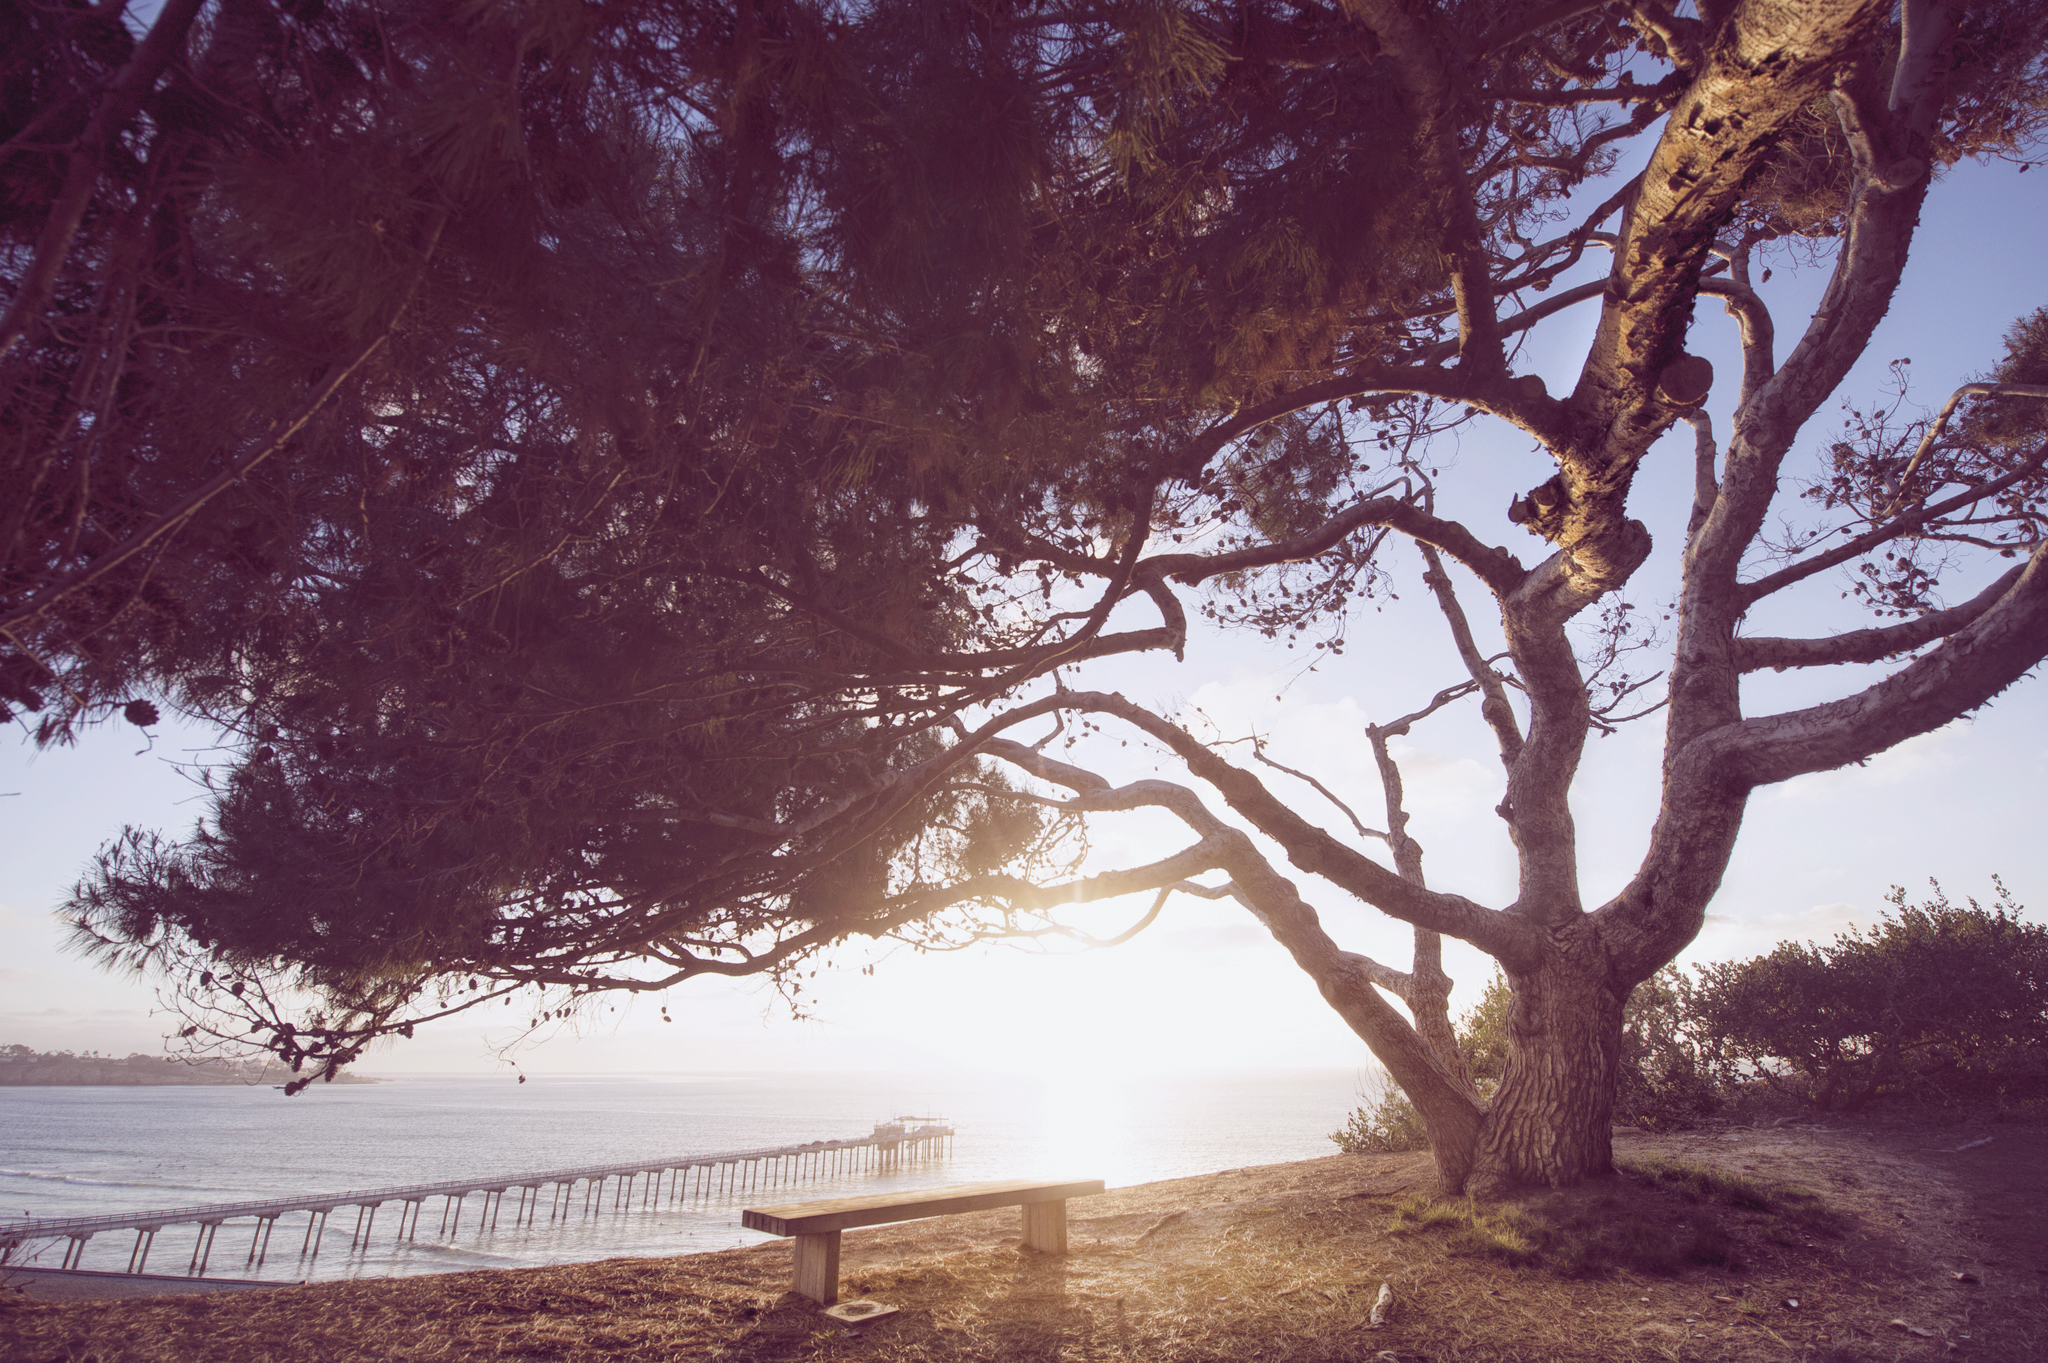
#28 The Bench (Google Map it)
I really hesitate to give out this secret location. Many locals know about it but it offers maybe the best view of San Diego. There is a bench at the top of the hill, overlooking a great expanse of coastline and a huge pine tree above it. This is a great location for romantic pictures. Just keep a secret please!
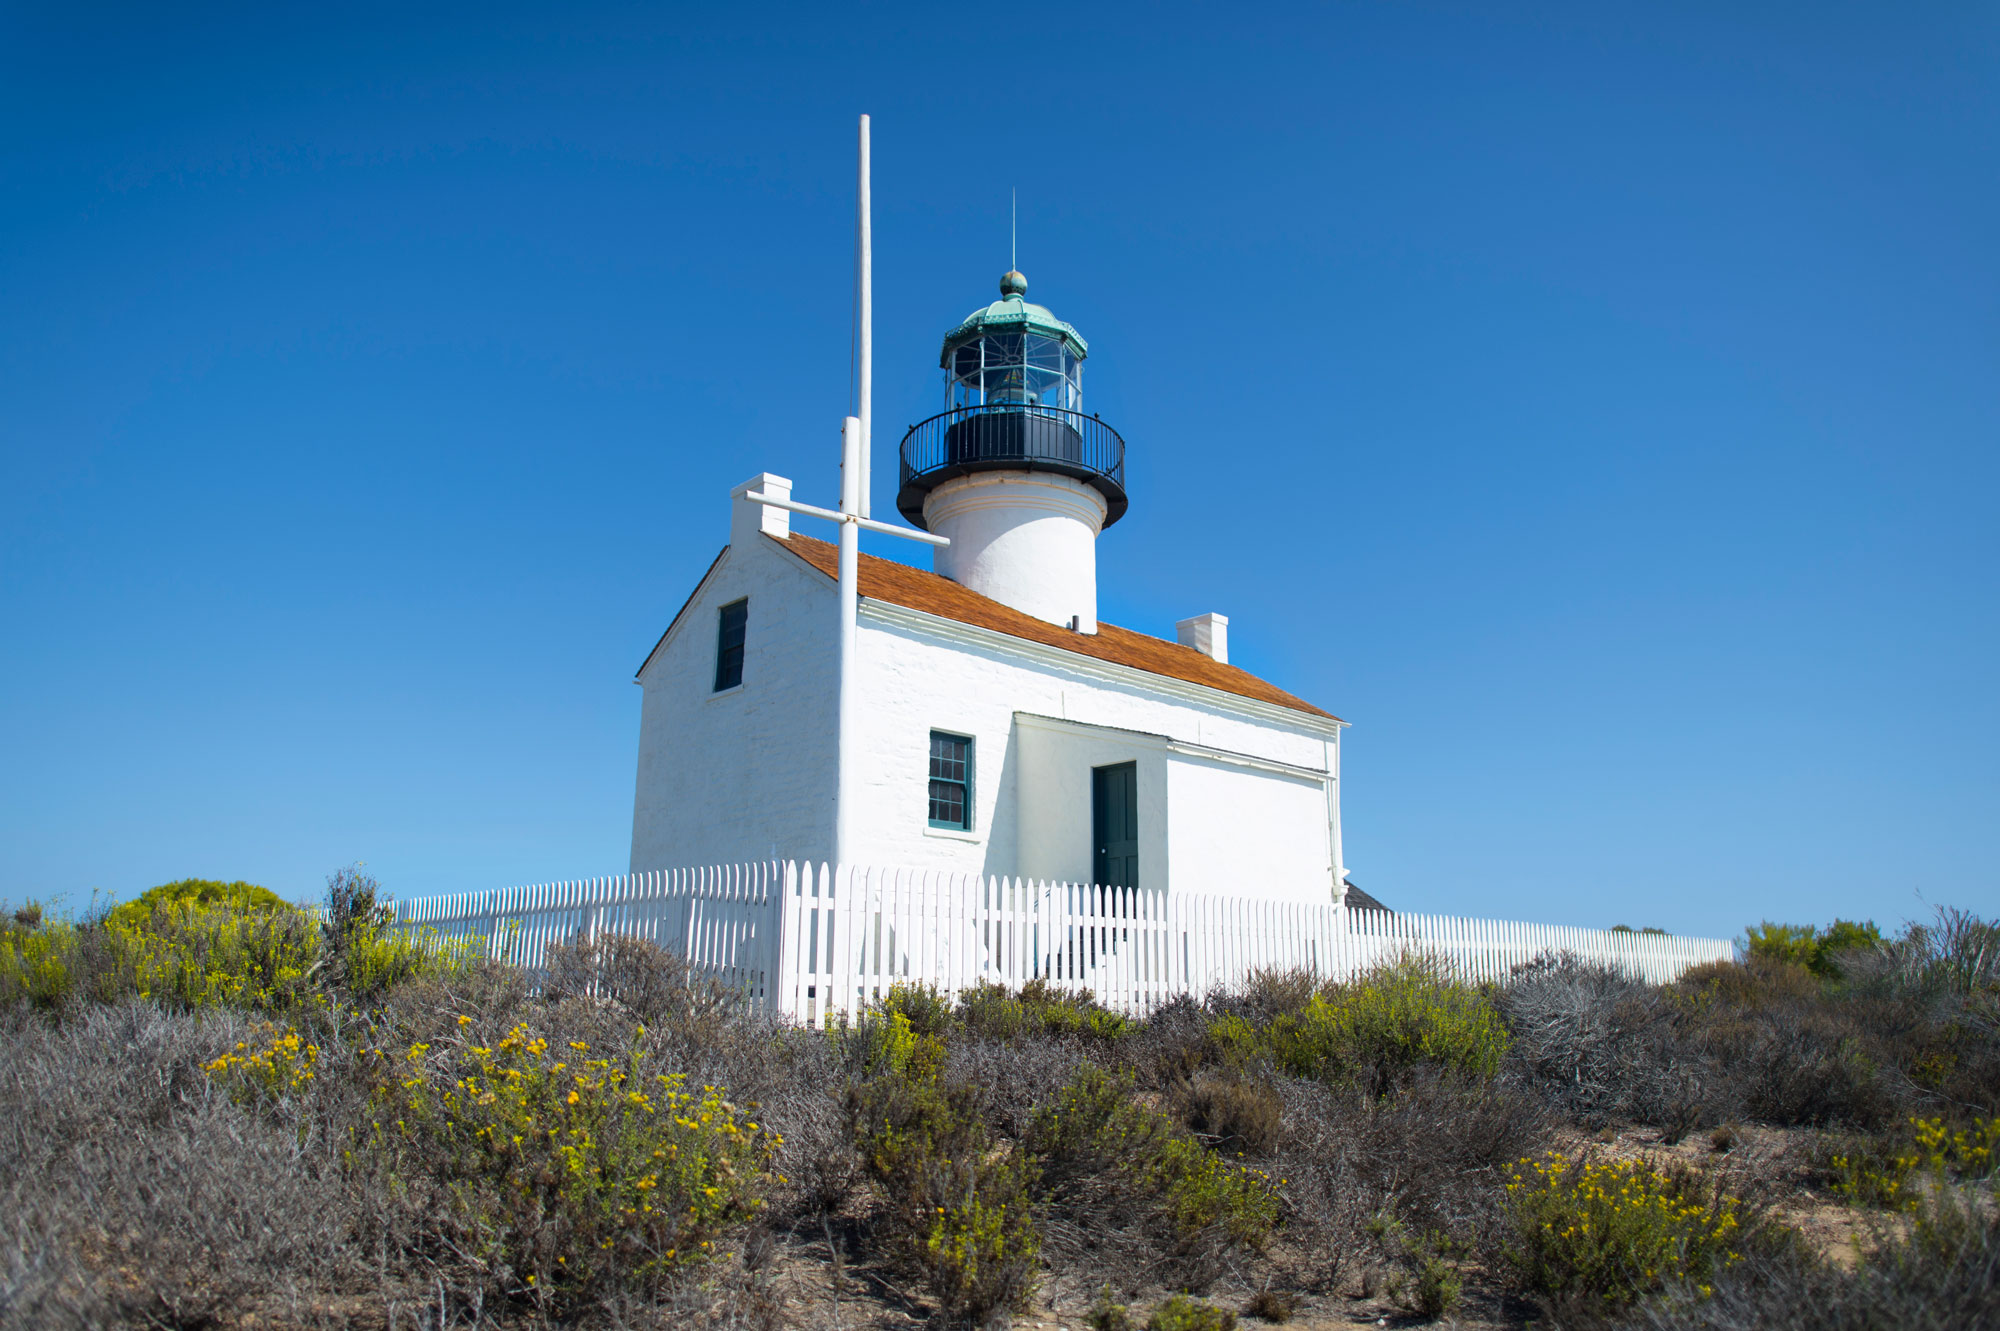
#29 The LightHouse (Google Map It)
The Old Point Loma Lighthouse is located in Cabrillo Monument. This is a great place to go but the gates close at sunset so you can only really take pictures during the day here. There are plenty of great places to take pictures of both the lighthouse and the dramatic coastline here. In fact the tide pools below the light house are some of the best in the world and you can spend hours walking around and seeing lots of sea life. This is a beautiful place to take pictures of Old San Diego.
# 30 Oceanside Harbor (Google Map It)
This quaint little harbor is a great place to walk around and see lobster boats, shop and take in the real northern San Diego County scene. The beach here is wide open and there is a beautiful pier that you can walk along. Its a very picturesque place.
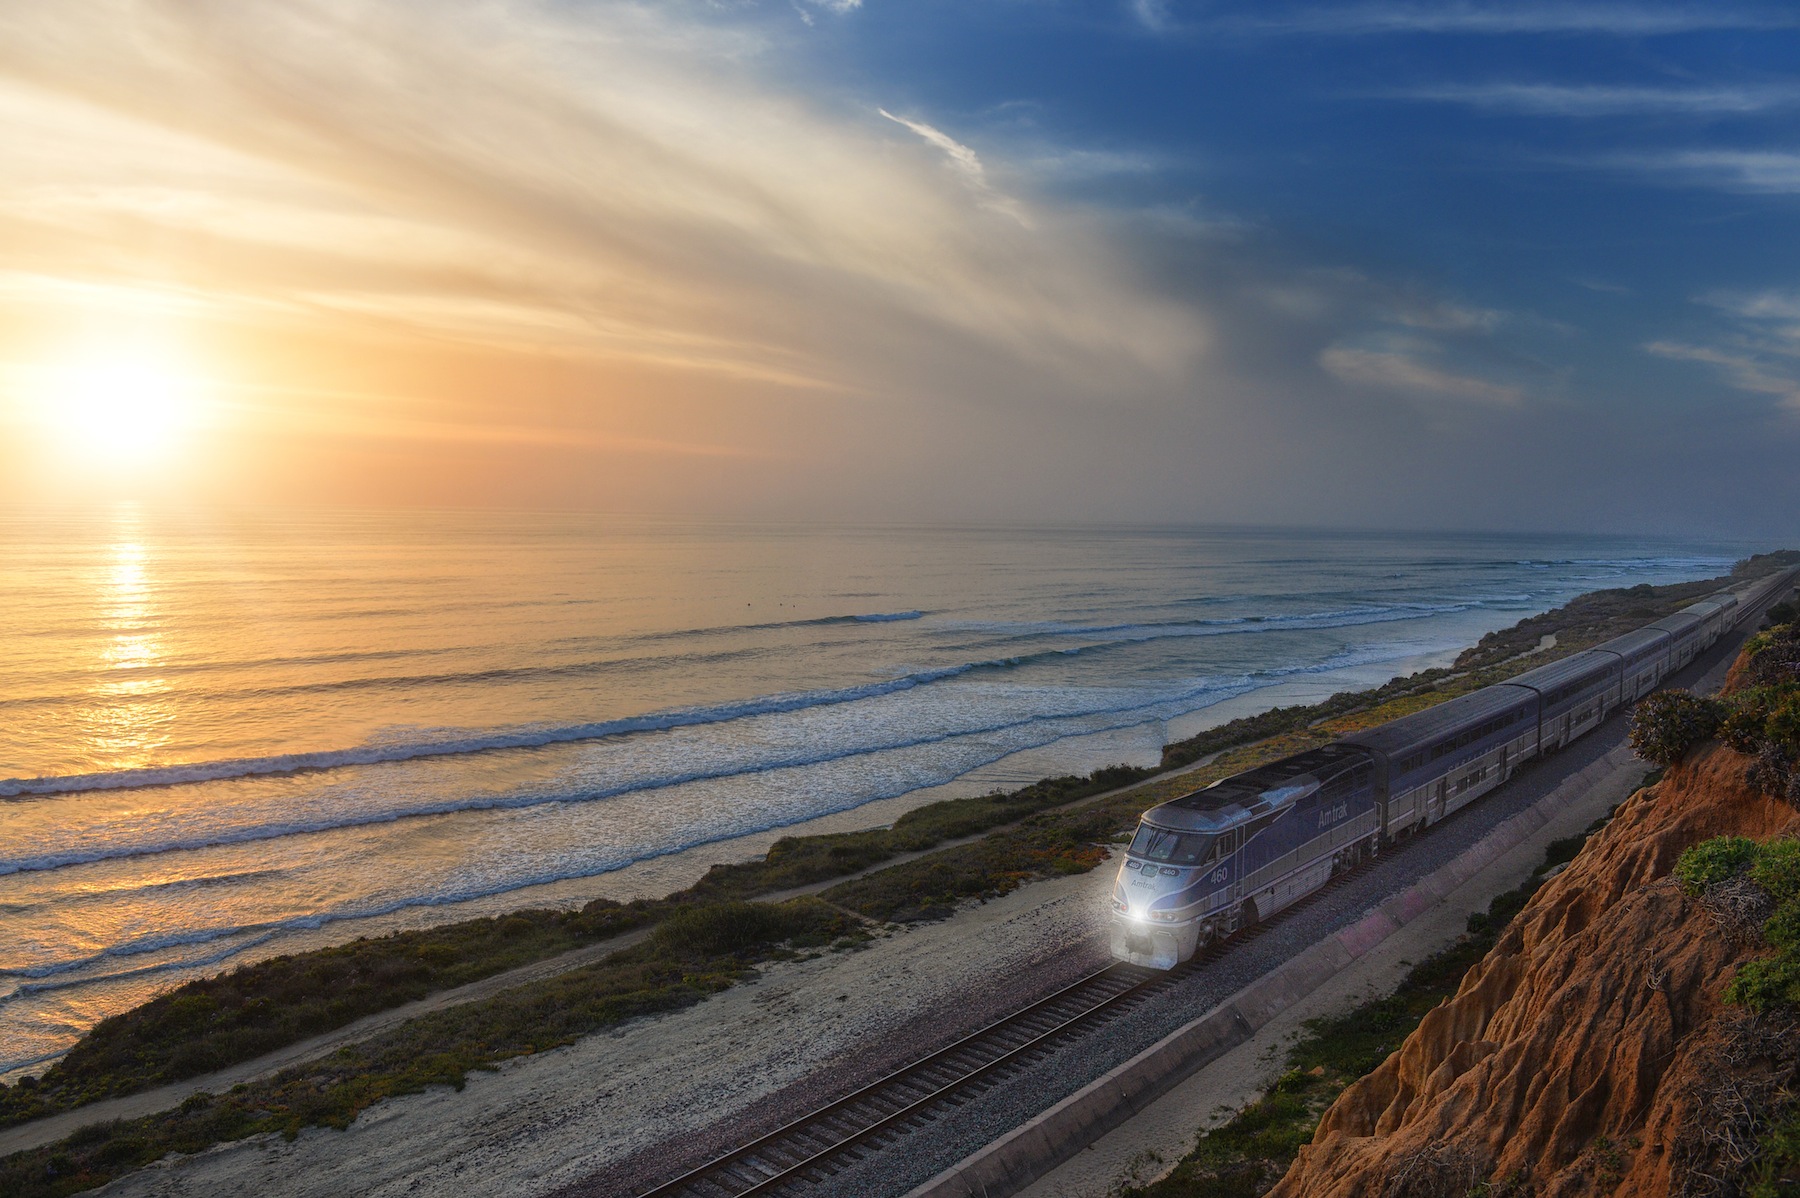
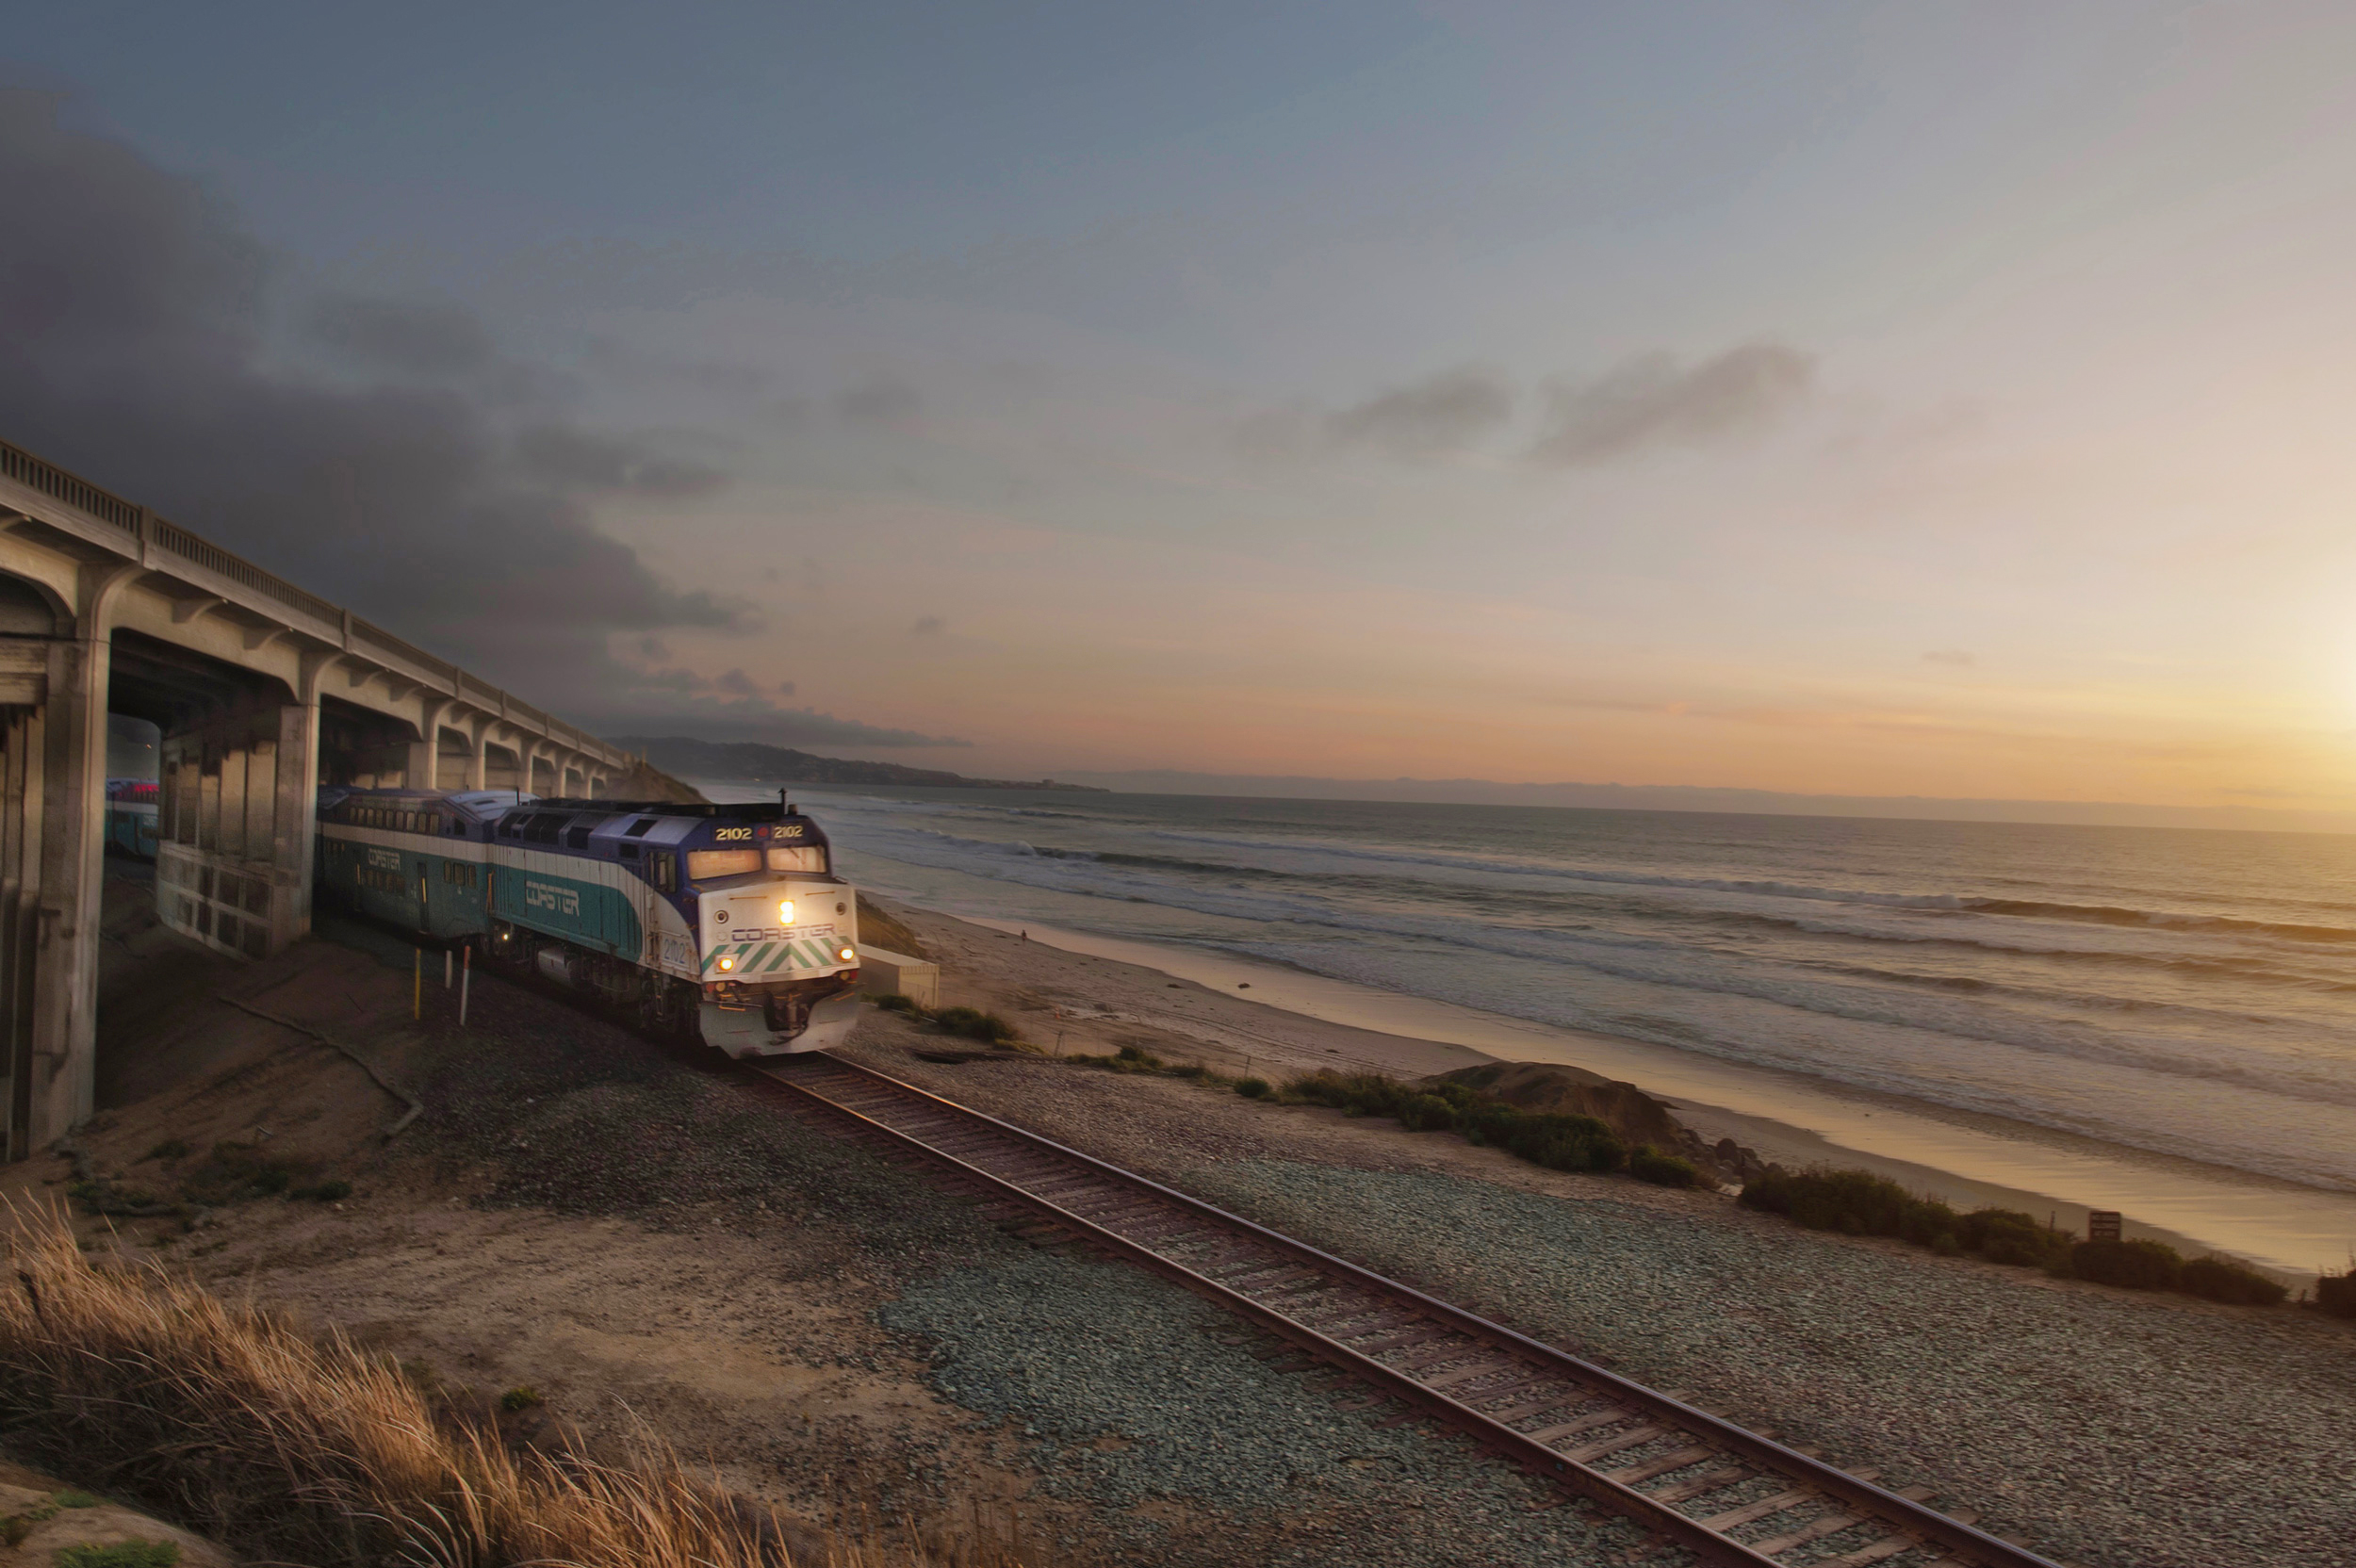
#31 North Torrey Pines Bridge (Google Map It)
A brand new bridge was recently completed to allow the trains to run under it and pass along the coast on their way north. It makes for a very picturesque place to take pictures of Torrey Pines State Beach or passing trains at sunset.
#32 – North Park San Diego (Google Map It)
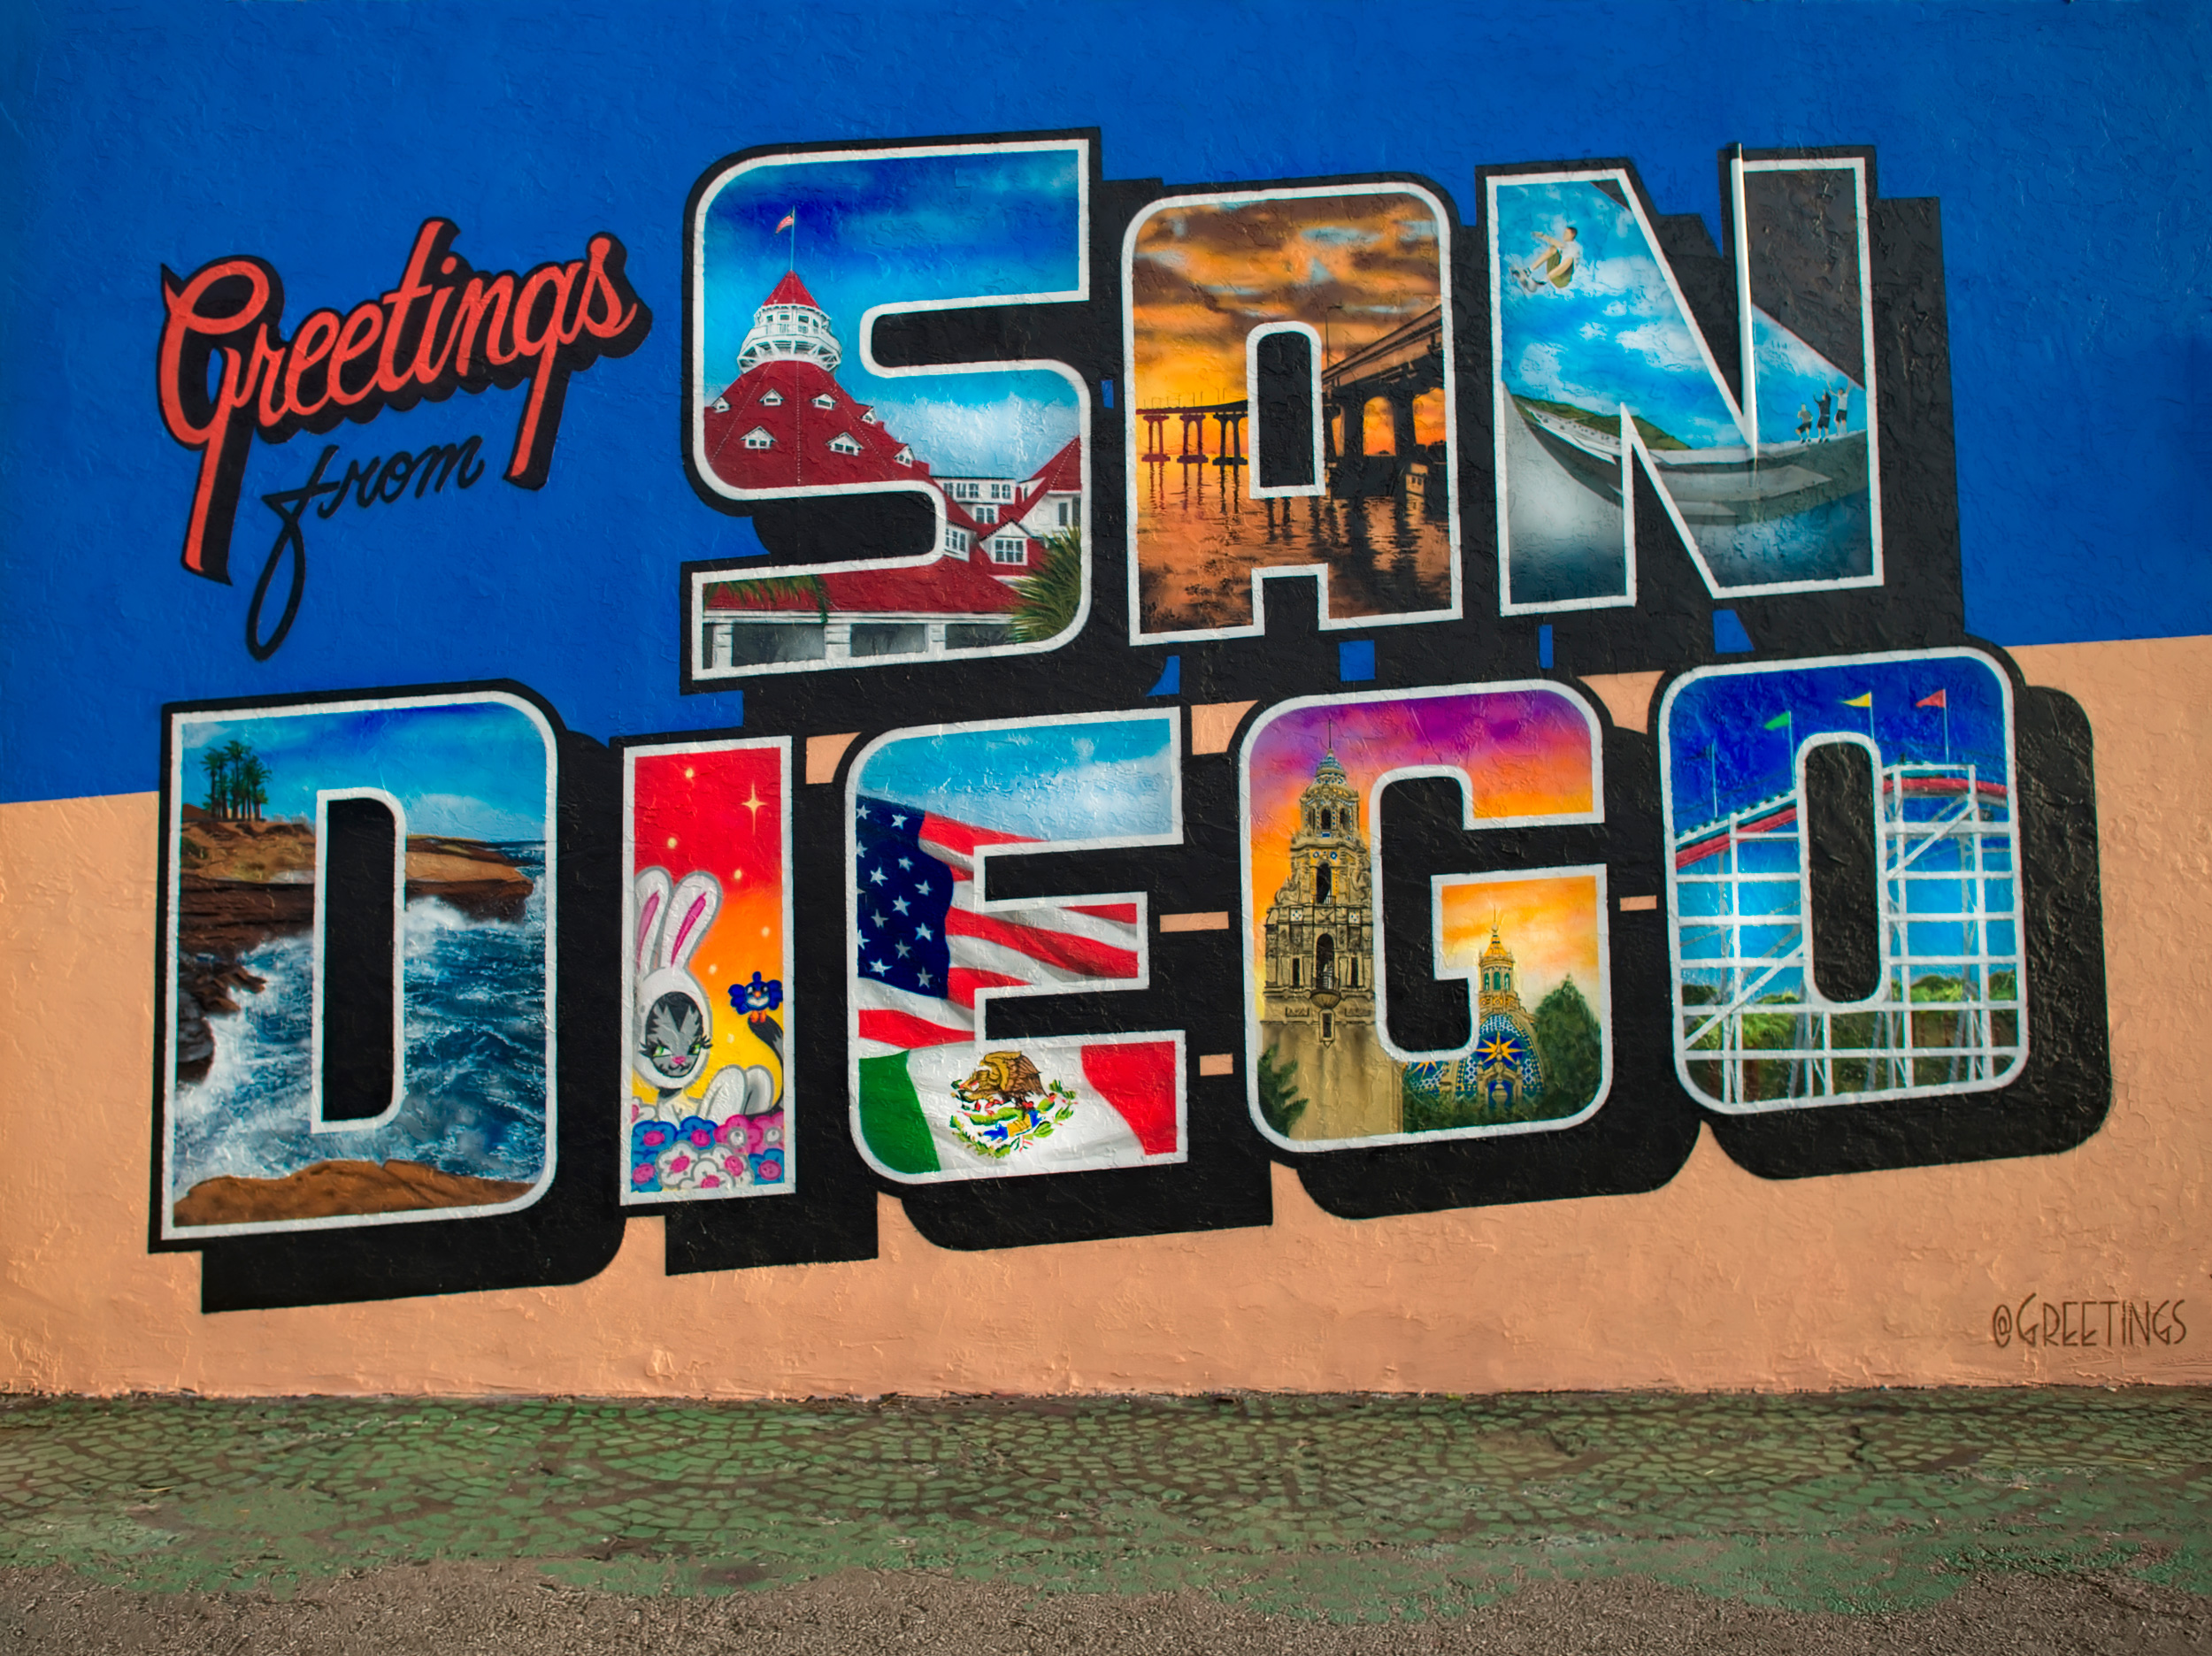
North Park is San Diego’s coolest neighborhood filled with lots of great restaurants, cafe’s, cool bars and just an all around great place to live the urban lifestyle. There are plenty of cool places to photograph in this neighborhood but my favorite place is the Greetings From San Diego Mural located at 30th and El Cajon Blvd.
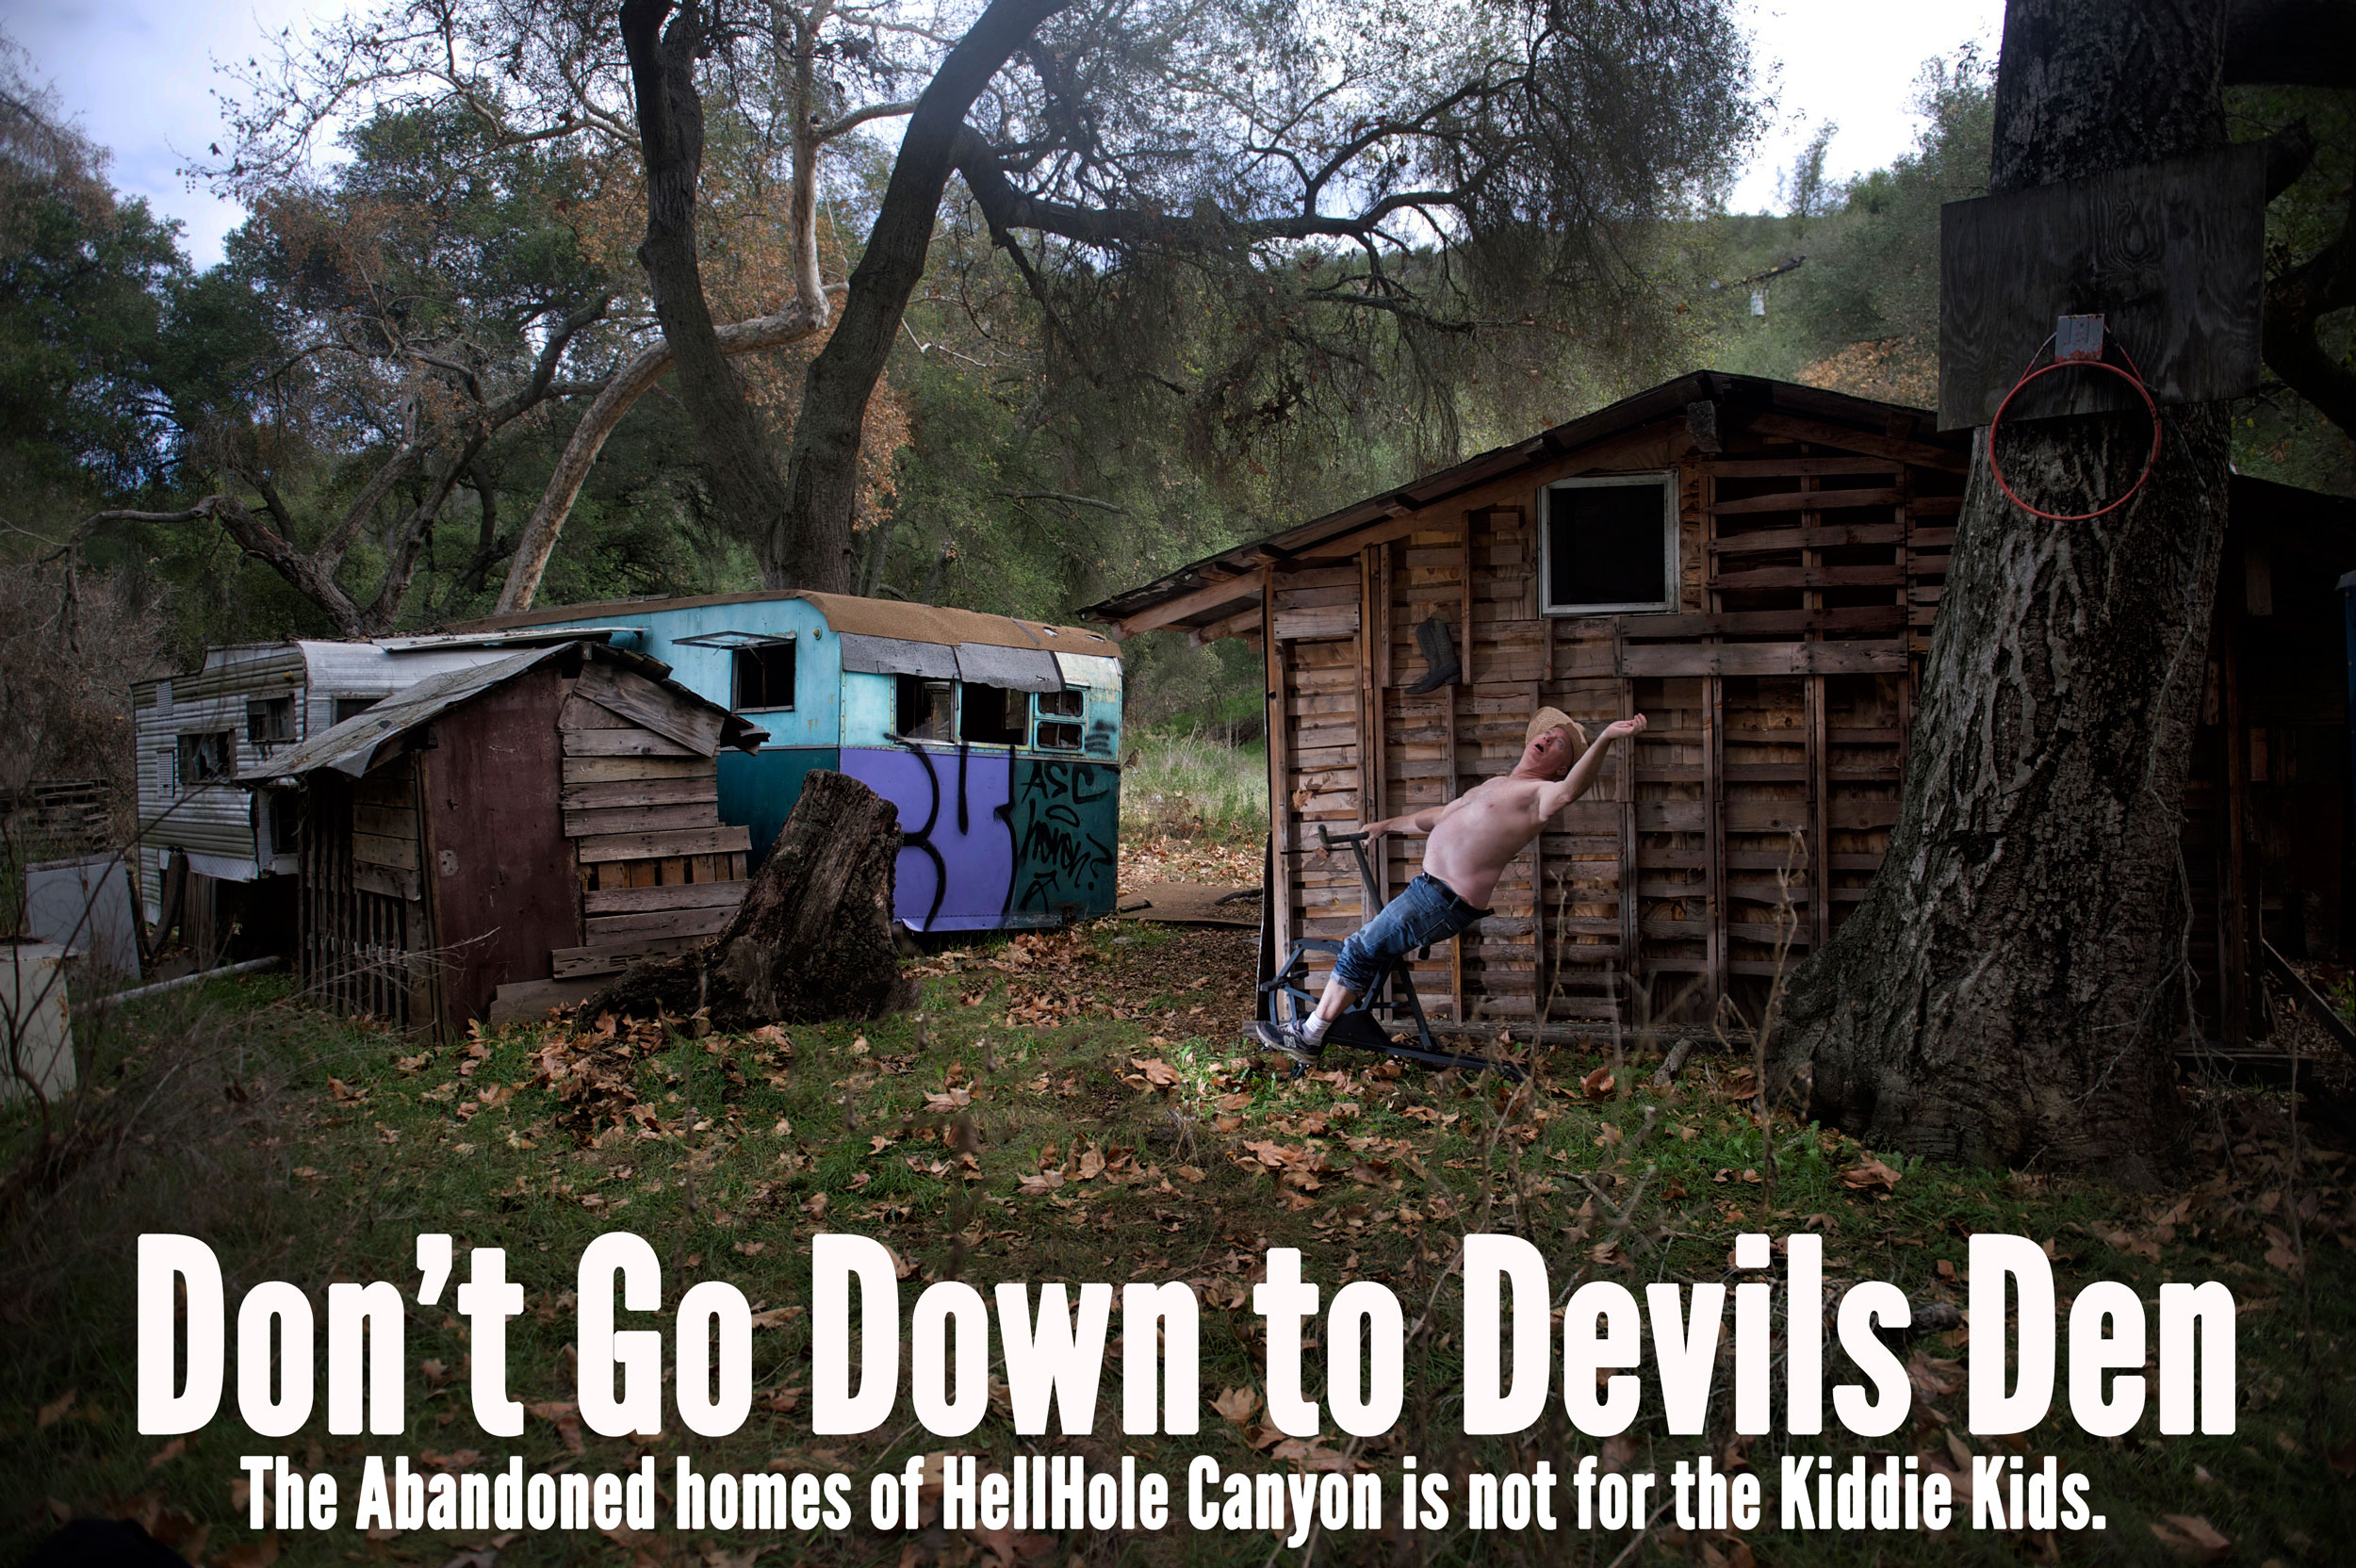
#33 Abandoned Homes of HellHole (The Devils Den)
I just visited there in early 2014 and its pretty cool. You can read about it here. The locals may be against people walking there, I have heard stories about that but have not confirmed – The Abandoned Homes of HellHole Canyon.
#34 Take a Trip to TJ (Google Map it)
TJ is pretty amazing for food and culture. I highly recommend a day in TJ just exploring but remember to bring your Passport. Don’t worry you don’t need to drive. Park your car on the border and head over for some good times and some great street photography.

San Diego is America’s Finest City
Now these are not the only places to photograph in San Diego but they are definitely at the top of my list. I love it. I think you will love it too if you are visiting.
If you’re looking to make a trip through California check out my tips on where to go to get the most amazing pictures – Best Places to Photograph in California. Send me an email at [email protected] if you have any questions.
Sunset Cliffs
They call it Sunset Cliffs because the sandstone is almost red and when the setting sun hits it they turn orange. It is a beautiful place to enjoy sunsets and to take long runs and walks along the cliffs to see some of the best coastline that San Diego has to offer. I went this afternoon to take some pictures for a San Diego Blog that I am working on. It wasn’t too sunny and pretty cloudy but the pictures still turned out adequate. I may go back and try to take more pictures when it is a bit more clear to capture more of the beauty of this place

Sunday at the Lake
When you live by the beach what is something that you rarely if ever do in July? If you answered – drive east to where it is hot then you are right but that is precisely what Tu and I did – headed east. We actually ended up in a pretty cool and breezy place called Cuyamaca lake which interestingly enough didn’t have many people there for a Sunday in July. It is place that you can rent a boat and fish for trout – a real nice place but I didn’t see anybody catching fish.
Tu posed on a pier where people take their boats out. She took off her shoes but thought it would be way too cold to dive in. Well anyway I think it was illegal to jump in the lake anyway.

Tu is an amazing Zen Buddhist and while chanting she found that she was able to float on water. You don’t believe me, just take a look at this picture. She was levitating on the lake


Sea Lane Beach
I heard someone yell my name, “Frank!” as I was slowly backing my way out of my parking space. I was on my way to run some errands and while I barely heard my name through the car window, I decided to stop and look to see if indeed someone was trying to stop me. Then up the street I saw her and some familiar faces – Mary, Lucy, Irish and Charlie were running up to my car. What a pleasant surprise. They told me that they were on their way down to Sea Lane beach (the street on my beach) to do some swimming and to hang out for a couple of hours. Well, needless to say I put my errands on hold and decided to bring my camera down and take some photos of the family at the beach. It’s July here so the sun is shining and everyday is a perfect beach day.
http://www.frankiefoto.com/Family/Girons-Beach-2012/24327921_R9rrnT
I brought my bright red umbrella down to the beach because I really hate sitting on in the sun and baking. Mary gladly took shade under the umbrella happy to have it so she could watch Irish and Charlie swim without having the hot sun on her face.

I remembered about 5 years ago in the same spot we were sitting I took a picture of Irish, Charlie and Lucy running down the beach to the water. That was in July as well so I decided to try to re-enact the scene as best I could. Well, I messed up the order I discovered when I got home and looked at the original picture but it was still fun. I think Lucy is twice as tall now.

Irish and Charlie are tremendous athletes and do flips pretty much all over San Diego. We decided to do some flips on the beach. Some girl came up to Charlie and asked to do some flips with them too.

Charlie was doing some massive flips, you can see the determination on his face to land each one – which he did on his feet.

Irish did some incredible flips as well. In this shot it looks like he is flying straight down from the sky. He got so high, went upside down and still landed on his feet – amazing.

And there is Mary, looking smashing on the beach in her Oakley glasses which she took from Irish while he was performing circus jumps

Everyone says Mary and Lucy are twins. I think so, what do you think?

Those Giron’s love their awkward family photos. Here they are posing around the red umbrella.

They call him handsome Charlie. Why do they call him handsome Charlie? Well because he is handsome like Rock Hudson and James Dean.


Before we left the beach, Irish wanted one last shot. He called the shot “Illuminati” which I seem to remember being something Tupac started years ago.

Guadalupe Island Mexico
This is an old photo but actually one of my favorite photos that I own. This is me and my brothers at the top of Guadalupe Island (the westernmost point of Mexico) which is about 250 miles west off the coast. To get the island was treacherous and we had to endure 15-20 gale warning swells where waves were crashing over the boat. Everyone was seasick except Danny and I and we had never navigated a boat yet we were forced into that night since everyone else was curled up in bed with very nasty seasickness. I mean it was bad that night plowing through stormy seas wondering if we were going to make it. The only thing we had was the navigation system and radar which would illuminate large ships in our paths. The whole night we were thinking we were going to capsize or hit a whale like Moby Dick.
Well we made it and this was the picture we took from this extremely remote island the very next day. The island is uninhabited except for a few unlucky soldiers from Mexico that guard the island on 6 months shifts to make sure no other country tries to take it over. What makes this place amazing is the wildlife. The seals are completely tame, there are white sharks everywhere and the Albatross land on this Island since it is the only land within hundreds of miles. We are one of the few humans to see this place and it felt great. It was absolutely beautiful here and peaceful but still scary since we were in the middle of nowhere literally with no one else around. The island was sunny and windy but it was nowhere near as bad as the gale force winds and storms that surrounded it. The sheer size of the mountains on the island creates a Jetty effect where the clouds basically part around the island allowing the suns to shine even when everything else around it is stormy.
It was a great trip because we knew it would be one of the few trips we would ever get to take together. We bonded over the difficulty of getting there and over the beautiful things we saw when we finally arrived. This was a great trip I will always remember.

Alessa Leigh
One of my favorite pictures taken from the helicopter was this brand new restored Yacht. This Yacht, the Alessa Leigh was so beautiful it was featured in Yachting Magazine. I shot the Yacht using a Canon 5D and a pretty nice telephoto lens. Bill and I took up the Helicopter, cruised to Catalina and caught these shots.
http://www.frankiefoto.com/People/Alessa-Leigh-Catalina/24263046_24mGDb

Try the Jarvie Window – its wow!
Check out this picture. Pretty cool huh?

Well, to make photos like this you can use a special technique. It wasn’t invented by me but Bay Area photographer named Scott Jarvie and it is a pretty eye catching way to take portrait photos. I first stumbled across the Jarview Window technique when I was reading Scott Jarvie’s blog. which you can read here: http://jarviestudios.com/blog/2010/02/the-jarvie-window-experience/ . Scott apparently discovered the new technique himself while wandering around a PhotoWalk event in Utah with a ring flash. Someone lent him a super wide angle lens, he snapped a picture and discovered how awesome the photo came out.
After reading Scott Jarvie’s blog, I wanted to try it out myself so I followed his directions and created my own Jarview Window setup. I will show it to you here, then show you some of the photos that I have been taking with it and tell you what I think of it.
Most photographers are going to have some of the basic things to start using this technique but most will probably have to buy a few things to make it work. You really need 4 things to be able to take these pictures. A DLSR camera, an external flash, a ring flash adapter and a super wide angle lens. If you have those things you are set and can start. Well, I had two of the things – a pretty nice Nikon DLSR camera and a SB700 Nikon Flash but I didn’t have the ring flash adapter and my wide angle lens (14MM Nikon) was just not wide enough to avoid catching the edges of the ring flash adapter. So I had to spend some money to create my rig.
So the flash, which I use which I already have is an SB700 which runs about $300 and is Nikon’s more basic flash. I found it is perfect for all types of flash photography and works particularly well with the Jarview Window technique. You’ll notice that I have it taped around the base. I did that because I needed to raise the flash head about a 1/4 inch with a wedge I created out of paper since the ring flash adapter was weighing it down and causing the bright edges of the ring flash to fall out of view. Some people hold the ring flash while they are taking the pictures but I just prefer to put the wedge in and crudely tape it. Since I have two SB700’s I just decided to dedicate this flash for this purpose.

The next step was getting a ring flash. I decided to use the Ray Flash that was recommended called the Jay Flash and I found it on Amazon.com. It ran me about $150 and you need to get the right size adapter based on the flash you are using since the flash head size and shape is different. The Ray Flash is just an adapter and doesn’t require any batteries since it is basically taking the light from the flash itself and channeling it down a lighted tube to a ring that fits around the lens. It is pretty cool and I find it is fairly robust since I have dropped it about 10 times and doesn’t even have a scratch. That is really key for me is to have camera equipment that can take a beating since I am pretty merciless and clumsy with my stuff.

The next step was to get the right lens. The recommended lens was a Sigma 8mm which is extremely wide angle. When you have an FX format camera such as the D3S that I am using that means that the pictures you take with the lens come out completely round. There is not a lot of functionality with the lens other than taking super strange photos at a very very wide angle. Before buying the lens I tried using my Nikon 10mm lens but I found that it did not work with the technique correctly. The minimal focal length was a 5 inches from the subject and that does not work with this technique as you literally have to be two inches from someone’s face to make this work. So I ordered the Sigma 8mm lens. It was not cheap and ended up costing me about $800. I’ve tried the lens now for two weeks and it is actually super sharp when you are a little over an inch from a subject – amazingly so actually. The problem with the 8mm focal length is that I think it is just a little too wide for an FX camera which makes it not really practical outside of just using for these types of portraits. It’s a great lens though and if your using a Nikon and want to get the same effect for Jarview Windows it’s probably the best choice.

After a week of anxious waiting, the lens had arrived from Amazon and I was able to put the rig together. After getting it altogether I realized this was pretty specialty contraption and if I was going to try to be inconspicuous with this thing that was not going to happen. It’s big, its heavy and it looks futuristic. To top it all off you have to be inches from someones face to get a cool shot. You can probably see why I had to create the wedge on my flash head – the flash ring is pretty big and heavy that it can dip below the lens and not create that perfect ring of light that you are looking for.

After assembling it, the only person around was Maria, the lady that helps me around the house. I was pretty happy with the result and started to practice some of the techniques that I had learned on Jarvie’s blog as well as some of my own trial and error’s with it.

Here are some of the recommendations and ideas for taking great Jarview Window Portraits.
Get Close – You need to get 1 or two inches from your subject to get the best photos. When I stand back the ring flash does not light them up enough, you get too much background distraction and you don’t get that cool 3d effect that the wide angle gives you at super close range. People will think you are crazy when you get that close but you will get a much better result.
Control your Flash – You pretty much need to move your flash to manual settings and then dial back the power. I found that the best power setting given low ISO settings on the camera was between 1/16th and 1/32nd. For a majority of the pictures that I have taken this seems to work much better than trying to use TTL or some of the other settings.
Add Depth with Fingers or Props – One of the first things you see when you are looking at the Jarview Window portraits is that it appears that the subject is looking into a jar that is lighted at the opening. You can really accentuate this effect if you have the person put a finger on the ring flash or hold a prop such as a gun or a stick. If the subject acts like they are looking into the jar that is even better and can make the pictures look pretty fantastic.
Keep Background clean – I found the best photos I took where when the background was a dark or similar color. If there is a lot of light in the background or it is busy, it will distract from the actual subject that you are shooting. Low light and black backgrounds are the absolute best for these pictures.
Shoot single people – I have tried several times to take pictures of multiple people in the shot and they never turn out as good as taking a single person. It pretty much has to do with the fact that light and focal area is so small that you need to have a single subject to focus on to get the best picture.
Coax the subjects to do something different – To take a great Jarview Window portrait your subject needs to be doing something to create a caricature of his or herself. If your subject just stands there without smiling or is not doing something slightly interesting it won’t come out as good. To take the best pictures you have to really interact with the subject and snap them during interesting expressions or actions.
Use with Kids photography – I find that the best subjects with this technique are typically kids since they love to make funny faces or do interesting stuff and they really get a kick out of looking at the pictures on your camera right after you take them. The more silly they look, the more silly they want to look in the picture the next time. It just is a recipe for getting a lot of great shots pretty quickly.
So after using the setup for the last couple of weeks my assessment of it is that it is pretty awesome. It really provides you with a creative way to take portraits in ways that people may have never seen before and it can really surprise them. But there are limitations with it. This is not something you would bring to a party and expect to take every picture with it. This can really only catch close up portraits and is really not ideal for capturing actions, activities or candid shots. You need to take the ring flash and wide angle off and use another lens for that. What I would recommend using this technique for is at parties or events to capture people in a “Photobooth” type of setting. They will love the results and you will capture some memorable photos.
Here are some samples of the pictures that I have taken with the JarView Window but you can also catch the whole gallery which I will be adding to over time on my website. http://www.frankiefoto.com/People/Jarvie-Window-Portraits/23554327_bGWdXK


