
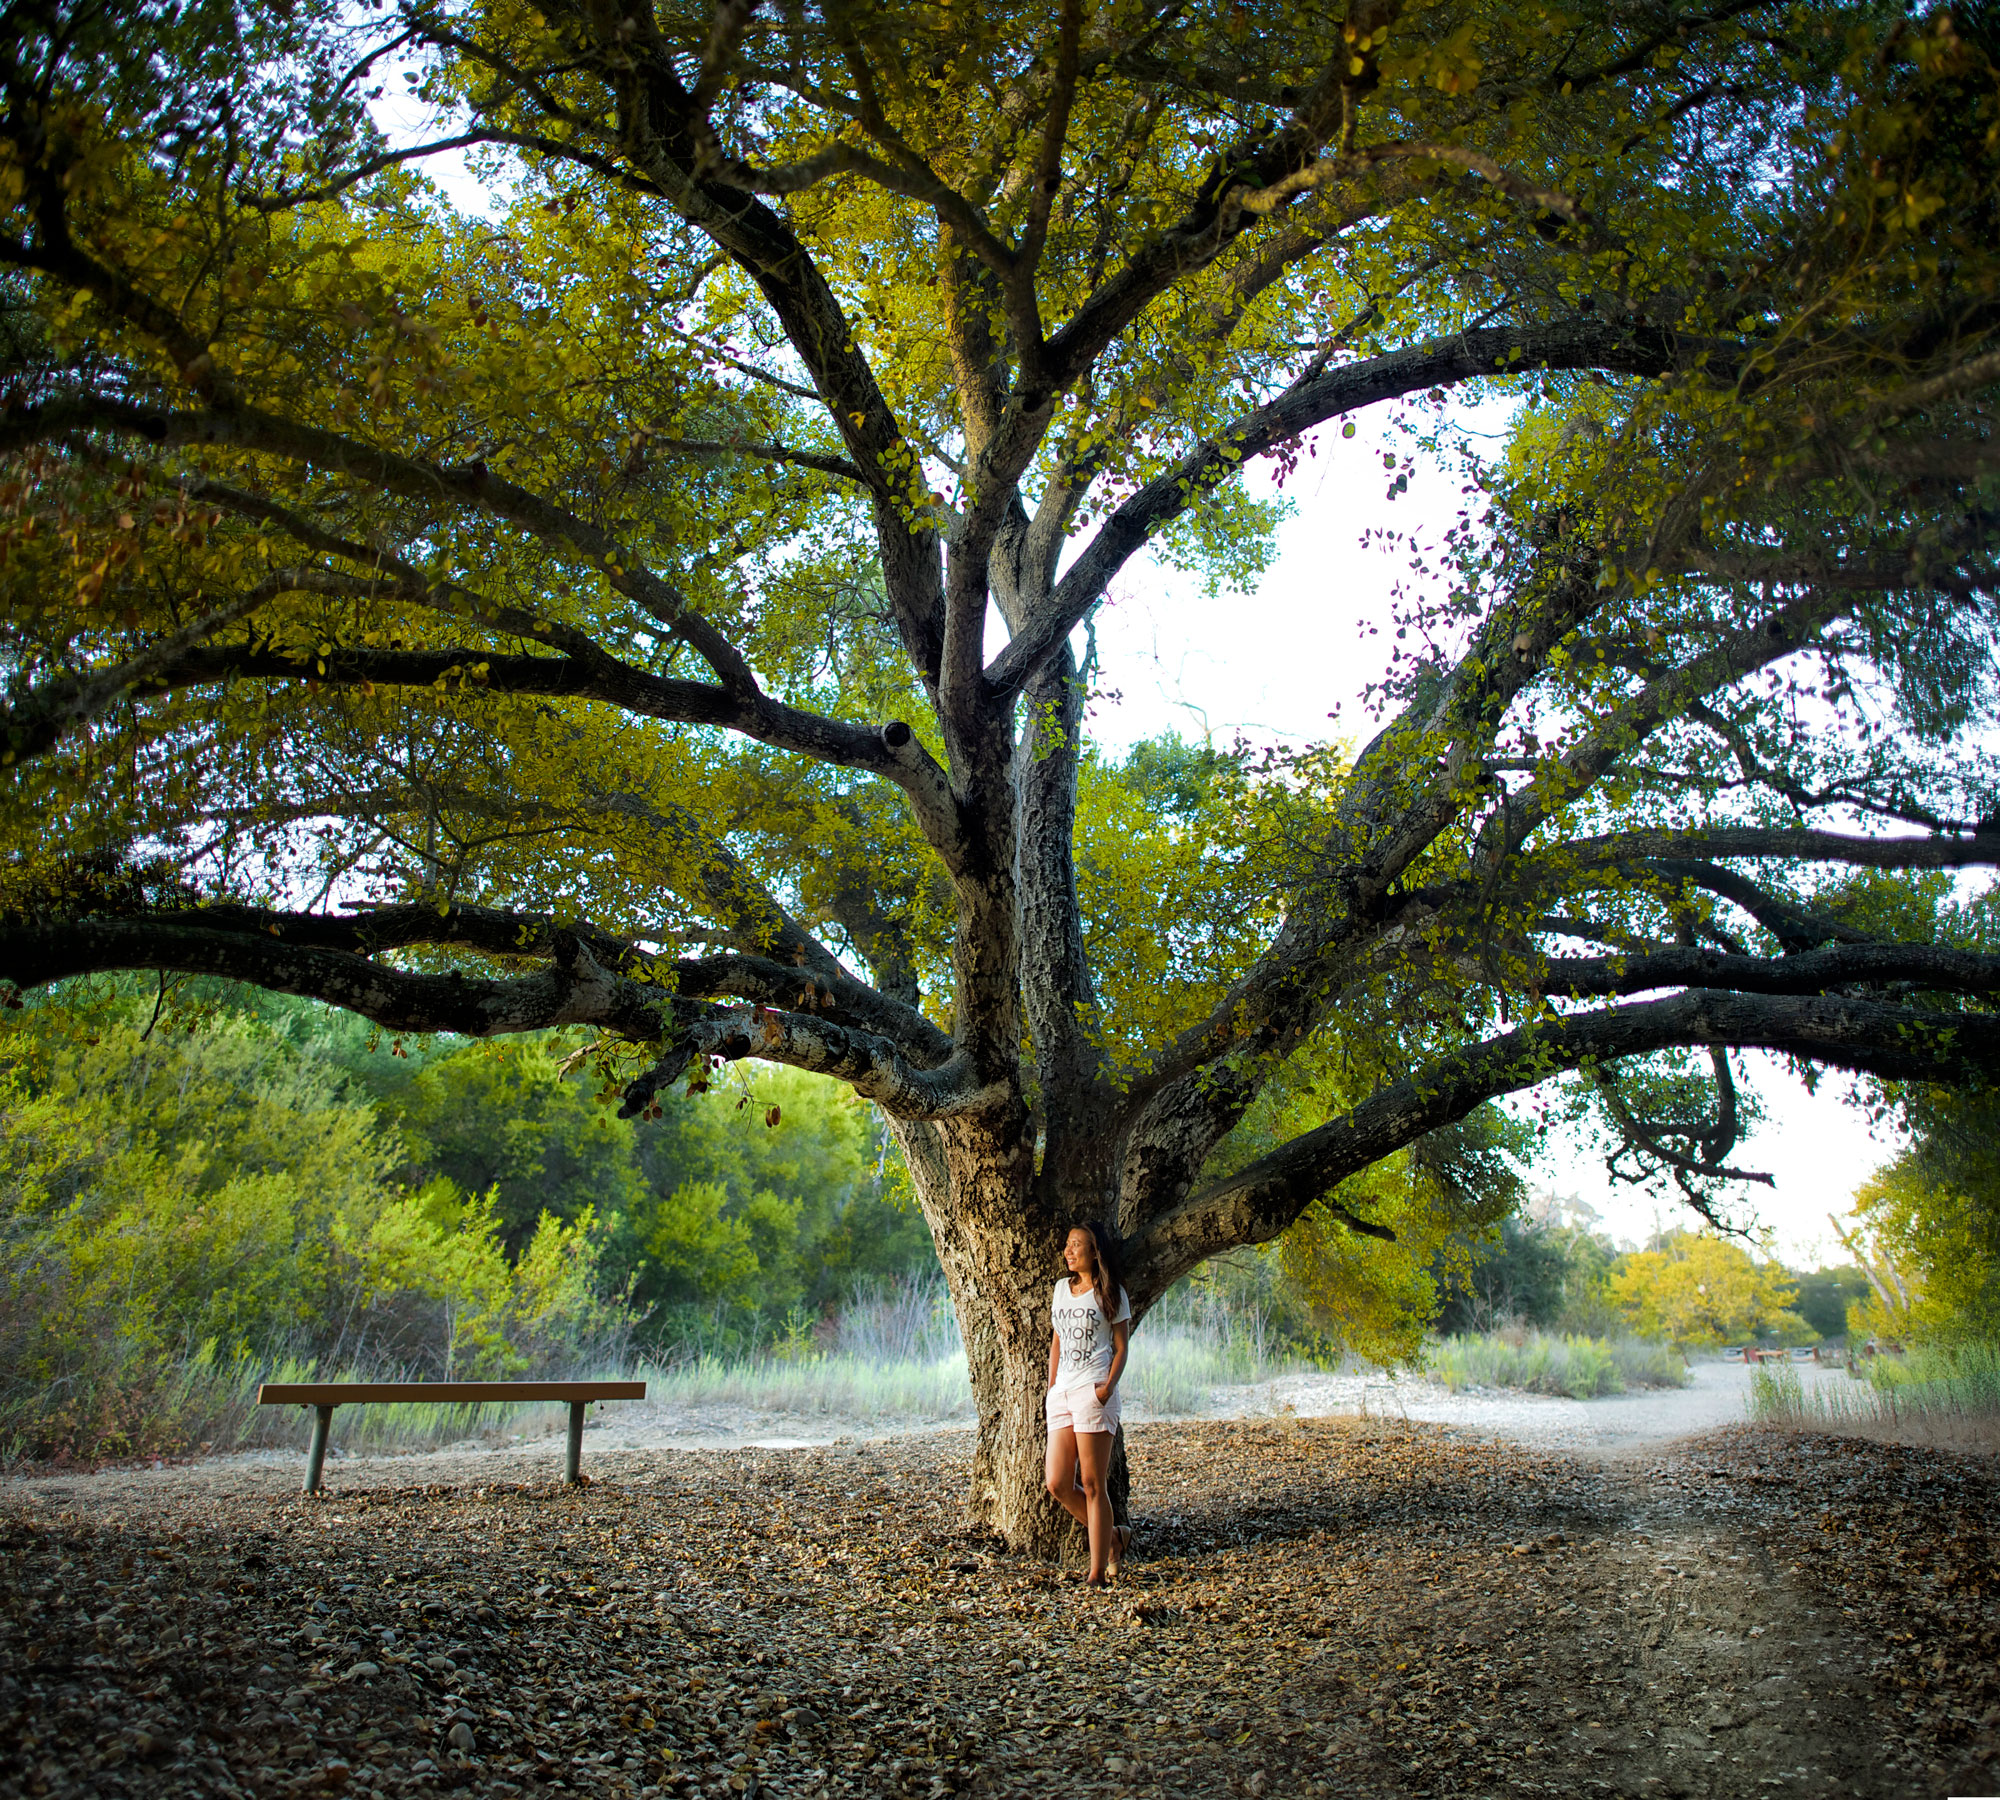
10 Ways Photography can Change your Life
I have always been interested in photos. When I was younger, I used to pour through drawers of photos and photo albums that my parents made, looking at them, rearranging them and remembering the moment that they were taken. I loved those photos. When I went to college and returned home for holidays and summers I would always return to those drawers, collect the photos to view the new ones and to catch up on everything that had happened while I was away. When I looked at the pictures, I tried to imagine myself there and what I would have been doing at that time.
I was intrigued by photos because I felt that I could hold an instant of time, of emotion, a memory, right in my hands. I never really took any of the pictures when I was a kid but I sure did appreciate the pictures in those drawers. Little did I know that those pictures would someday help shape a great hobby of mine and something that brought me great joy – Photography. Over the last two years, Photography has helped me live life a lot better and completely change my perspective on the world.
I wanted to share 10 ways that I think photography can help you improve your life First I want to tell you my journey with Photography, then I will tell you 10 ways I discovered to help my camera improve my life.
1989 I buy an Olympus Film Camera – What a Fiasco!
I was 21. I had just graduated from college and decided I had to travel. I bought an Olympus camera, some black and white Ilford Film and headed to Central America with my good friend and roomate – Aaron. Aaron was a great photographer (a great artist, writer and poet actually) and I always wanted to capture pictures like him. He always captured this incredibly interesting shots of things that were happening around him. He was observant and patient. I was not and I was young and lacked any attention to the details that matter. I didn’t have the patience to learn any of the basics – lighting, focus, composition.
I used all the film up during the trip. I took so many pictures of so many interesting things. I was in Guatemala, El Salvador, Nicaragua and so many other interesting places. I wanted to take pictures of everything! We traveled by bus everywhere and stayed in hotels that cost 90 cents a night. We ate beans and rice and I still got a deadly stomach virus that made me drop 20 pounds. The trip was hard but we kept taking pictures and capturing all of those wonderful moments.
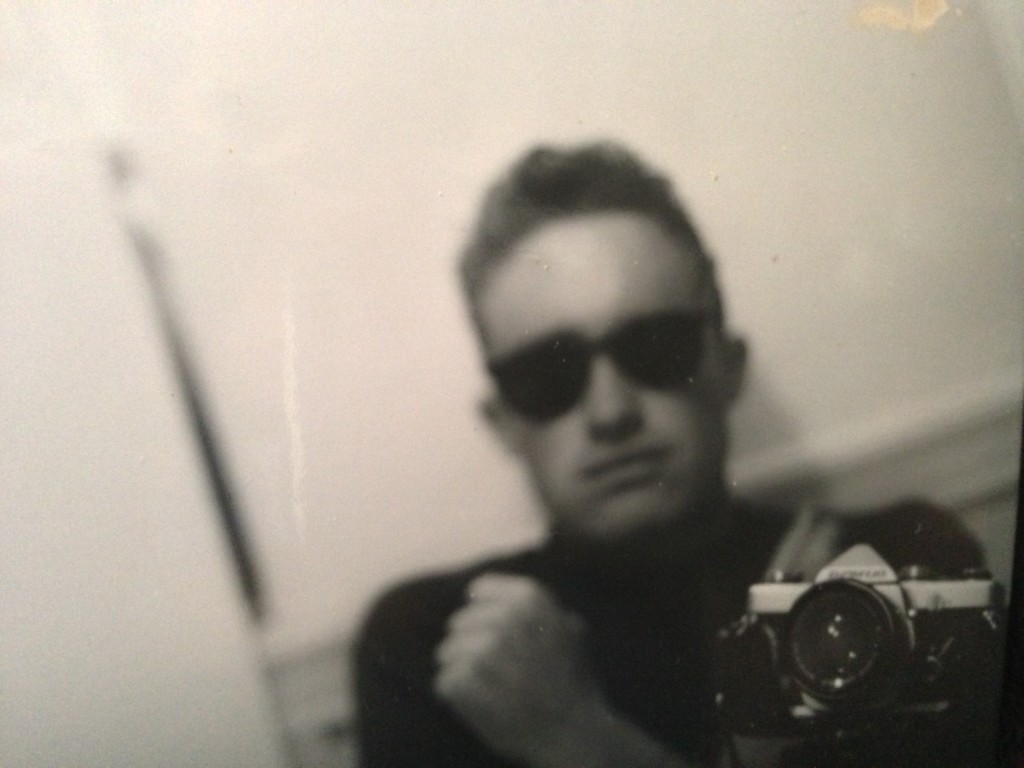
An Olympus Camera and some Ilford Film. I thought I was so cool.
I was eager to get home to develop and look at my first pictures with my camera and then disaster struck. While sitting in a bus station after a grueling 24 hour bus ride, one of my bags and one of Aaron’s bags were stolen by thieves. My journal and all of my pictures were stolen. I had a couple of unused rolls of film and one in the camera and I was so upset – not necessarily because the bags were stolen but because all of the moments in time I had captured were stolen.
I felt like somehow the trip to Guatemala and Central America was all for naught. Just like the tree that falls in the forest when no one is around makes no sound – a trip to Guatemala never happened without the pictures. That was my first experience with photography and I decided to abandon it. The Olympus camera was buried in a bag somewhere and I didn’t give a second thought about taking another picture. Well, that isn’t exactly true.

Aaron and I in Peru. One of the few photos left after thieves stole our bag.
For the next 10 years I traveled the world without a camera. I was like a body traveling without a soul.
In 1999, I took a job as a consultant. The job promised to let me travel the world and it did. During the next 10 years I traveled the world extensively for work. I racked up over 1.5 million air miles. I traveled to London 40 times, to Toronto 30, to Taipei, Tokyo, Sydney Australia, Europe and just about everywhere in the US. I was a road warrior to the extreme.
I saw the world but I never enjoyed it. I just worked and I hardly ever carried a camera with me. I never captured any images of the world, of the places I had been too or the people that I had met. While I had traveled to all these great places and had so many great experiences, I felt that I didn’t really have any images to show for it. Once again, I had significant experiences that I barely felt I could remember. On top of that I felt like I never enjoyed a minute during all of those trips. I hated it.
I traveled 1.5 million miles with it. But I had almost no photographs of the journey.
I Re-discover Photography. I am a man obsessed. But I am a man without talent.
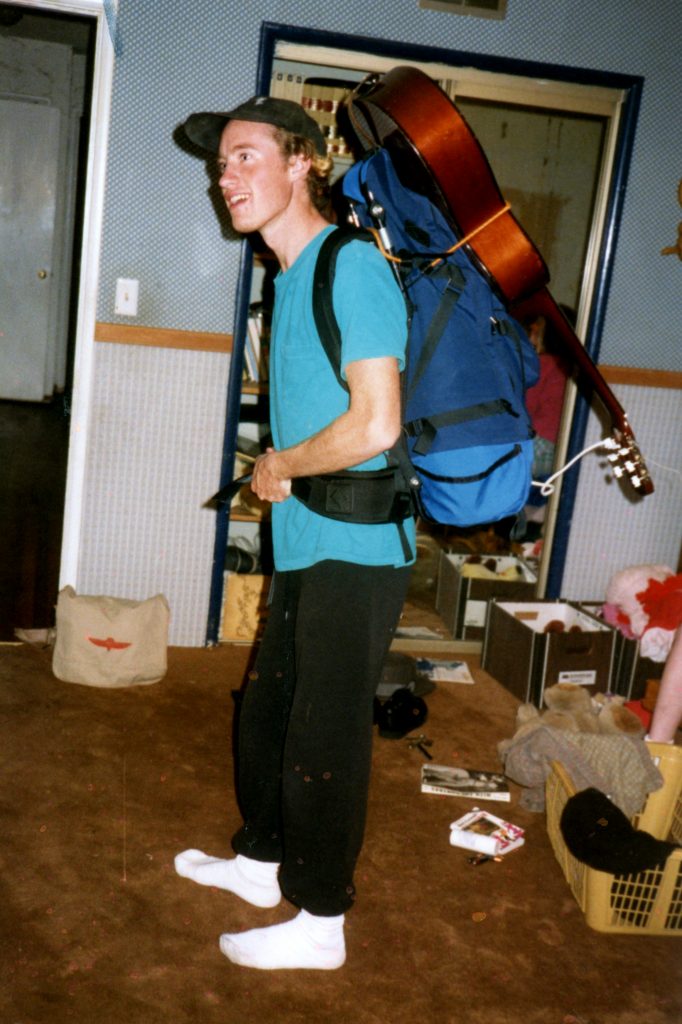
In 2009, I made a resolution to buy a nice camera. Not a camera phone, not a point and shoot but a DSLR camera where I could change the lens. I ended up choosing a Canon D50 which was about $500. And that is when I went crazy. As Patrick, my brother said, “Frank has gone click click crazy.” Referring to the way that I was constantly clicking the shutter of the camera. I would shoot everything and anything. My motto was (and still is to this day actually) that you never regret the pictures you take, just the one’s that you don’t. I would shoot things from 10 different angles; stupid angles that made no sense. I would shoot things without paying attention to the light; shots taken in total darkness that would never turn out.
And all my shots were blurry; out of focus, whats going on blurry. But it didn’t matter because I loved it. For every 100 shots I took, I found one that I liked. And for every 100 of those shots I liked, I found one that I loved. That one shot, that was worth everything to me.
I begin my quest to hoard more camera gear. I make an interesting discovery.
As I began to take more pictures, I started to crave better and better equipment that could increase my range. I upgraded from the D50 to the D700 to the 5D and that was just the cameras. I bought and sold lenses for Canon until I had tried out virtually every lens focal length you can imagine.
After going through the Canon line-up, I switched to Nikon and went through their high end D3 and D4 lineup and all of their lenses. I tried everything to make sure I had the best equipment. I mean I turned into a chronic buyer and seller on Amazon, Ebay, Adorama, BH Photo and anywhere else you can imagine.
I always thought that the better the camera, the better the pictures I would take. I would soon realize that I was sorely mistaken. Sure the cameras helped to a certain extent but even after I upgraded a camera my images almost always looked the same as before. Maybe photography was less about the camera and more about me? Could that be the case?
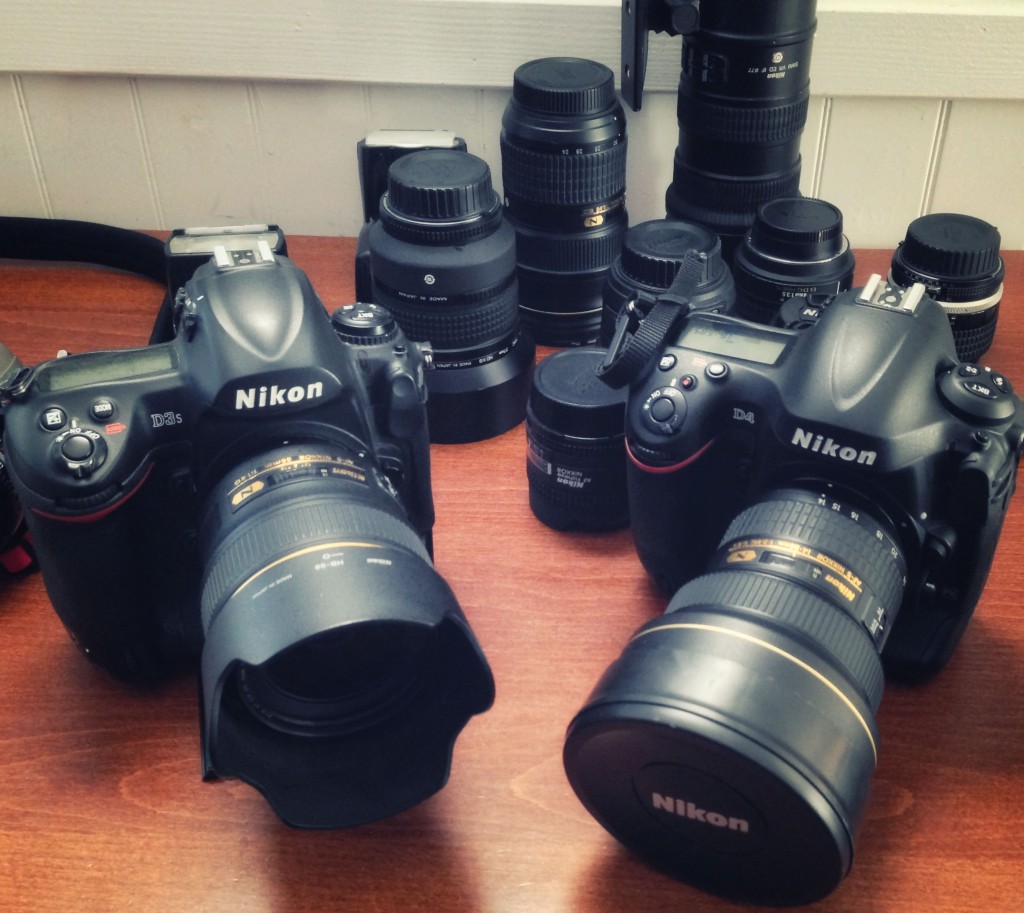
My latest gear. I have bought and sold so many cameras and lenses. It was fun but didn’t make much of a difference
I learn the Great Irony – Photography isn’t always about what you share but about what you don’t.
My photography really changed when I took a significant step in sharing it. I stopped posting thousands of marginal looking pictures on Facebook every month and focused on building my own website and a photography blog. I heard something from my friend Aryo (another brilliant photographer that I always try to emulate) that good photographers learn that it is more important to learn what not to share than what to share. In this day and age of Instagram, Facebook, Google Plus and Twitter people are inundated with pictures.
In short less is more and how you present your photographs is just as important as the photography itself. Good photographers know that less is more. Don’t show everything. Show only your best work. Put your work into a larger context that tells a story. Keep your work interesting.
I started my site www.frankiefoto.com through smugmug. I had about 12,000 visitors to it my first year. It was exciting.
I begin to live by the motto – Practice, Practice, Practice!
My blog was a huge help. I started posting photos and stories behind them 3 times a week. The blog taught me to take photos with a purpose and to make sure that the photos were able to support a story or best yet – to tell the story in and of itself.
The blog helped me add context to my pictures and helped me practice. And that was the key – Practice, Practice, Practice. I began shooting everyday. I began to read the camera manual to figure out how to control the aperture, the shutter speed and the ISO. I slowed down, took less shots and put the camera into full manual mode.
As I slowed down and became more thoughtful I took less pictures. Surprisingly though, as I took less pictures on each outing, I began to take more good pictures. I was shooting more often, taking less pictures each time, but keeping more good pictures. I was learning and I was happier with the result.
I ask the question To Photoshop or Not to Photoshop? There was never a question.
There is no question that Photoshop can change your photography and skills. Photoshop and editing became 50% of each picture I took. I started to practice every night for at least 2 hours. I started learning and using techniques to make my pictures look better and more interesting. I learned that Photoshop was an absolute must if I wanted my pictures to become more interesting.
I found plug-ins like Color Efx Pro and Viveza which I could use to make my photos look more professional and vivid. While I am not an expert in Photoshop by any means, I learned that if you want truly interesting pictures that you have to edit them before you post them online. Even if it is a tiny edit you can almost always improve your photos a bit with photoshop.
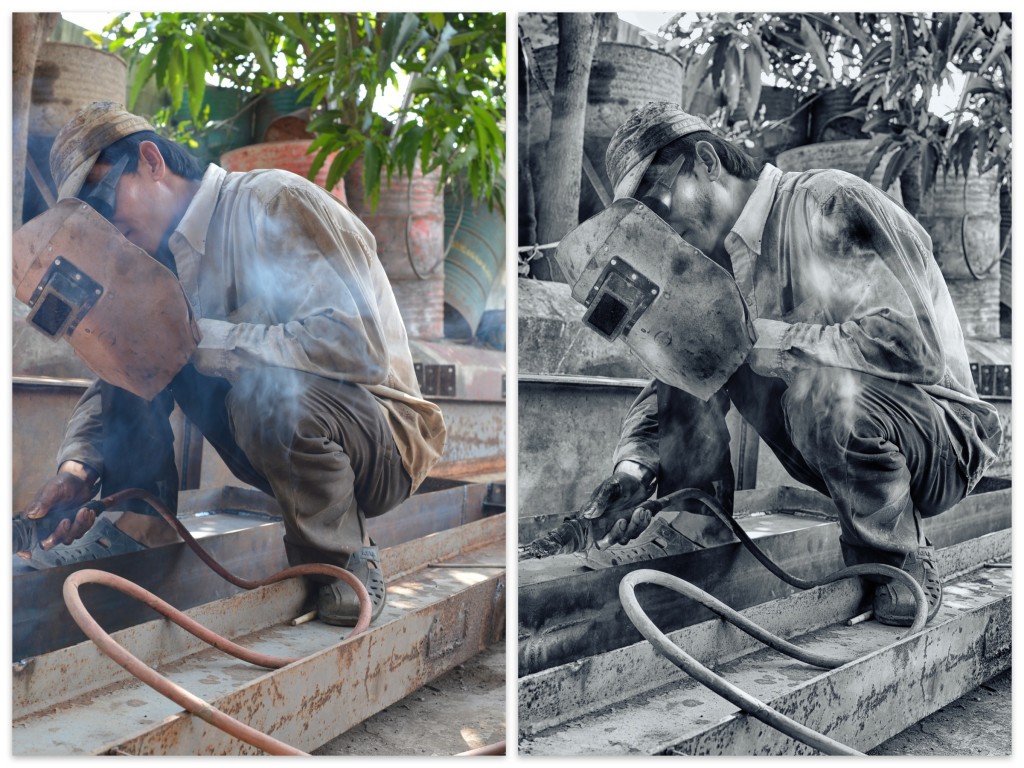
The pic on the left is straight from the camera. I enhanced it on the right with some basic edits.
Learning a lesson. Pointing the camera at the world, to reveal pictures of me.
After the obsession, after the hoarding of gear, after shooting every day, after blogging everyday and learning everything I could about photoshop I always question myself – When am I going to be where I want to be? I look at other photographers pictures in awe sometimes and have no idea how they do it. The only thing I can do is try to copy them and I do just that shamelessly at times.
But gradually over the last year I find myself becoming more accepting of my photography – of what it is and what is not. I have learned to accept what I am good at and what I am terrible at. Through all this, I like where it has taken me. I have discovered that photography has pushed me to live more, to see more of the world, and to become more understanding of what is important to me.
I am not a fashion photographer. I am not a landscape photographer. I am not a photojournalist. I am not a street photographer. I am not a professional photographer. I am only me and can only see the world in a certain way. I take pictures of the way that I see the world and of the way I see people and who they are. I take pictures of where I am and sometimes of where I pushed myself to be. The more I point my camera at others, the more I find out about me and what is important. When I take pictures of others, I am really just revealing small pictures of myself for others to see. To see the world through my eyes is to see more of me and who I am.
When I point the camera at others, I begin to reveal myself
Every click of the shutter reveals more and more of me to me and it is changing my life with each picture I take. I guess photography for me has not only been a journey of discovering the world but of discovering myself and what is important to me. I learn something new about others, and about myself every time I pick up the camera.
A camera can change your life too. Maybe just a little but it can.
It’s amazing how the internet and all it’s sharing tools have democratized photography. Sharing a photo takes literally an instant and requires nothing more than your phone and an internet connection. Sharing a photo is as easy as dialing the phone was just 20 years ago and instead of communicating with a single person, you can communicate to the world.
Absolutely anyone can share a photo and have it viewed and admired by millions. Photography is about sharing and never before have people been able to share their work with so many so quickly.
Over the last couple of years, I have found many ways that my camera has helped changed the way that I experience life. They are simple things that almost anyone can do if they have a camera. Since it’s the beginning of 2013 and people are making resolutions to make it a great year perhaps the camera can help.
Here are 10 ways to use and enjoy your camera. 10 ways to use Photography to start a new life. A life with richer experiences.
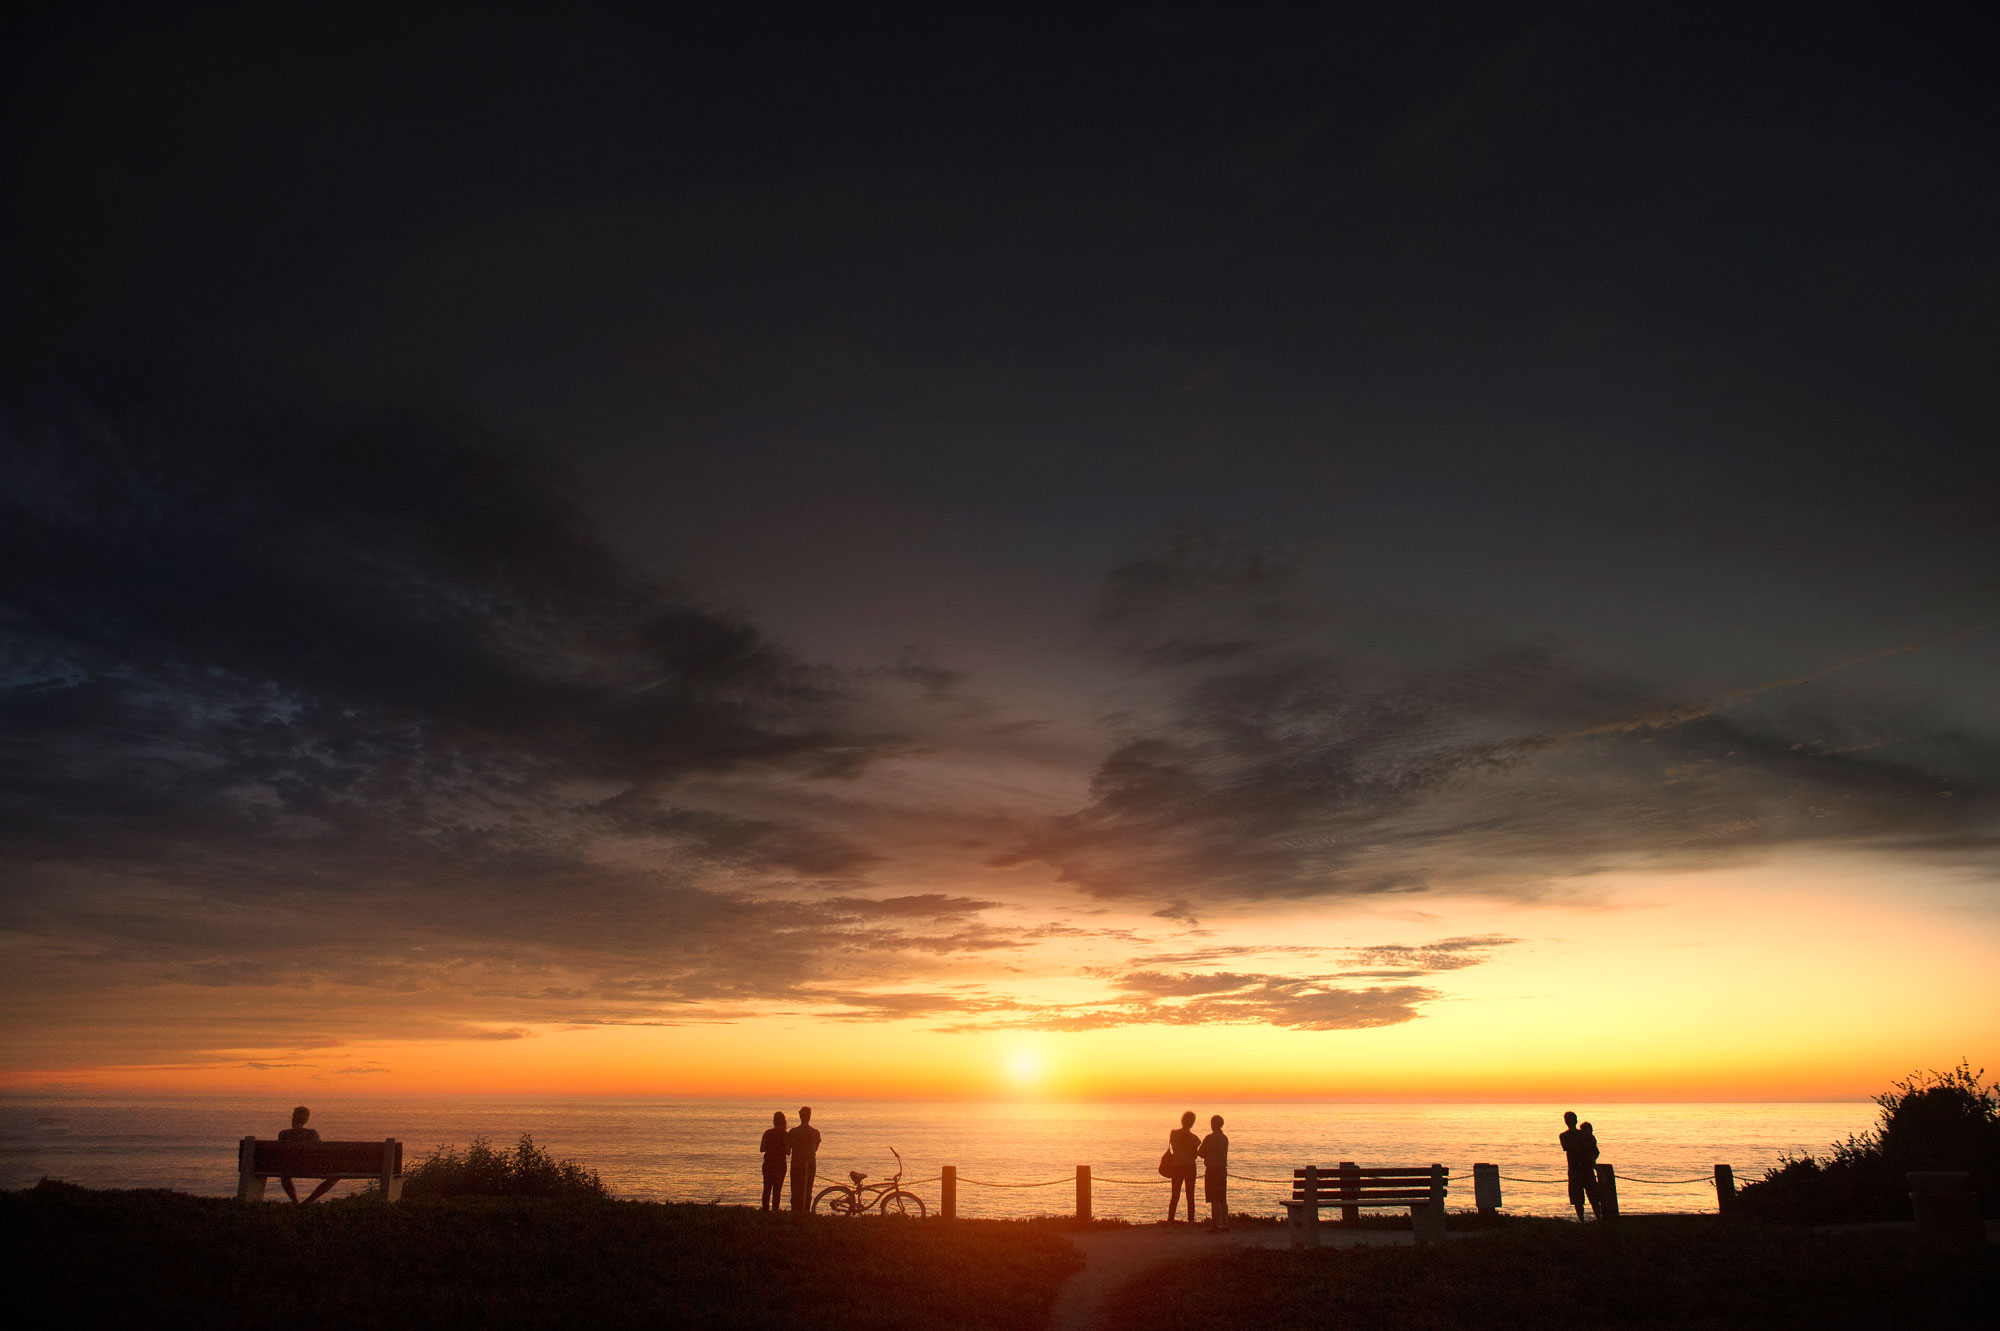
1) Take Photo Walks – Go out and see the beauty of the world without distraction.
Shut down your computer, turn off the TV, grab your camera and go on a walk. A Photo Walk is just what it sounds like – you go on a walk somewhere interesting and take photos if anything looks amazing or interesting. I do at least 1 a week and they can last anywhere from 30 minutes to 5 hours.
The trick to a good Photo Walk is to not set expectations too high. The point is to take a walk first to see the world, and the second is to take pictures if anything comes along. I have tried doing photo walks where I made up my mind that I wanted to take great photos. That never works. I come home frustrated and not too happy with my pictures. It’s important to let the walk guide your pictures and not the other way around. You might come home with zero good pictures but you will always have a great walk and that is important.
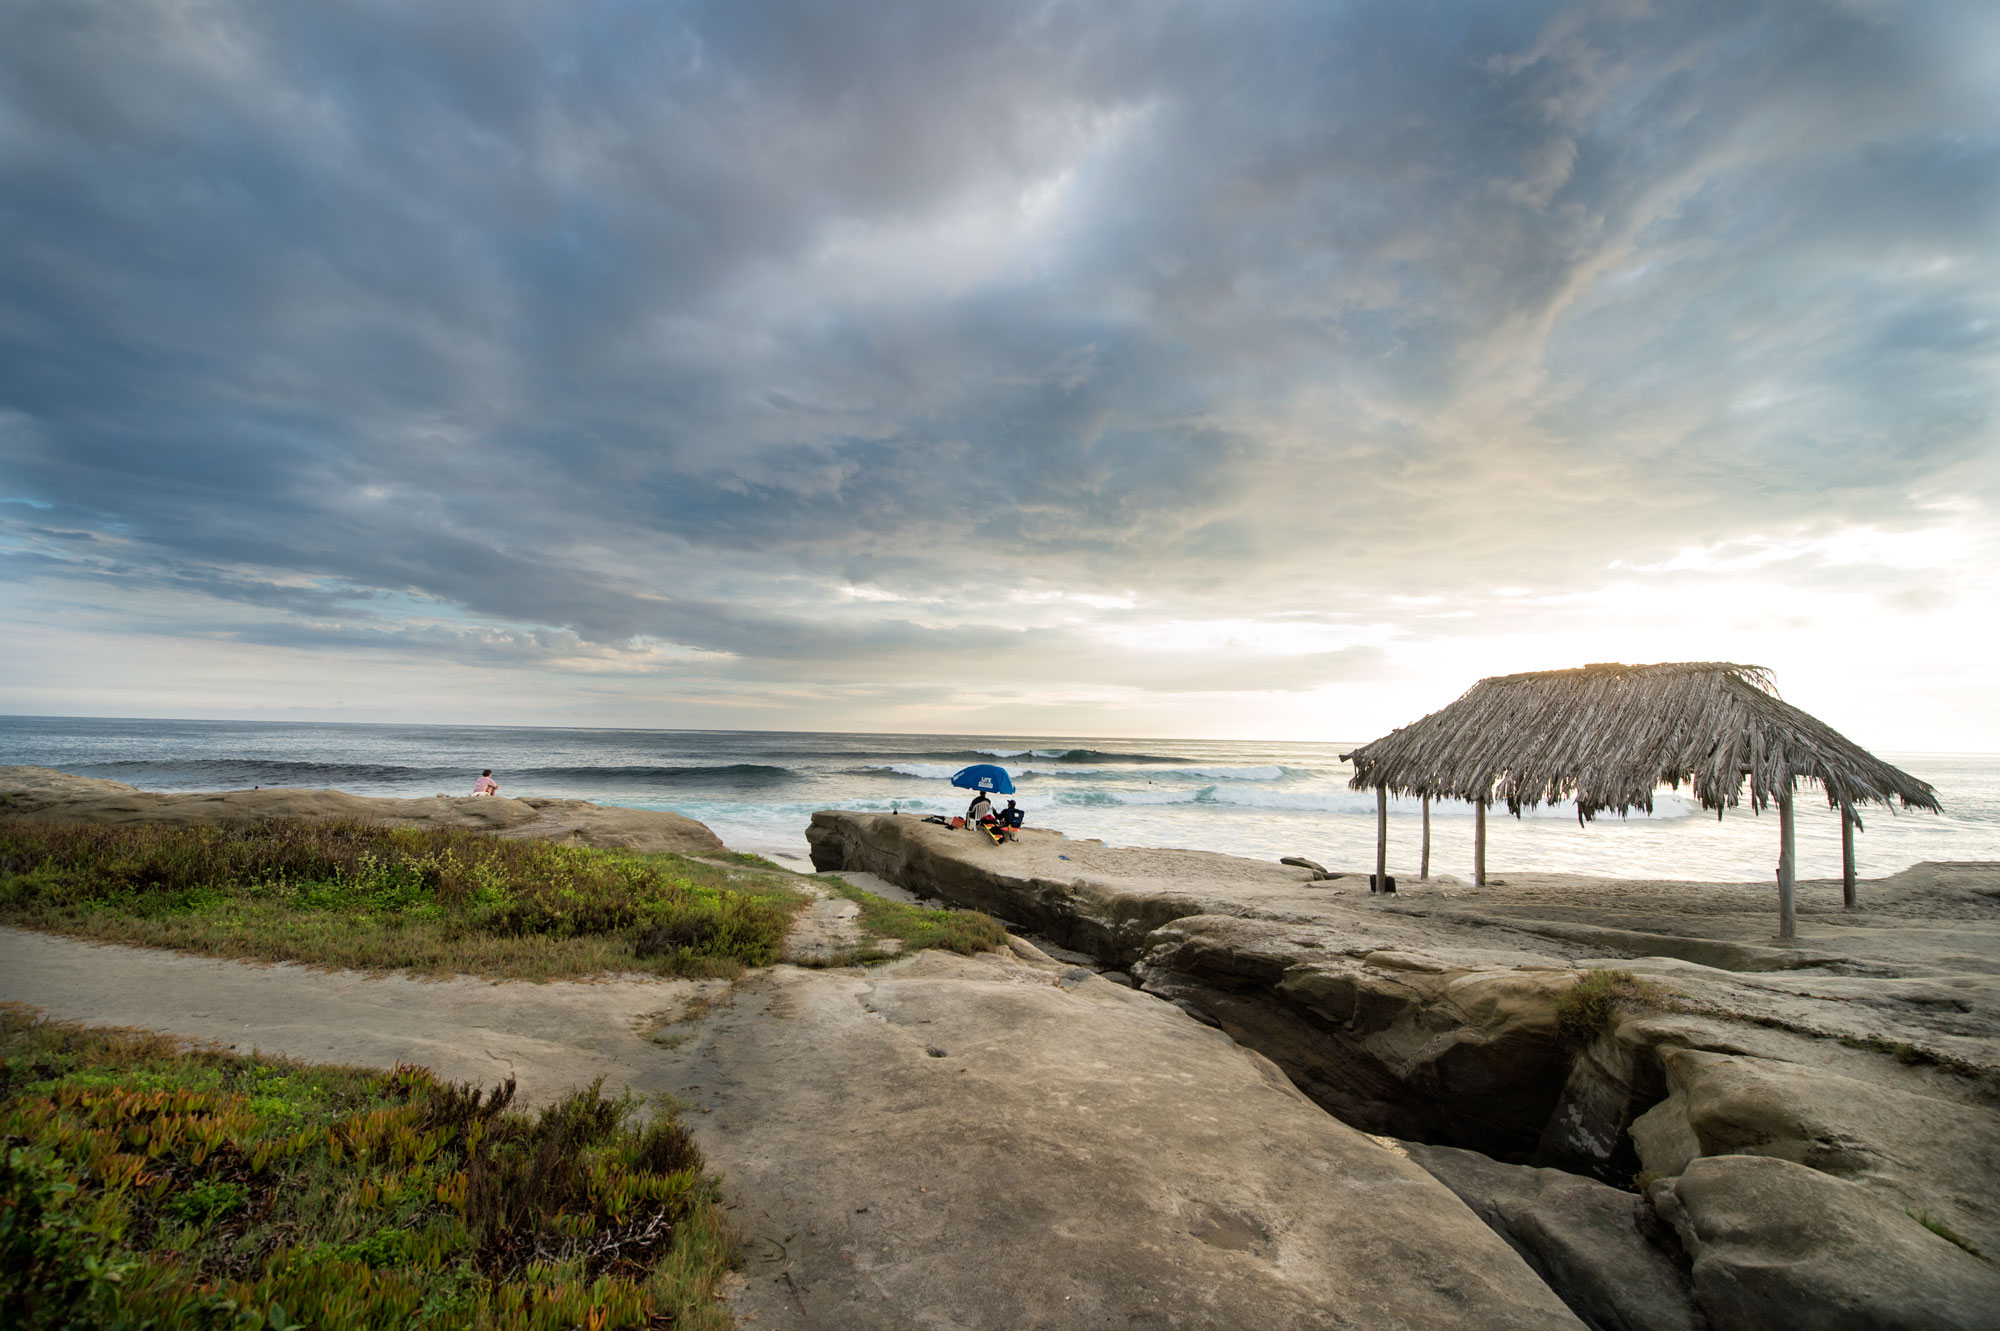
I usually take walks around sunset and along the beach. I was walking along sunset cliffs in Ocean Beach when I saw this beautiful scene unfolding before my eyes. The golden sunset was casting colors on the sandstone rocks and it looked beautiful against the crystal blue waters. I was living life, seeing beauty and appreciating the world around me.

2) Open a magazine, see a beautiful picture of somewhere amazing and then go there.
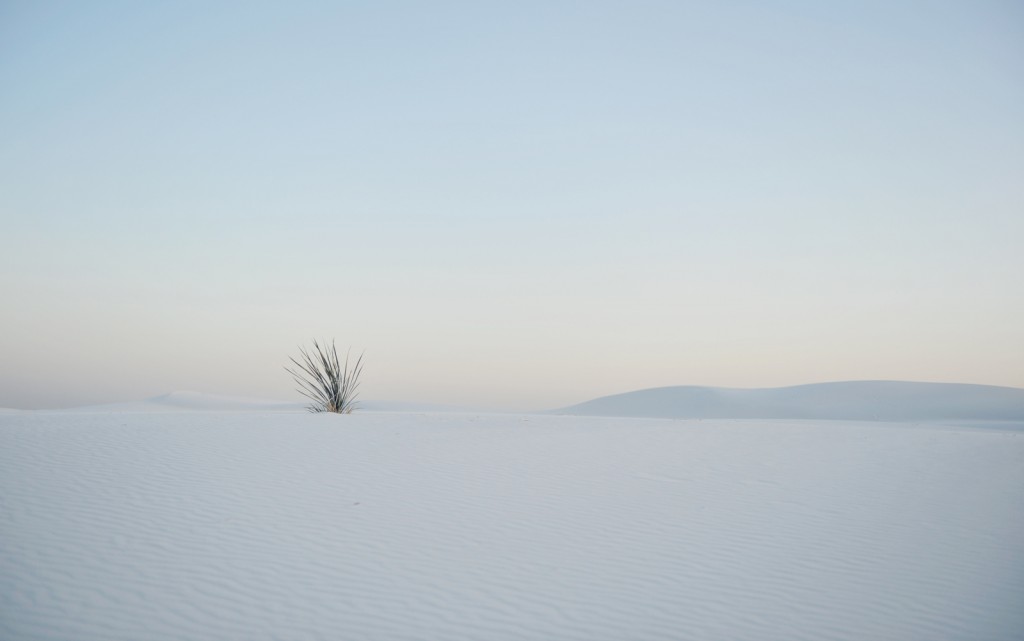
Photography gives you the freedom to go anywhere in the world with a purpose. Last year I bought a Life Magazine that showed pictures of the 50 most beautiful places in the United States. I poured through the magazine and saw pictures that blew me away. I wanted to go to some of those places so I did. If I didn’t have a camera I probably would have been content to browse the pictures and move on. But I didn’t. I started choosing places out of the magazine and visiting them with the intent of capturing beautiful images from those places. I visited Banff National Park, Arches, Yellowstone, Monument Valley Arizona, White Sands New Mexico and many other of the most beautiful places that I saw in the magazine. I didn’t just visit those places, I went there to find beauty and capture it – I had a purpose and it kept me exploring. The camera can make you an adventurer, an explorer of the world.
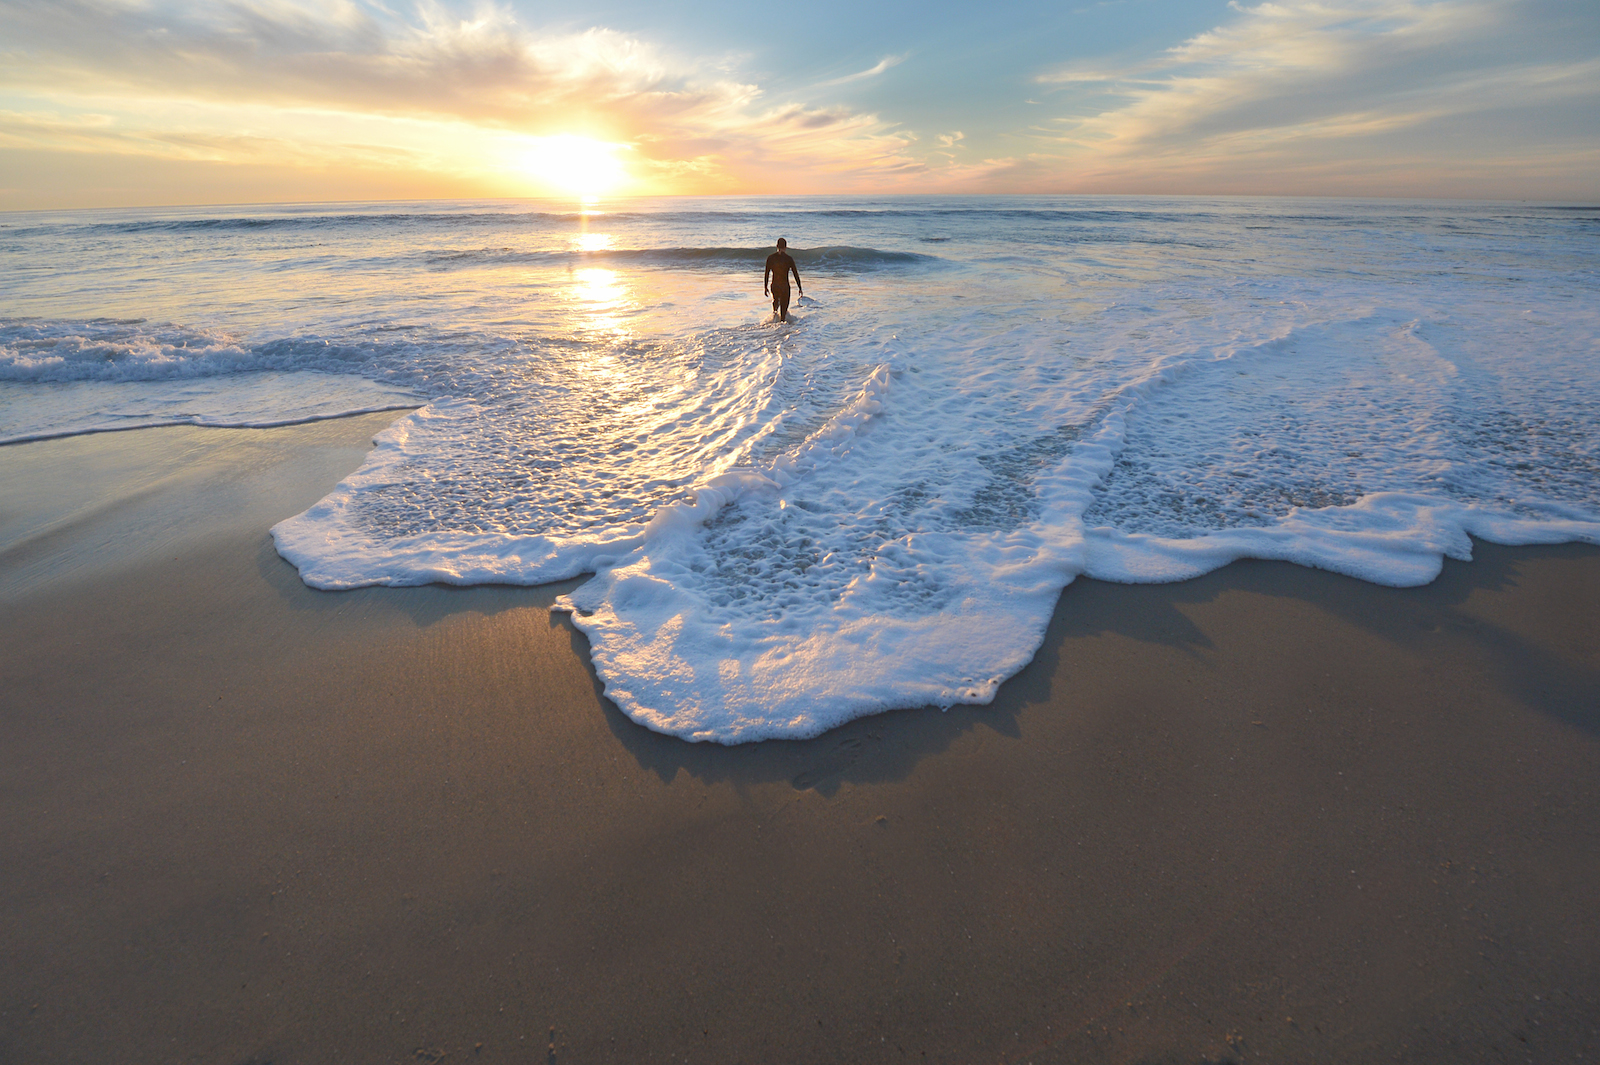
I took this picture in White Sands. It was calm, peaceful and beautiful. I was alone in massive white sand dunes with my camera while the sun slowly set. There was no sound, just the click of the shutter as I snapped this picture.
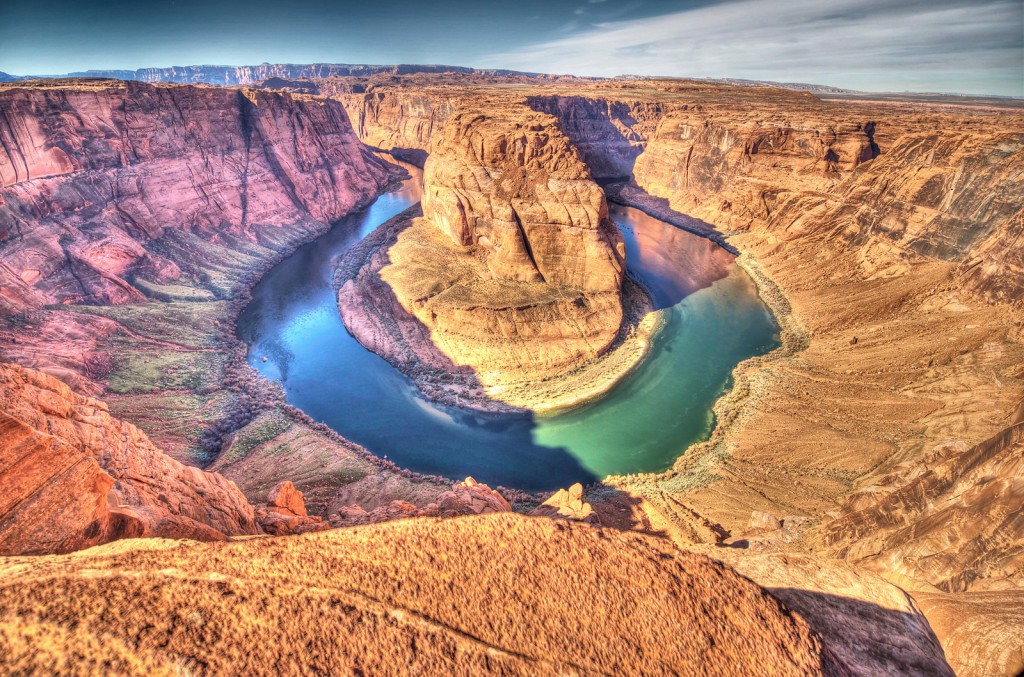
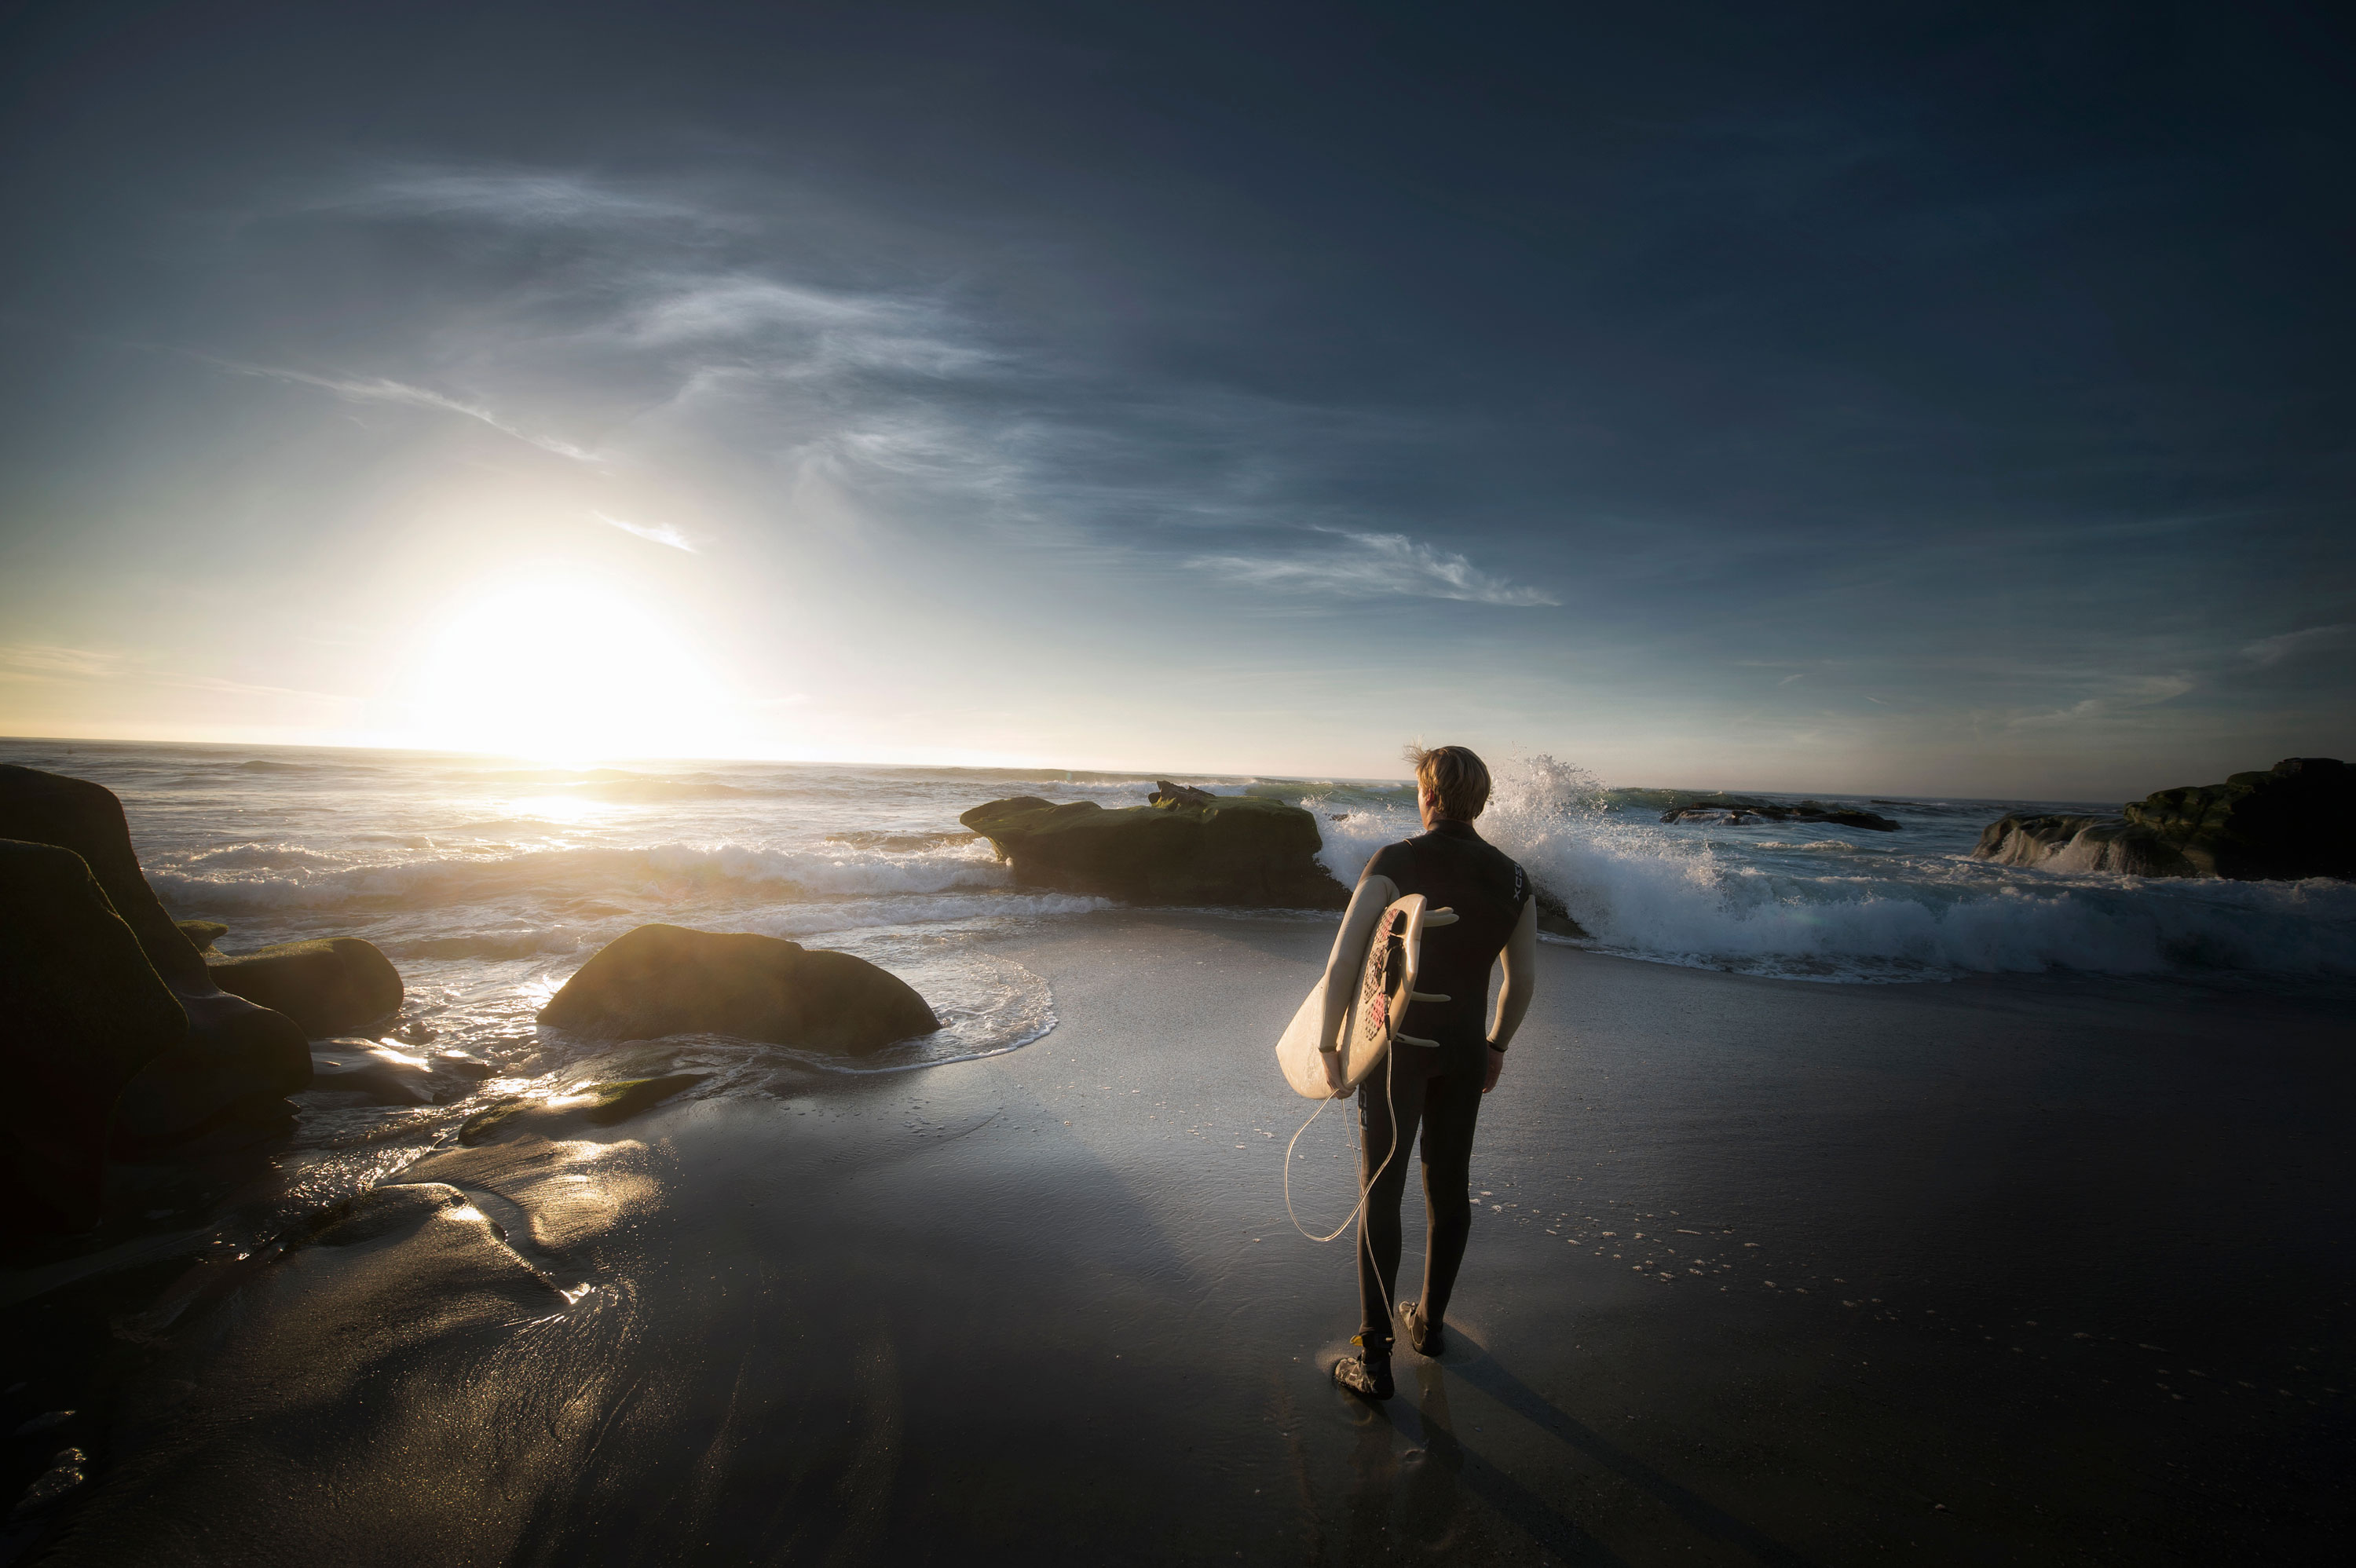
3) Do something uncomfortable. Push yourself to the edge of your limits.
There I was. I was standing on the edge of a massive cliff looking down at one of the most amazing views I had ever seen. I was not sure if it was fear or awe that was taking my breath away. I was breathing quickly and half of me wanted to slowly back away from the edge, and the other half made me reach for my camera to capture the moment forever. I was in Page Arizona looking down at the iconic “HorseShoe Bend” where the river makes almost a complete circle. It is no secret that a few (and sometimes more than a few) photographers die here each year when they get too close to the edge and slip off. I am massively afraid of heights and this was a photo that I felt compelled to get. I was pushing myself to my limit to test myself but also to capture something that I found to be beautiful. I felt alive and exhilarated and after I got the photo-triumphant.
The camera can give you a purpose to push yourself to your limit. Find somewhere that test your comfort zone. Whether it is taking a picture of a stranger, an activity, or somewhere slightly dangerous, the camera can give you a purpose to conquer the fear but also a trophy and a story to tell others about your experience.
4) Tell a story with a picture to help someone in need.
A picture paints a thousand words, and photos often tell a story that words cannot. Many photographers spend time helping non-profit groups get their story out there so they can raise money or awareness. The feeling you get by taking a picture of someone in need to help them tell their story is amazing. In these busy days people may not give words a second glance but they will look at a picture and at times be moved enough by that picture to do something.
It was Christmas. We were in Vietnam and we heard of a little known orphanage on the out skirts of town in a former run down prison. We arrived and saw the abysmal conditions and when we opened the rusty gates to enter we were greeted by the happy screams of beautiful but forgotten kids and babies inside. Each orphan had a single pair of clothes and most slept right on the floor in rooms that used to be prison cells. I felt that pictures were the only way to tell the story. The pictures could show the world these kids so that people would go to visit, perhaps adopt them or perhaps just give them simple things like the milk and food they needed. We used the pictures to setup a Facebook page and tell the world the story.

5) Meet a stranger, learn their story. Appreciate how blessed you are.
As I do sometimes, I was walking around taking pictures on the street and looking for interesting situations and people. I saw him in the distance and knew I wanted a photo of him. He was well dressed while others were casual. He was walking with a binder and seemed to have sense of purpose. I took a picture of him and he stopped to talk to me. He told me he was an English teacher many years ago but not anymore. The Vietnam War had ended his career as well respected and highly paid teacher. I learned later that even though he had not had a job in over 30 years teaching, that he awoke each morning, put on his work clothes and walked outside making his way to a job he did not have. He went through the motions each morning to go to work to give his life a sense of purpose.
I later learned that several years ago he suffered tragedy when his wife was hit and killed by a car while they went jogging at night. His life was empty but he filled it with hope that things would get better. He thanked me over and over and over again for taking a picture of him even though he never expected to get a copy of it. He was just happy that someone found him interesting enough to take a picture of him.
Going out in the world with your camera can oftentimes lead to an introduction of a stranger. Their story might interest you. You can look at the world with a bit more compassion and you might appreciate how blessed you are for your own situation.

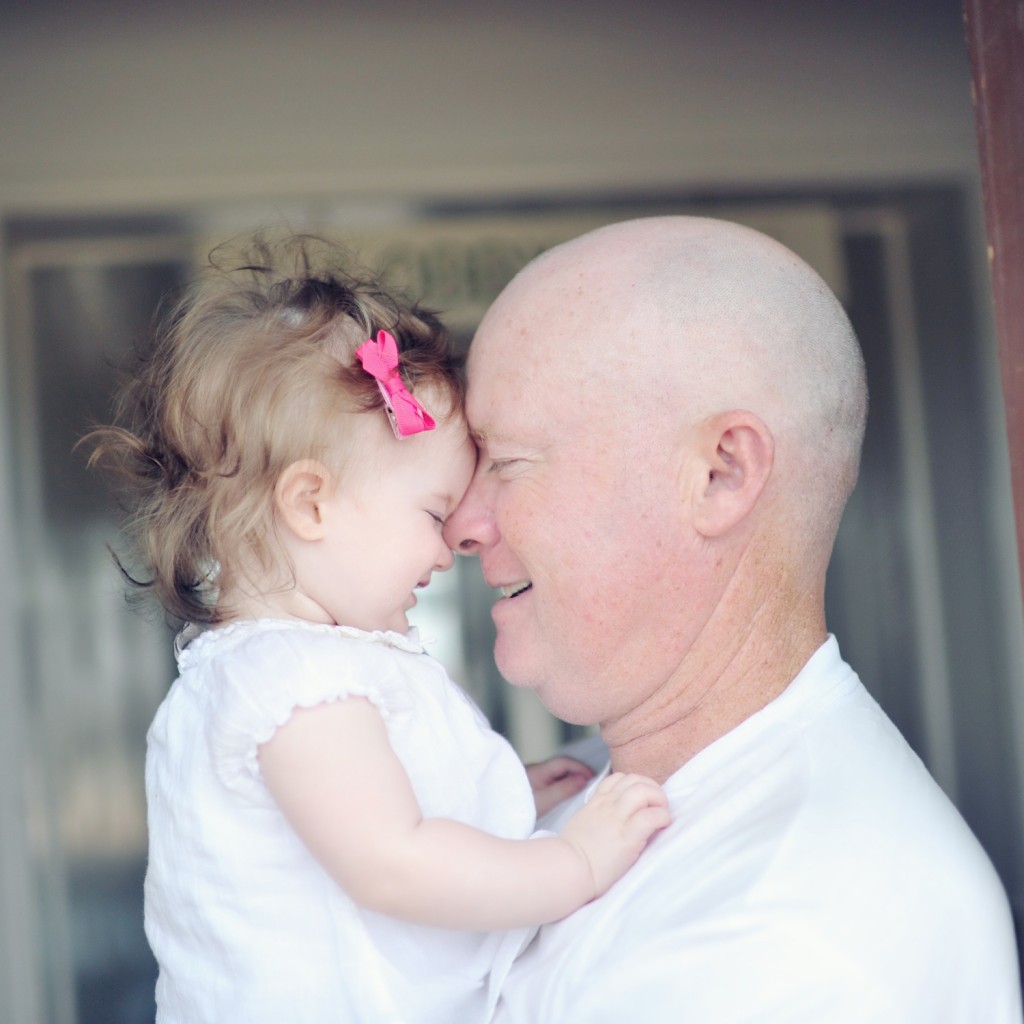
6) Make someone feel good with a picture you take.
A picture can make someone feel beautiful, or feel loved, or feel like they have a wonderful life. Your picture can be a mirror back to that person of what their life is and it can make them feel wonderful about they have. I have found that people are often hesitant to let you take picture of them because they have had a bad experience in the past. Maybe someone has uploaded an unflattering image of them on Facebook for the world to see and they just don’t want that to happen again. Whenever I take pictures I am always aware that I need to be sensitive to how the picture will make someone feel when they see it. You can use your camera to take a beautiful picture of someone and they just might feel good about their life and what they have when they see it.
I took this picture of my brother and his daughter Isabella. I think when he saw it he must have felt that he had the best life of anyone in the world.
7) Start a photography blog to enrich your life and tell your words and pictures.
I can honestly say starting my photography blog was a huge step in improving my photography. The blog was a personal way for me to put my pictures into a context with a story that would be interesting for others to read. The blog also helped improve my life too. 3 to 4 time a week I will post a picture and reflect upon what has happened in my life. The blog might be a picture and few sentences but the habit of writing the blog keeps me focused on taking pictures and journaling my life. Over the past year, I know have a diary of where I have been and what I have done. When I started only a few people would read it. It is still small but everyday I get about 100 readers that look at my post. It makes me feel good to tell my story.
My first blog post was about my nephew Geno and ever since he has been the subject of many.
![]()
my first blog post over a year ago – http://blog.frankiefoto.com/?p=22
8) Wake up early. See the Sun Rise over the world.
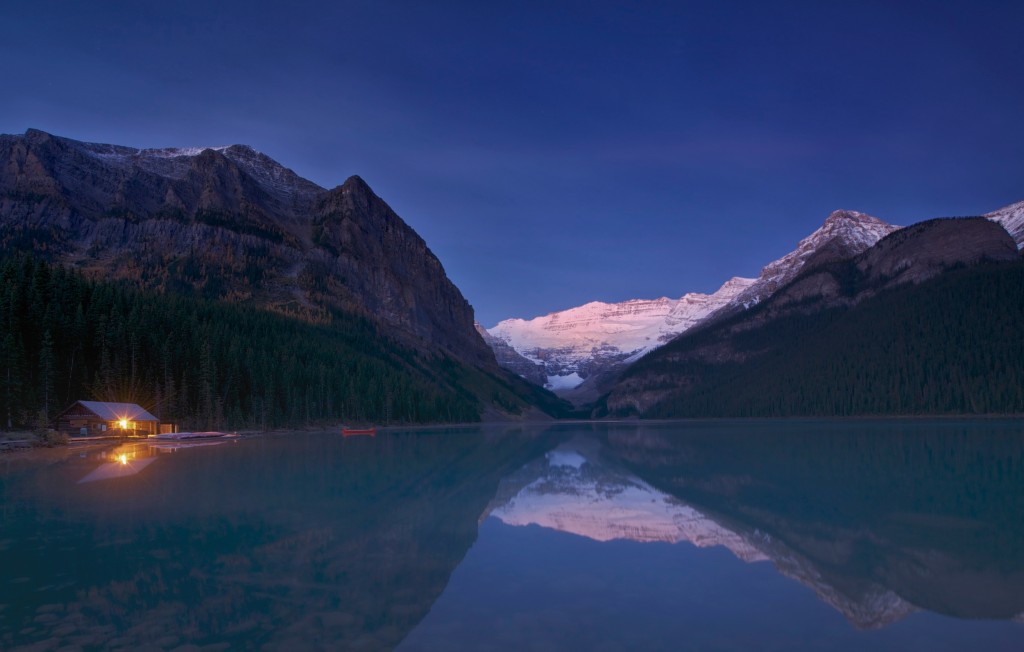
Waking up at 5am while it is still dark to take pictures while everyone else is soundly sleeping may not sound like fun but it can be extremely rewarding. It’s no secret that the most beautiful light of the day for photographs is either sunrise or sunset. Since the sun is so low in the horizon it gives your pictures color, clarity and contrast that you can never get in the middle of the day. Your camera can give you the sense of purpose to pull yourself up out of bed early to capture a beautiful scene. When you get home others will be just waking up but you will have already accomplished something extraordinary that day.
It was dark, it was cold and I was tired. It was 4am in Banff and I was in a car on a dark road on my way to take pictures of sunrise. There was frost everywhere and I just felt like crawling back into bed. I got up too early actually and found myself waiting around for about an hour at a beautiful lake waiting for that perfect sunrise picture. There was no one around. I had the place to myself (and maybe some bears but I tried not to think about that). I set my camera on the tripod and took this picture of the serene boat house. Its light was on. There we were, the boat house and I anxiously waiting for the beautiful sunrise that was just on the horizon. Life was good. I wasn’t tired anymore.
9) Experience Winter, Spring, Summer and Fall
I never appreciated the changing seasons until I had a camera. Living in San Diego our seasons are subtle and most often seem like either spring or summer. Sure we are blessed but half of the beauty of the world is in the way it changes over time. Your camera can help you experience each of these helping you see and capture the beauty that each has to offer. For example, I could never fully appreciate the beauty of fall until I looked at it through my lens. I learned to love the changing colors of the leaves and the beauty that I was able to capture with a photo. I feel like I am really living each season and anticipating the beauty that I will find in each.
10) Do a 365 Day Project.
One of the best things you can do with your camera is to start a 365 Day Project. Photo sites like 500PX, SmugMug and Flickr have communities setup where you post a single photo that you take each day. Other people will look at your photos and comment or encourage you. A 365 day project is only a commitment to try to take a single photo each day and post it. It will force you to practice everyday and share everyday. The more you practice and the more you share, the more reward you will get from photography. The best thing about a 365 day project is you have a site that you can go back to for years which chronicles your daily journey though life.
I started my 365 day project last year. To be honest I probably only post pictures 4 times a week but the site has become one of my favorite places to go to see what I was doing each day.

my 365 day project portfolio – http://www.frankiefoto.com/People/mylife/
Start living life. Let Photography push you to experience life.
Thank you for taking the time to read my journey through photography. I hope that you got some interesting ideas on how to use a camera (any camera really) to help you live life more fully. If you immerse yourself in the world of photography you will be amazed at everything that it can offer you. It is not easy to take the time for pictures everyday but even if you take the time once a week you might be surprised out how much you can improve your life experience. You can stare at the world, or you can take a picture – it last longer.
Falling Down – Marian High School
It opened in August 1960 and closed 50 years later. Marian High School was the natural place that catholic kids in the South Bay would enroll after finishing grammar school in places like St Pious, St Rose or St Charles. While it did close in 2007 the buildings still sit vacant, decaying and waiting; waiting to be demolished by whatever developer with whatever plan with whatever money it can be bought for. I guess it doesn’t help that the economy tanked and the real estate market took a dive, but for whatever reason no one is buying and so the old school waits while the weeds grow up through the cracking cement.
I went to Marian during the 1980’s and made a lot of friends. It was a small school but we still had all of the things a big school had. We had a cafeteria. We had football. We had basketball, track, wrestling and all the sports you could want. We even had a marching band. There were 10 of us in the rag tag band barely pumping out enough sound with our saxaphones, flutes and single snare drum to reach the stands when we played the anthem before games. We spelled out the letter “M” to honor our school just like any other big school would; we just did it with 10 people instead of 100. I know other high schools would laugh at Marian – we were small and they were big. They had money – we didn’t. But we had something that none of them had. We had Matt Modine, the most famous of famous actors in the world. What other school had someone so famous such as that?
I went back to Marian this last week when I heard it might be sold soon and torn down for good. I wanted to capture some pictures of the old school before that happened and to see what had become of the place that I left over 25 years ago and never went back to.
Sir Arthurs cafe sits boarded up after serving tasty treats like frozen burritos and pre-packaged sandwiches. At lunch, this was the spot.

Classrooms are empty now. The old hallways are quiet now. The boarded windows make the place feel ghostly.

The lockers are gone. The benches removed. Stoners, rockers, sport guys, international students used to pick their spots in this quad and hang out during breaks. Where and who you hung out with defined your high school years here.

The counselors room, now home to ferrel cats sports a sign in the corner with the caption “Natural High”

This source of inspiration did not work on all Marian high schoolers.

The Gym now littered mostly with cat feces, old books and a lawn mower. The smell has not left my nose for days now.

The gym was the meeting places for just about everything – dances, games, school meetings. It as always filled with sound. Not anymore.

The football and the weight room. You could hear the Led Zeppelin blaring from outside the walls while football players did their bench presses.

Crab grass grows over dry grass on the old football field.

The library has a few books left. Why they are still there is a mystery since everything was moved to the new school. I guess they didn’t make the cut. There is a mattress on the ground, some old computers and things that probably meant something to someone once.

Letters and a diploma holder spill out of a box. This was rescued.

Plans for the new school Mater-Dei left behind. The plans for the new school show a beautiful place in sharp contrast to the dull decay left behind here.

The Senior Lawn. This was the power center of the school where freshman dared not tread. My brother met his wife the first day of school at a locker which has since been torn down. How many other people met their significant others in this very place?

The old Cross still stands at the school entrance. A cardboard plaque of the schools Alma Mater still left behind somewhere behind the shuttered doors.

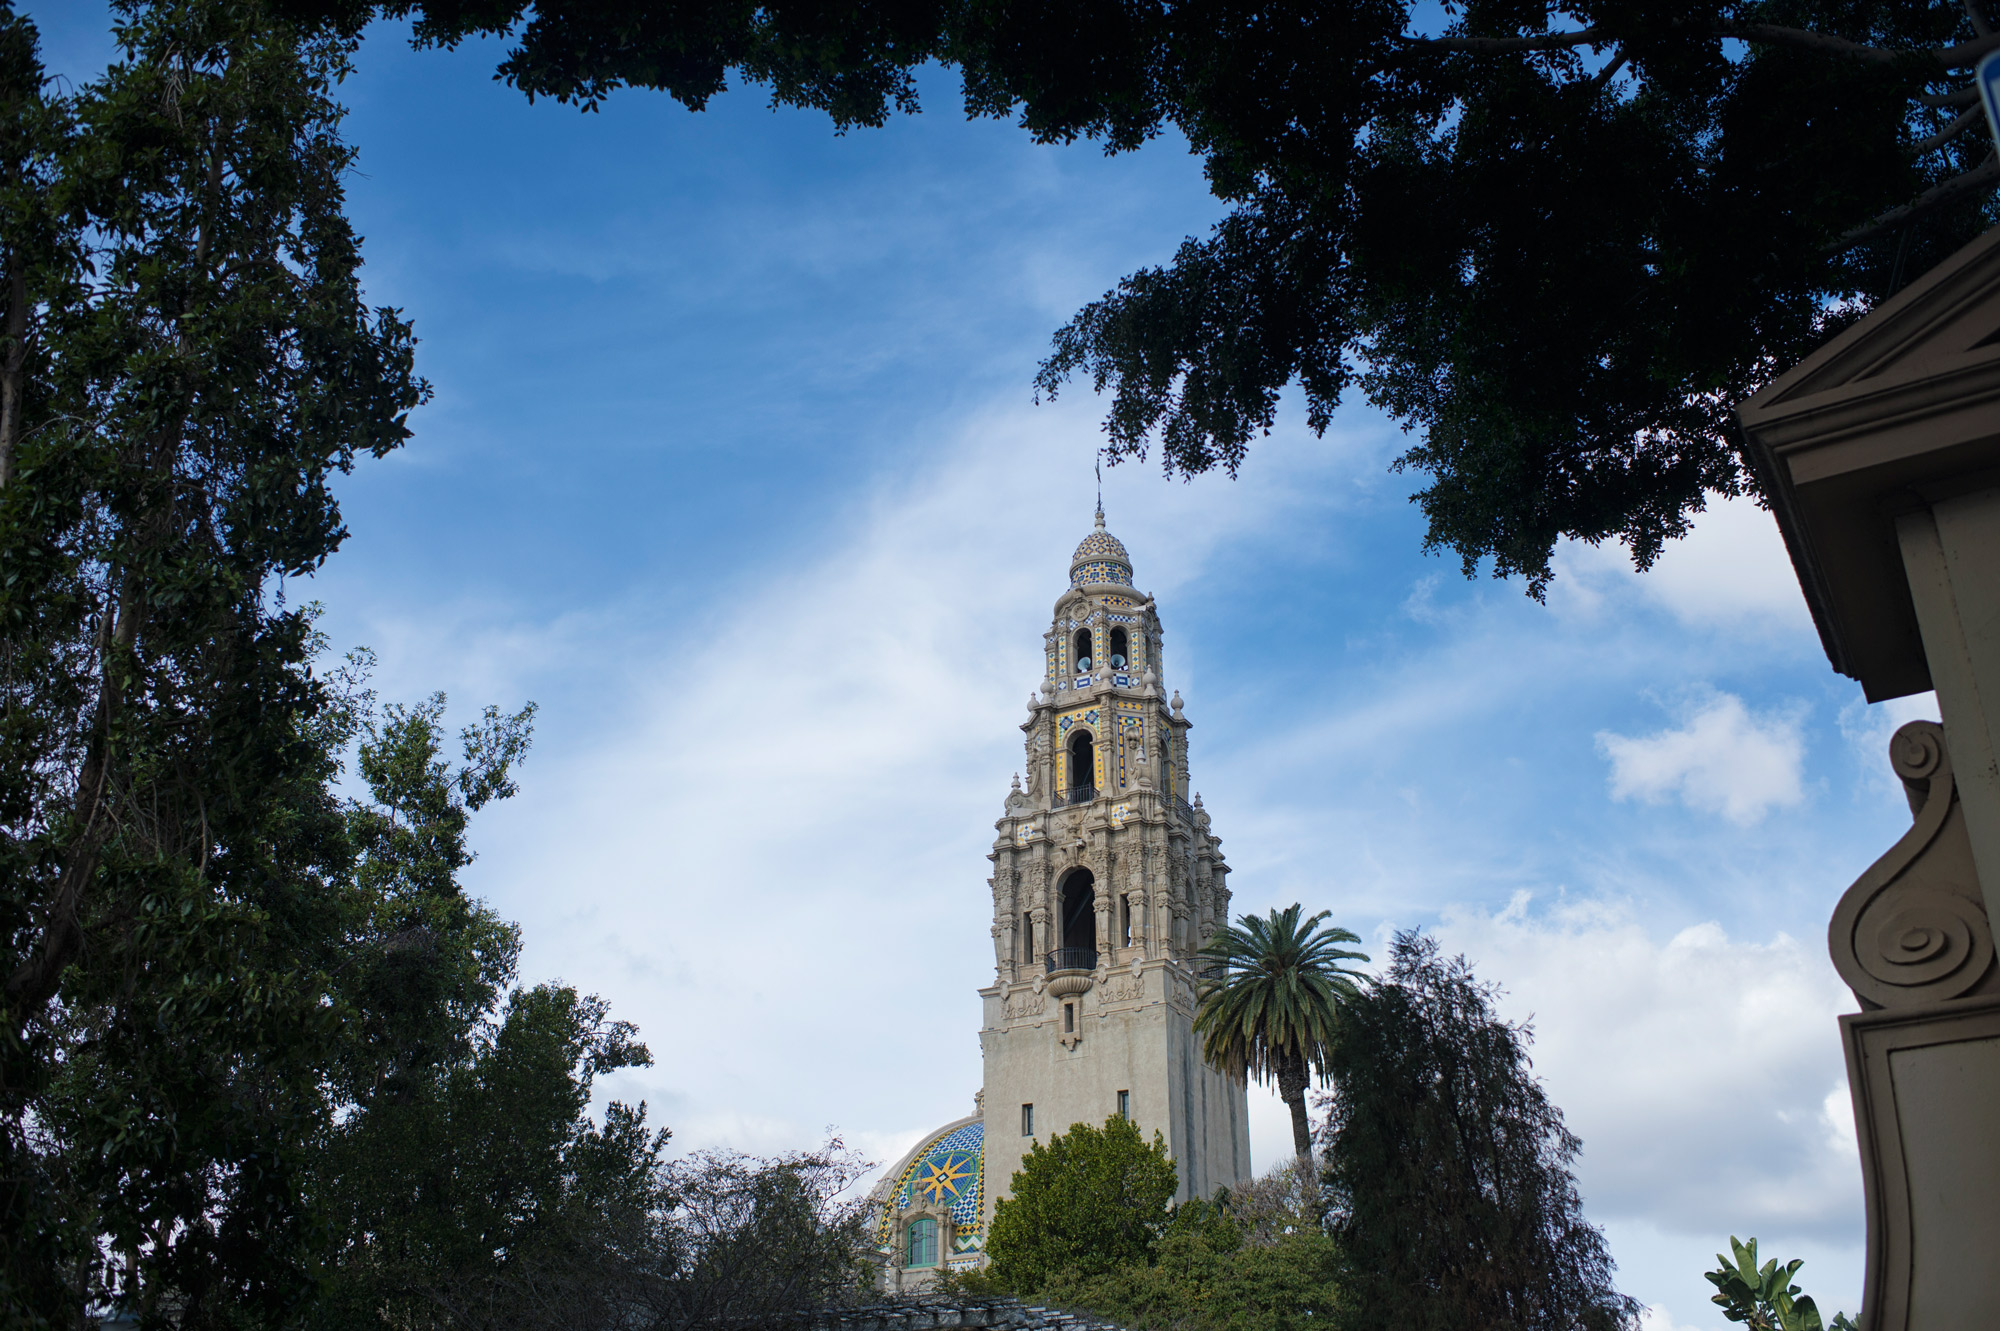
5 Best Spots for Photographs in La Jolla

My name is Frank Mckenna, a La Jolla Photographer. La Jolla is one of the most beautiful places in the world. The beautiful rugged coastline broken by long beaches combined with the almost European town setting creates a feeling like no other place in California. Coming into La Jolla you notice the sugar sand beaches hitting the beautiful blue water of the Pacific Ocean and palm trees lining almost every street. It’s a beautiful place and one that I am proud to call my home.


On average, La Jolla gets 263 days of sun a year. And ironically, those sunny days are usually months of the year that you would not expect. The best months to come to La Jolla if you want to experience the beach like sunny weather are November, December and January where on average 73% of the days are sunny and warm. The least sunny months are May and June where you can expect at least half of the days to be overcast due to the thick marine layers.
Since I am from La Jolla and love photography, I wanted to provide people coming to the city the best 5 spots for taking pictures. I have spent lots of time traveling around various areas and photographing some pretty spectacular places here in La Jolla. If your able to get to these places you should be able to get some stunning shots.
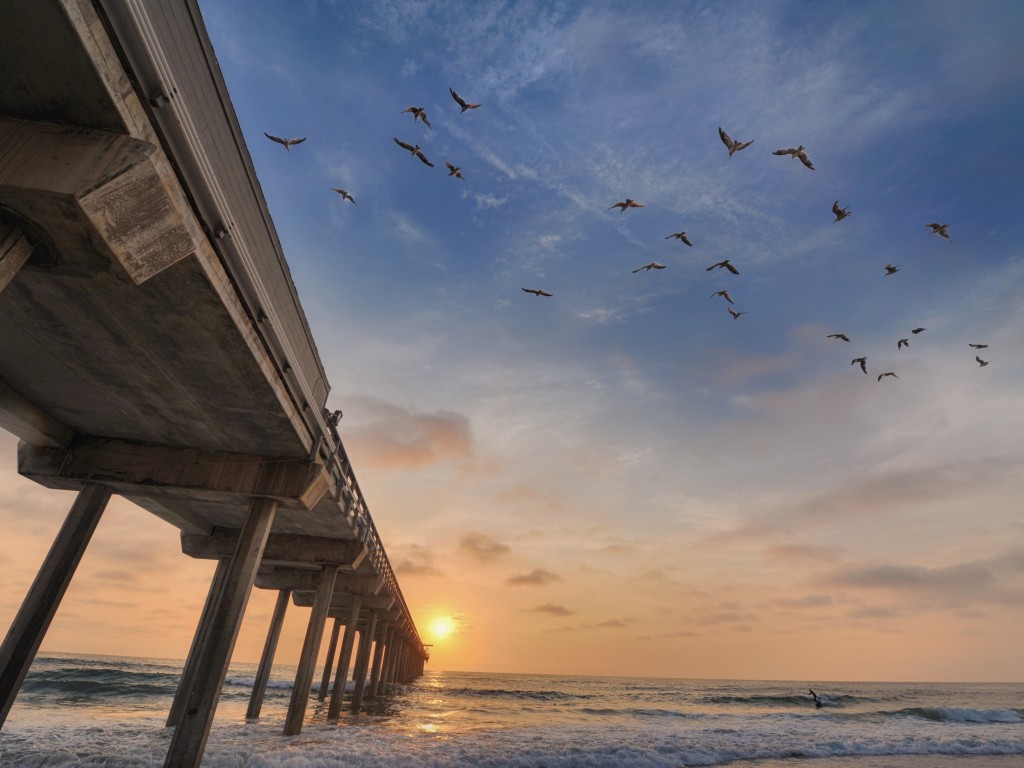
#1 Scripps Pier La Jolla (Best Time of day Early Morning and Sunset)
Drive and park at La Jolla Shores Parking lot and head north along the beach until you hit the pier.
My favorite spot in all of La Jolla is Scripps Pier. Not only do you have the fantastic sunsets and the huge pier but there are loads of great shots to be taken of people and wildlife here. When you look around everything is a shot and everything is bathed in a beautiful golden glow. If you can get to Scripps on a day when the tide is low, the receding water just glistens on the sand and reflects everything like a mirror. This is the absolute best place in San Diego to take pictures. Here are some sample shots of pictures you can take here.


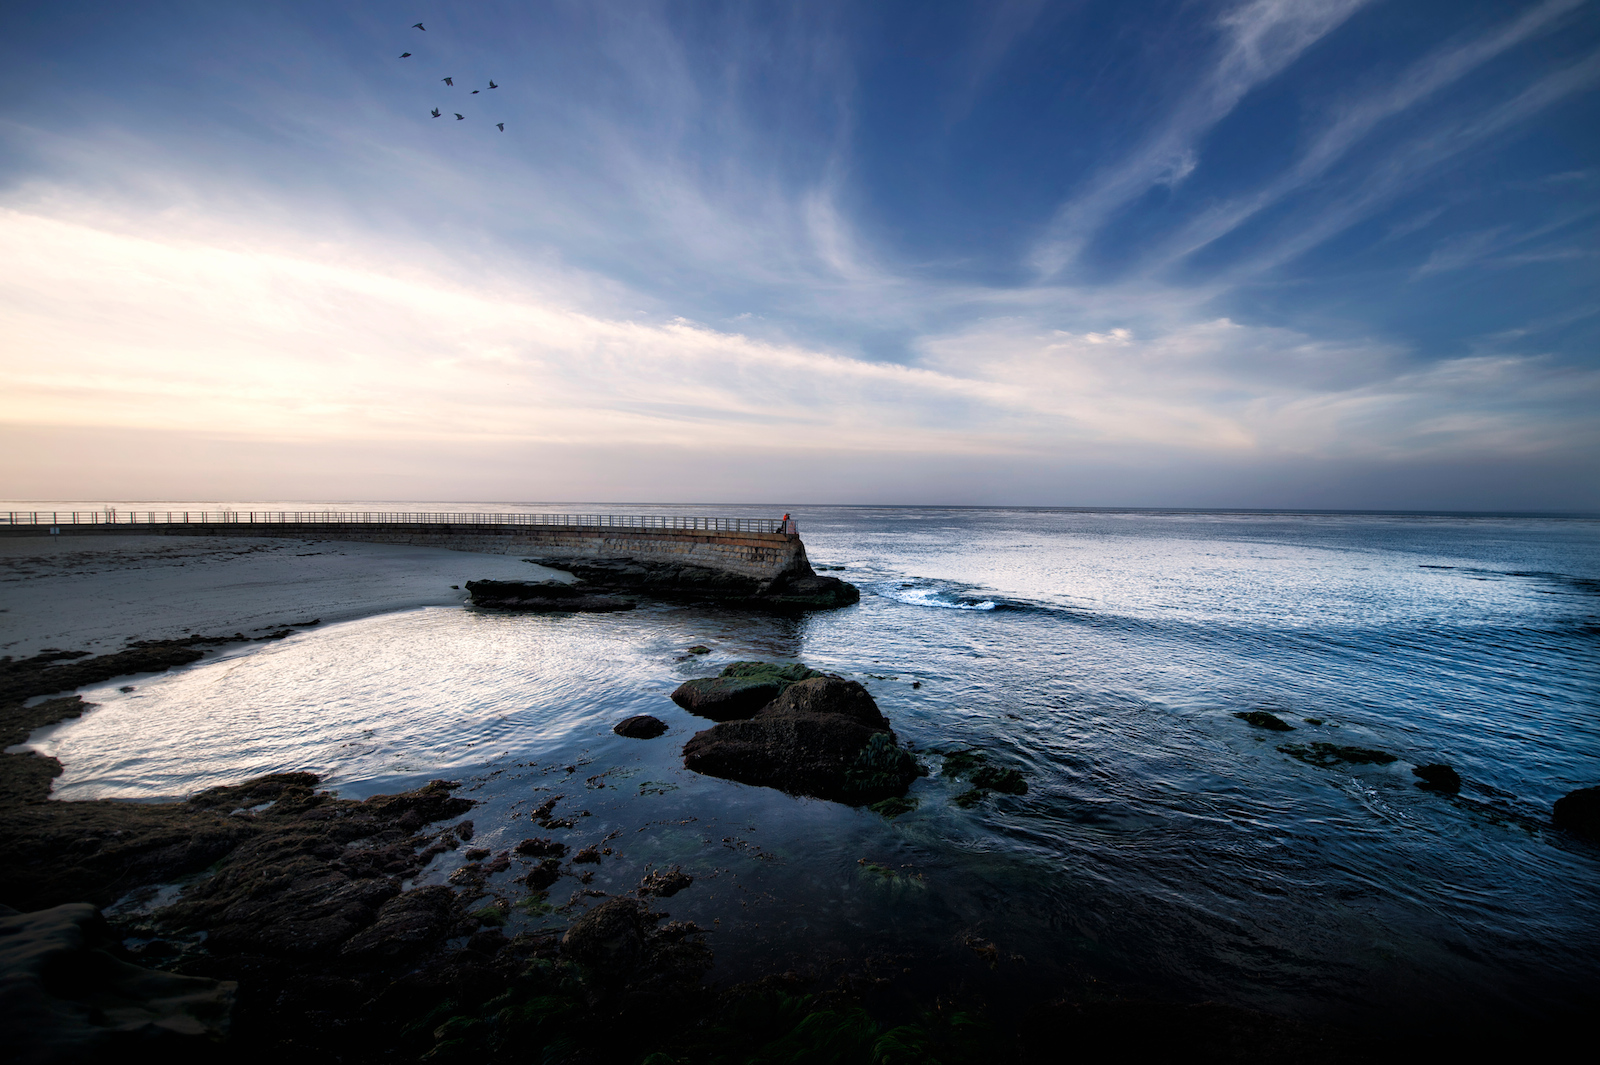
#2 Children’s Pool La Jolla (Best Time of day- Sunset)
Turn toward the coast off Prospect and head down Prospect until you see Casa De Manana and Large LifeGuard Tower.
The Children’s Pool is one of the most beautiful but most controversial places in San Diego. Originally built by Ellen Scripps as a place where kids could learn to swim it was quickly over-run by seals when the water got too contaminated to swim years ago. Now the battle rages on in courts to determine if the seals should stay or go. Regardless of the politics this is a beautiful place to photograph seals, people or just the landscape. If you get there on a day when the waves are big you can capture some pretty incredible photographs of the waves breaking over the breakwall or against the shore. This place is truly out of this world and worth a visit.


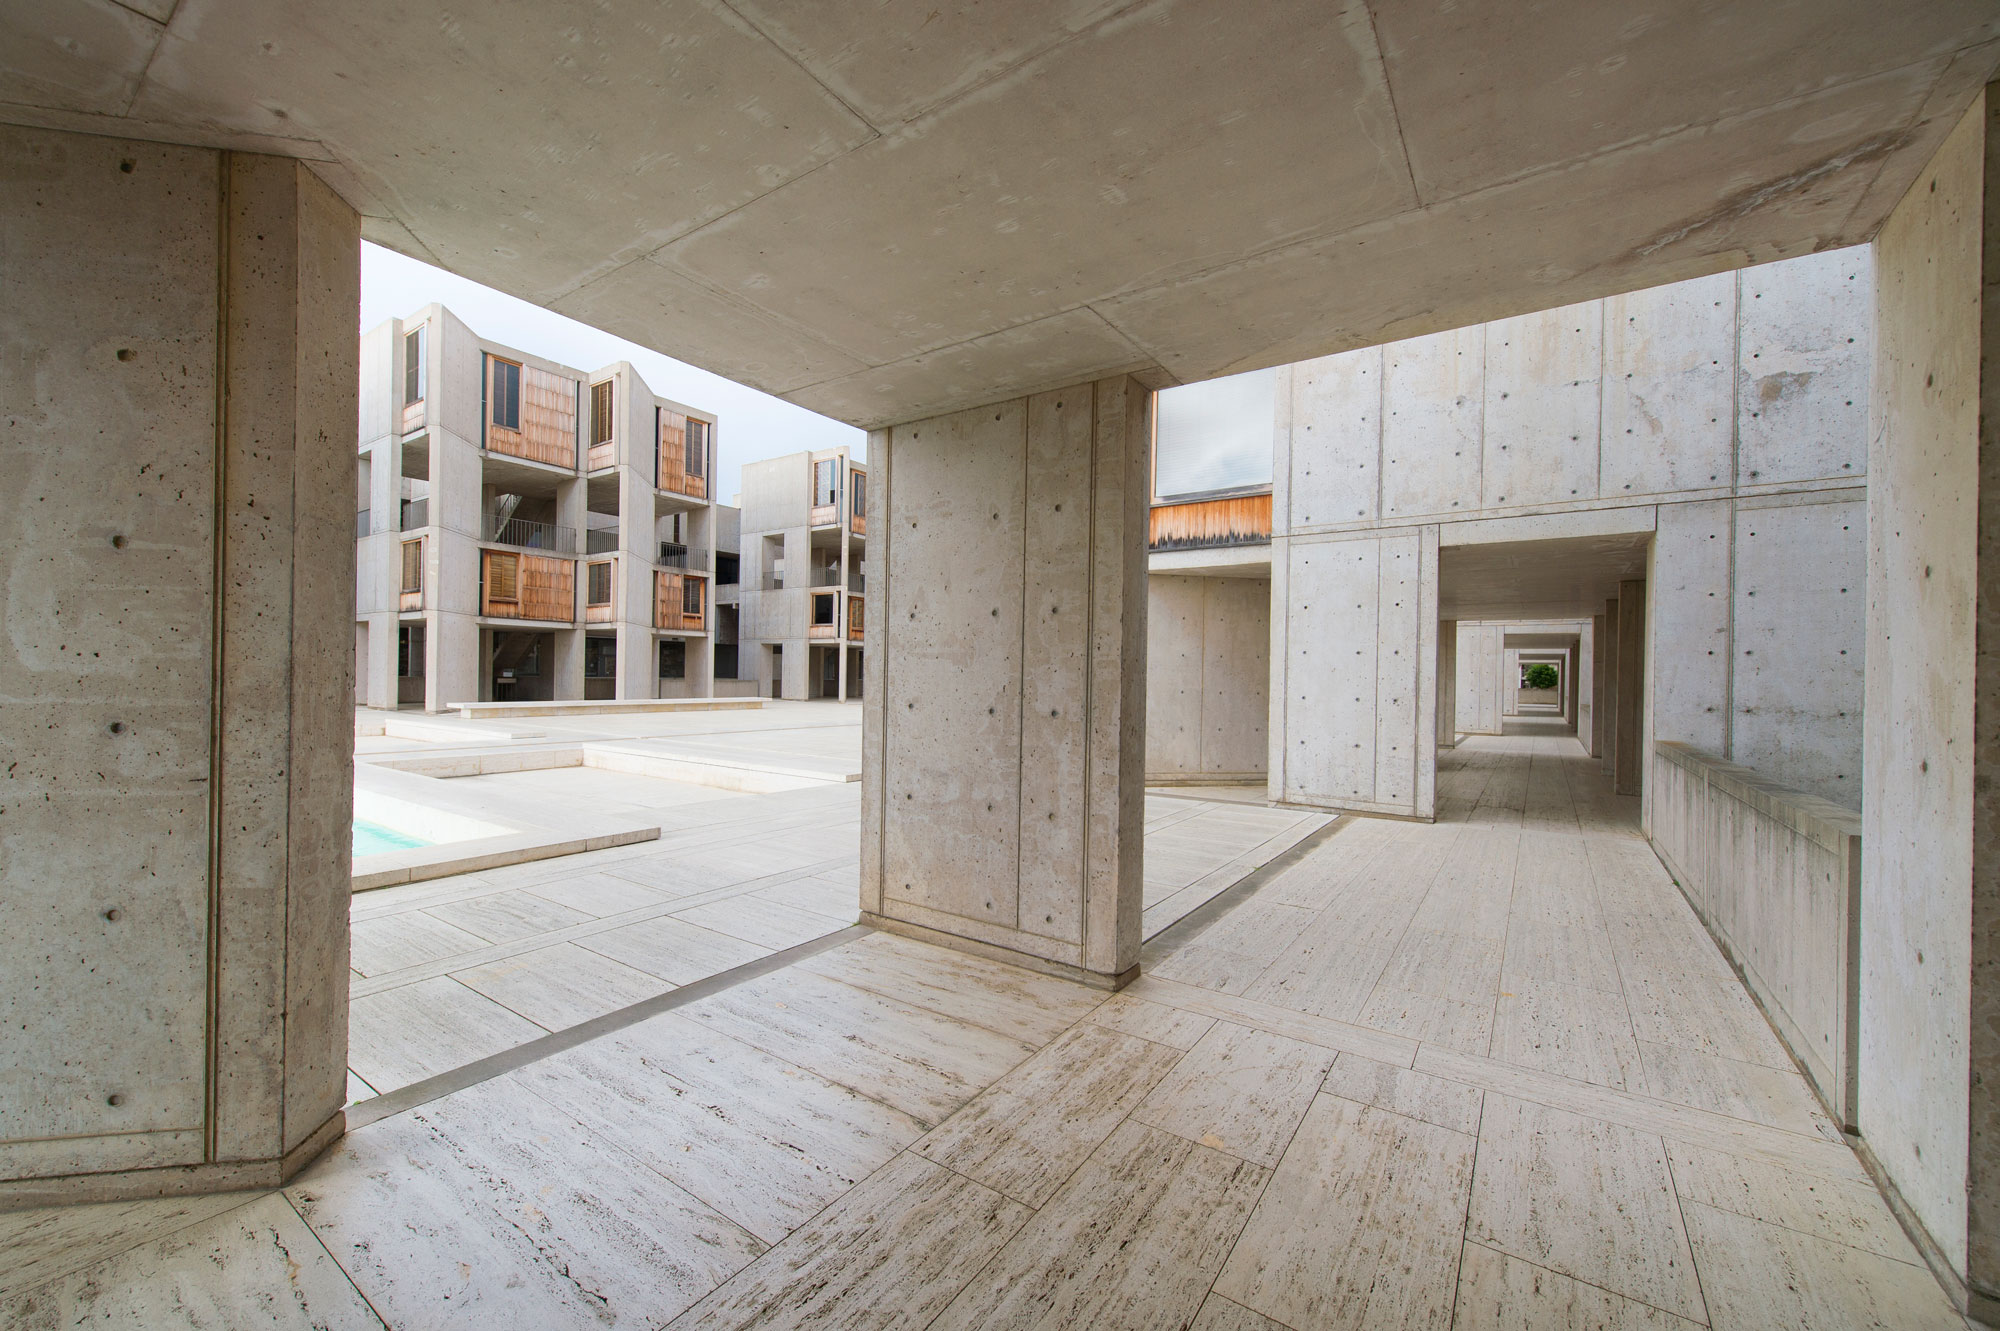
#3 – Salk Institute of La Jolla (Best time of day – Anytime)
Head north on La Jolla Shores until you hit North Torrey Pines road. Make a left on North Torrey Pines and it will be on your left at 10010 North Torrey Pines Road.
One of the most amazing architectural places in San Diego is the Salk Institute. It provides a photography opportunity in San Diego that is not your typical tourist destination. The only parking for the Salk Institute is on the street since the lots are reserved for employees. As a bonus, there is a gliding port next to the Salk Institute where you can take pictures of hand-gliders leaping off the cliffs and flying back and forth high above the coastline. I like the Salk Institute because you can take some great pictures of amazing San Diego architecture.


#4 Church of Latter Day Saints La Jolla (Best time of day early morning and sunset)
Going North on 5, exit at Noble Drive and turn right, turn right on Lebon Drive, turn right on Charmant drive and the Church will be on your right. Park on the street.
The Church of Latter Day Saints in La Jolla is one of those iconic spots that you have probably seen in pictures of San Diego. This church looks like something out of a Fairy Tale and it is bright white. It is really one of the most beautiful churches that I have ever seen. I have provided a map there because getting there is a little tricky since you have to go down a few roads. The best place to take pictures here is up at the church from the huge green lawns that sprawl around the front of the church. You can also shoot the temple at night as it is very well lit up and provides some pretty dramatic pictures but I prefer the day shots.


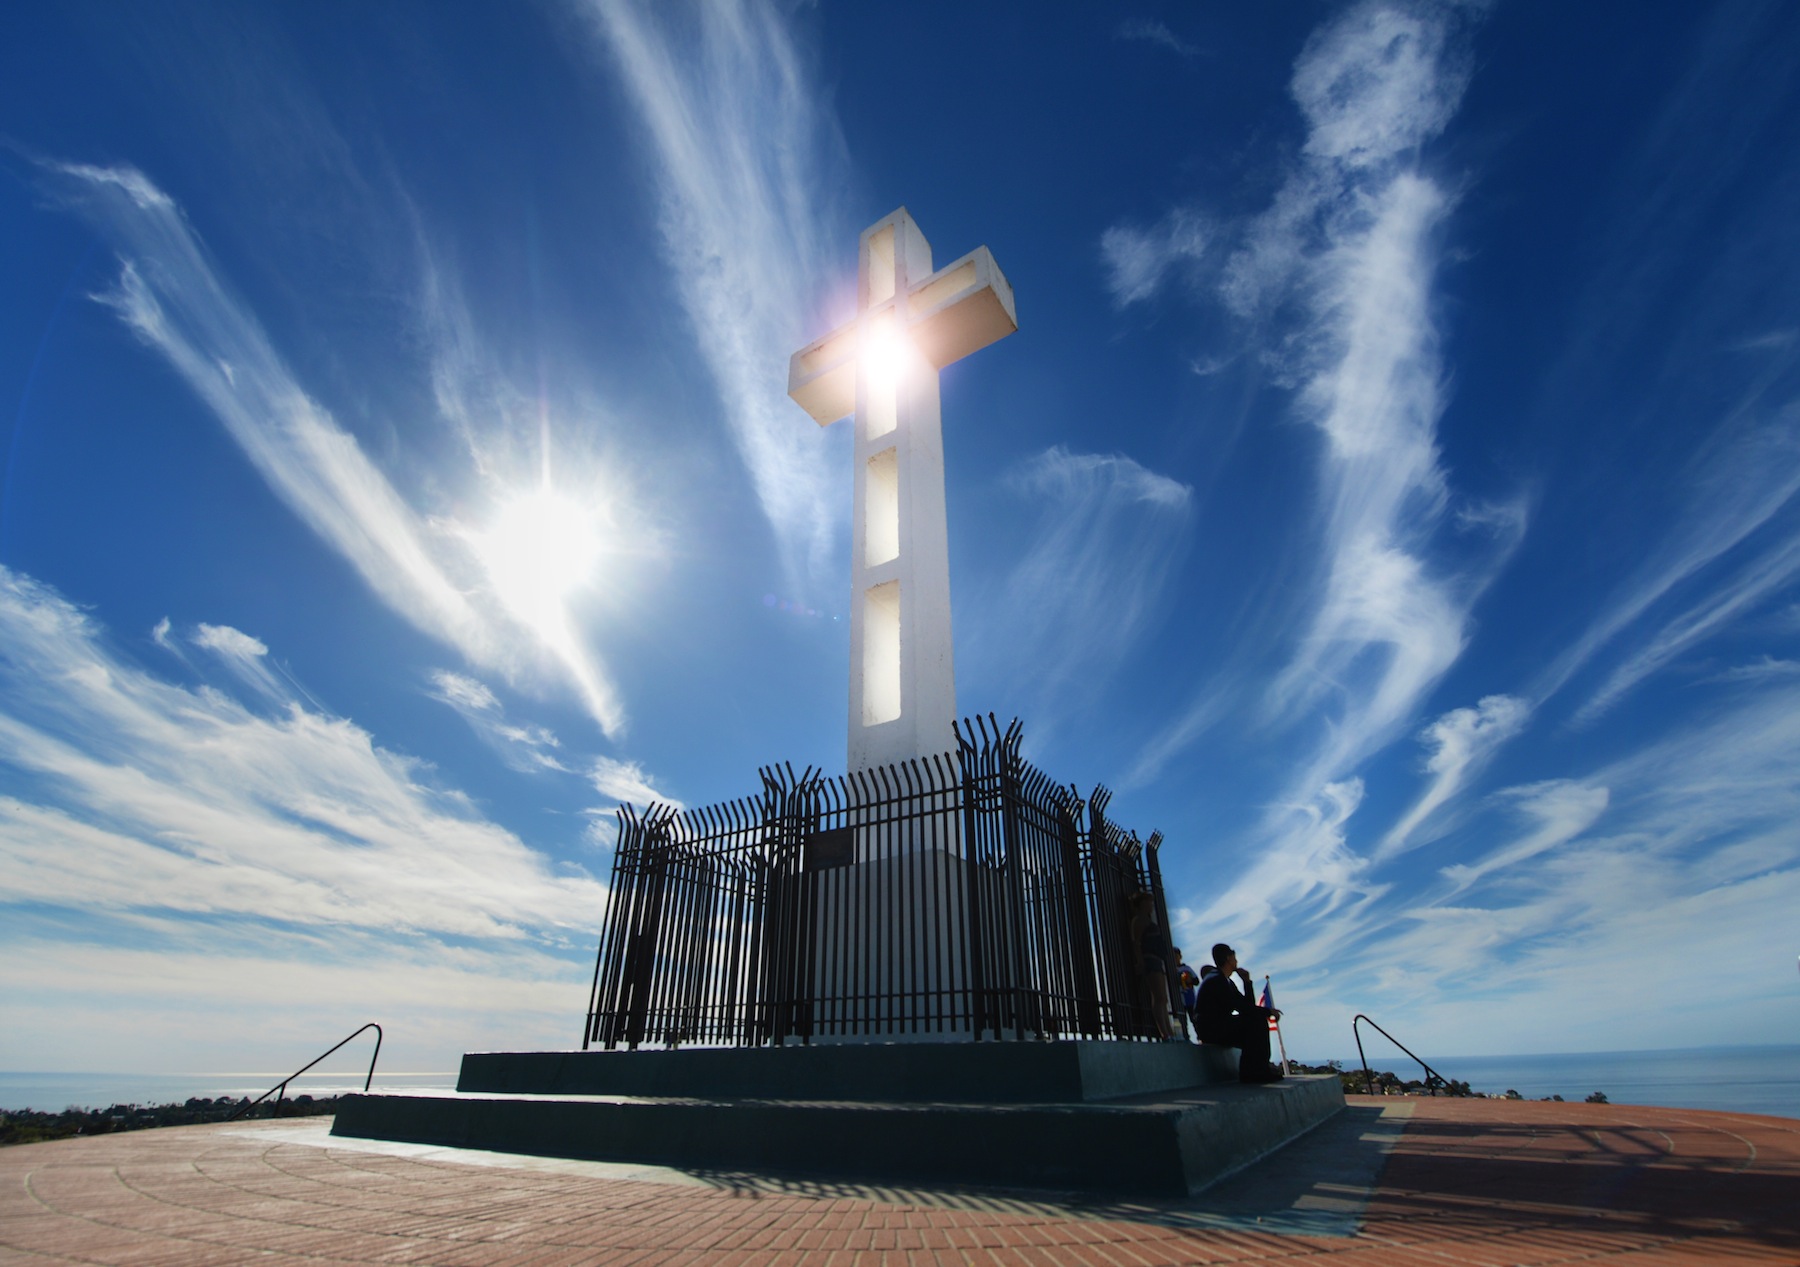
#5 Mt Soledad. (Sunrise, Sunset or Nighttime)
Turn left on Torrey Pines from Prospect, make a right on hillside drive, turn right on via capri, turn right on soledad park road, take first right onto via casa alta.
Mount Soledad is the highest peek in La Jolla so when you drive up to the top you will get sweeping views of La Jolla and most of San Diego as well. It’s actually a better spot for viewing then photographing pictures but the cross that sits atop the peek is beautiful. Most people like to go here to try to get pictures of the sun rising or setting through the cross as the pictures can be quite dramatic and beautiful. When I go at night, I bring a big flash light and set my camera for a very long exposure and light up the cross with my flashlight as the shutter is released. There are no lights on the cross so this creates a fairly unique picture.

One Last Tip – Take Great Sunset Portraits
When people come to La Jolla they almost always want to get a picture of themselves or their family on the beach while the sun is setting. Well this is actually a pretty difficult picture to get unless you do it right. Here is the best way to do it.
First – take the picture when the sun is getting lower in the skyline.
Second – position the person directly in front of the sun so that they block the sun. This will ensure that the sun does not dominate the picture. What you want to capture is the beauty of the sky and ocean and the person in front of it. If you get the sun in the picture it can make everything else hard to see.
Third – Turn on your flash and take the picture of the person. A flash is completely necessary for a sunset shot because you need to light up the person’s face and body. It might not make sense but take a look at the picture below and you will see what I mean. I took this using this exact same technique and it works great.

If you want to take great sunset shots in La Jolla, be sure to check out Windansea Beach. It is one of the best surfing places in the world.
Thanks for stopping by. Have a great trip to La Jolla and look me up at FrankieFoto
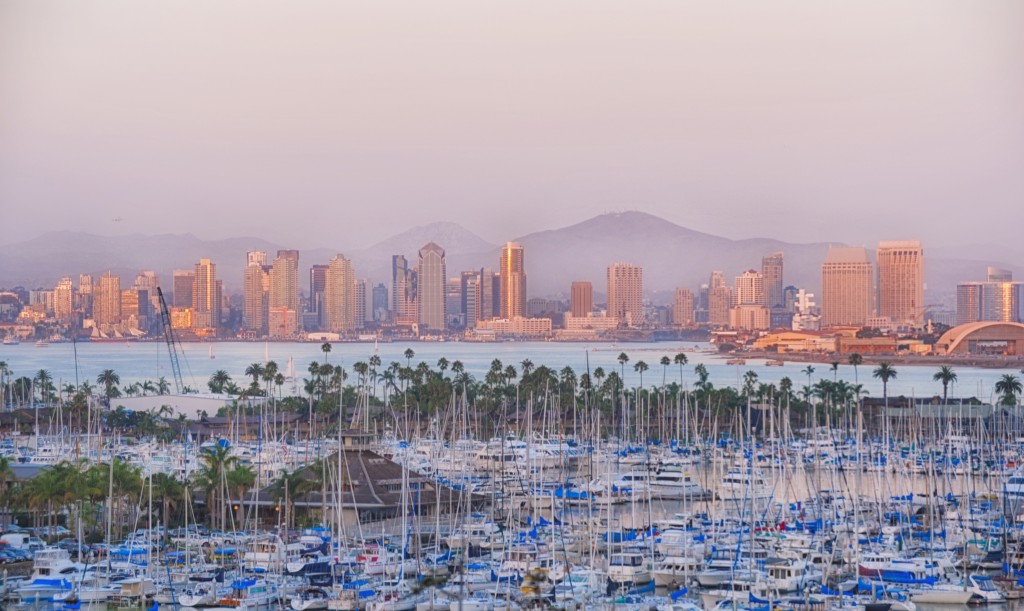
15 Best Spots to Photograph San Diego
 I’m a local San Diego Amateur Photographer. My name is Frank McKenna. I grew up in San Diego and I love this city.
San Diego is one of the most beautiful cities in the world and millions of visitors, business travelers and tourist come here each year to take in the warm weather and beautiful scenes of the city. As a frequent traveler myself and one that really loves photography, I have found that traveling to a city to take pictures can be difficult. Being unfamiliar with a city, its really hard to know exactly where to go to find the best pictures. Since I live here in San Diego I thought I would put together something for travelers and photographers to help them take awesome pictures during their short time in San Diego.
If your looking to take day trips from San Diego to photograph cool locations, I put together a list of the best locations within 2 hours of San Diego that you can read here. 7 Best Photography Day Trips from San Diego.
If you are into Night Photography in San Diego, I put a guide of great locations here – 12 Best Places for Night Photography in San Diego.
Or if you want to check out my gallery of selected San Diego Photographs you can go here – San Diego Pictures.
First, Some Tips for Photographing San Diego Sunset is glorious in San Diego, take advantage of it – San Diego is nestled on the Pacific Ocean and has unobstructed views of sunset’s.
I recommend photographing around sunset. The golden hour here in San Diego is spectacular and your pictures will be so much better if taken at that time. Give yourself 30 minutes to walk and setup for each location .
Most of the best San Diego pictures you see on the internet and on postcards were probably taken with wide angle lens. I prefer anything 24mm or less for wide angle shots. For shots in San Diego I prefer to use 24mm for landscape and 35mm shots for the cityscapes.
#1 Scripps Pier La Jolla (Google Map It)
My favorite spot in all of San Diego is Scripps Pier. Not only do you have the fantastic sunsets and the huge pier but there are loads of great shots to be taken of people and wildlife here. When you look around everything is a shot and everything is bathed in a beautiful golden glow. If you can get to Scripps on a day when the tide is low, the receding water just glistens on the sand and reflects everything like a mirror. This is the absolute best place in San Diego to take pictures. I have provided a map but I recommend parking at La Jolla Shores Beach and walking the half mile up the beach to just under the pier.

#2 Children’s Pool La Jolla (Google Map It)
The Children’s Pool is one of the most beautiful but most controversial places in San Diego. Originally built by Ellen Scripps as a place where kids could learn to swim it was quickly over-run by seals when the water got too contaminated to swim years ago. Now the battle rages on in courts to determine if the seals should stay or go. Regardless of the politics this is a beautiful place to photograph seals, people or just the landscape. If you get there on a day when the waves are big you can capture some pretty incredible photographs of the waves breaking over the breakwall or against the shore.

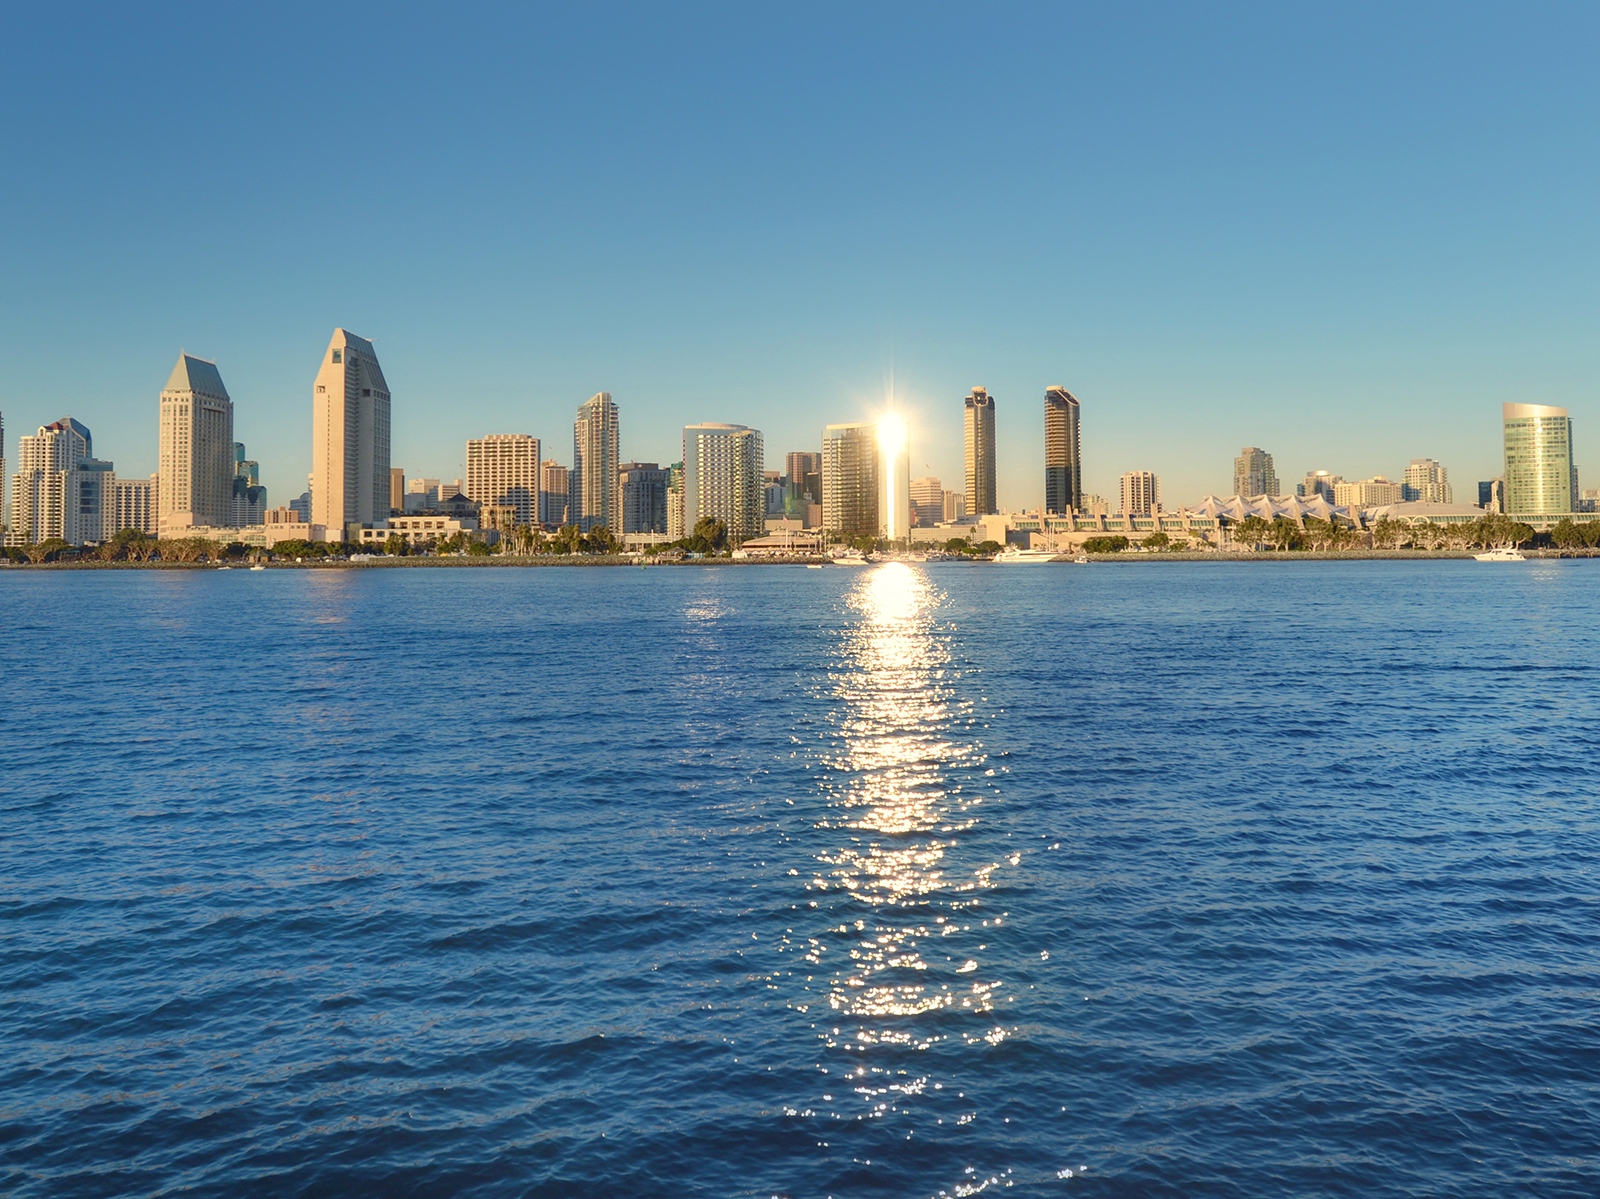
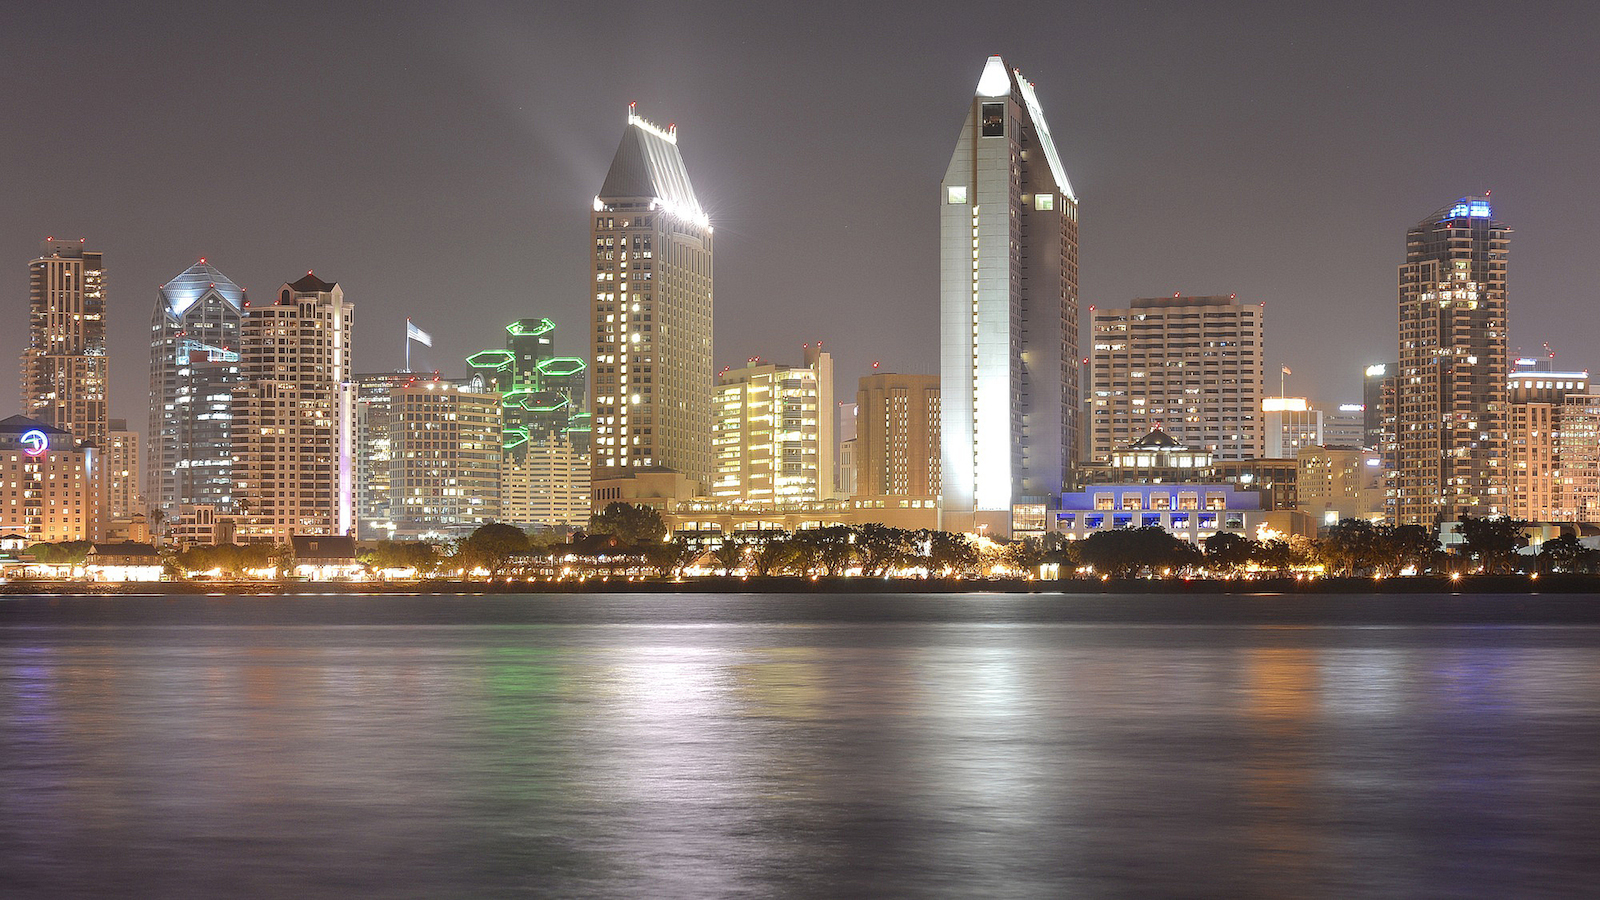
#3 Centennial Park Coronado (Google Map It)
This doesn’t seem like one of the parks that you have heard about in San Diego but it happens to be the location where most the best San Diego Cityscape photographs are taken. The park is located right on the bay and has panoramic views of the city of San Diego. You will need to park down the street at the public parking provided in the shopping center or on the street as this park does not have its own parking. For the best shots venture down to the beach located on the left hand side of the park and you can get unobstructed views of the entire city. This place is great for day or night shots.
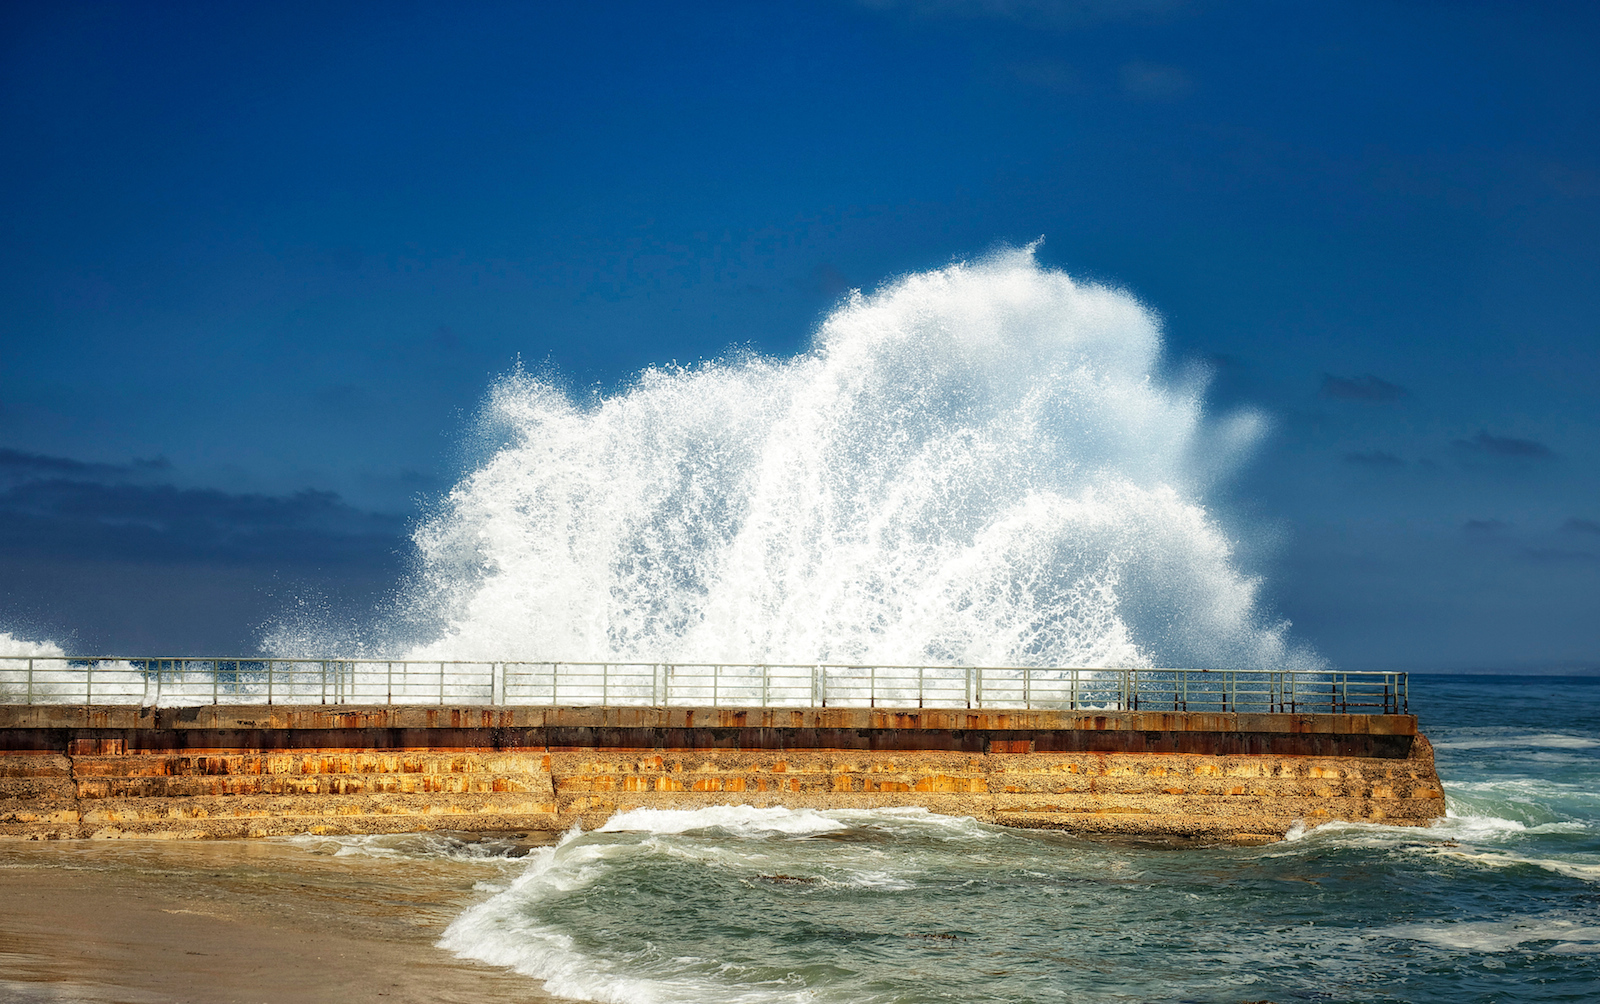
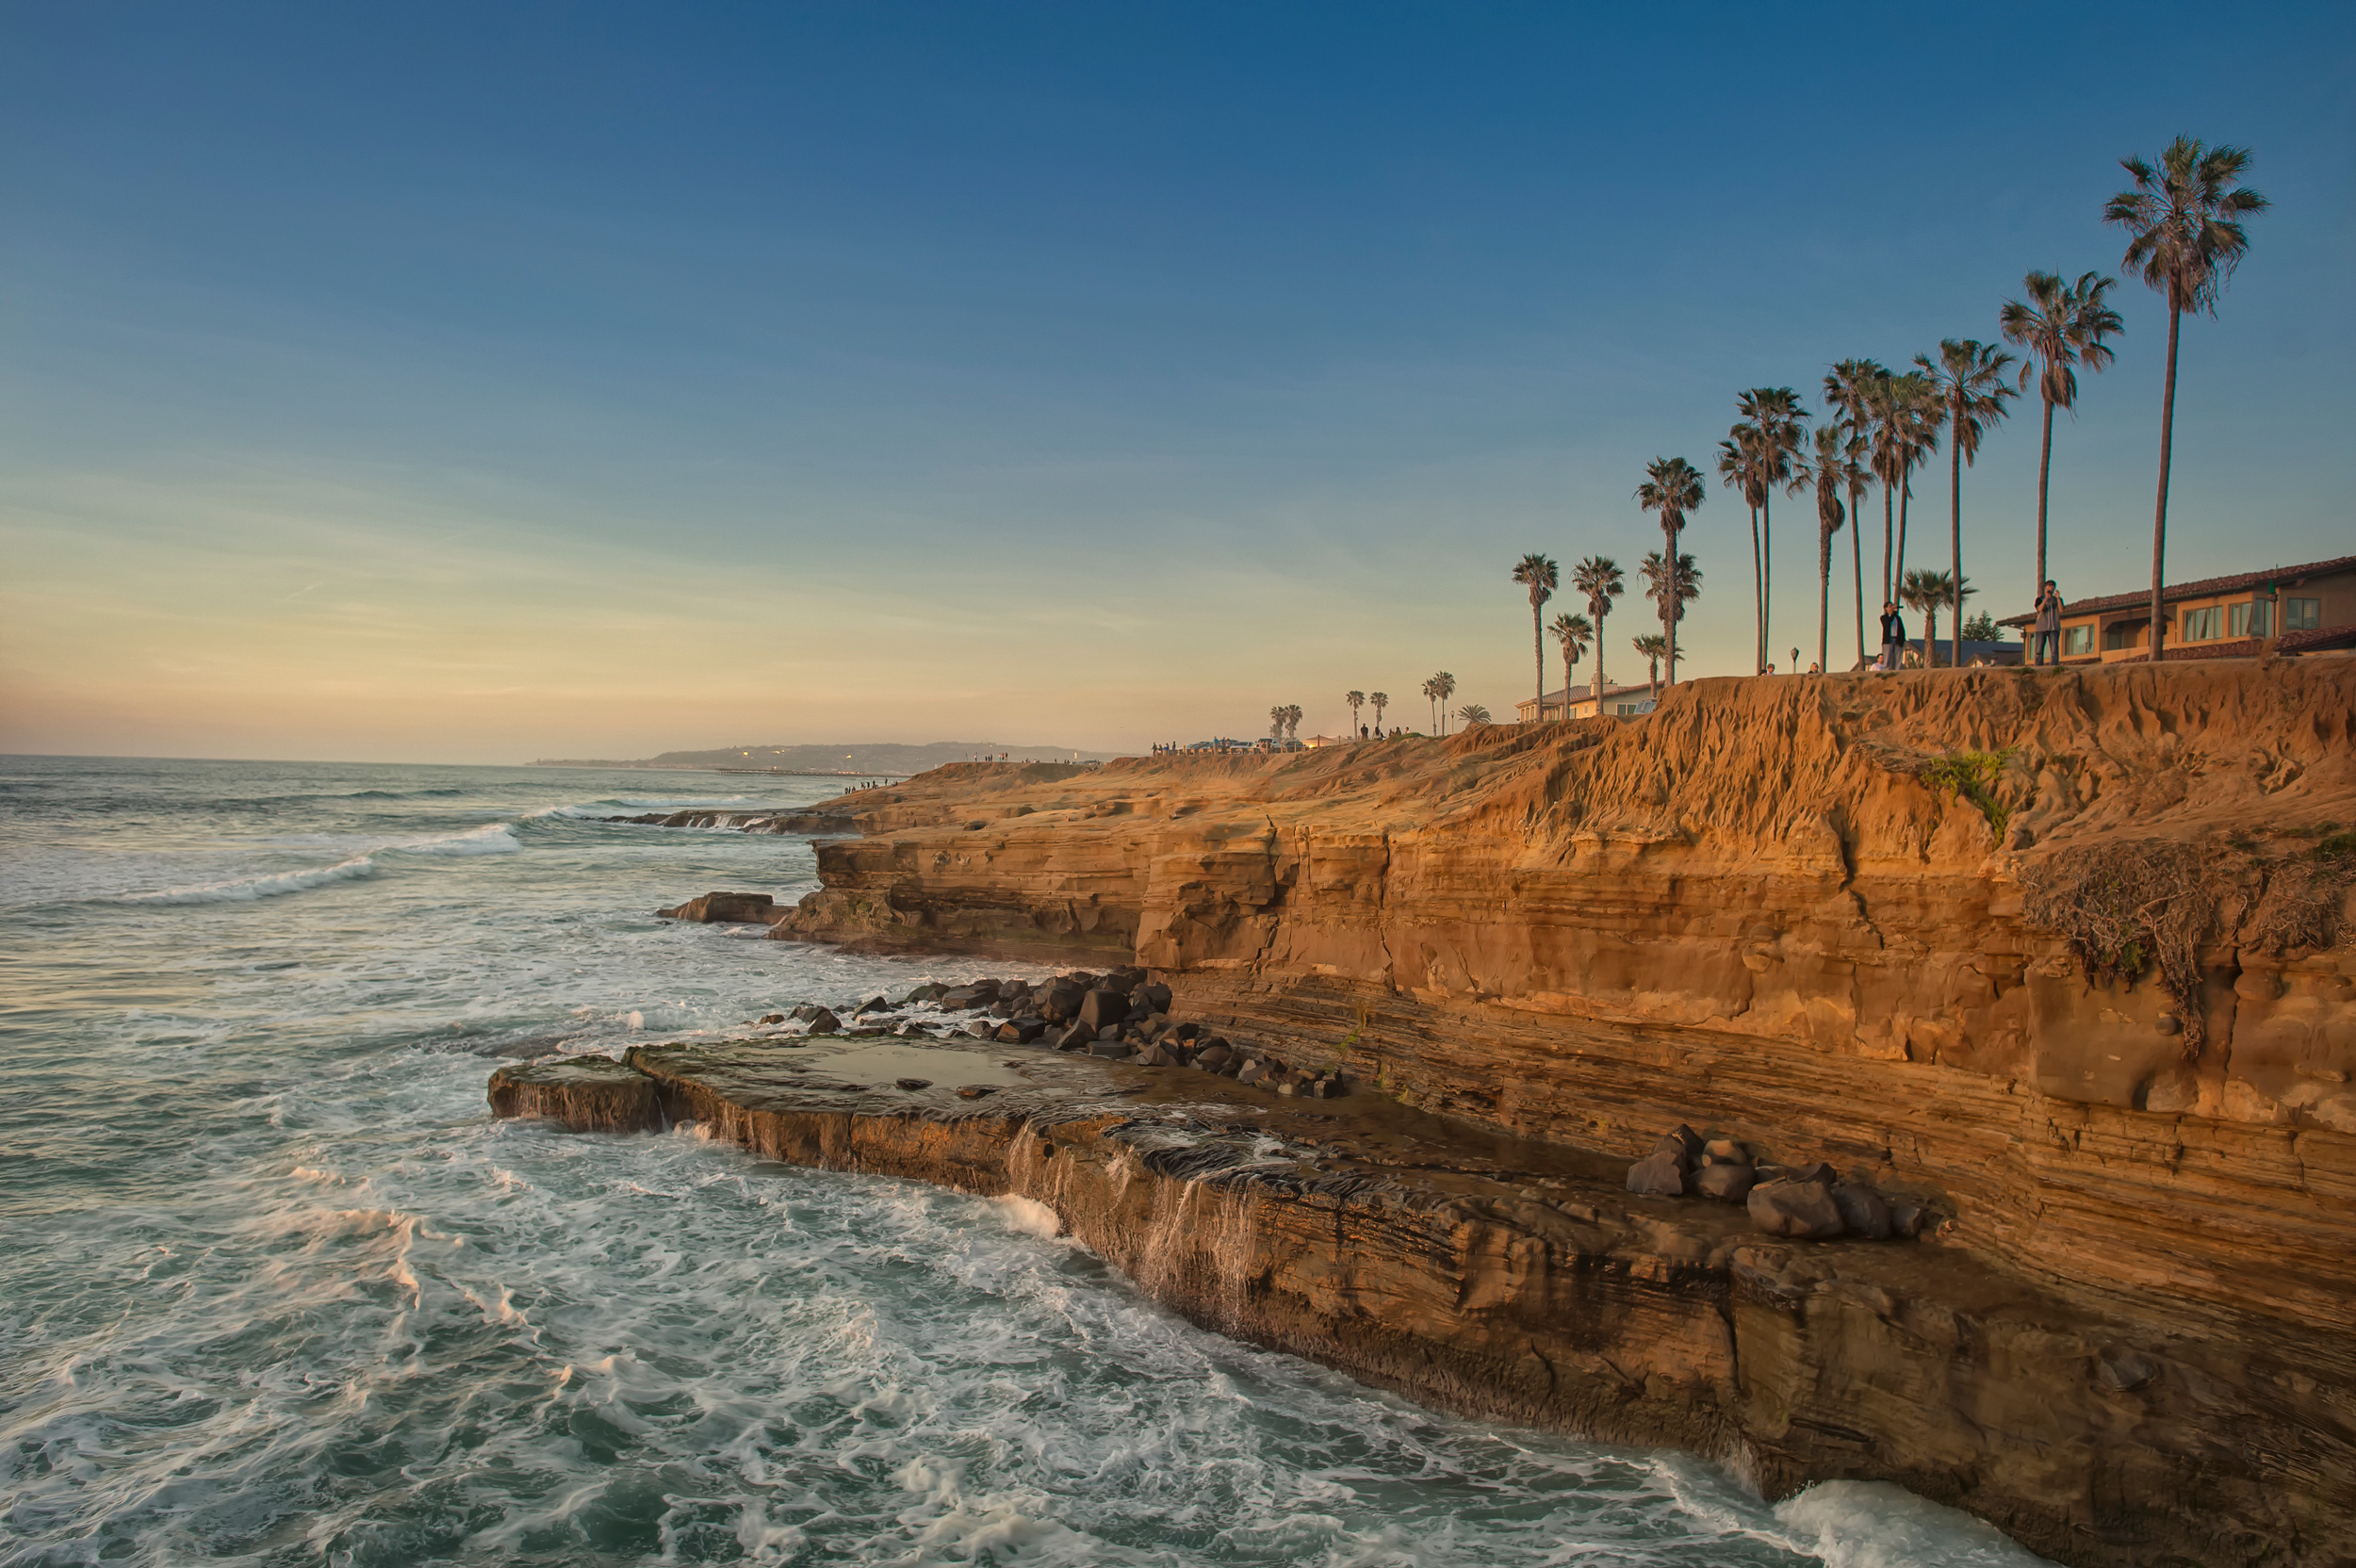
#4 Sunset Cliffs Ocean Beach (Google Map It)
Ocean Beach has one of the most underrated yet most beautiful coastlines in all of California. If you want to catch some amazing sunsets and great photos head out south of the pier to a place called Sunset Cliffs Park. Park your car at one of the lots where the cliffs jut out further into the water and it gives you a perfect place to photograph the water and the coastline. What makes this place excellent for sunset photos are the sandstone cliffs which turn golden in the sunset and look beautiful against the blue Pacific. Be careful if you are walking close to the cliffs as they can crumble and send you are your gear to the rocks below.
#5 – Salk Institute of La Jolla (Google Map it)
One of the most amazing architectural places in San Diego is the Salk Institute. It provides a photography opportunity in San Diego that is not your typical tourist destination. The only parking for the Salk Institute is on the street since the lots are reserved for employees. As a bonus, there is a gliding port next to the Salk Institute where you can take pictures of hand-gliders leaping off the cliffs and flying back and forth high above the coastline. I like the Salk Institute because you can take some great pictures of amazing San Diego architecture.


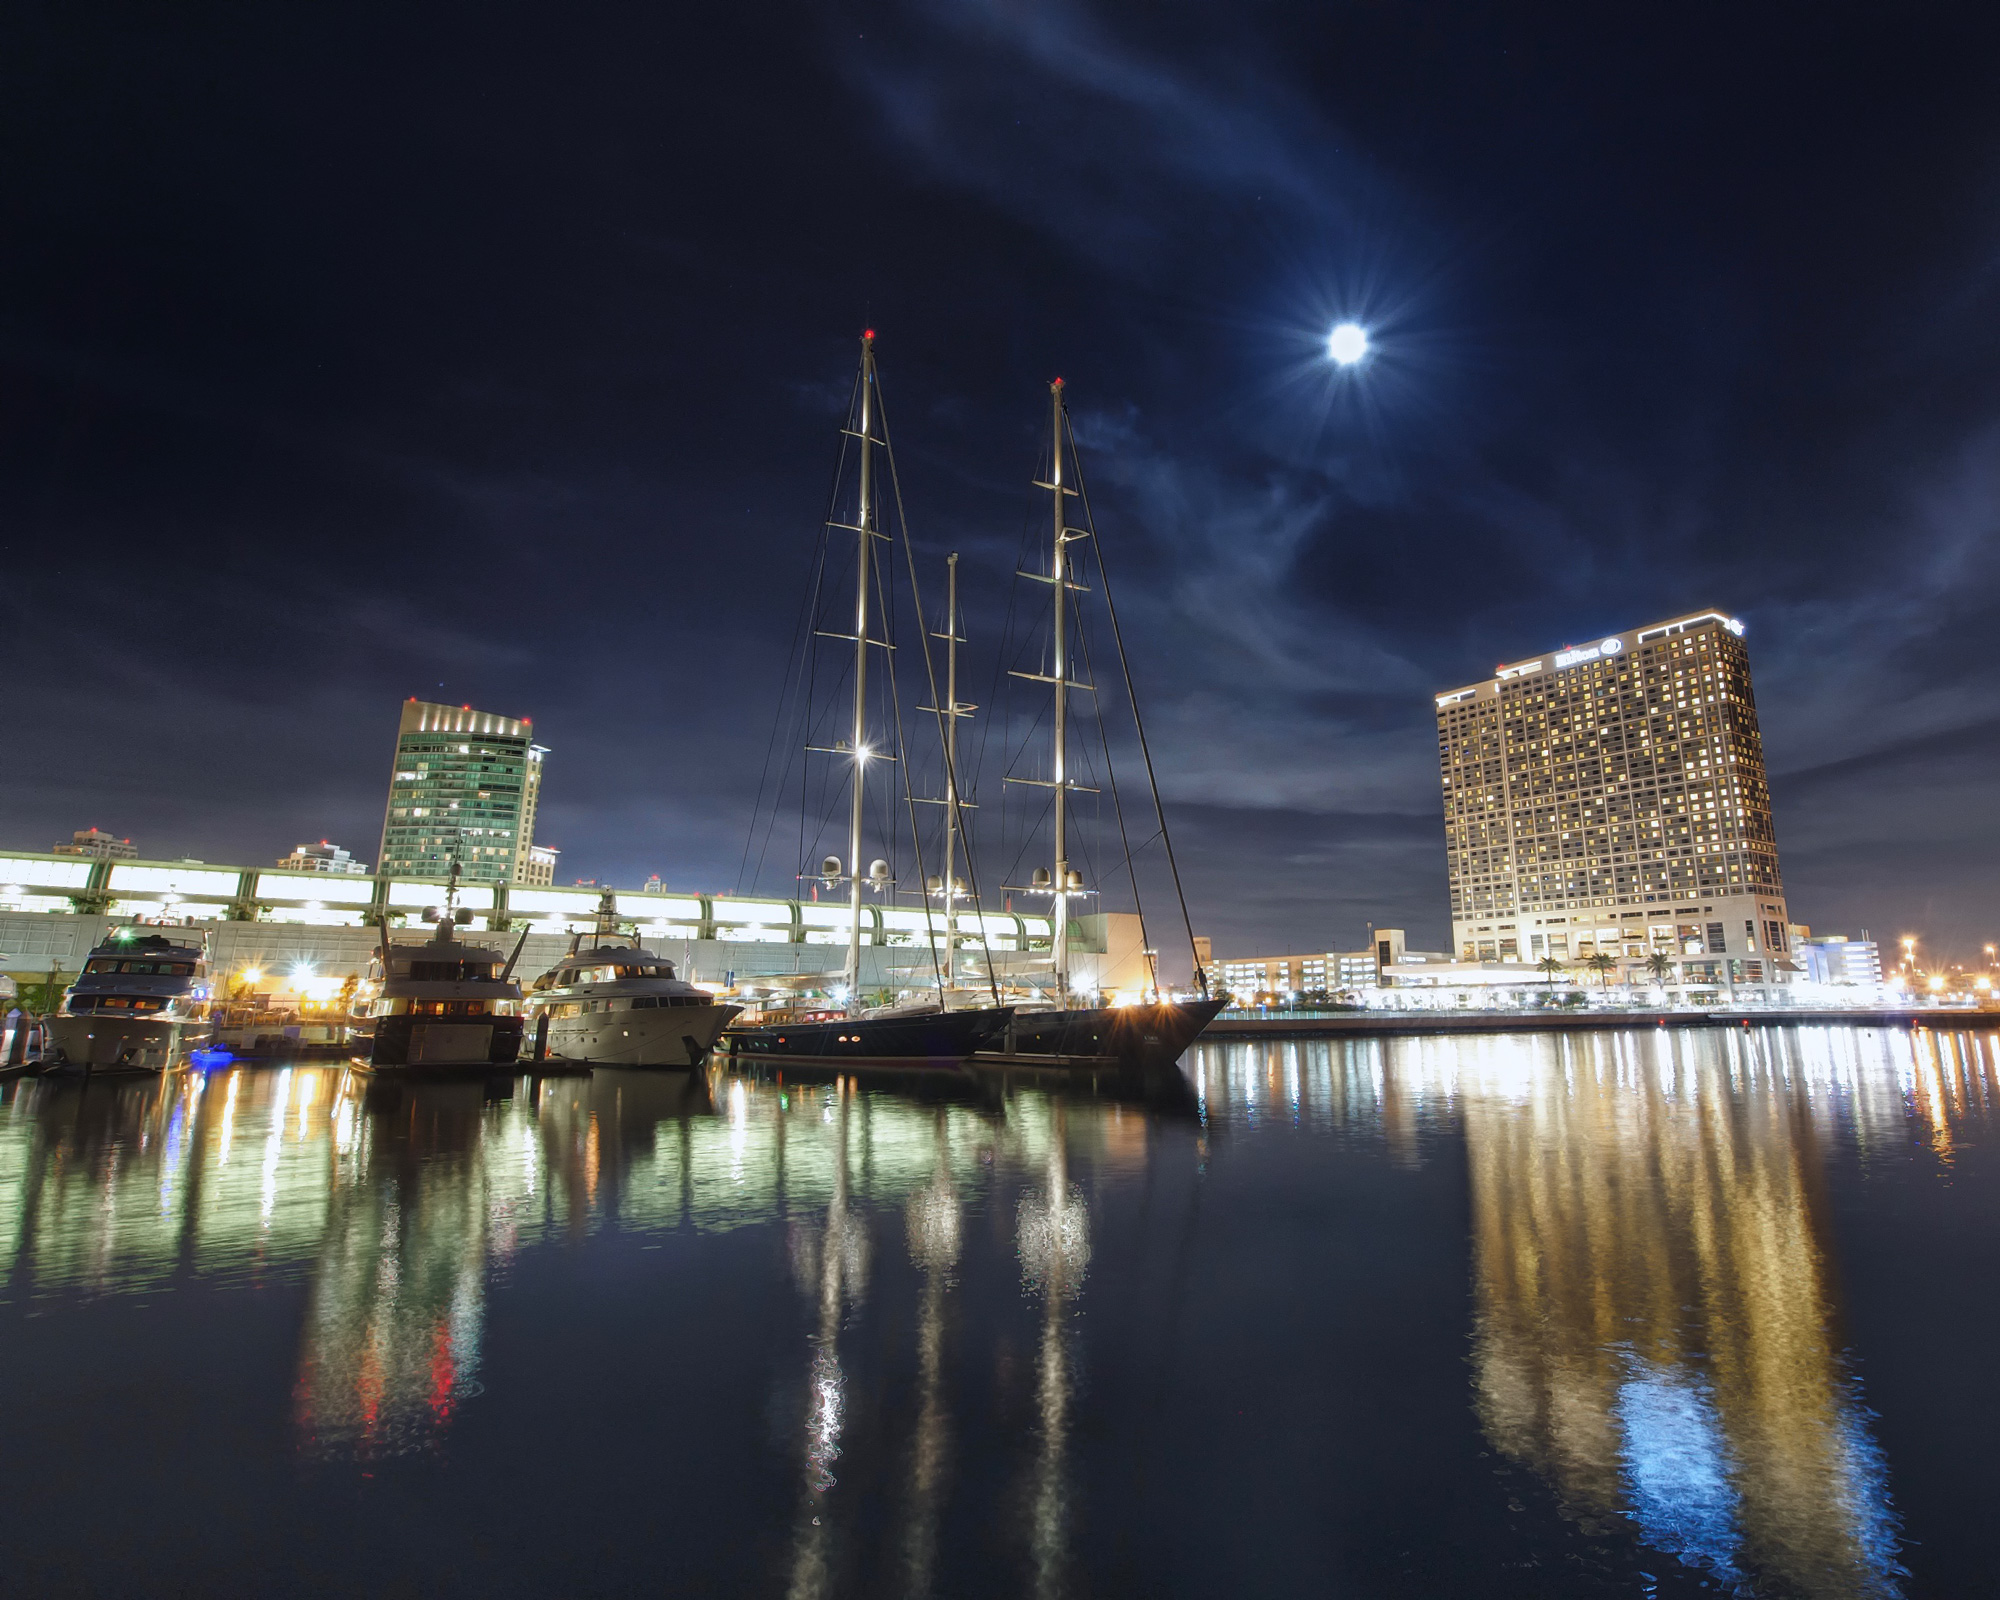
#6 SeaPort Village San Diego (Google Map it)
SeaPort Village is pretty much the #1 tourist destination in San Diego. You can buy any sort of San Diego T-Shirt, crazy hat or carnival type of food in this little tourist trap shopping mall. SeaPort Village however is a pretty cool place to capture night photos since it has lots of boats and structures that reflect against the calm and still waters of the bay. Bring your camera and tripod and set up for some long exposure shots around SeaPort Village. There is lots of parking in the lots there (which you need to pay for but it’s pretty cheap). I like to stroll down the bay and find interesting places to photograph there at night and it usually never disappoints.
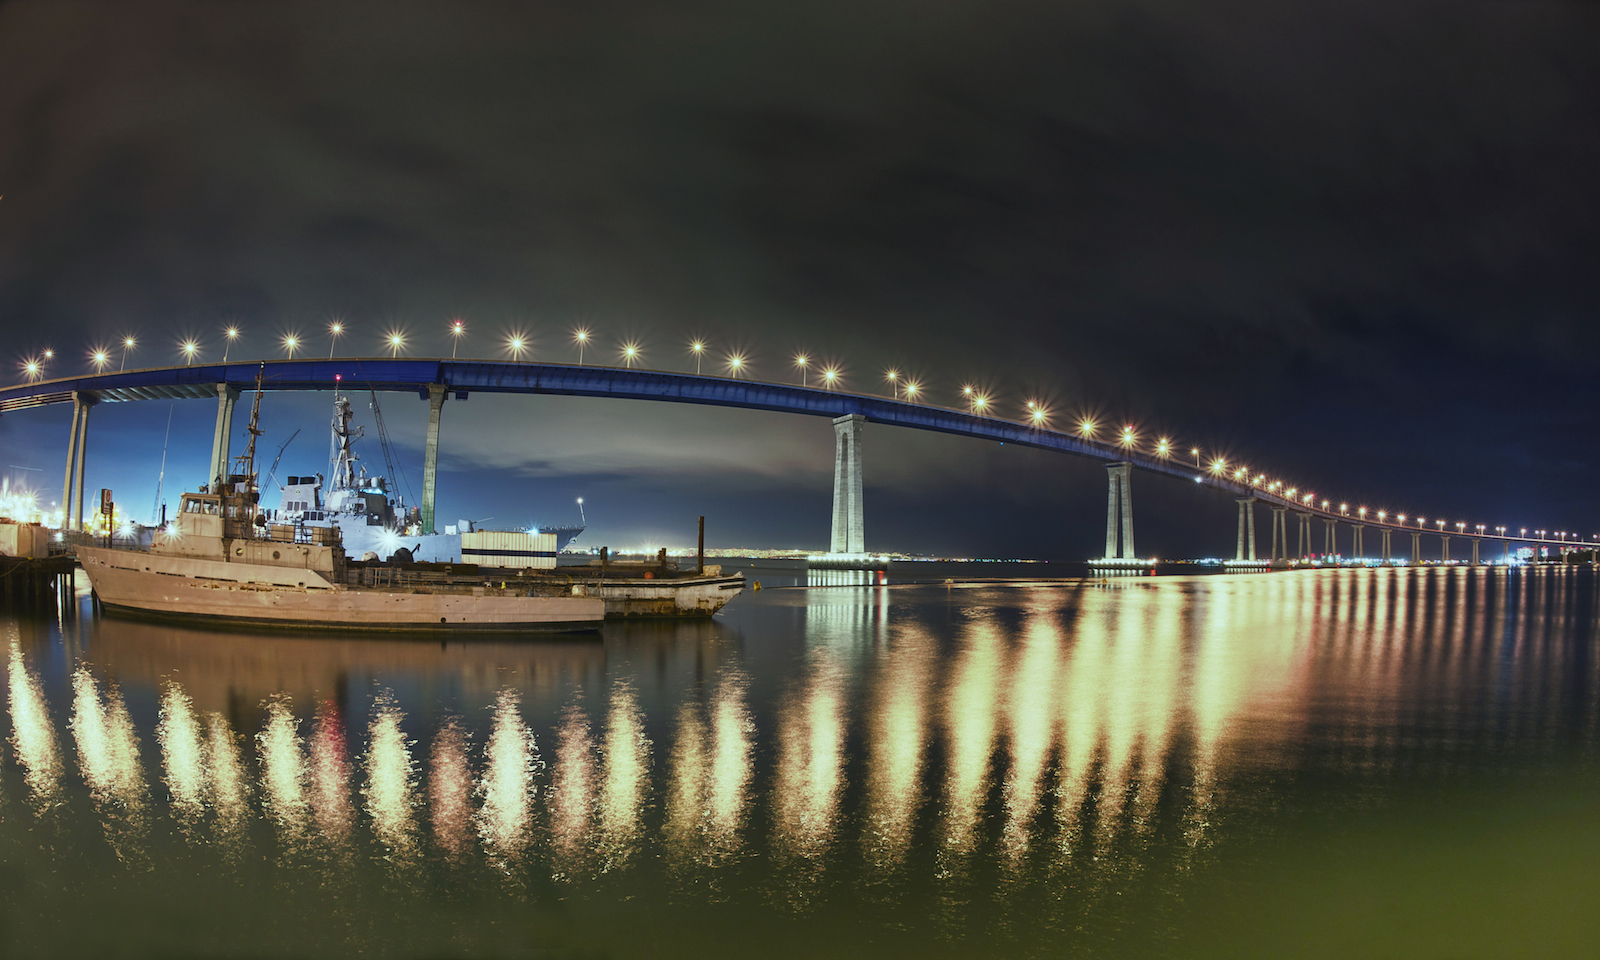
#7 – Crosby Street Park San Diego(Google Map It)
Crosby Street Park is a tiny little park that just happens to have a pier that extends way out into San Diego Bay which allows you to get some cool shots of the Coronado Bridge that most people may not have seen. Along the pier there are tug boats and military ships in the yards being fixed so it can give you some pretty interesting pictures. The park has lots of parking and this place is almost always deserted so you will probably have it all to yourself.
#8 The Church of Jesus Christ of Latter Day Saints La Jolla (Google Map It)
The Church of Jesus Christ of Latter Day Saints in La Jolla is one of those iconic spots that you have probably seen in pictures of San Diego. This church looks like something out of a Fairy Tale and it is bright white. It is really one of the most beautiful churches that I have ever seen. I have provided a map there because getting there is a little tricky since you have to go down a few roads. The best place to take pictures here is up at the church from the huge green lawns that sprawl around the front of the church. You can also shoot the temple at night as it is very well lit up and provides some pretty dramatic pictures but I prefer the day shots.


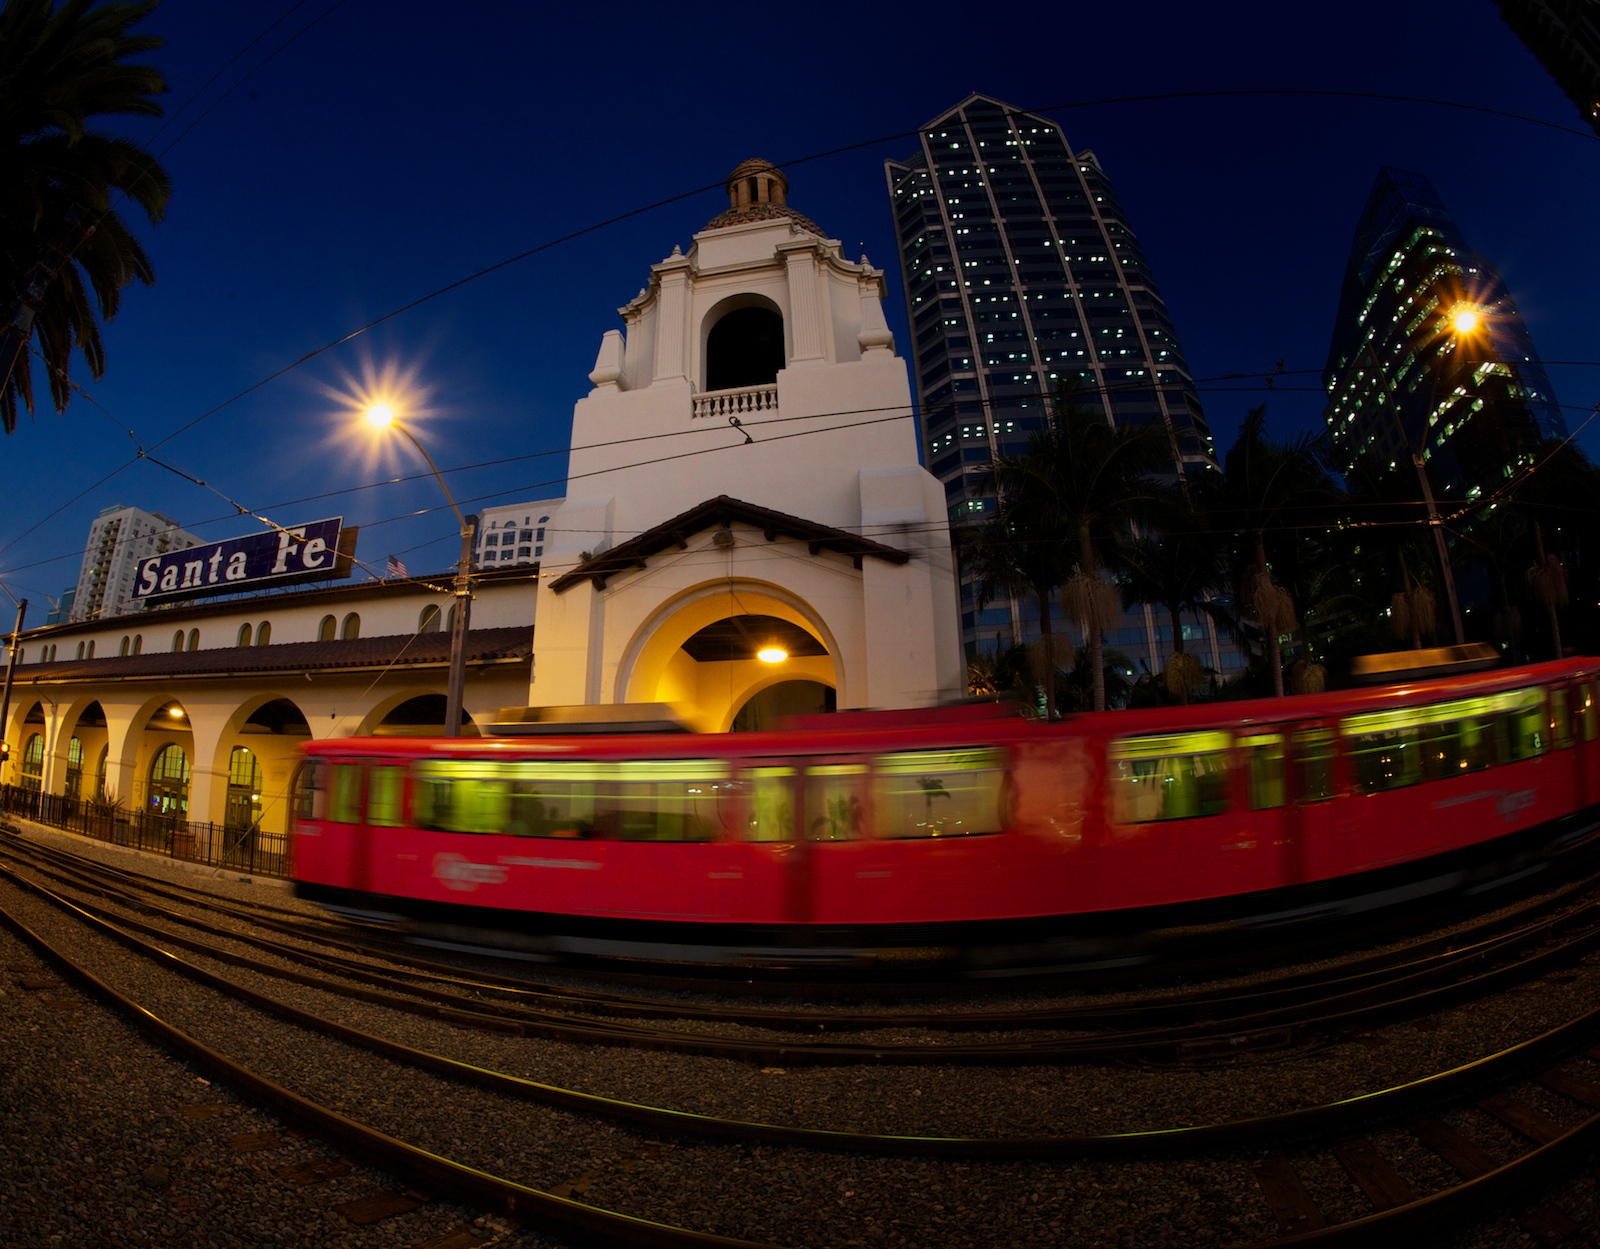
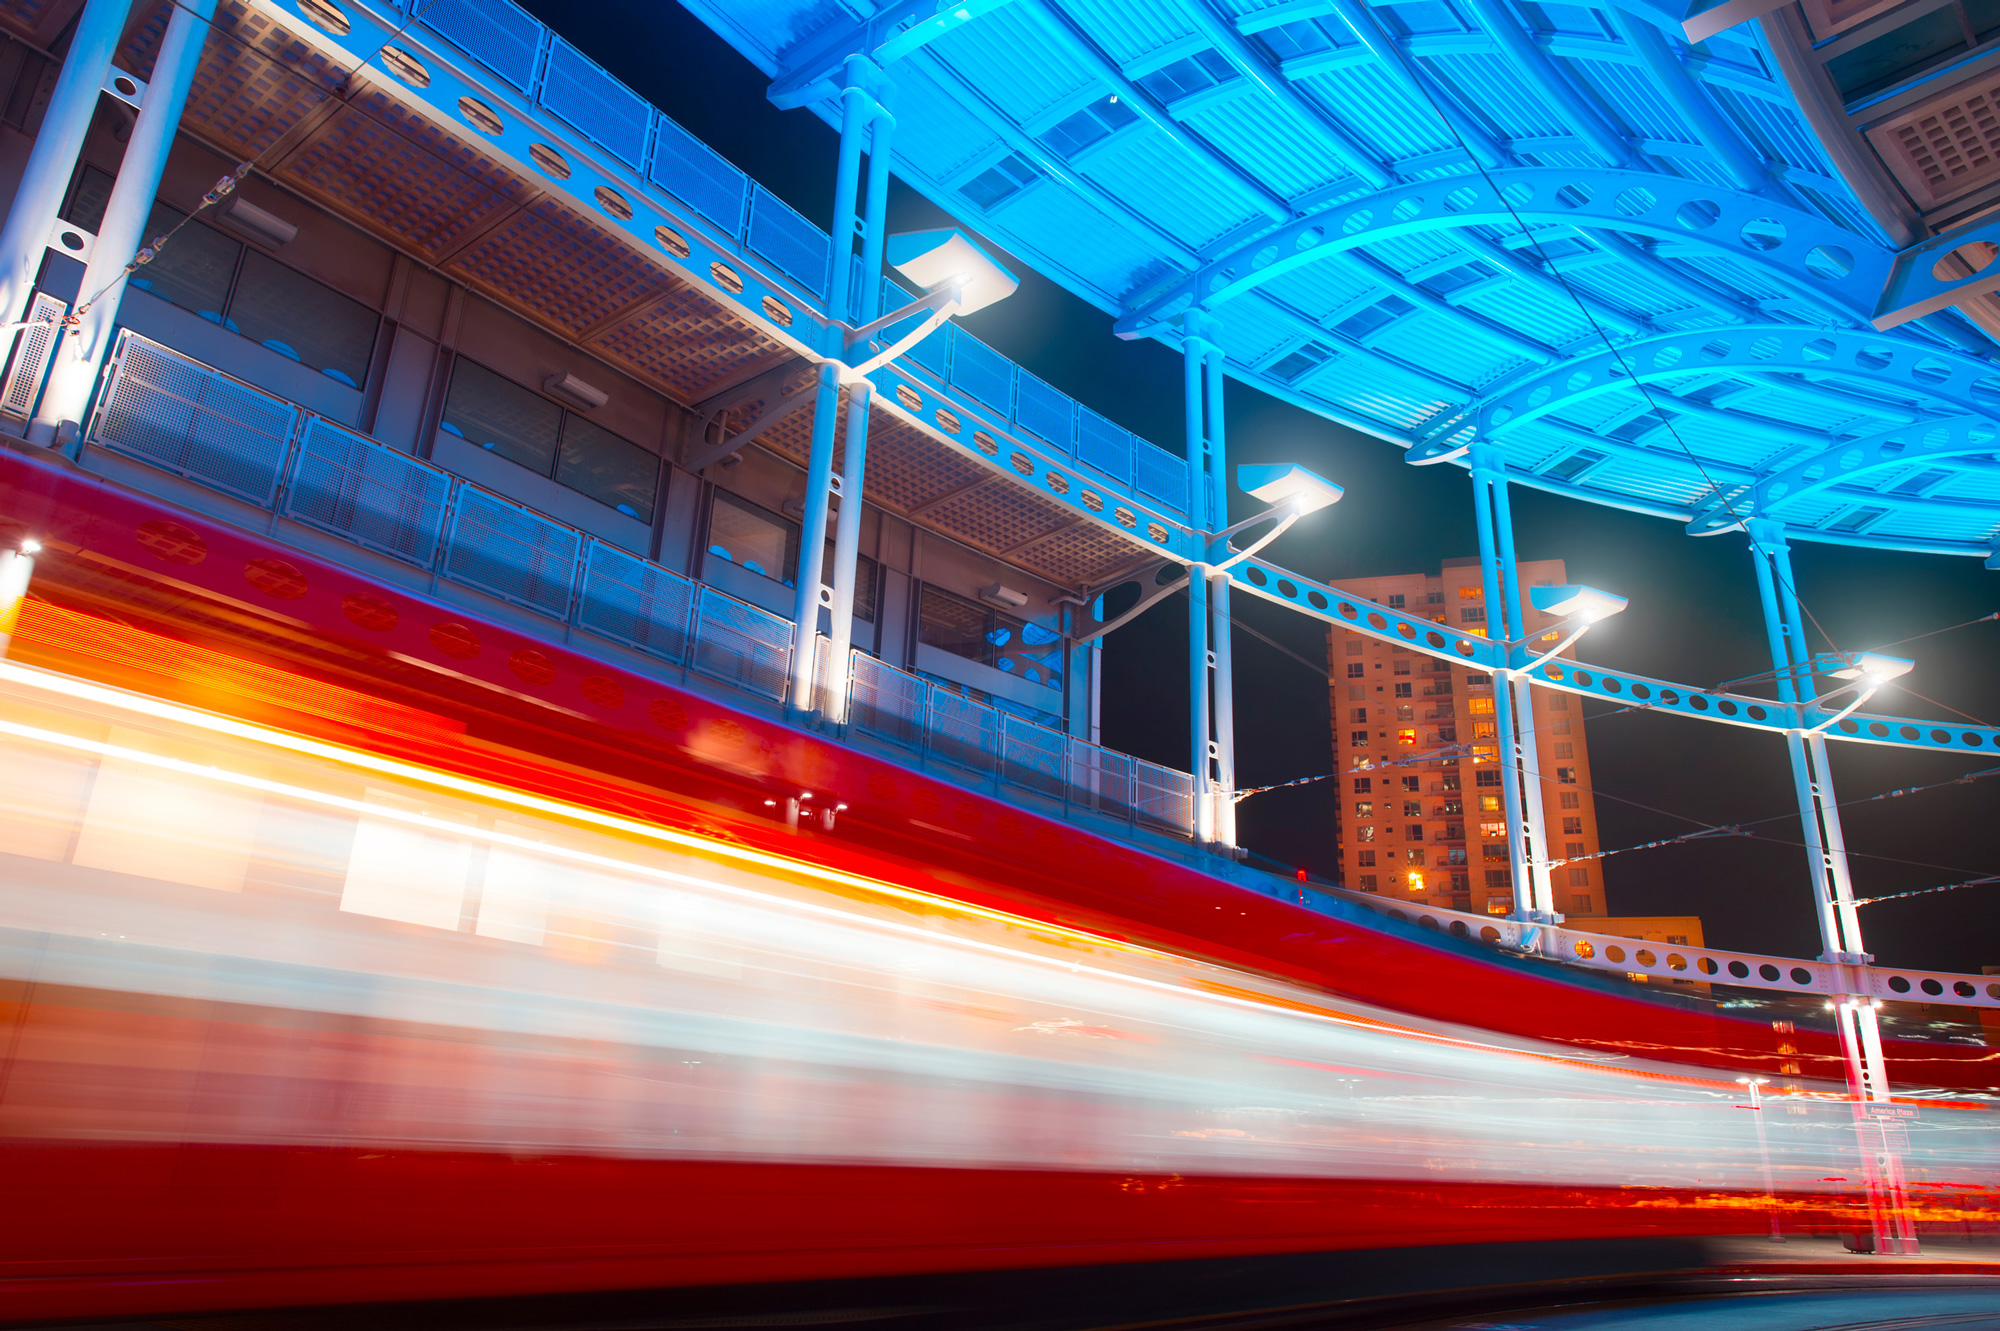
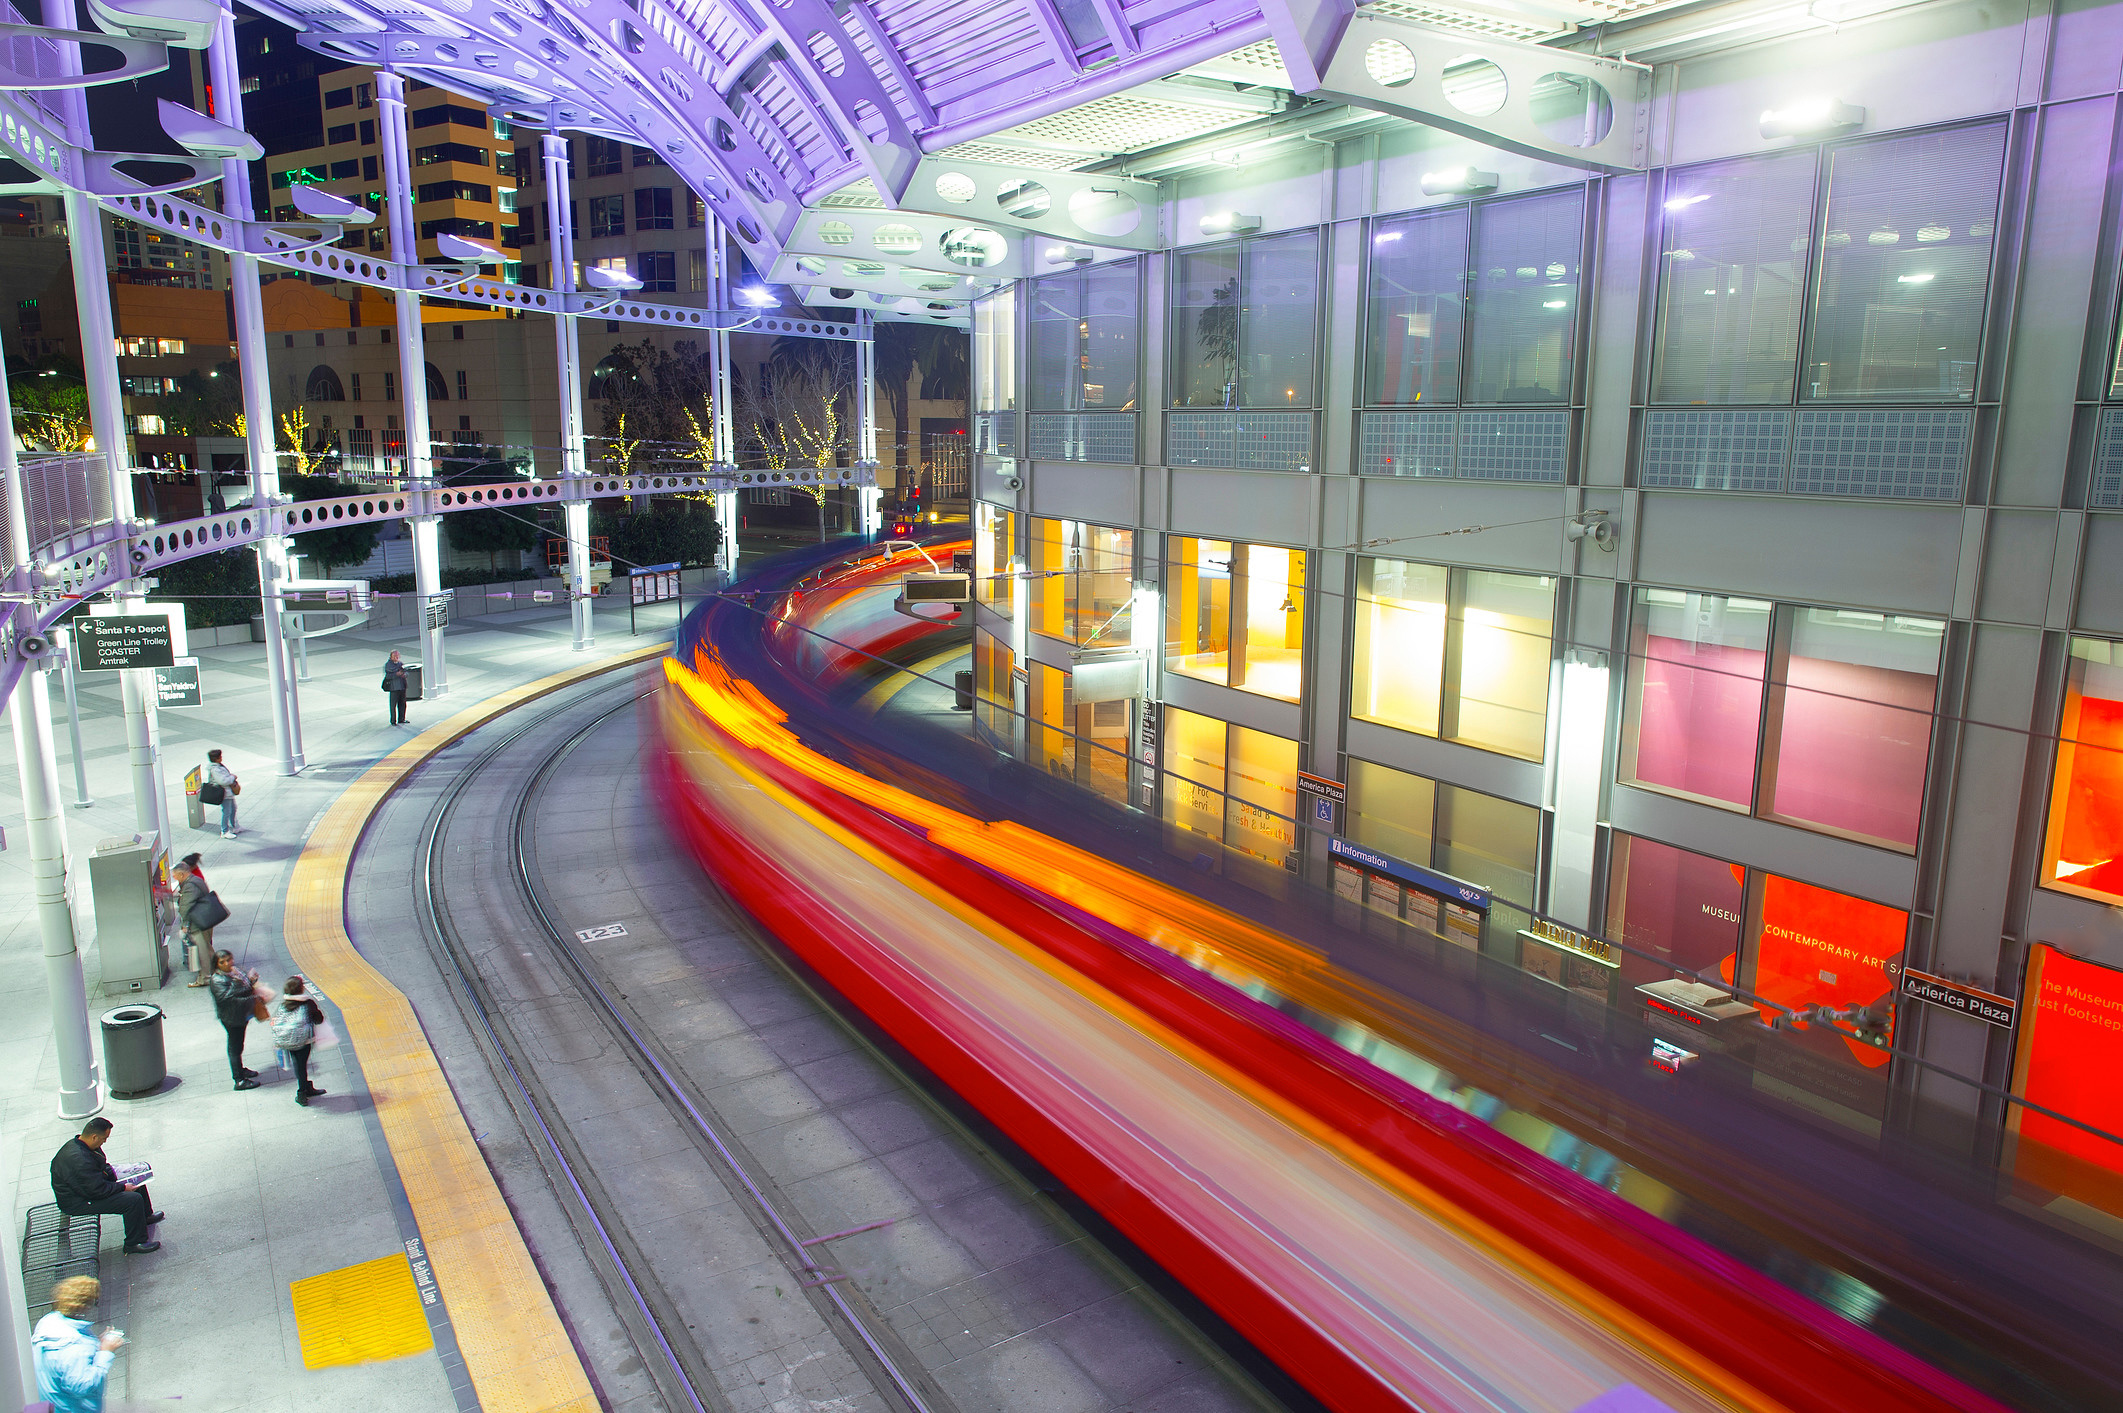
#9 – Santa Fe Train Depot Downtown San Diego (Google Map It)
The Santa Fe Train Depot in San Diego is one of the oldest and most historic places in Downtown San Diego. The old spanish style train depot was built in the 1920’s and it will take you back in time to when San Diego was just being incorporated. The train station is the main Amtrak station for San Diego and it even has some historic old train cars outside that you can take pictures of. You will need to park in the public lot located just west of the train station since street parking is limited. The train station is best photographed at night as you can really capture the movement of the trains and trolleys moving by against the backdrop of the station itself. This truly is one of the gems of San Diego.
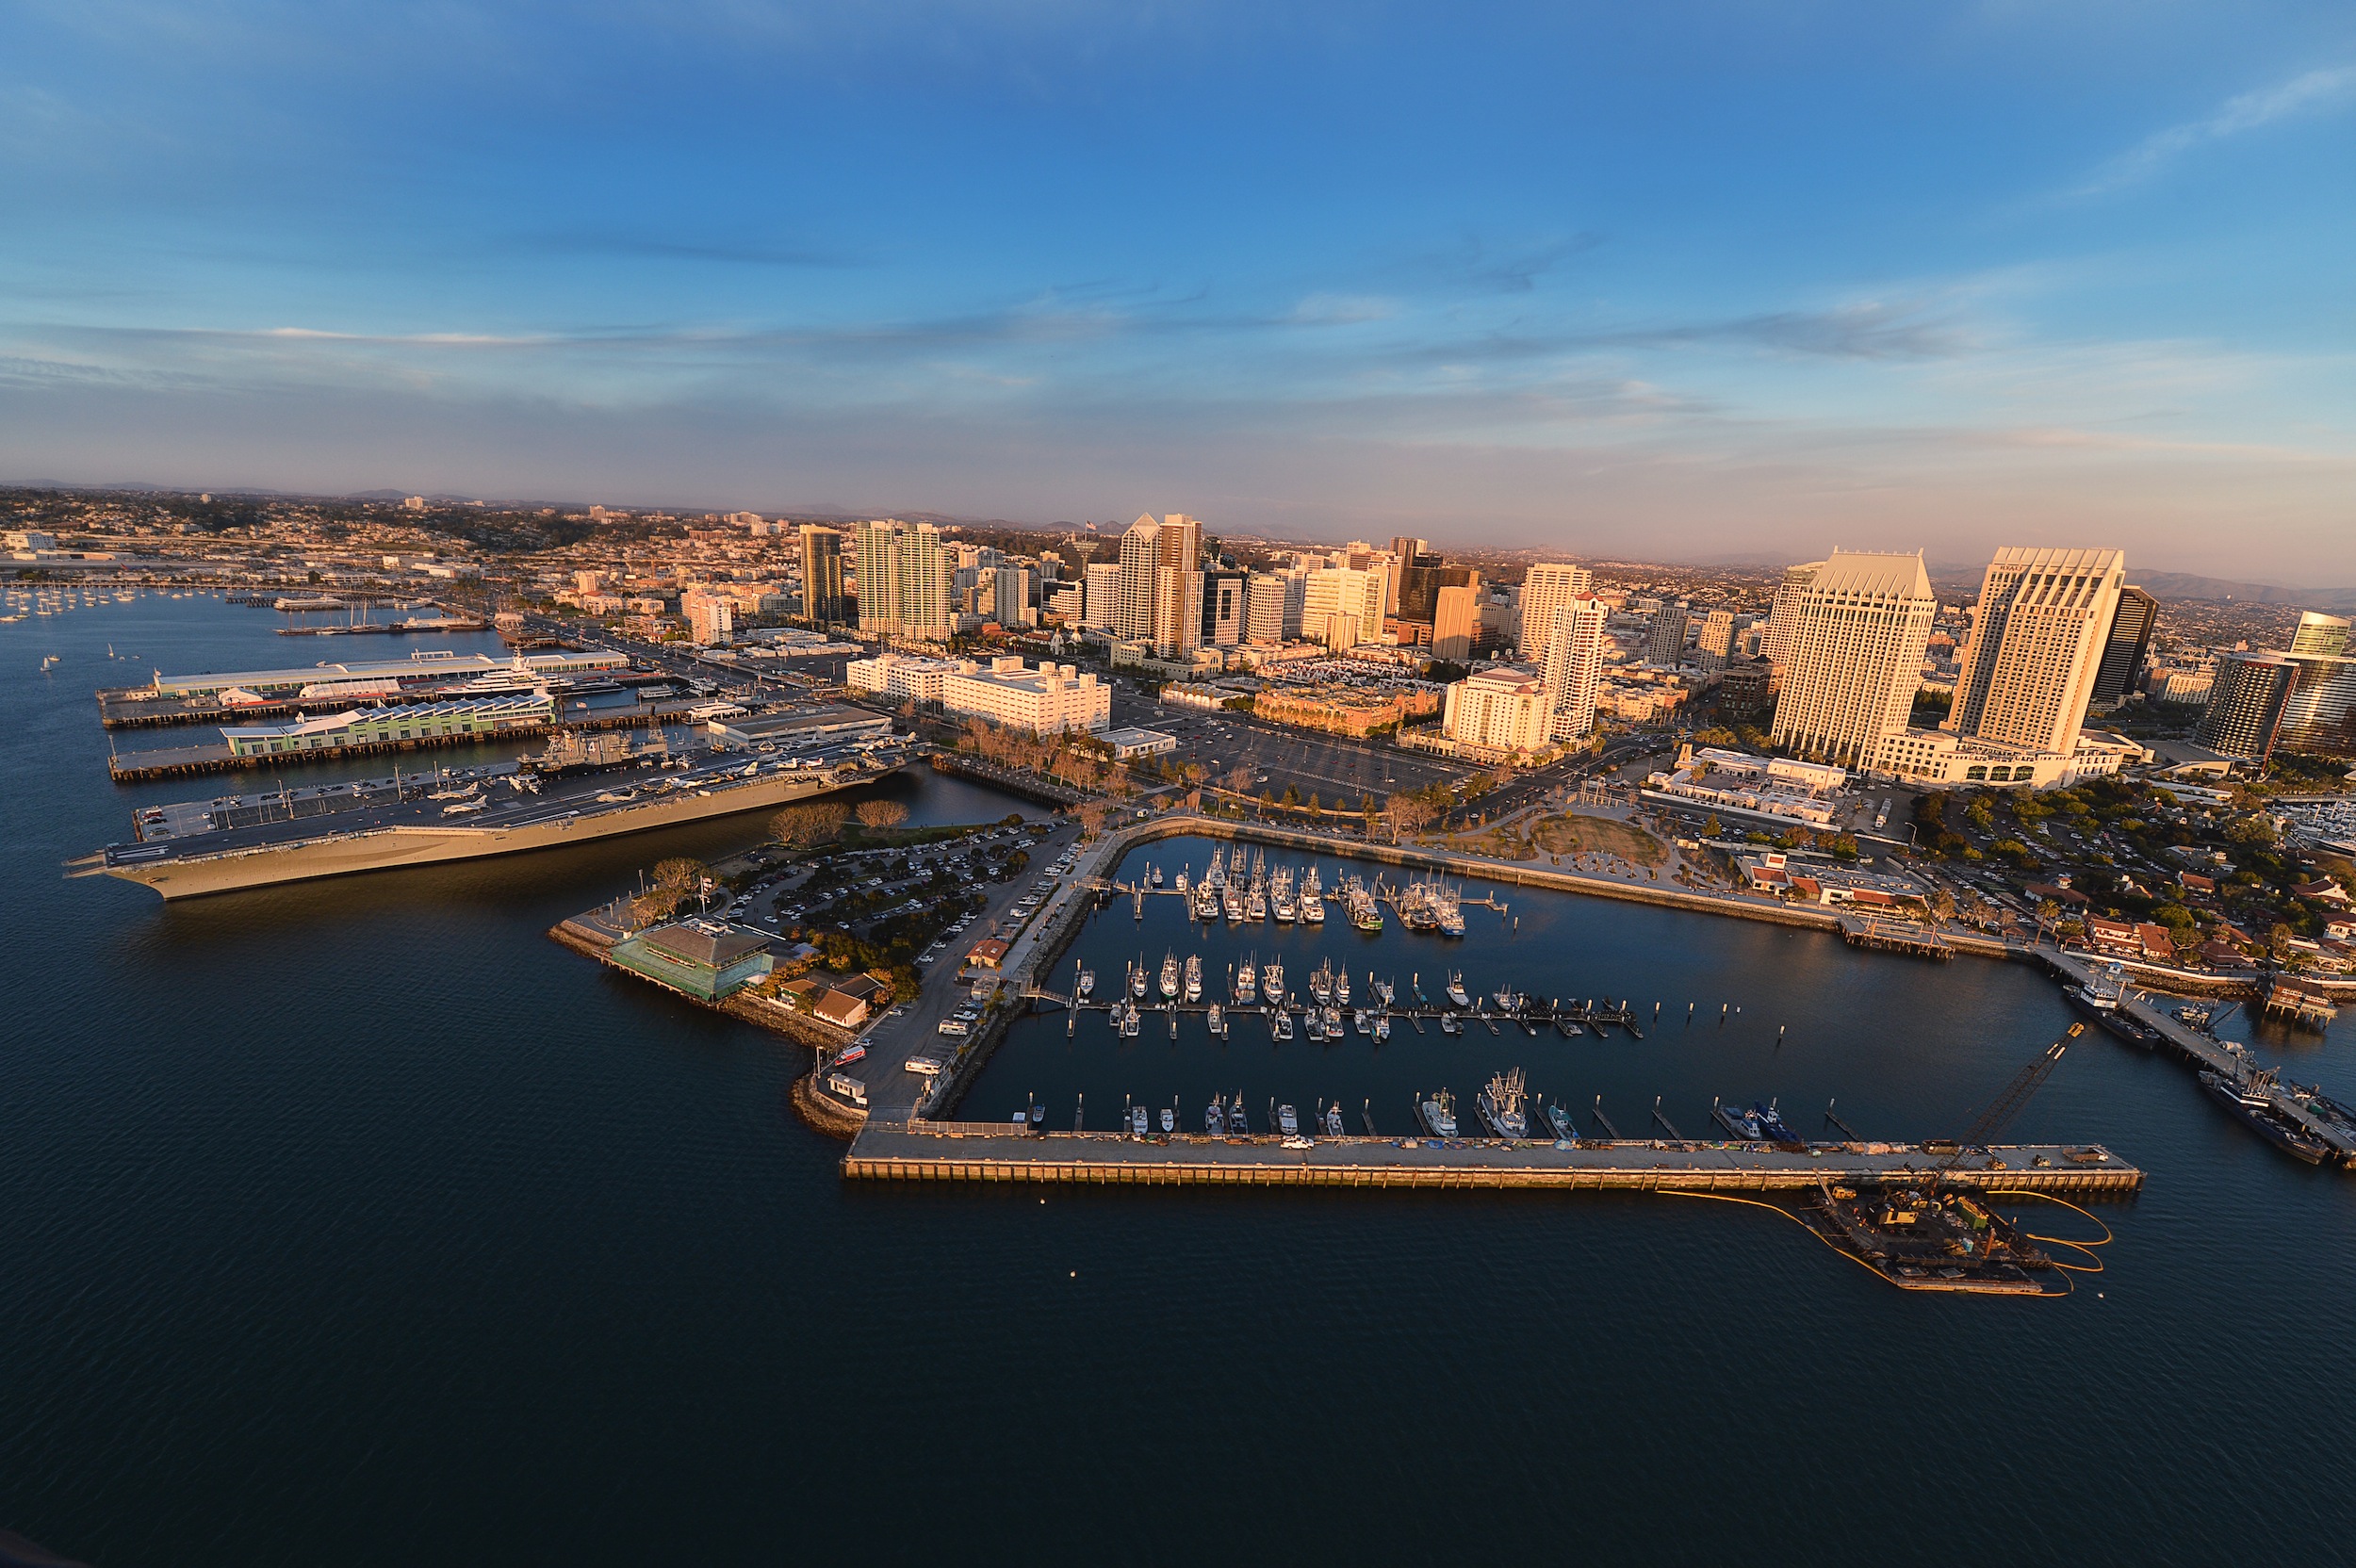
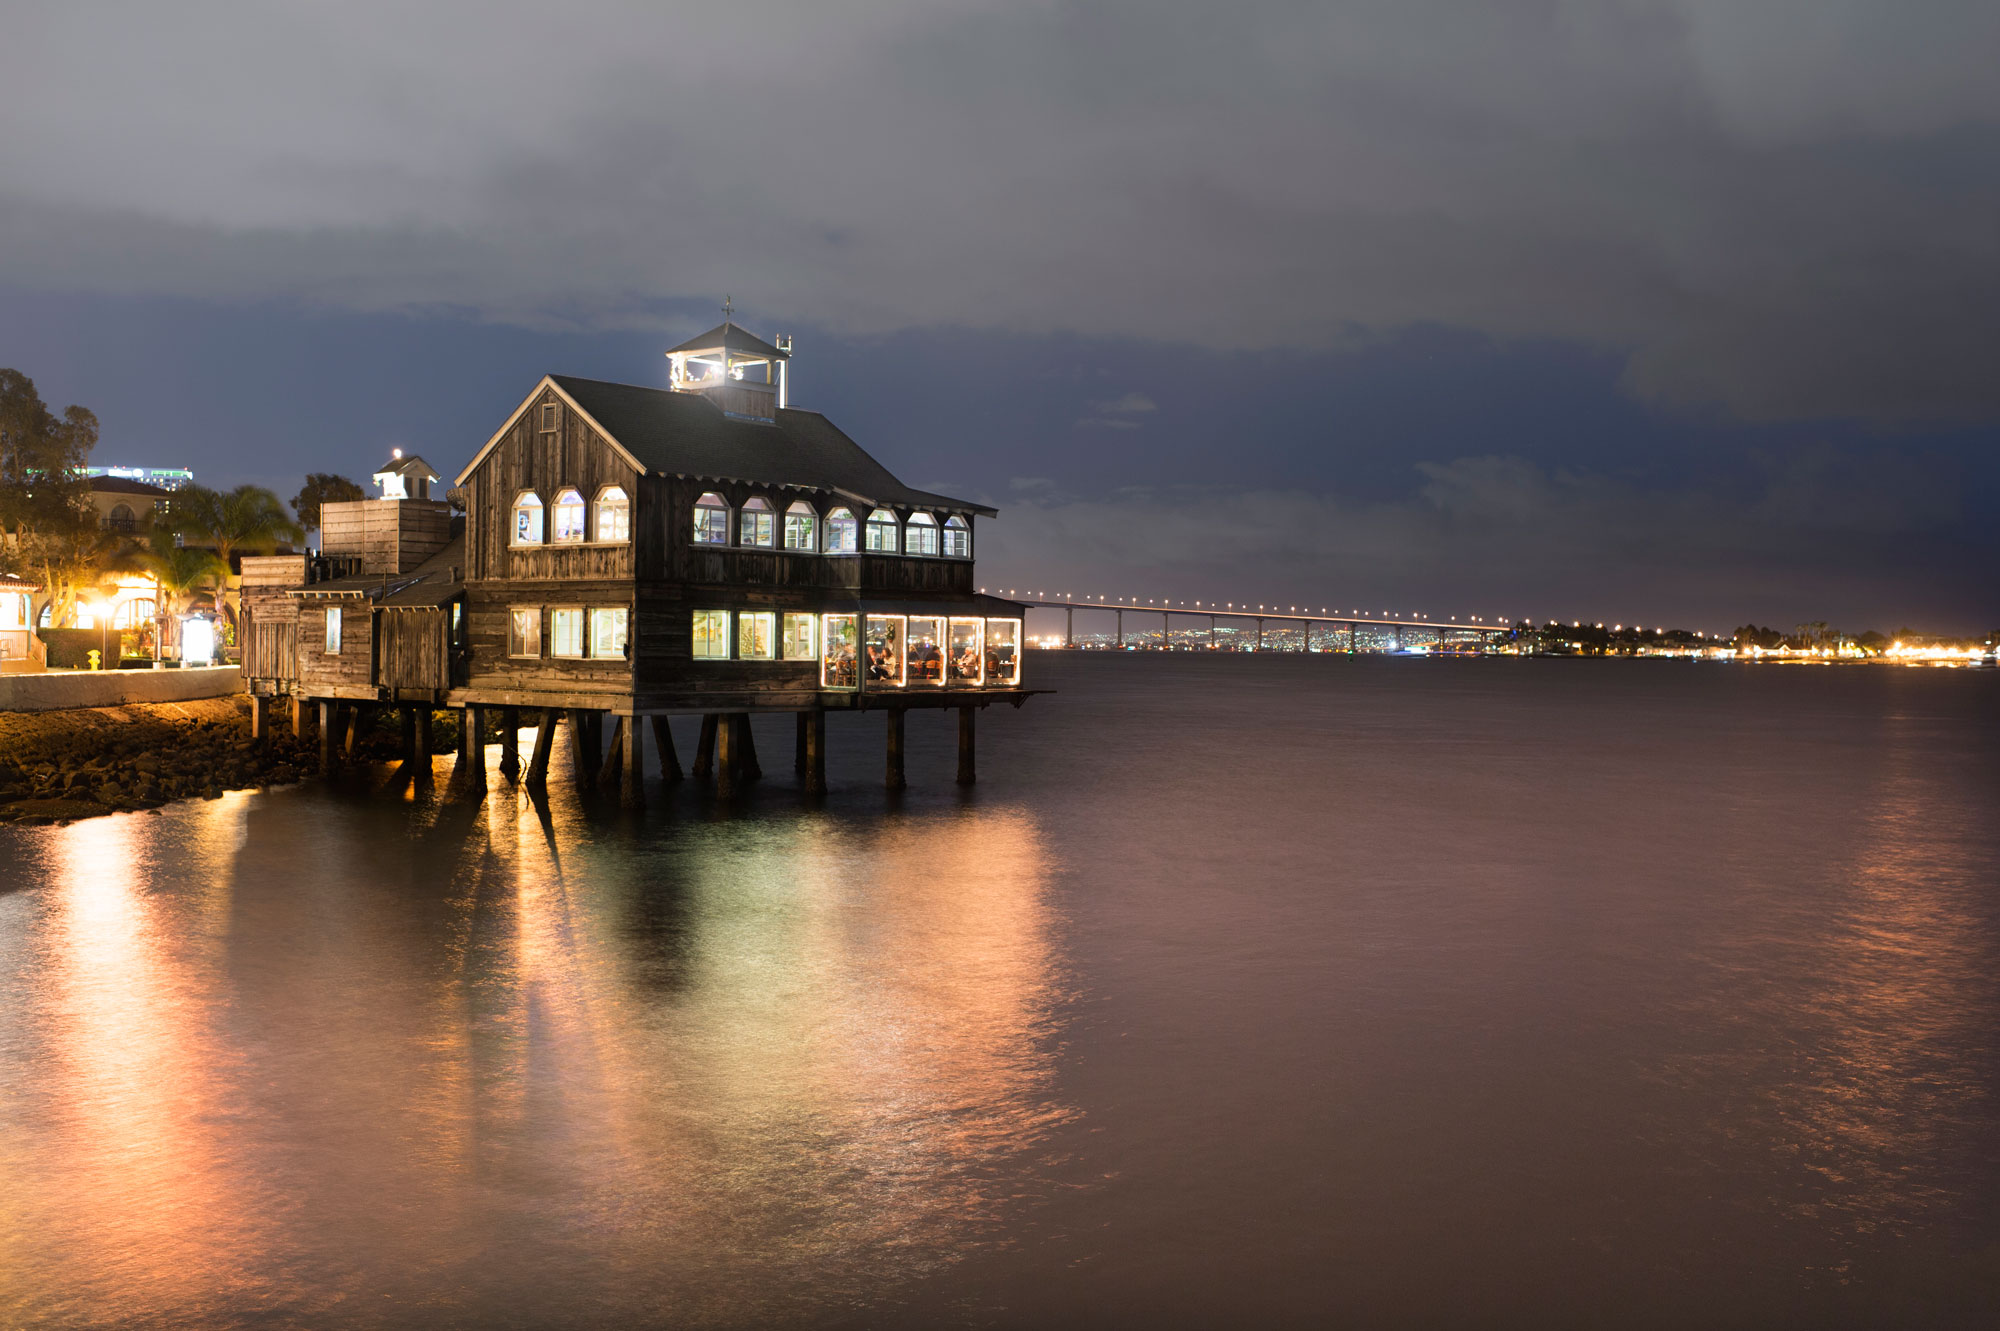
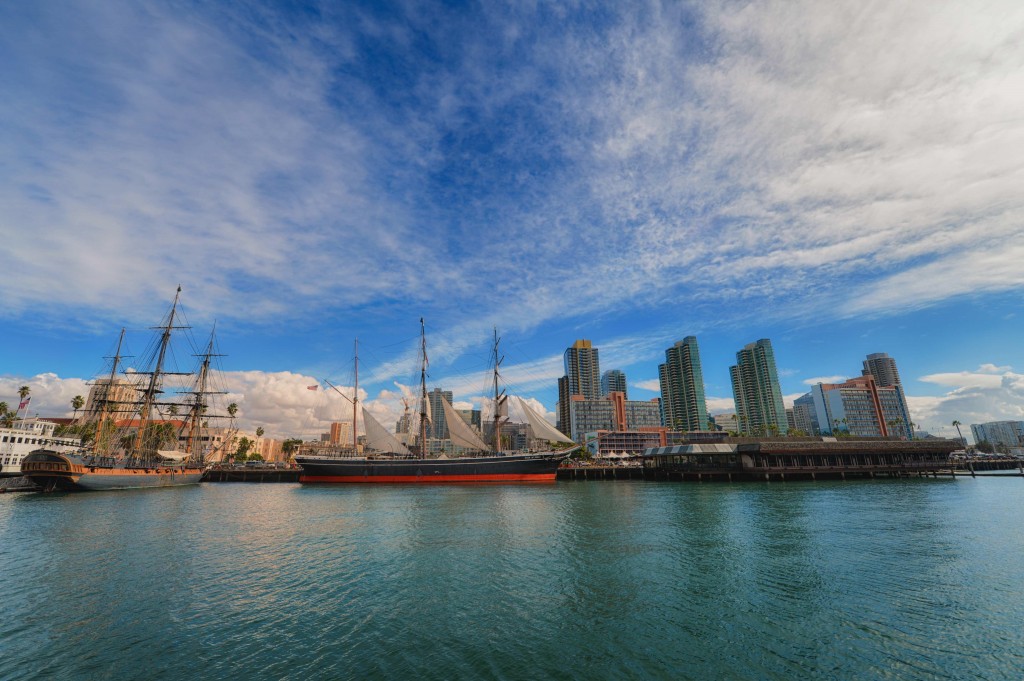
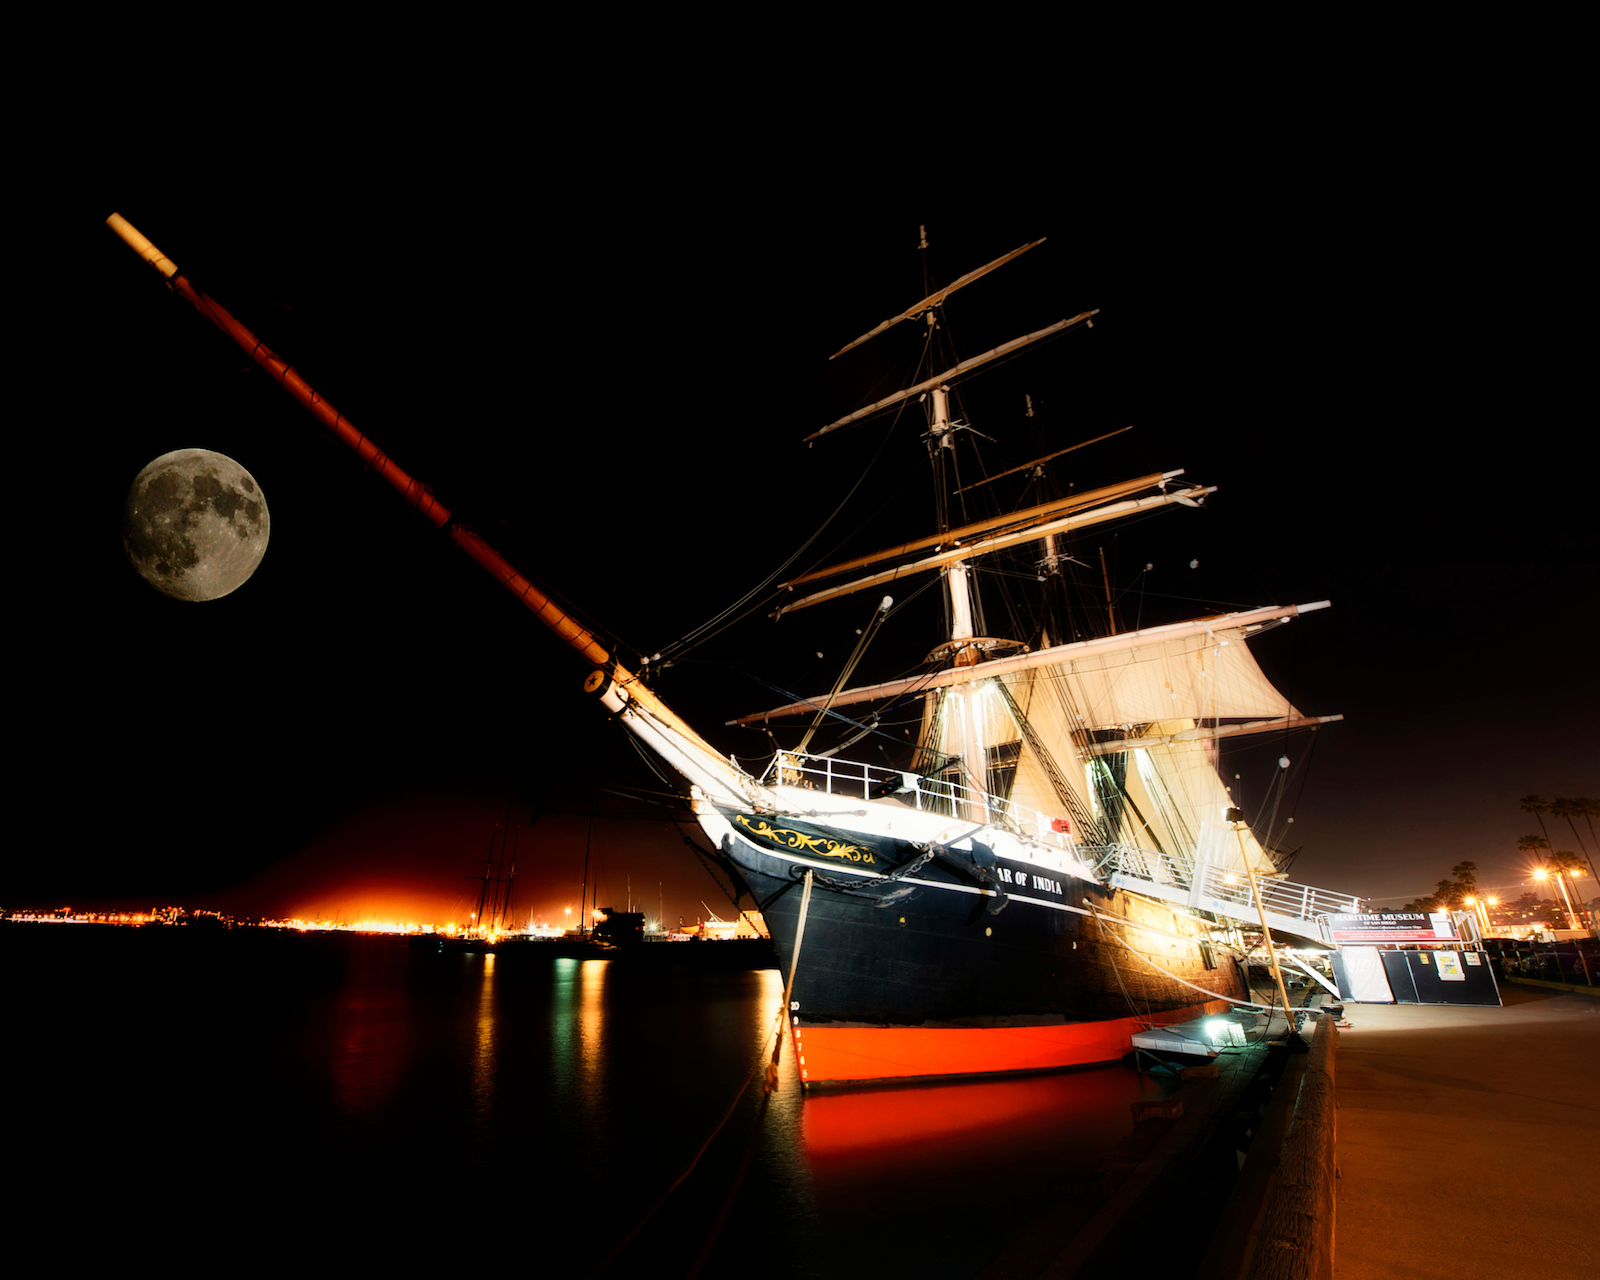
#10 – Star of India/San Diego Maritime Museum (Google Map It)
The Star of India is an old merchant ship that was in operations primarily around the turn of the century. This ship looks like something out of Pirates of the Caribbean and you can even board the ship and take lots of great pictures on it. When you buy tickets you get access to 4-5 other vessels including a russian submarine. There are a lot of great photos you can take in this place and it’s also a very interesting place to go and visit and just browse what life would have been like on these old time ships and submarines. When you head out to the pier to go to the Russian submarine, look behind you and you can capture some great views and pictures of the city as well. While you are there stroll down the harbor to catch lots of nice photos including pictures of an out of commission aircraft carrier – The Midway.
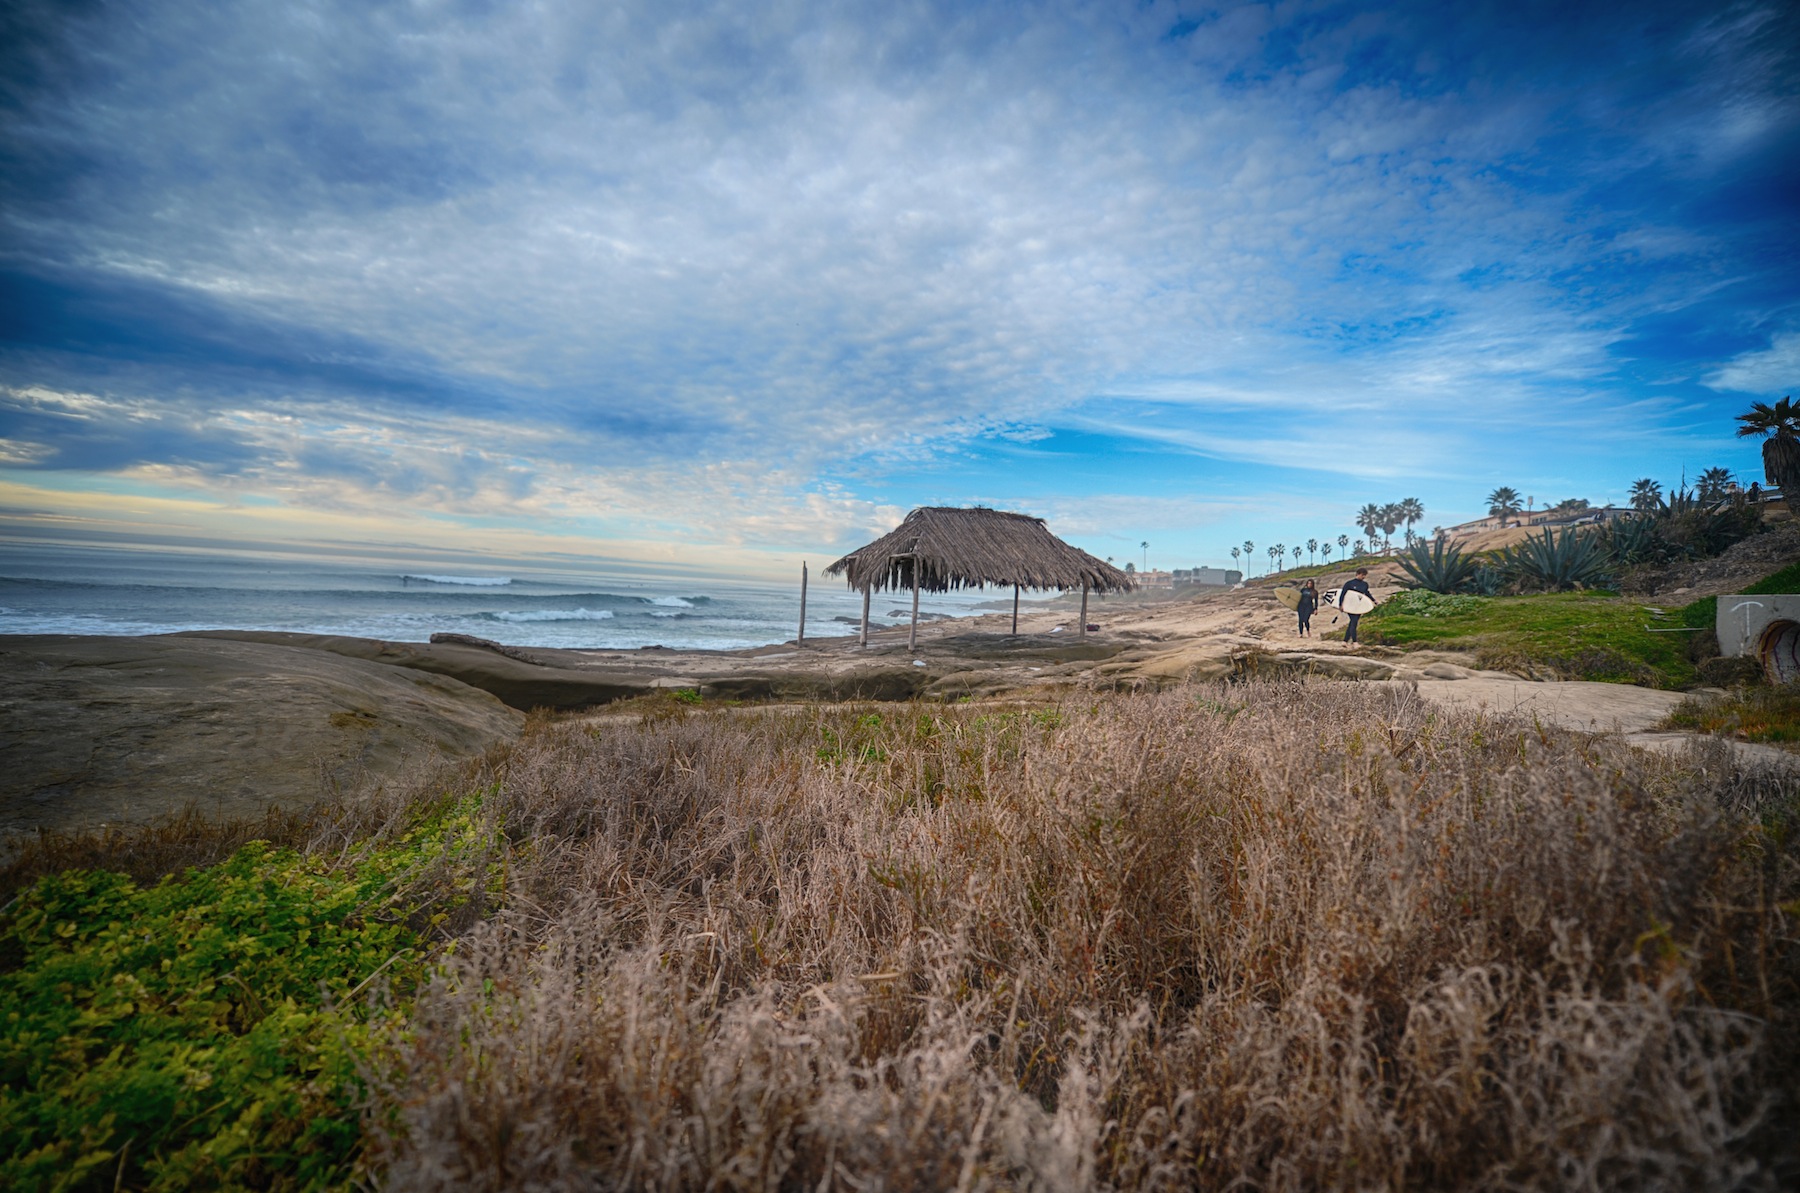
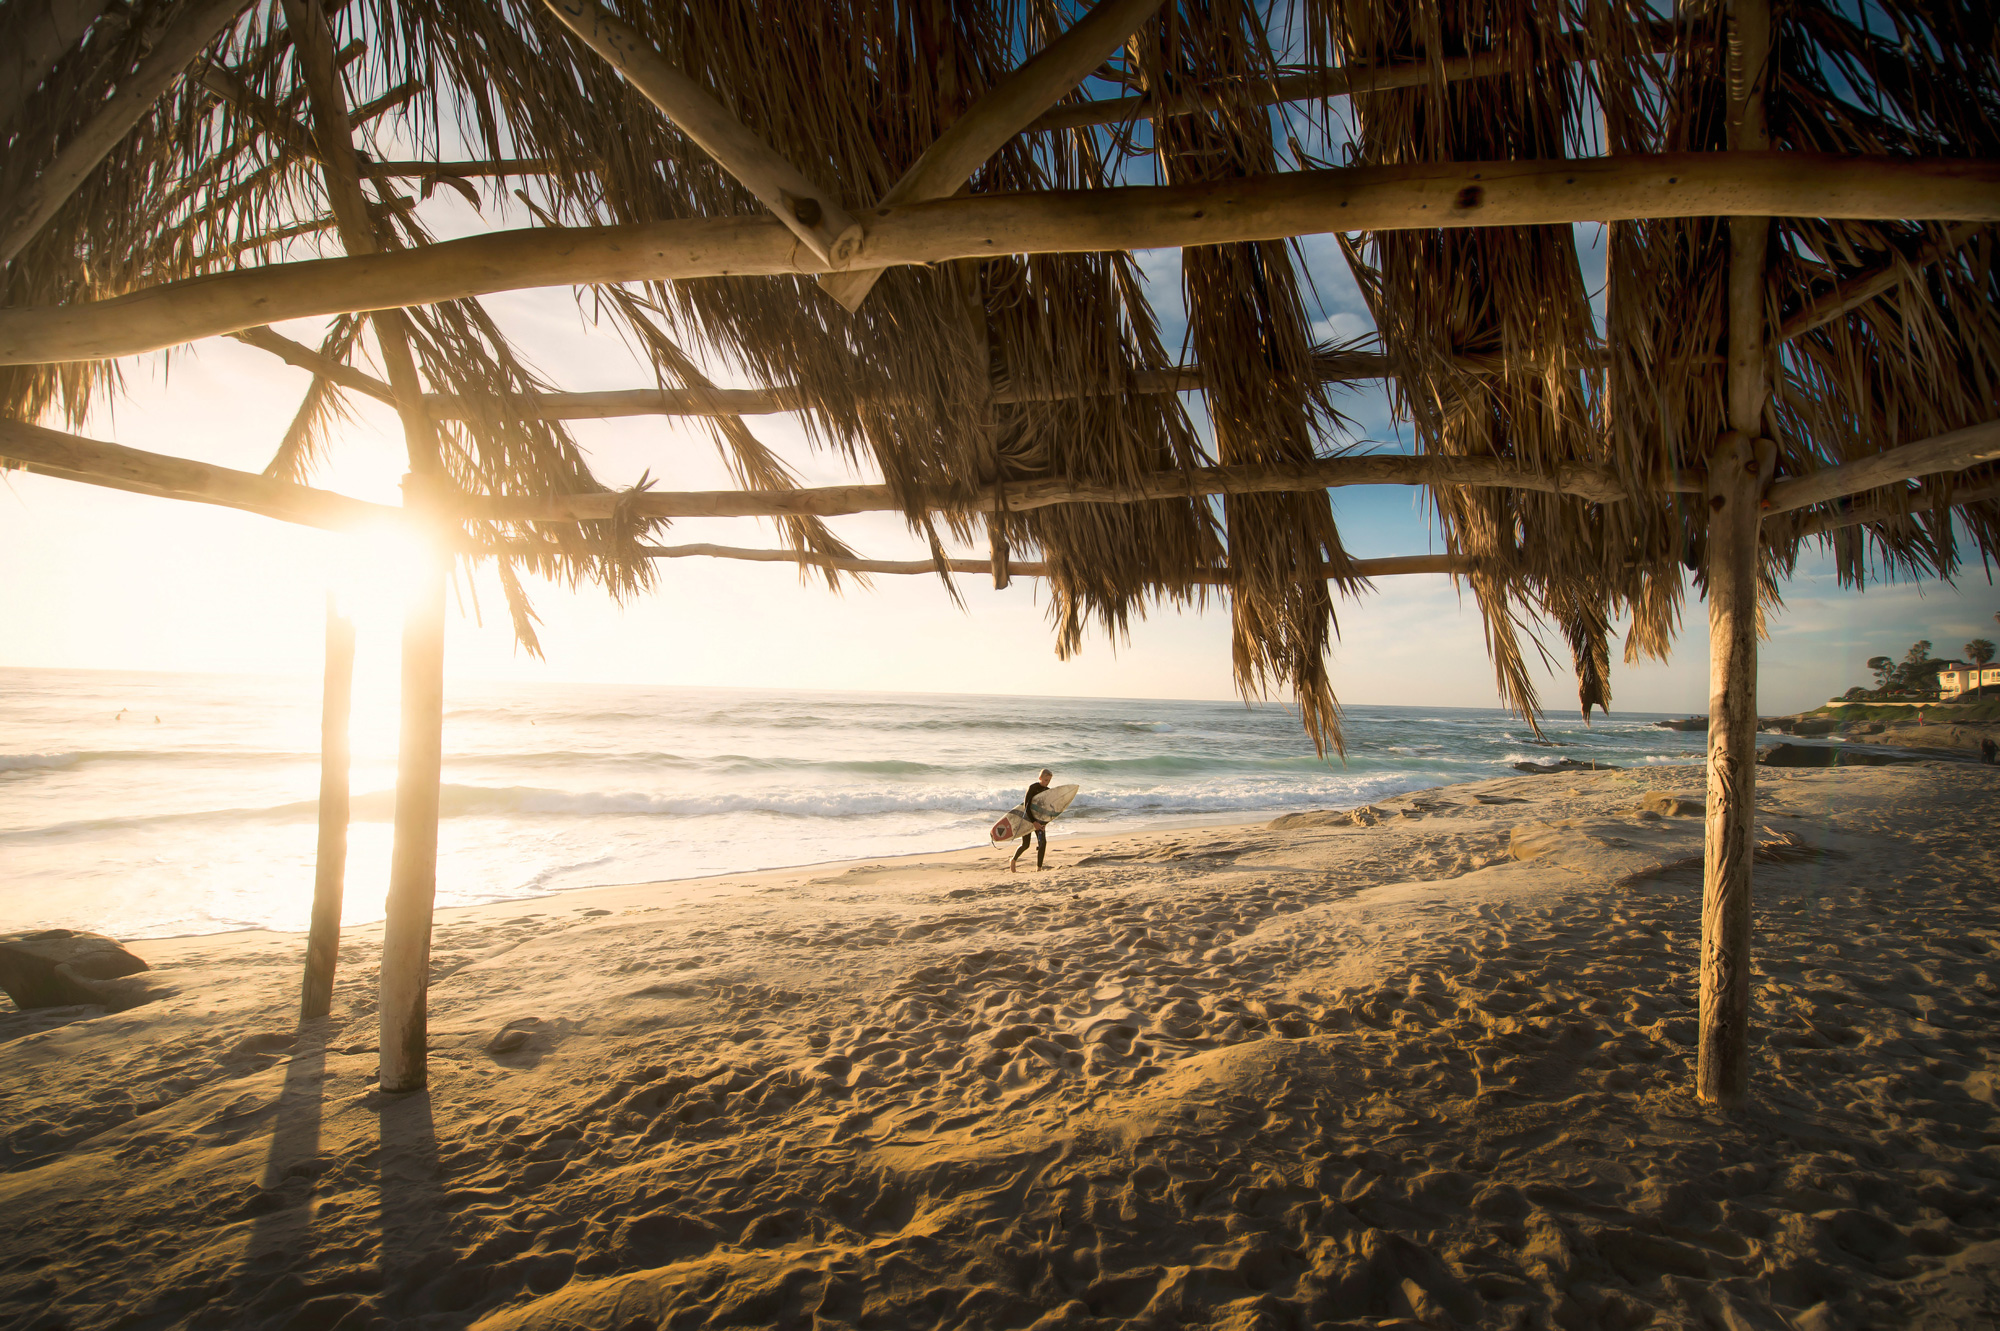
#11 – WindanSea Beach La Jolla (Google Map It)
WindanSea Beach is one of the most famous surfing beaches in the world. This place was featured in the surfing documentary, The Endless Summer, and the old palm thatched surf hut is still maintained by locals that make sure the palm fronds are replaced when they blow away.
This place is a great place to watch surfers off the coast catch some of the most perfectly shaped waves that you will ever see. This place is very popular with wedding and family photographers so expect that at sunset you will see lots of photographers with flashes taking engagement photos or photos of families.
This is great place to take sunset pictures of people. To do it make sure that you take the photos as close to the sun setting as possible or even slightly after the sun has set. Place the subject to block any sun and use your flash to light up there face since the background can easily wash them out.
When you use a flash you can capture some amazing portaits since you will capture the brilliantly colored sky and clouds and the person in front. WindanSea is a must photograph location in San Diego.
#12 – Balboa Park San Diego (Google Map It)
Balboa Park is the largest urban park in the United States and it was built for the Worlds Fair. The buildings here still stand and it is home to one of the best zoos in the world too – The San Diego Zoo.
This is another location that is a favorite among photographers shooting engagement photos. The old buildings provide the perfect backdrop to that timeless old spanish colonial feel. There are so many great places to photograph here including some reflection pools where you can take really good night time photos.
There is plenty of parking around the park and if you have time you can check out the San Diego Historical Society and browse vintage photos of the various areas of San Diego. There are hundreds and thousands of photographs in books and you can even buy prints of the old photos. I have about 10 photos in my house which I had printed in poster size and then later framed. You can get pictures of old time portuguese fisherman and surfers from the 1920’s.
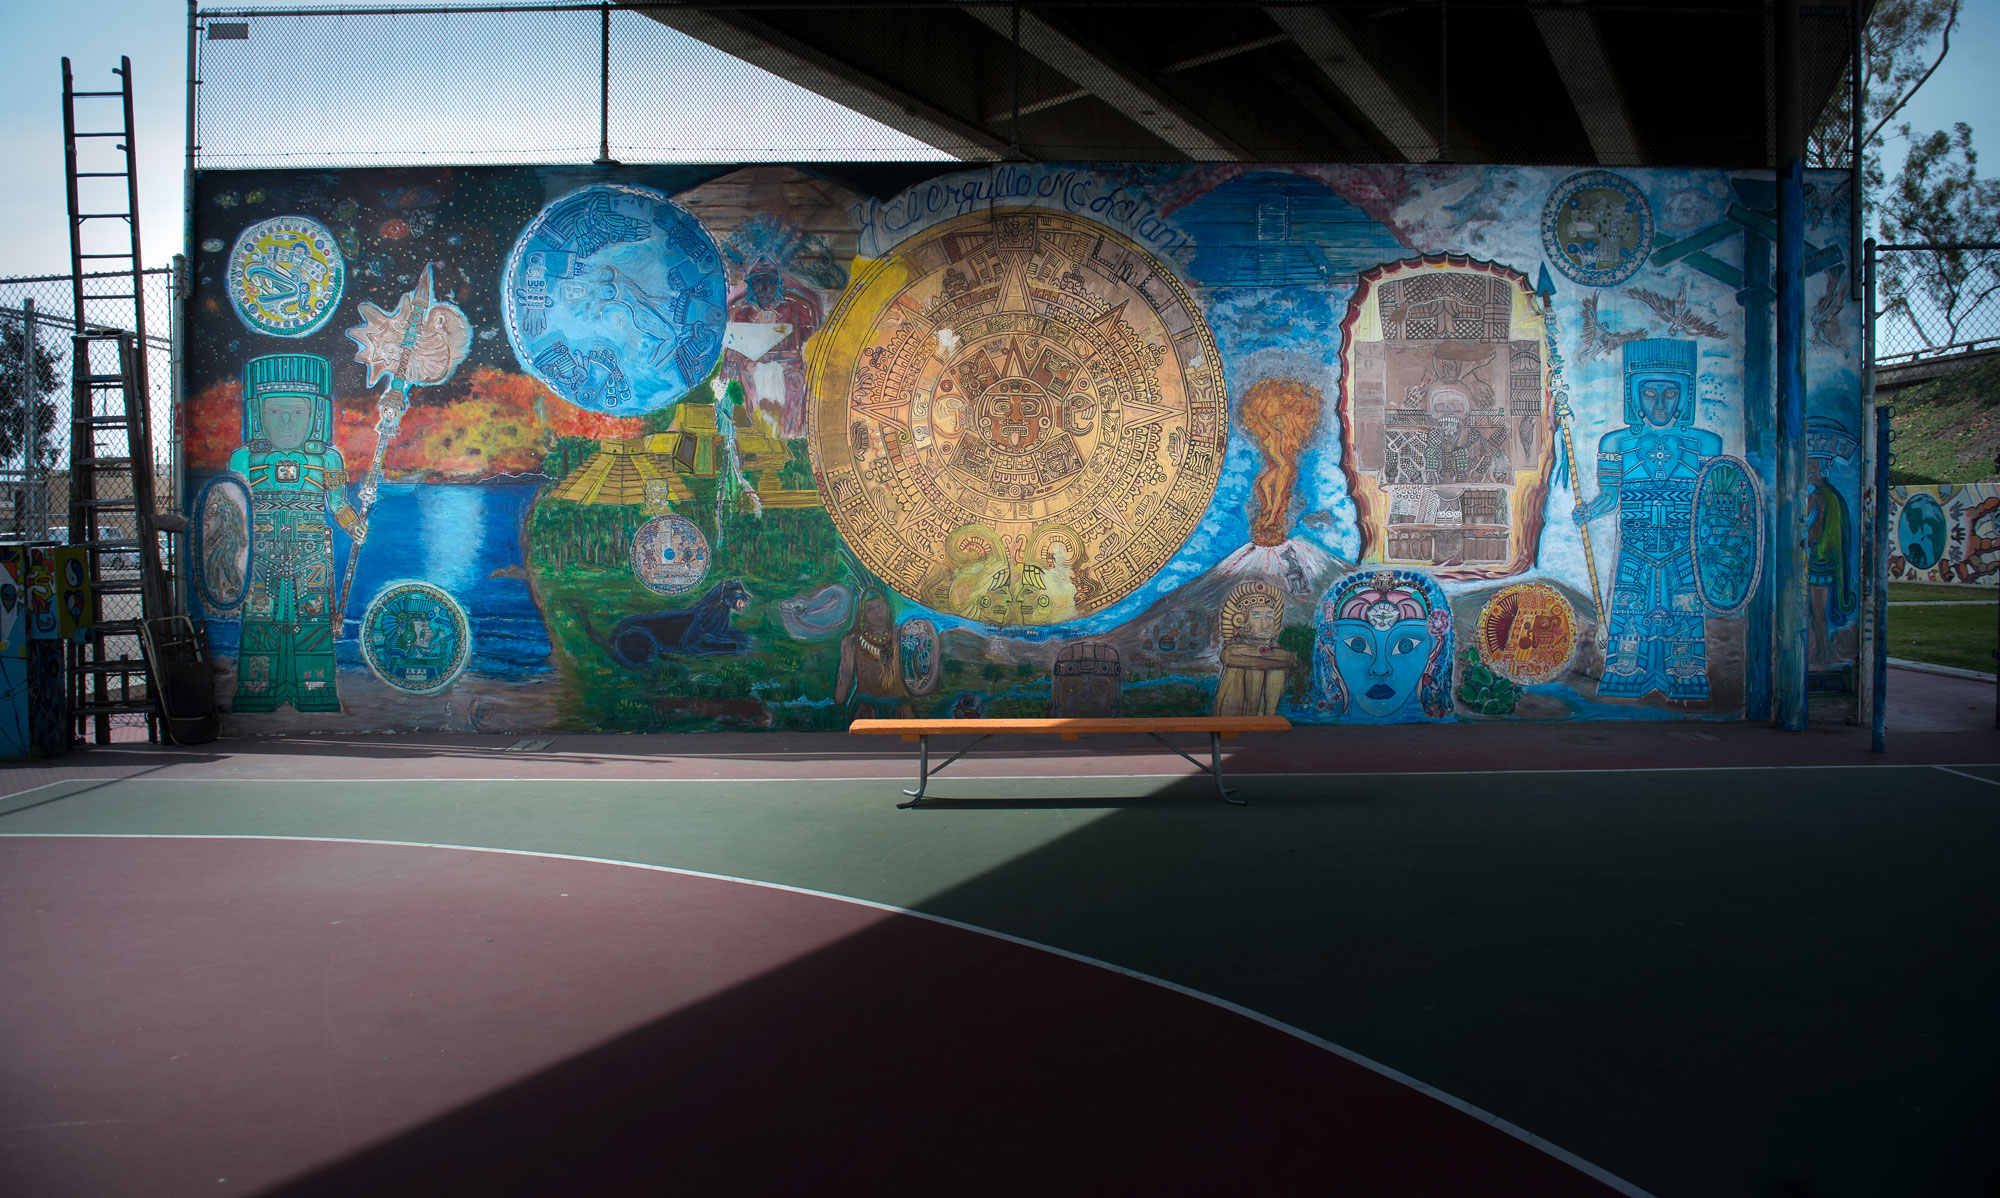
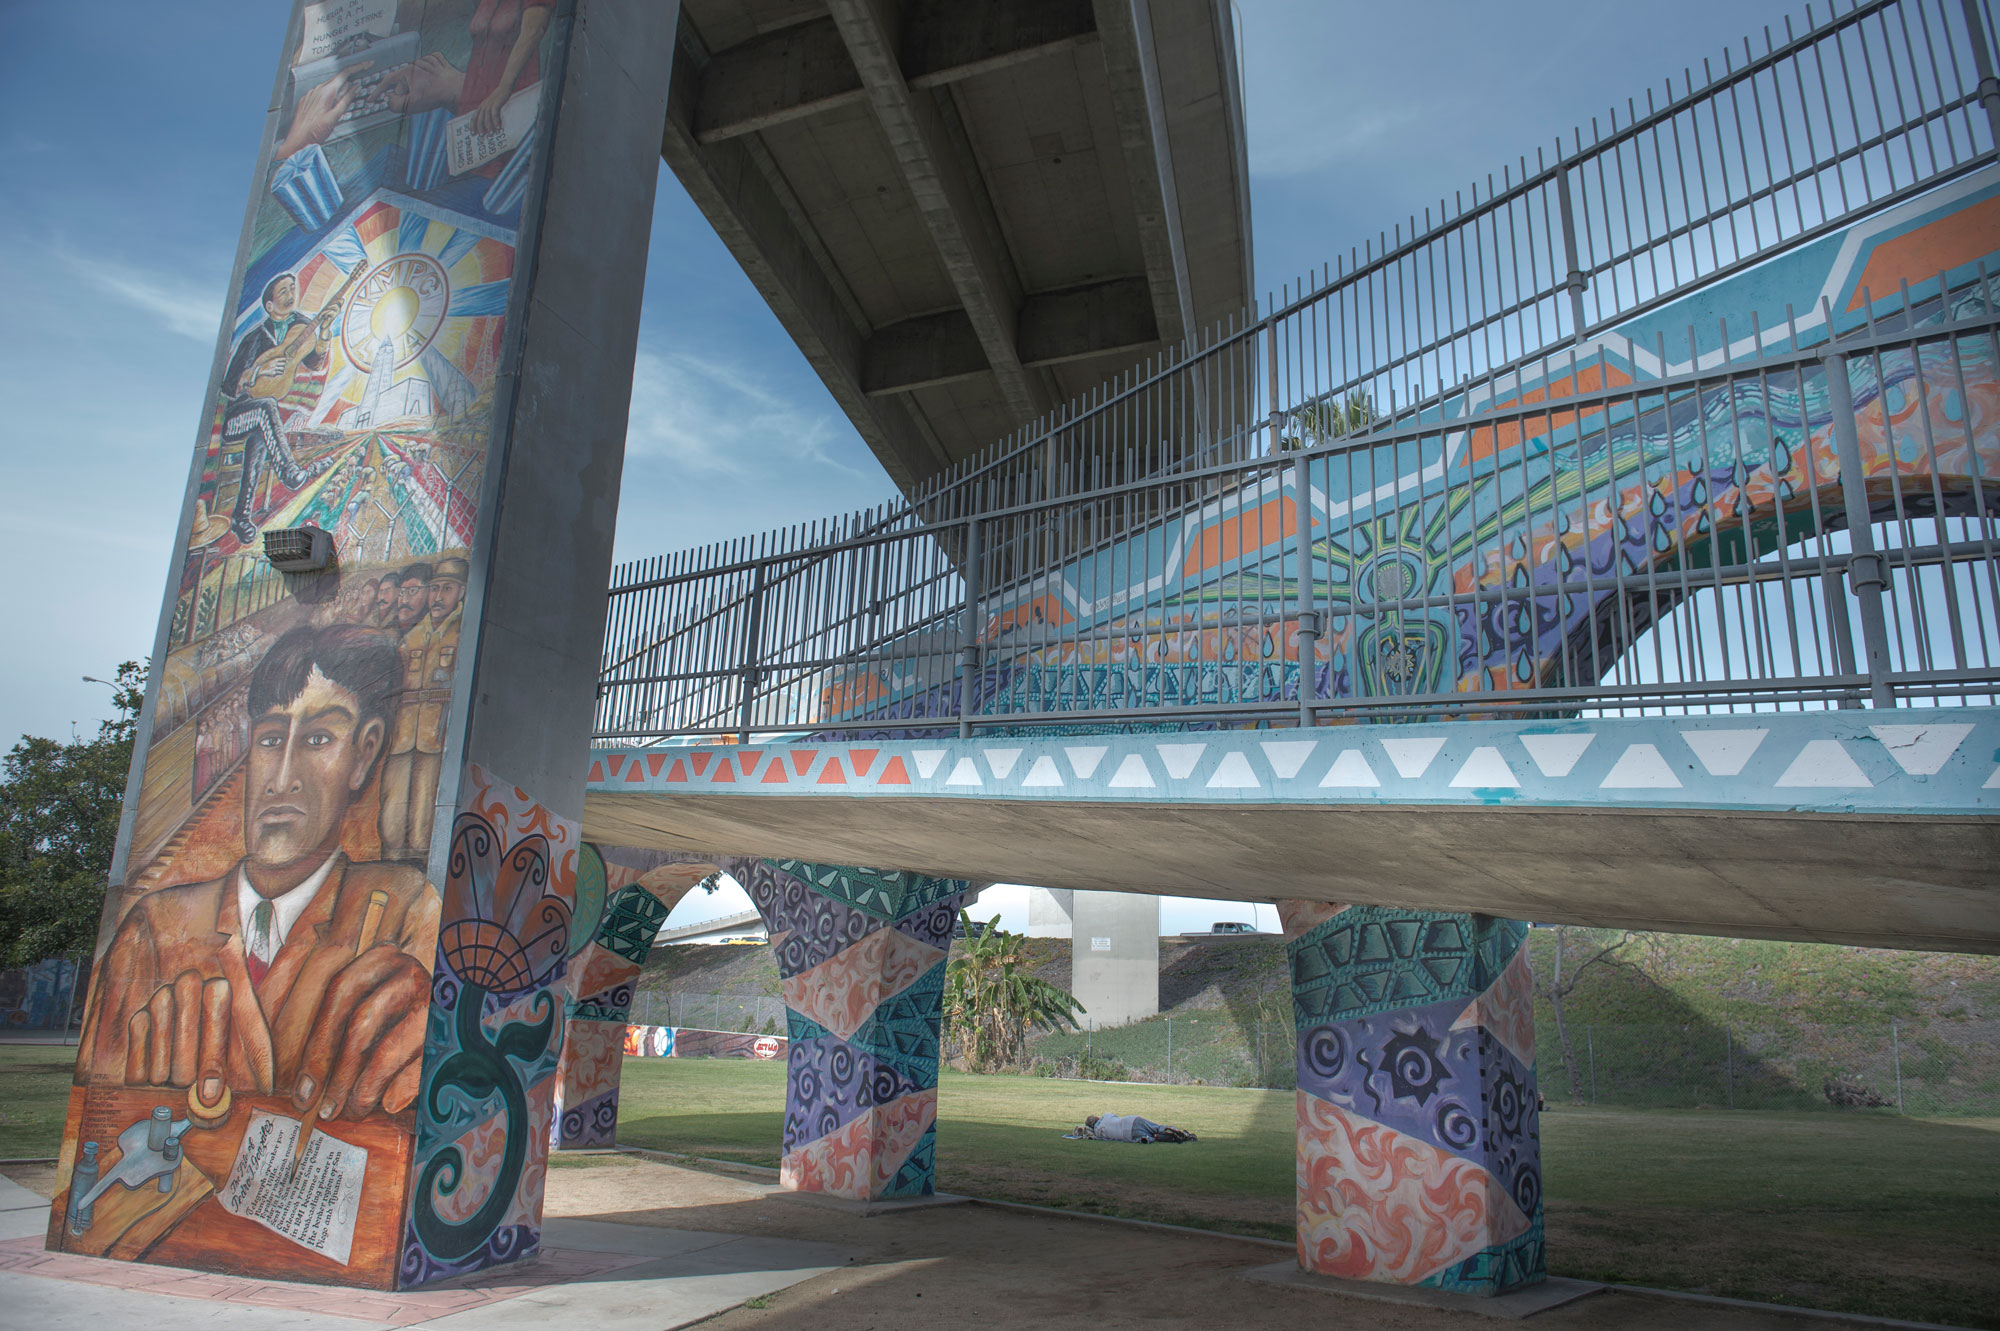
#13 – Chicano Park Logan Heights San Diego (Google Map It)
Chicano Park is not your typical tourist destination but it is home to some rich Latino history in San Diego. The park is located underneath the Coronado Bay Bridge and it has some of the most beautiful murals and art that are painted on the pillars and sides of the freeway. The murals are constantly being changed by local artist and they tell some amazing stories. This place is great as a backdrop for portraits but also to just photograph the fantastic art and murals.
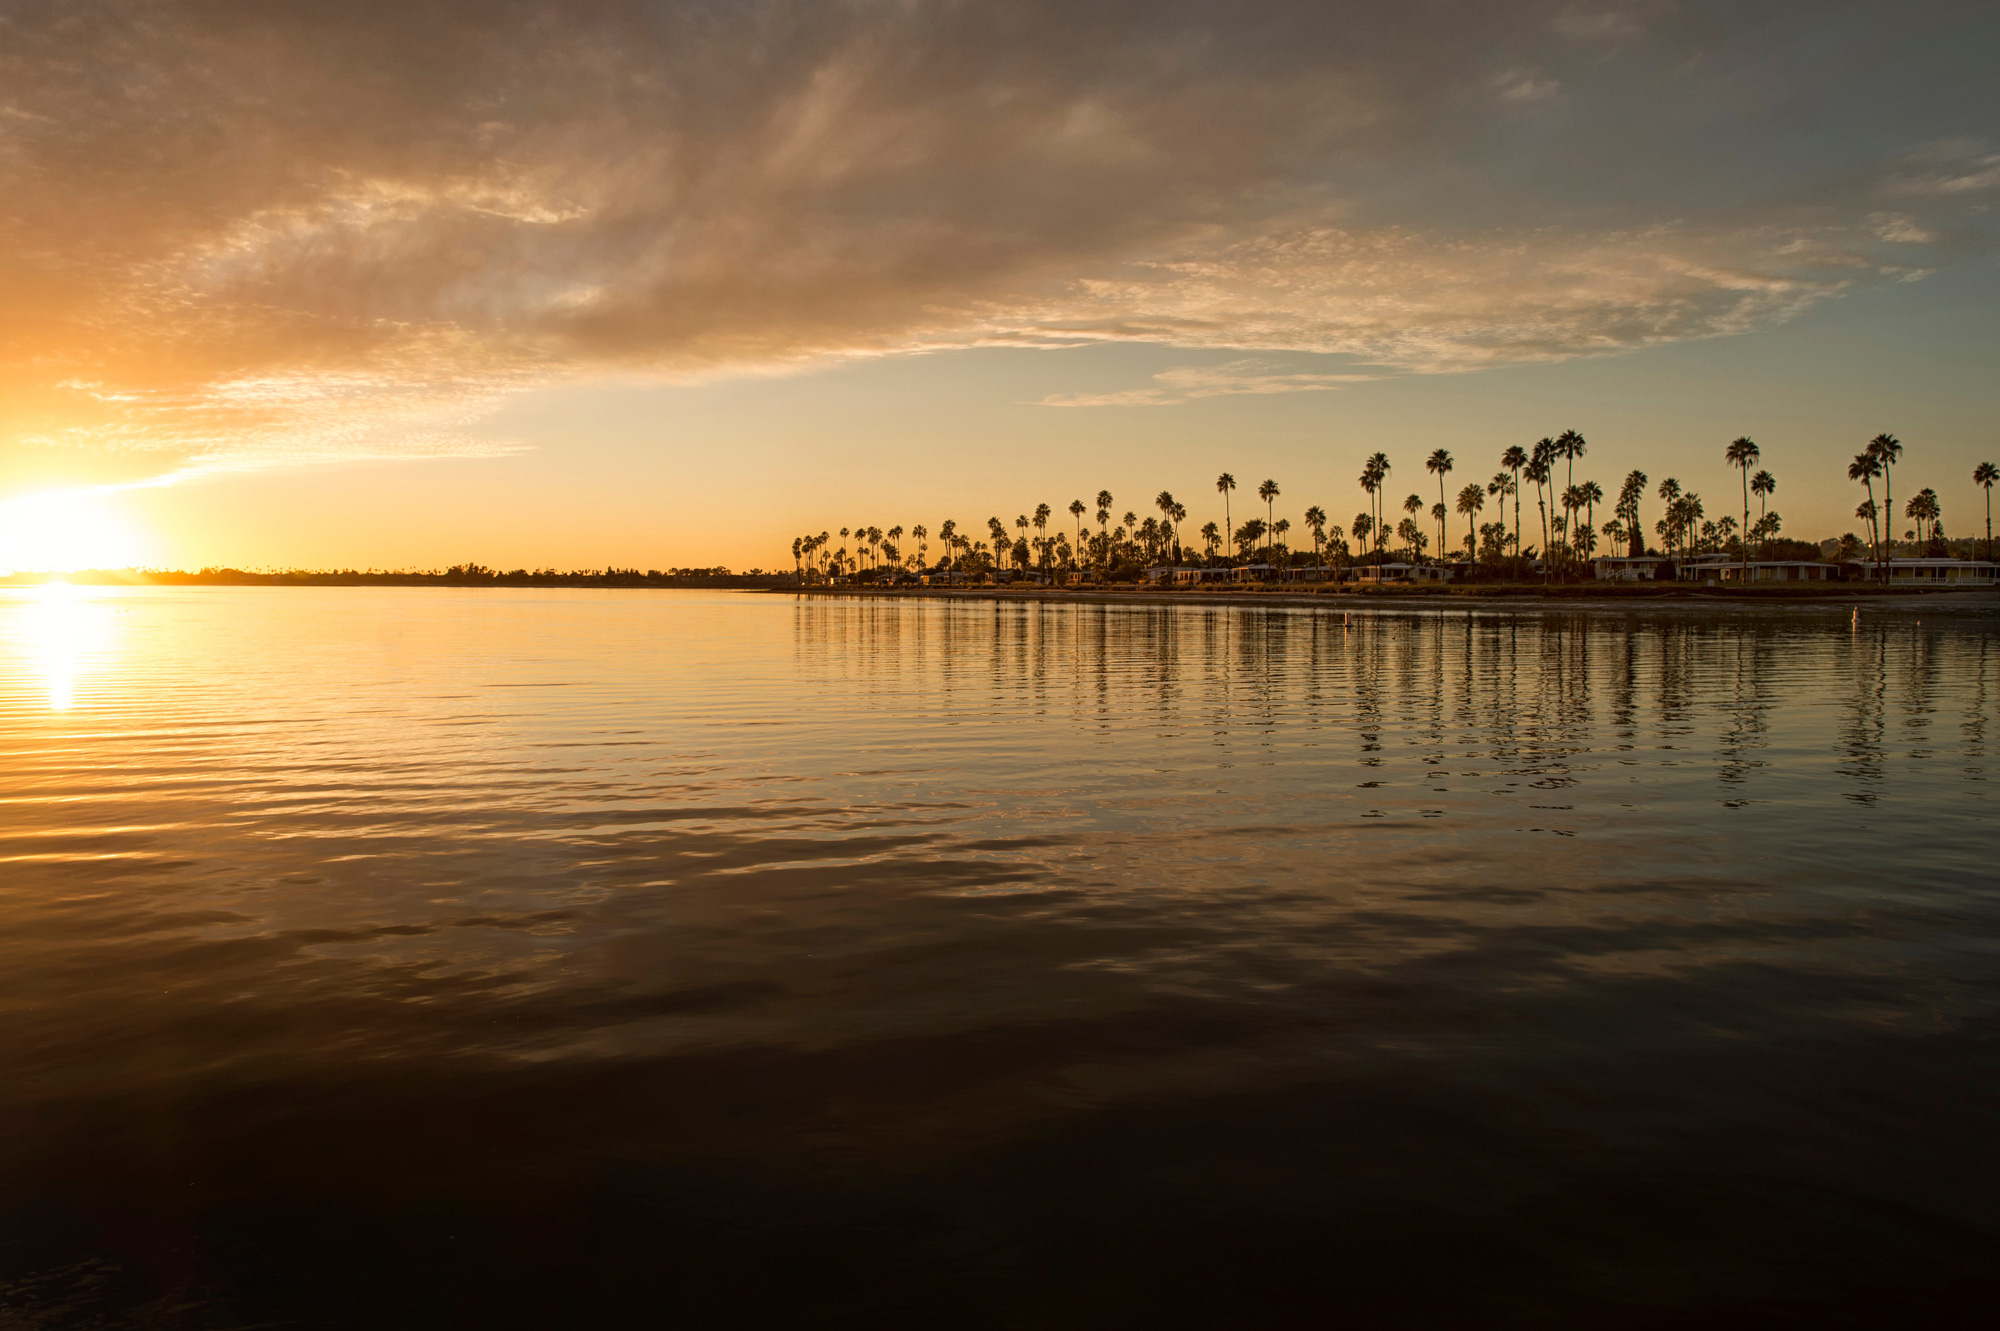
#14 – Mission Bay (Google Map It)
Mission Bay Park has some great places to take sunset photos. I always like to take sunset photos with some context and something in the foreground. This places provides a location where you can get nice palm trees, calm waters and even sailboats within the sunset picture. Its a great location.
#15 – Laurel Street Parking Garage San Diego (Google Map It)
The top deck of the Laurel Street Parking Garage has one of the most amazing views of large planes landing at San Diego International Airport. The parking structure is the very last building on the approach path before the big planes touch down just a couple of hundred feet away. The planes pass so close that the mist off the engines will seemingly trickle down right on top of you. You get an extraordinary perspective on the landing planes.
The only catch is that the parking structure does not allow photos on the roof so if you are going up there for that purpose they probably wont like that. There is a sign as you enter that says it. So you either need to be parking there or going on a trip. In any case if you find that you can’t get up there than the surrounding area is still a great place to capture pictures of planes coming in very close. San Diego airport is one of the only major airports in the US that are actually located right smack in the middle of the city.

#16 Petco Park in Downtown (Google Map it)
Petco Park is right next to the Convention Center and it is a great place to get wide angle shots of the city, but also to capture the trolley line that runs right beneath the footbridge. If you love train watching, this is a great place to visit. If you are staying at any of the hotels downtown you are within minutes of the picturesque sights of the Petco area.

# 17 The Dr Seuss Tree in La Jolla (Google Map It)
The tree can be viewed in the park across from the La Jolla Cove Suites. If you can get on the roof of the hotel you can get some great panoramas too.
The tree can be viewed in the park across from the La Jolla Cove Suites. If you can get on the roof of the hotel you can get some great panoramas too.

#18 North Beach (Google Map It)

#19 San Diego Skyline from Point Loma (Google Map It)
This is a hidden place not many people know about. You will need to park your car and then look for the small hidden set of stair cases that are between two houses. From there you can setup and get a great view of the whole of downtown. Bring a zoom lens because that will give you the best result.
#20 Mount Soledad Cross La Jolla (Google Map It)
This can be a beautiful place to see the entire skyline of San Diego from way up high.

#21 Del Mar 4th Street Beach (Google Map It)
G0 to the end of 4th Beach in Del Mar. Take a walk along the cliffs, it is extraordinary at sunset.
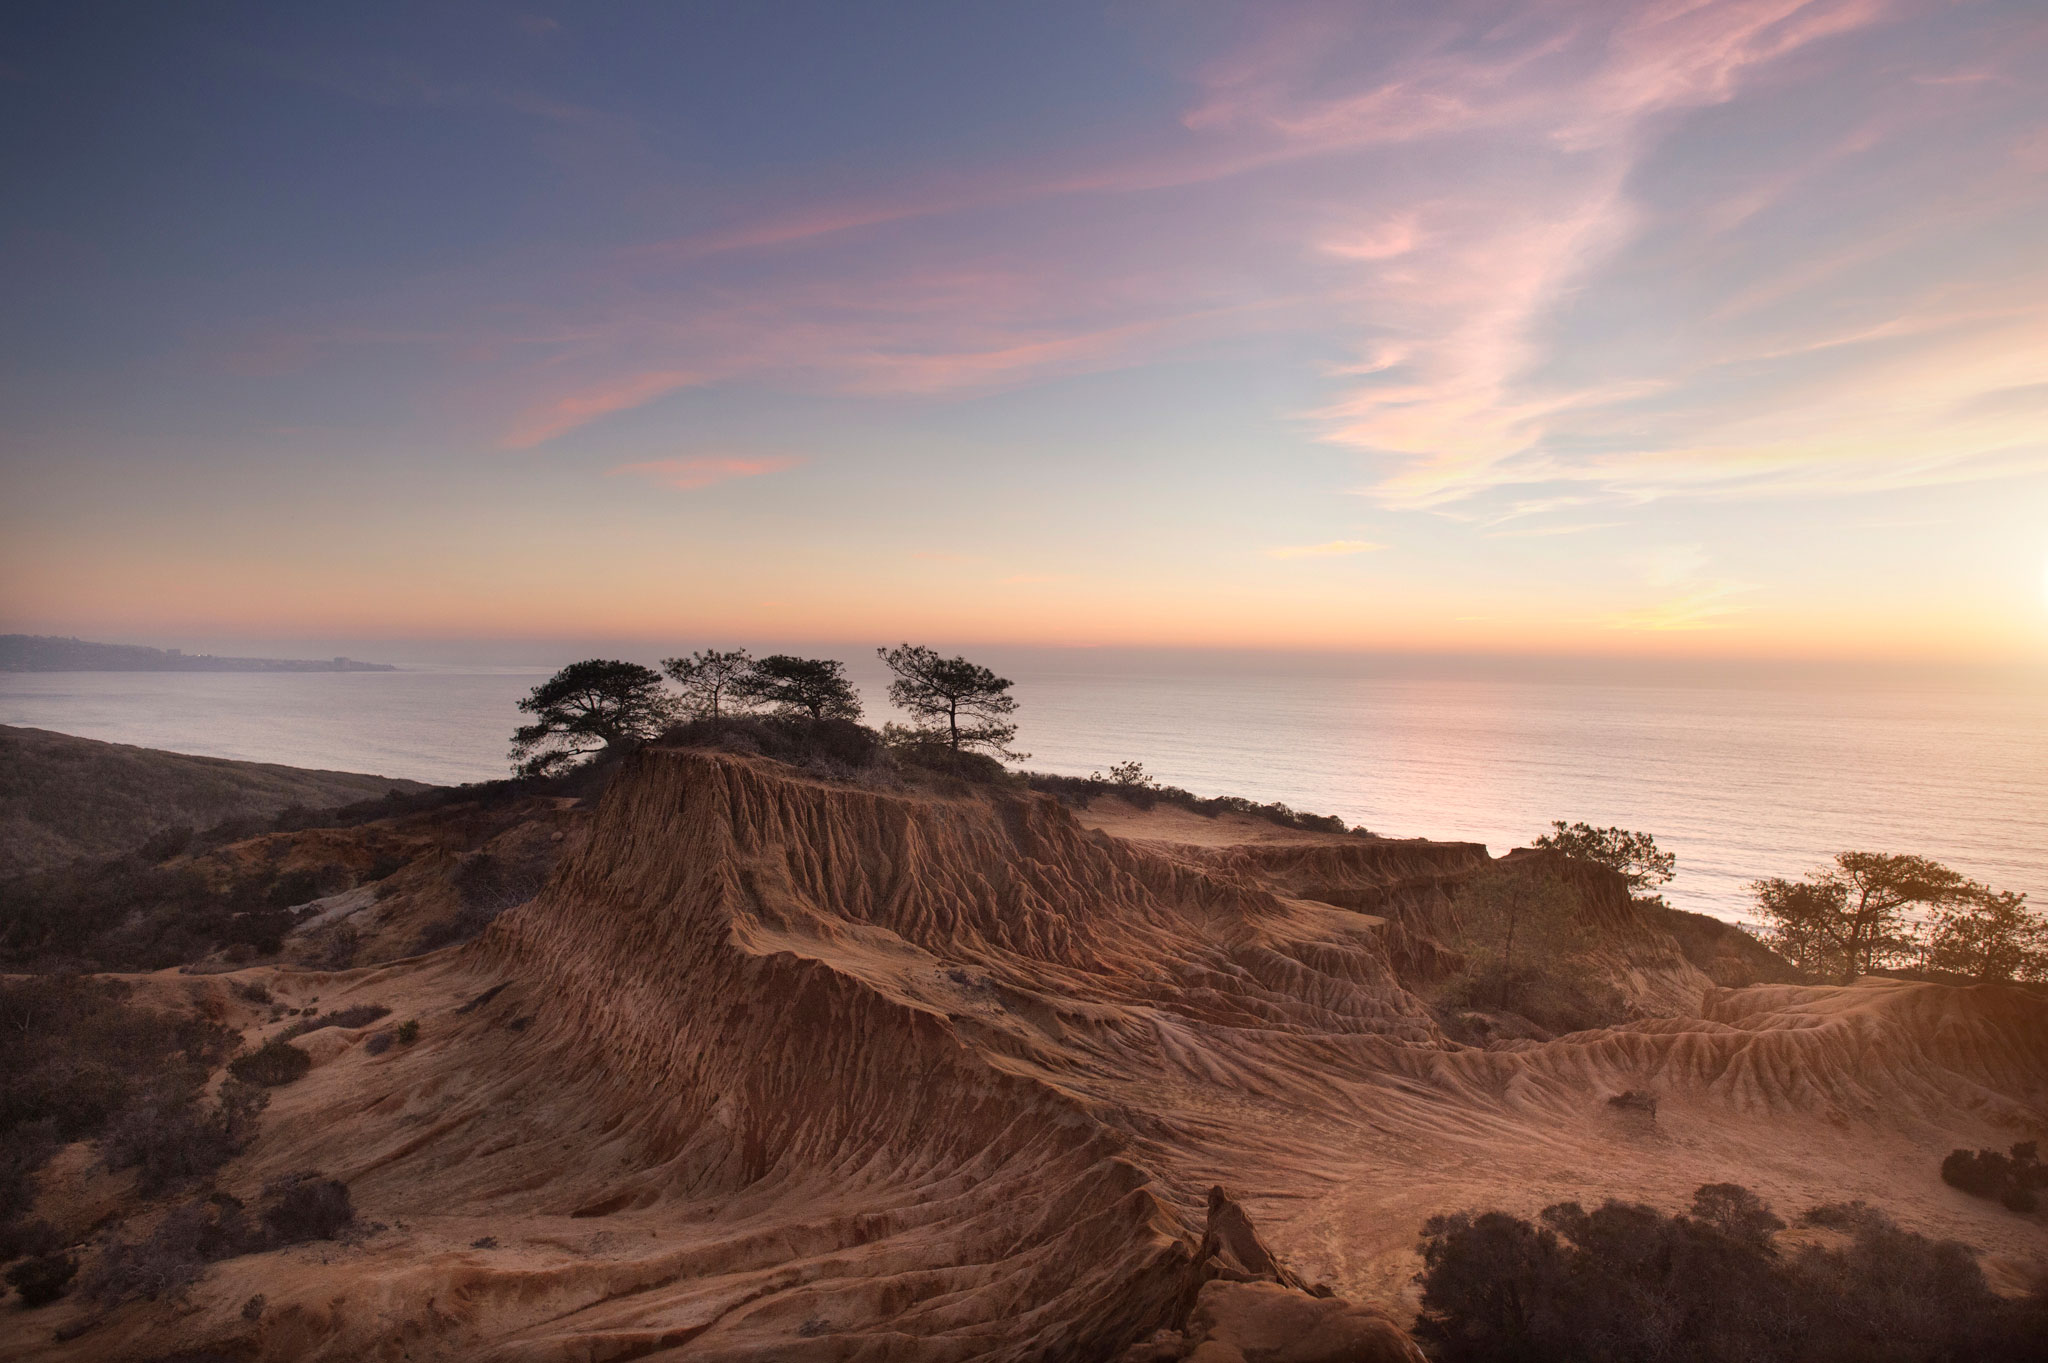
# 22 Broken Hill in Torrey Pines (Google Map It)
This place is pretty amazing if your looking for a nice location. It will take you a 15 minute hike to get there but it is worth it. Park at Torrey Pines Golf Course and walk the path to Broken Hill Trail in Torrey Pines (South Trail)
#23 Marian Bear Park (Google Map It)
This is a good place to take engagement photos or do a nature walk to take pictures. A very wooded and secluded area right off the 52 freeway.
#24 The Mushroom House La Jolla (Google Map it)
There are 2 ways to get here. Walk along the coast up from Scripps Pier (about 10 minutes), or take the longer walk down the cliffs from the Glider Port through Blacks Beach
#25 Gas Lamp District from Convention Center (Google Map It)
This is a nice cityscape of Downtown San Diego and easy to get to. Go to the central steps of the Convention Center and go to the top of the steps and you will see a tram stop. That is the best vantage point for this photo.
#26 American Plaza Trolley Station (Google Map It)
This is a very cool trolley station located in downtown San Diego. It is right near the Santa Fe Train Depot.
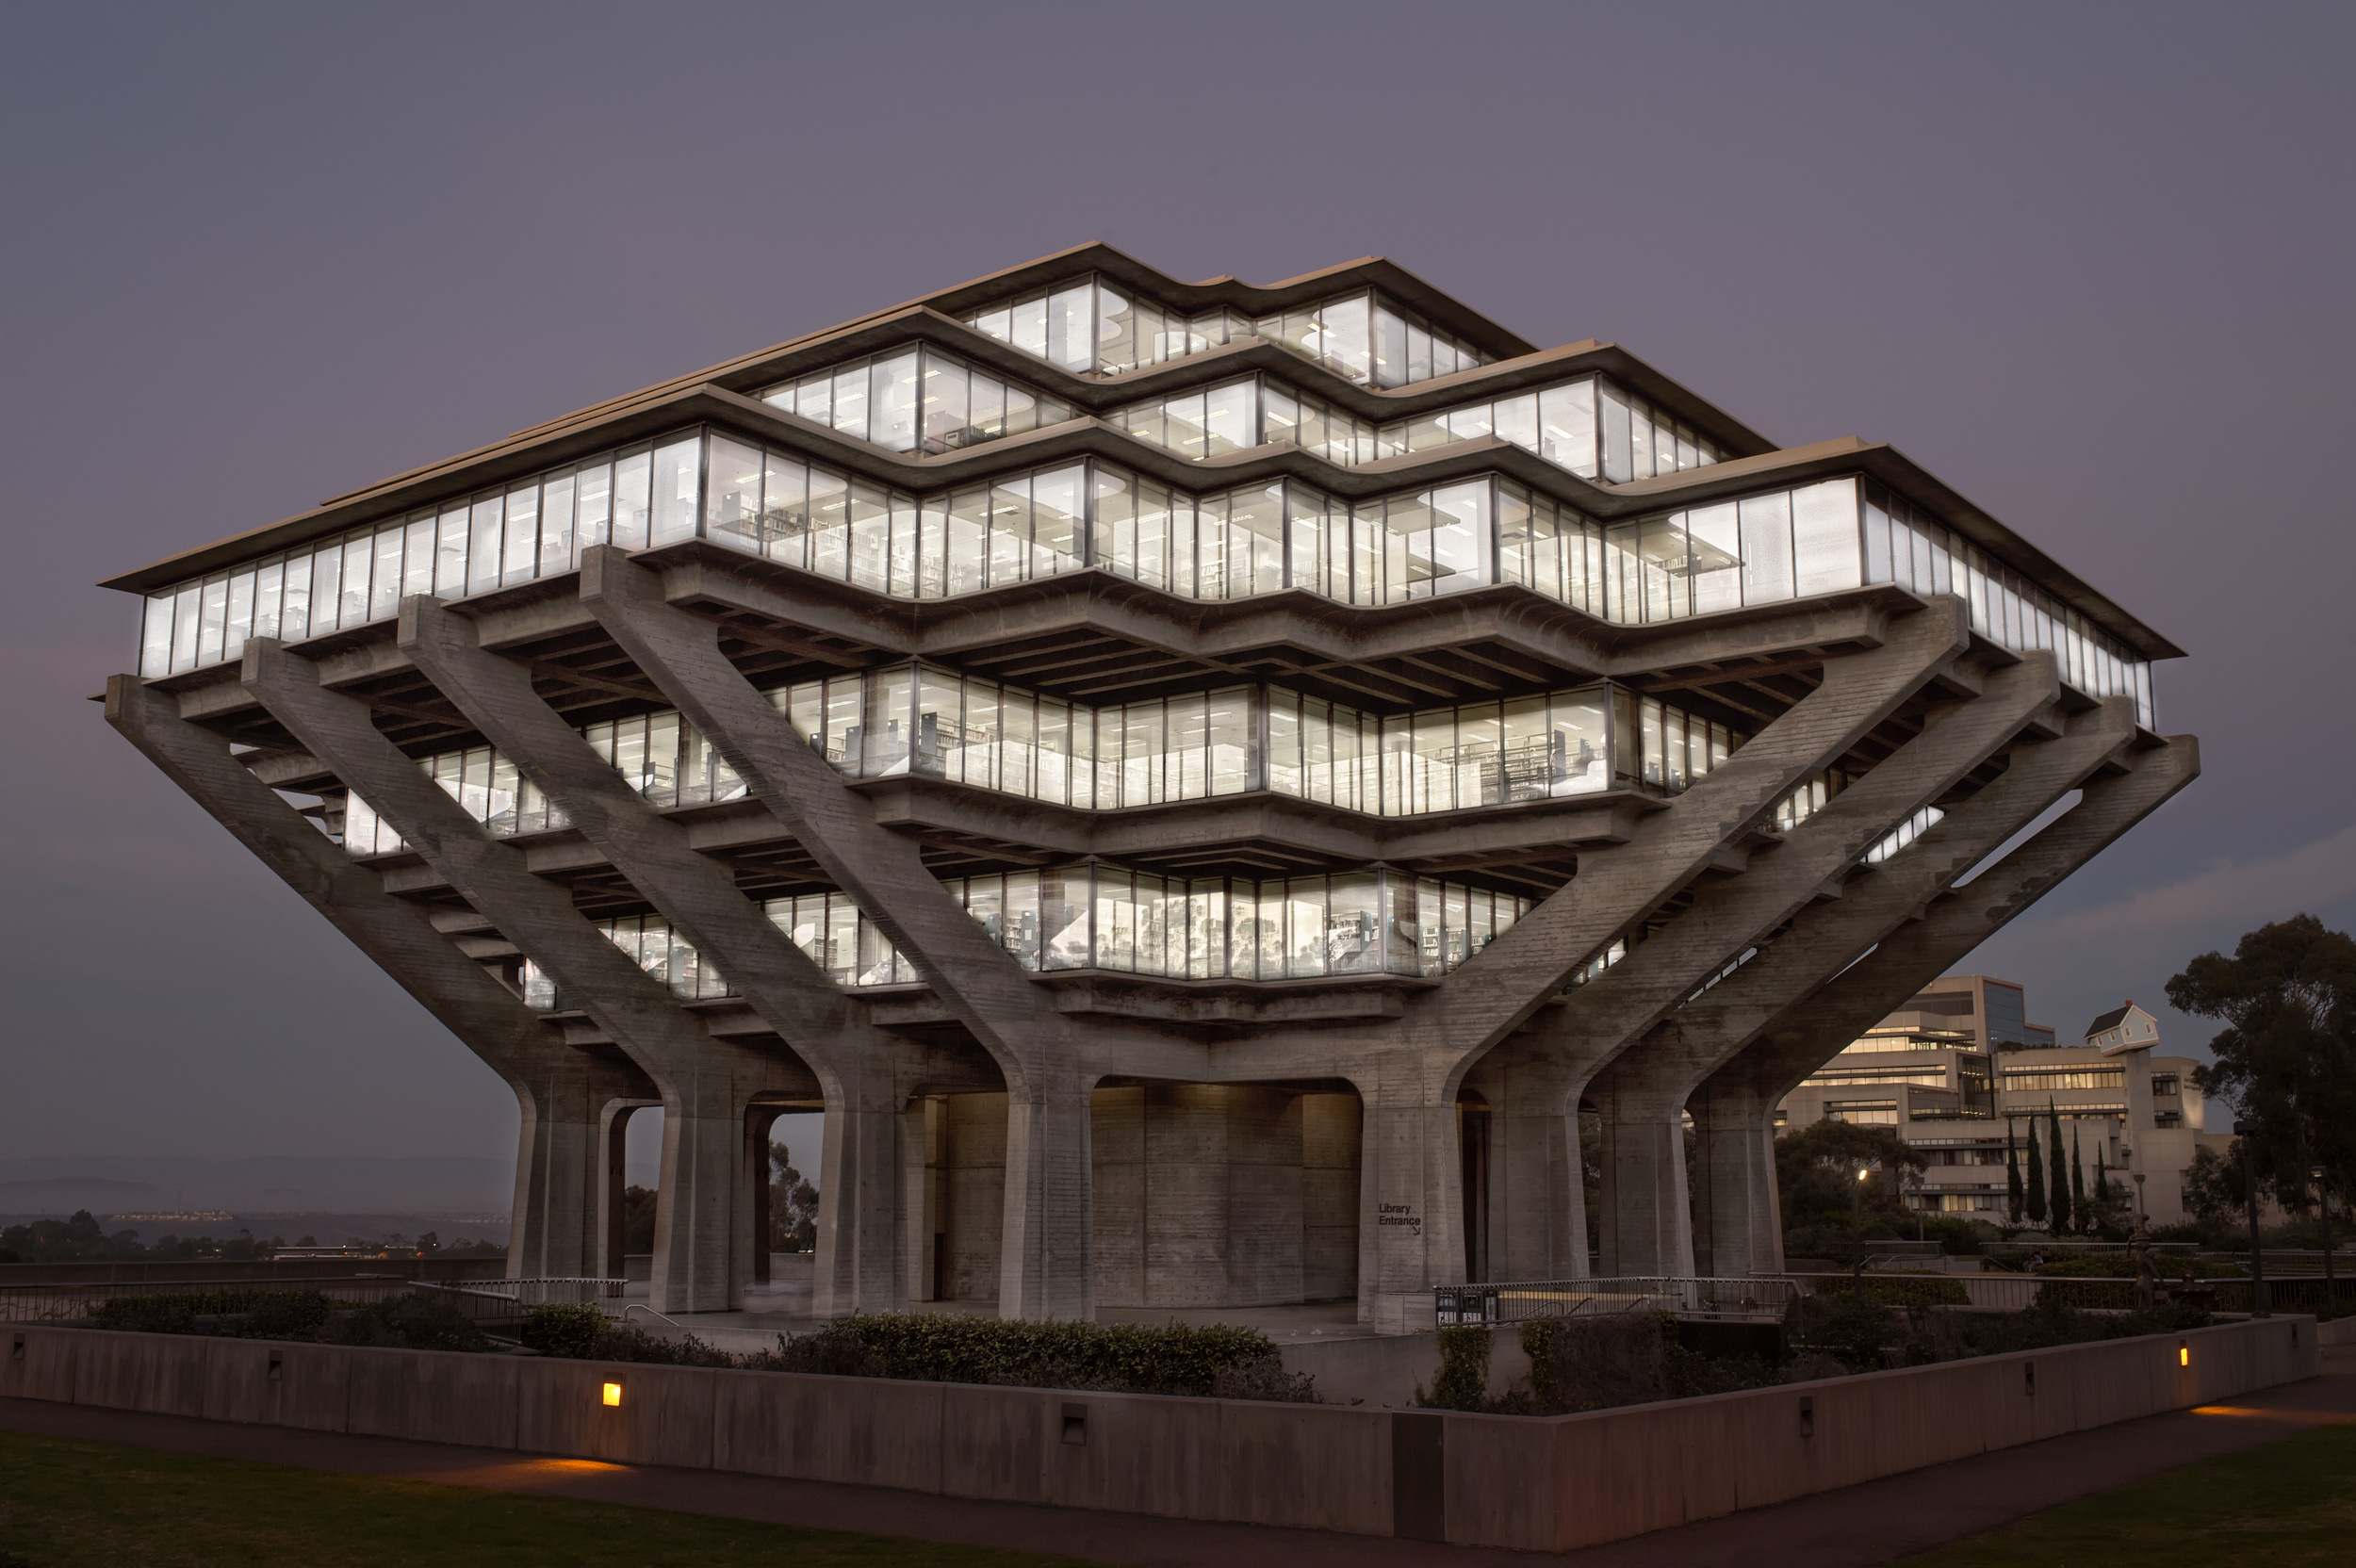
#27 – Geisel Library (Google Map it)
This is a beautiful library located on the campus of UCSD. For the best angles, go to the corners of the building to capture the whole architecture. This place reminds me of a big diamond ring.
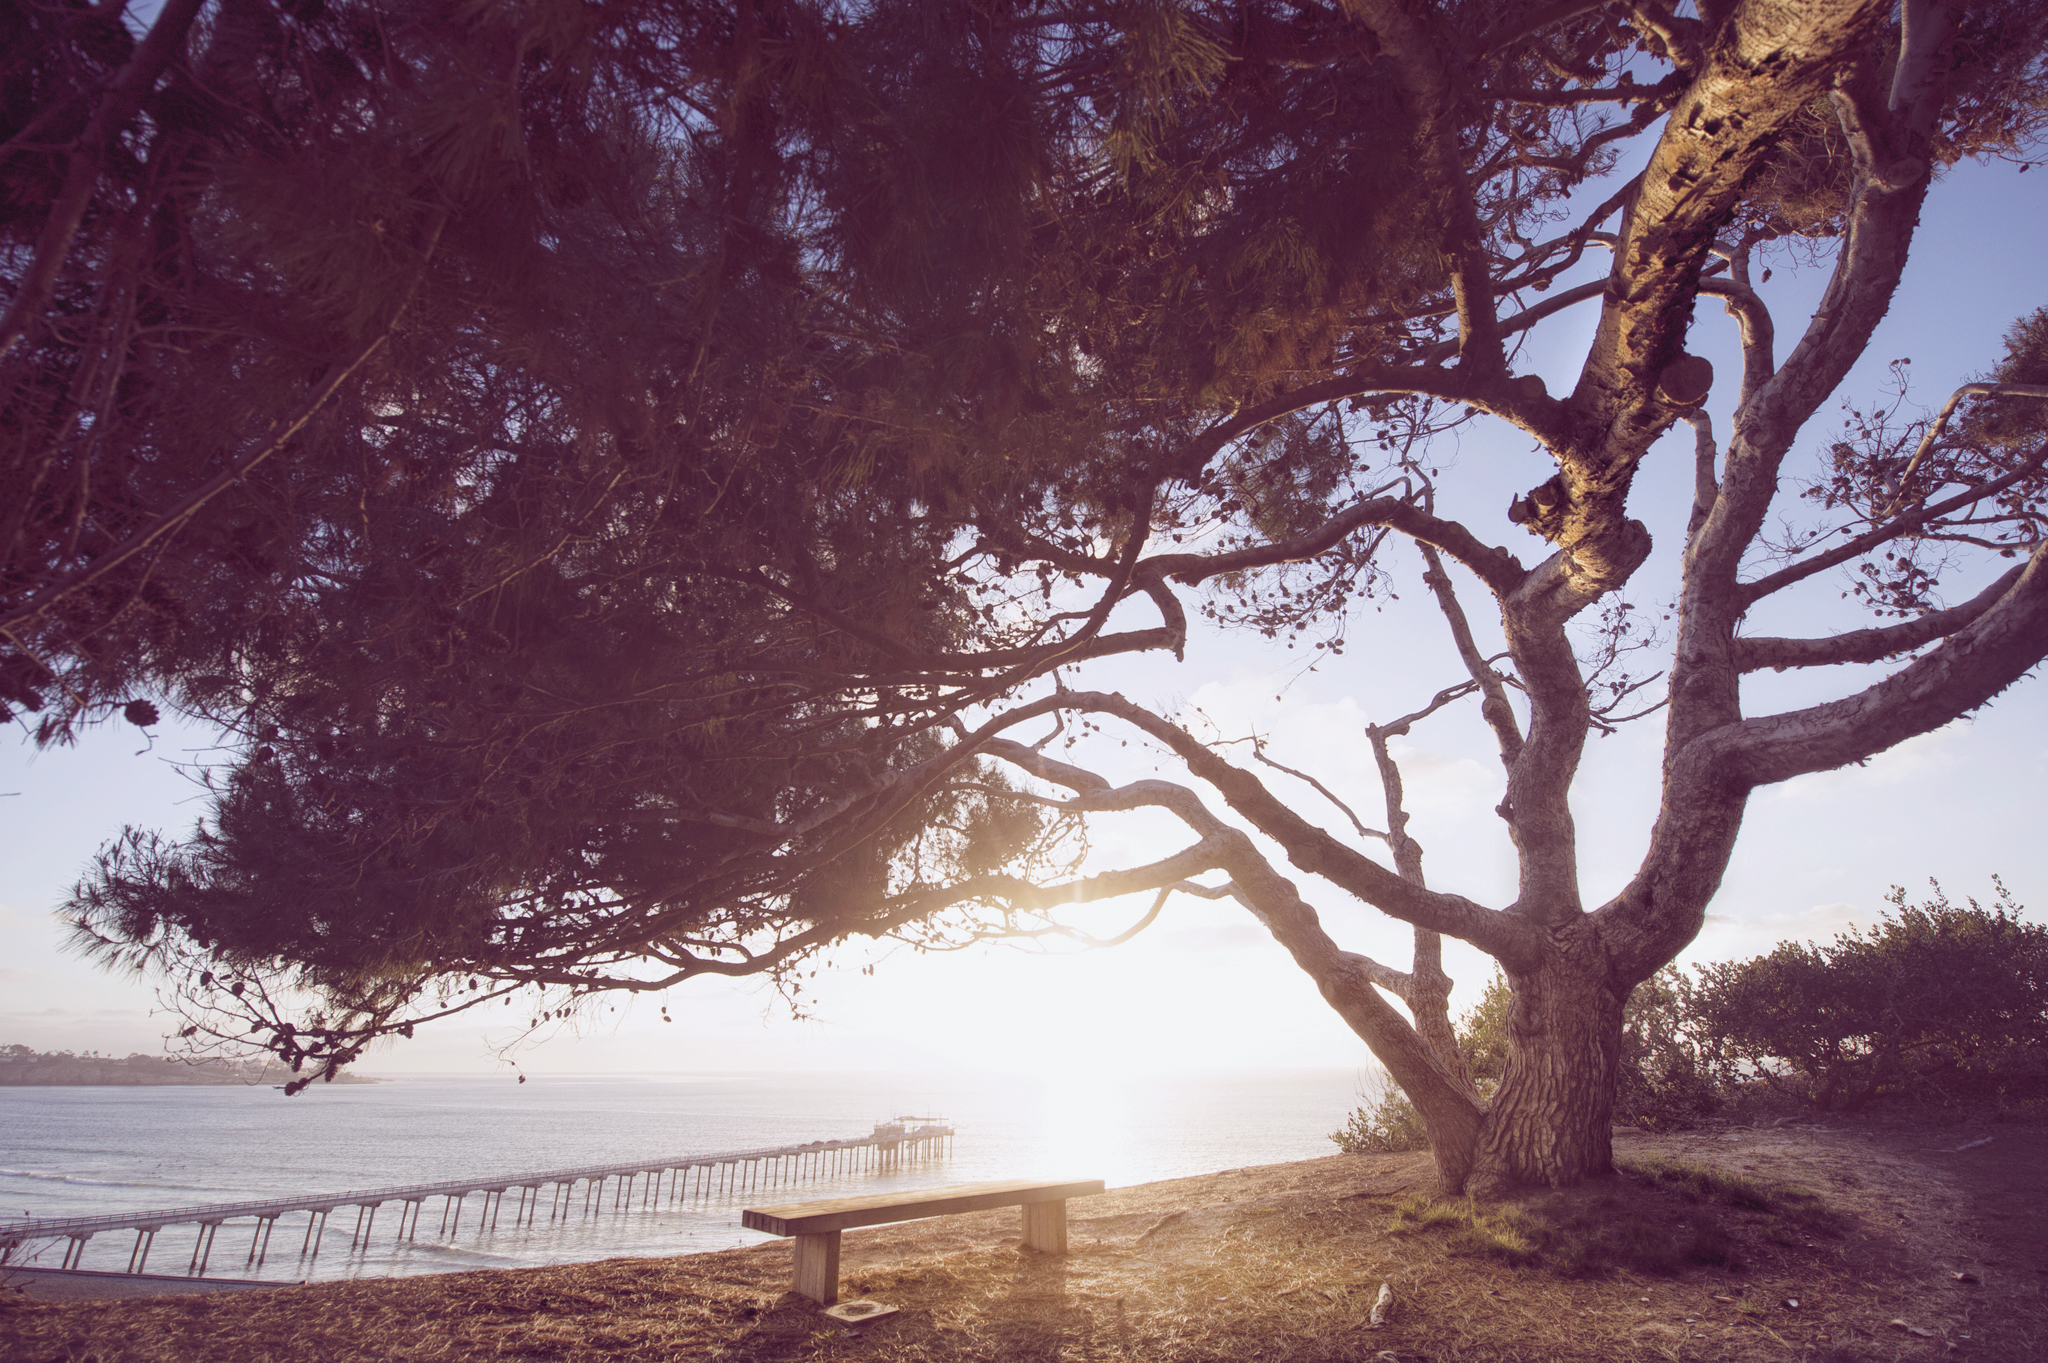
#28 The Bench (Google Map it)
I really hesitate to give out this secret location. Many locals know about it but it offers maybe the best view of San Diego. There is a bench at the top of the hill, overlooking a great expanse of coastline and a huge pine tree above it. This is a great location for romantic pictures. Just keep a secret please!
#29 The LightHouse (Google Map It)
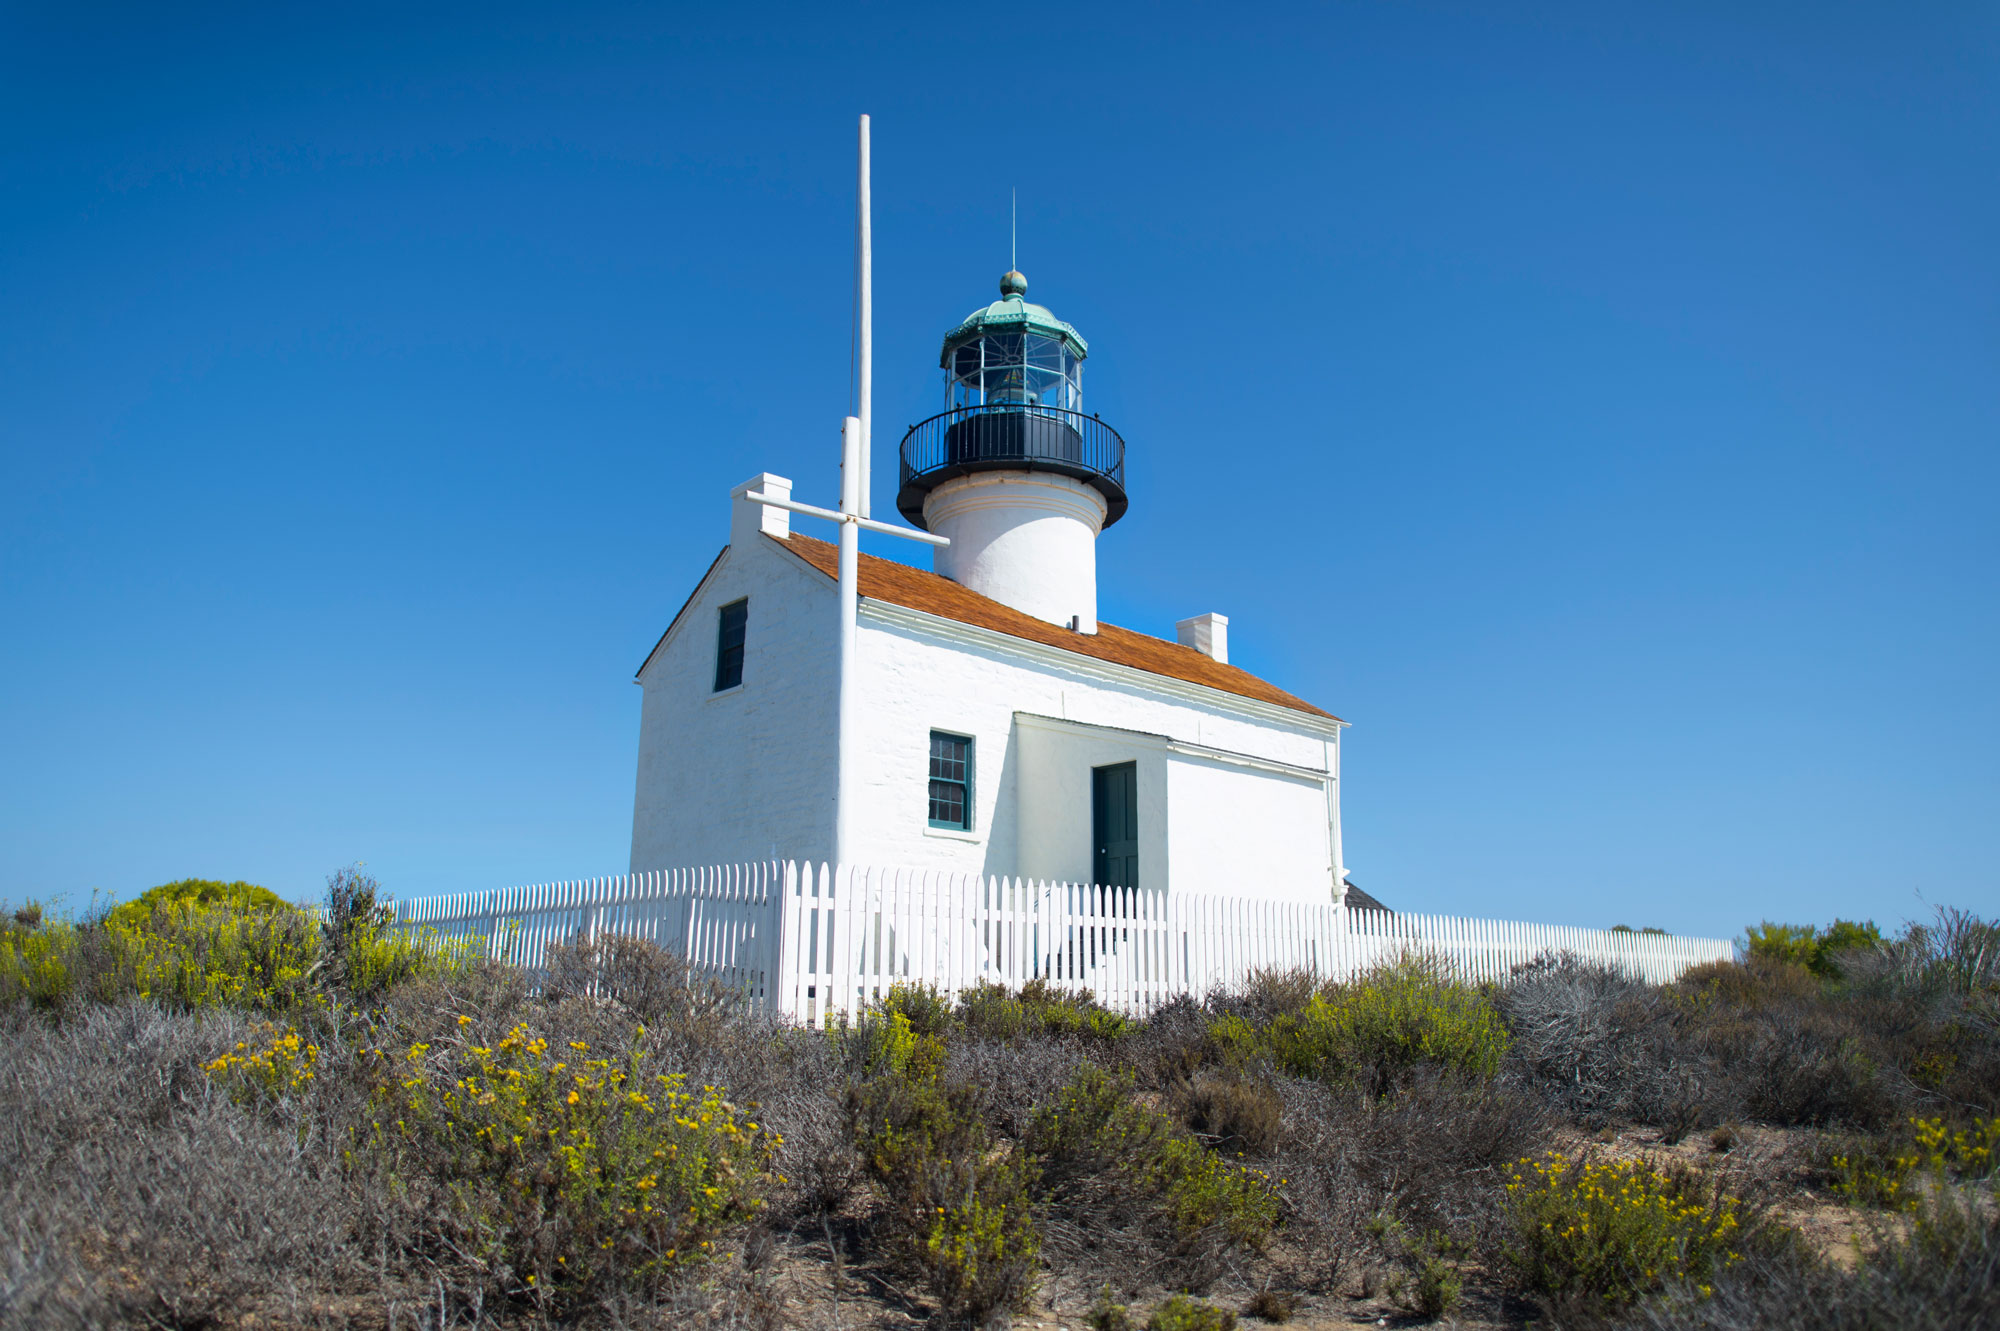
The Old Point Loma Lighthouse is located in Cabrillo Monument. This is a great place to go but the gates close at sunset so you can only really take pictures during the day here. There are plenty of great places to take pictures of both the lighthouse and the dramatic coastline here. In fact the tide pools below the light house are some of the best in the world and you can spend hours walking around and seeing lots of sea life. This is a beautiful place to take pictures of Old San Diego.
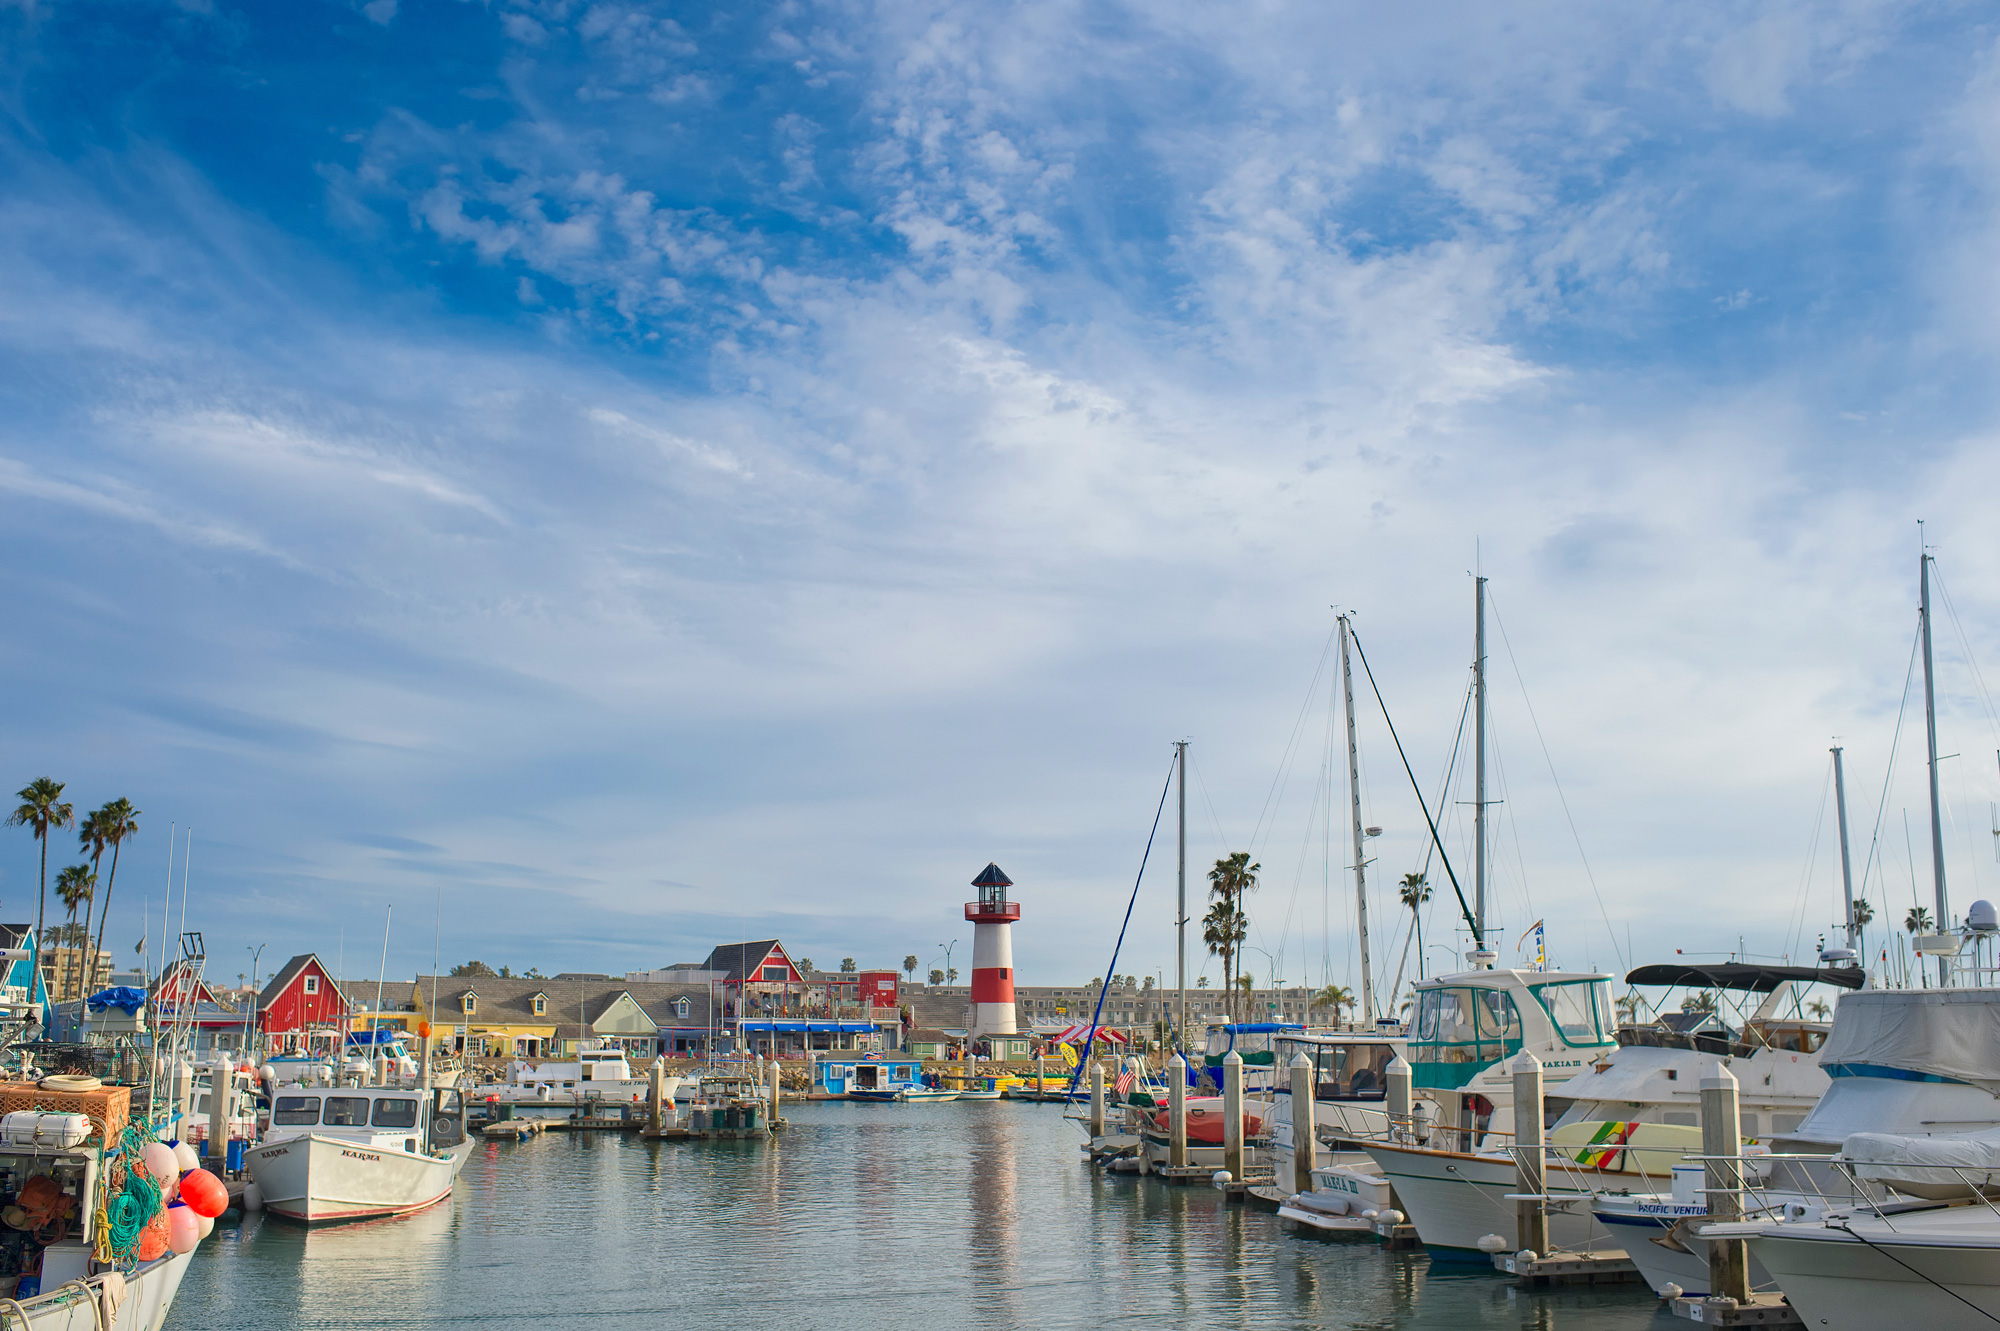
# 30 Oceanside Harbor (Google Map It)
This quaint little harbor is a great place to walk around and see lobster boats, shop and take in the real northern San Diego County scene. The beach here is wide open and there is a beautiful pier that you can walk along. Its a very picturesque place.
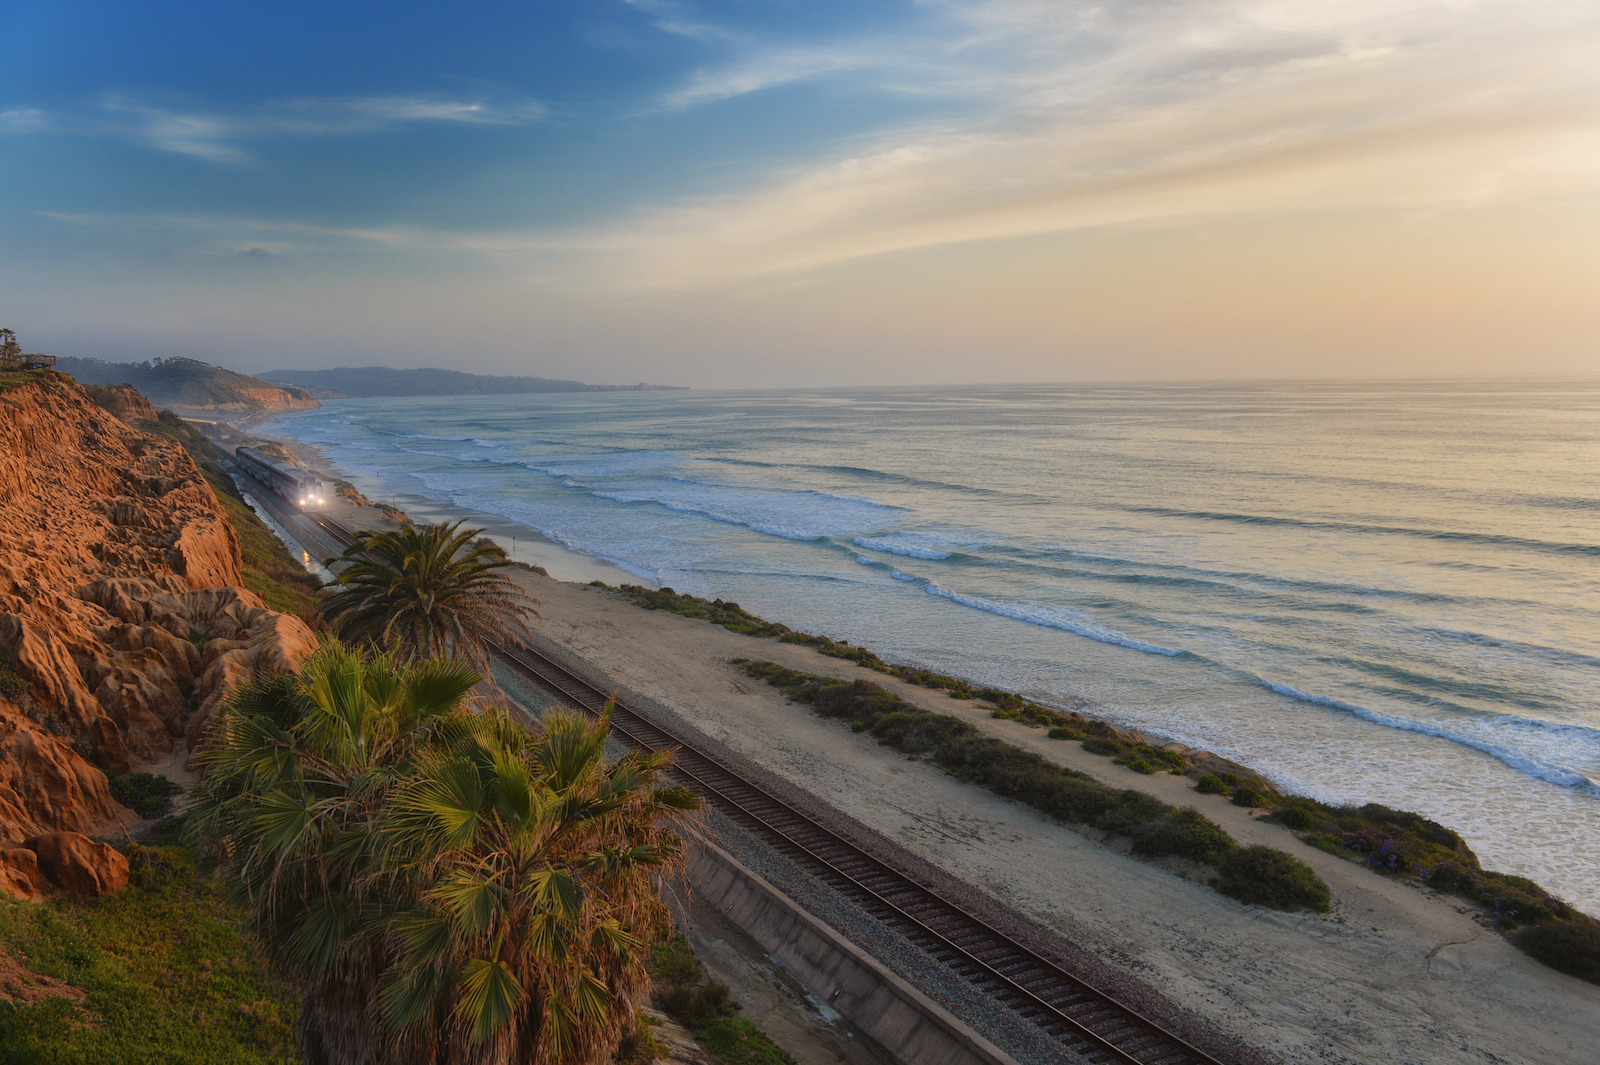
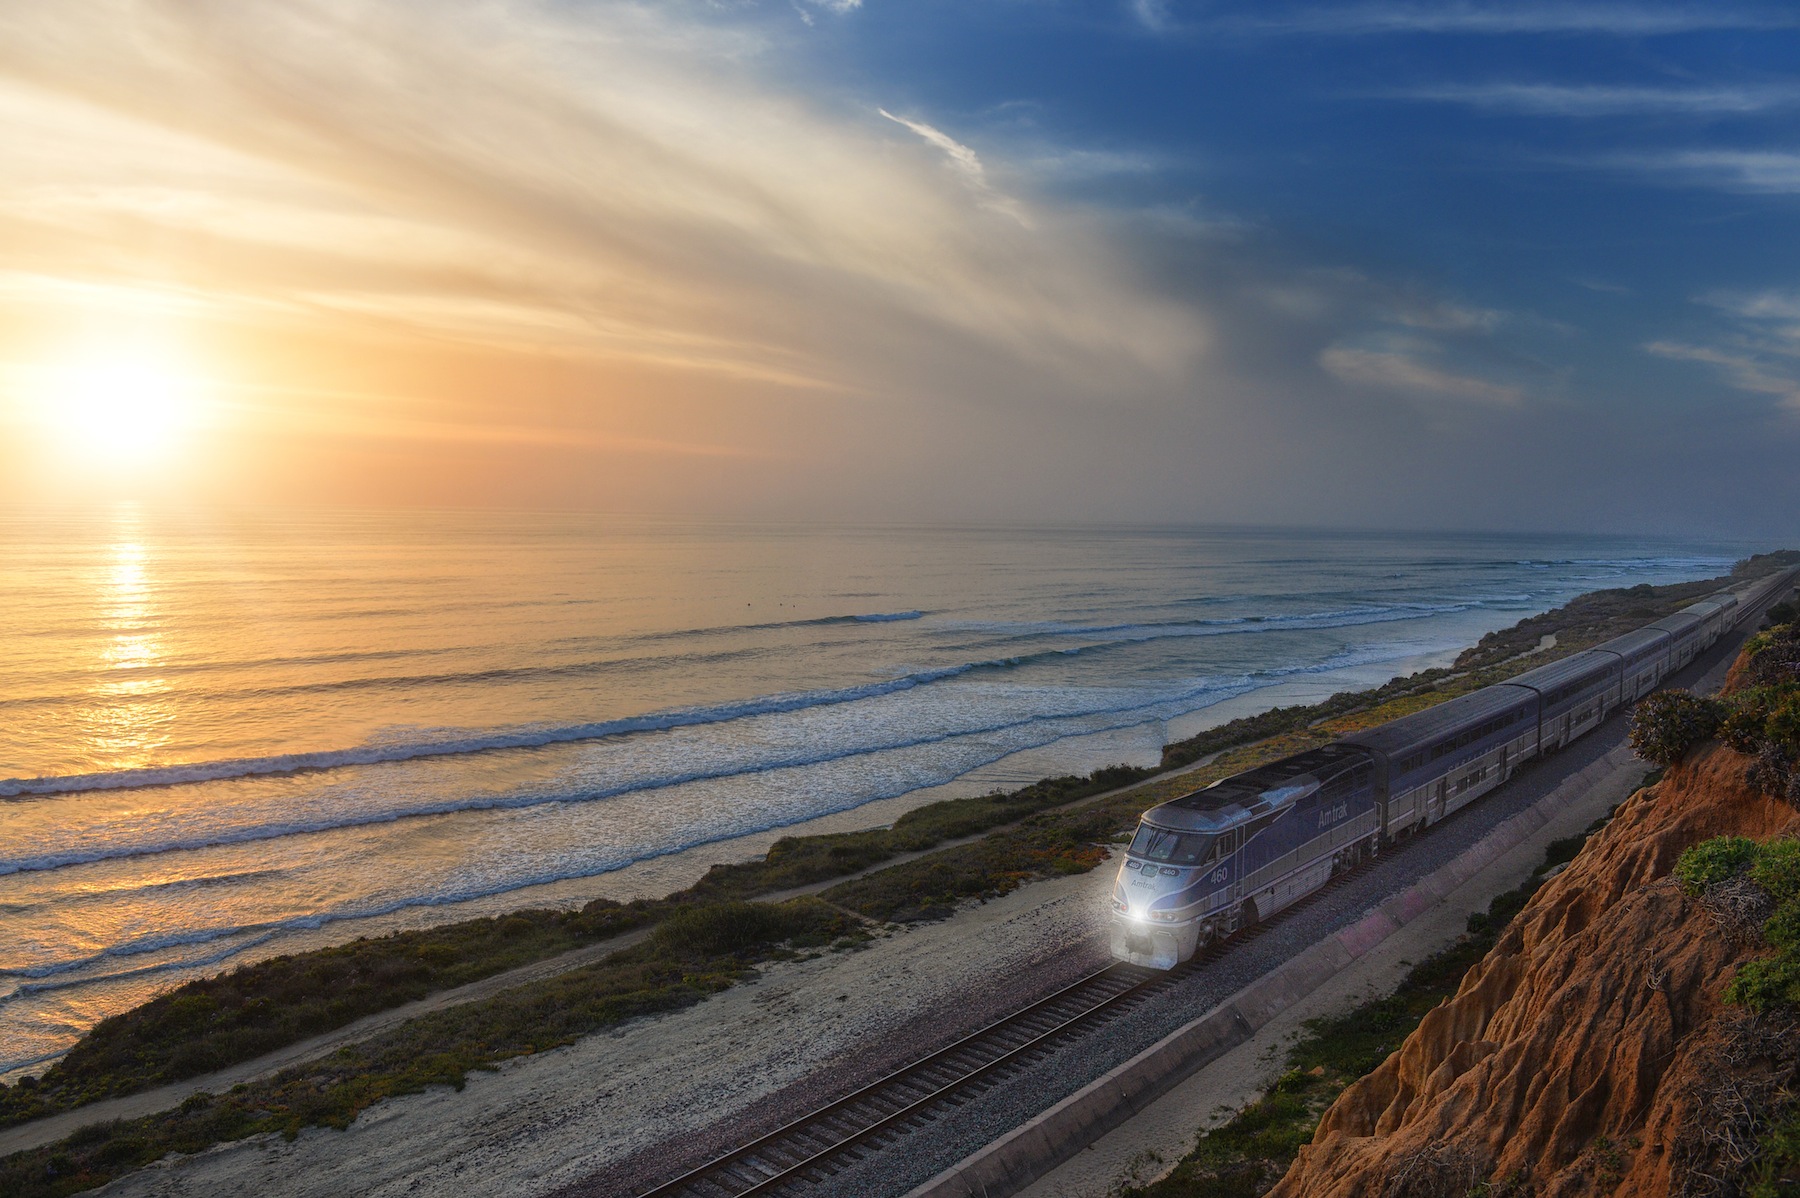
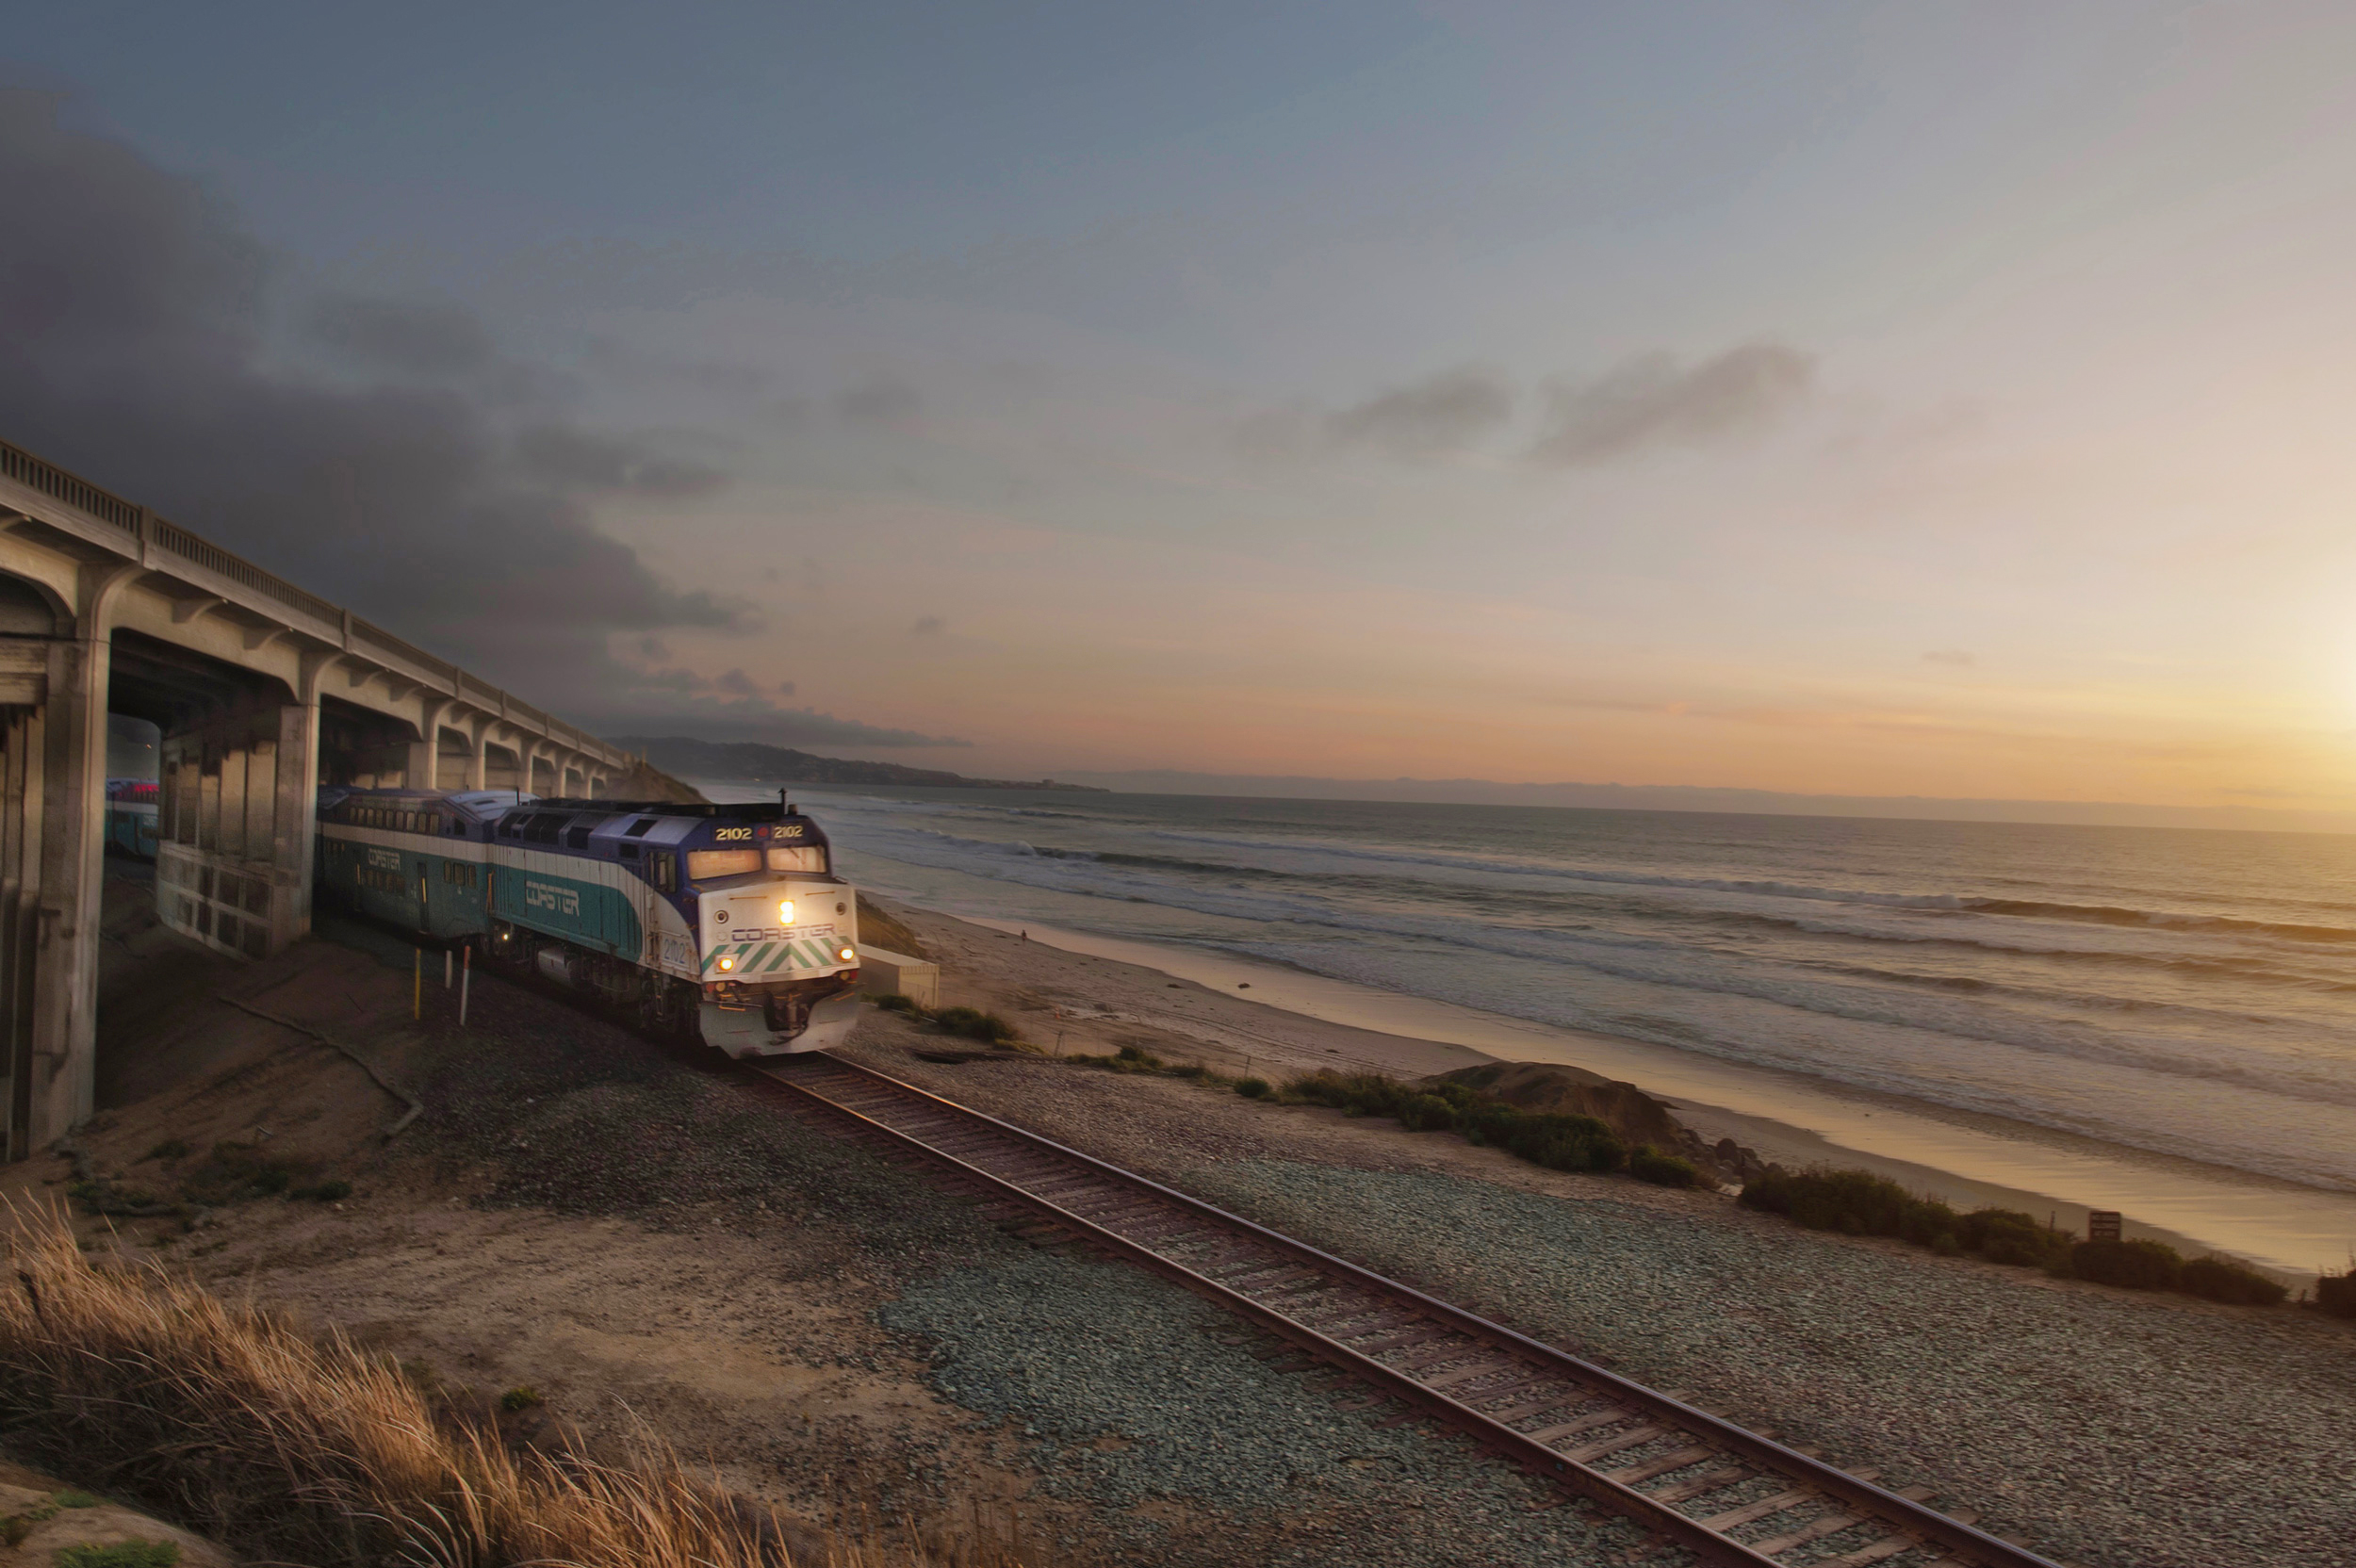
#31 North Torrey Pines Bridge (Google Map It)
A brand new bridge was recently completed to allow the trains to run under it and pass along the coast on their way north. It makes for a very picturesque place to take pictures of Torrey Pines State Beach or passing trains at sunset.
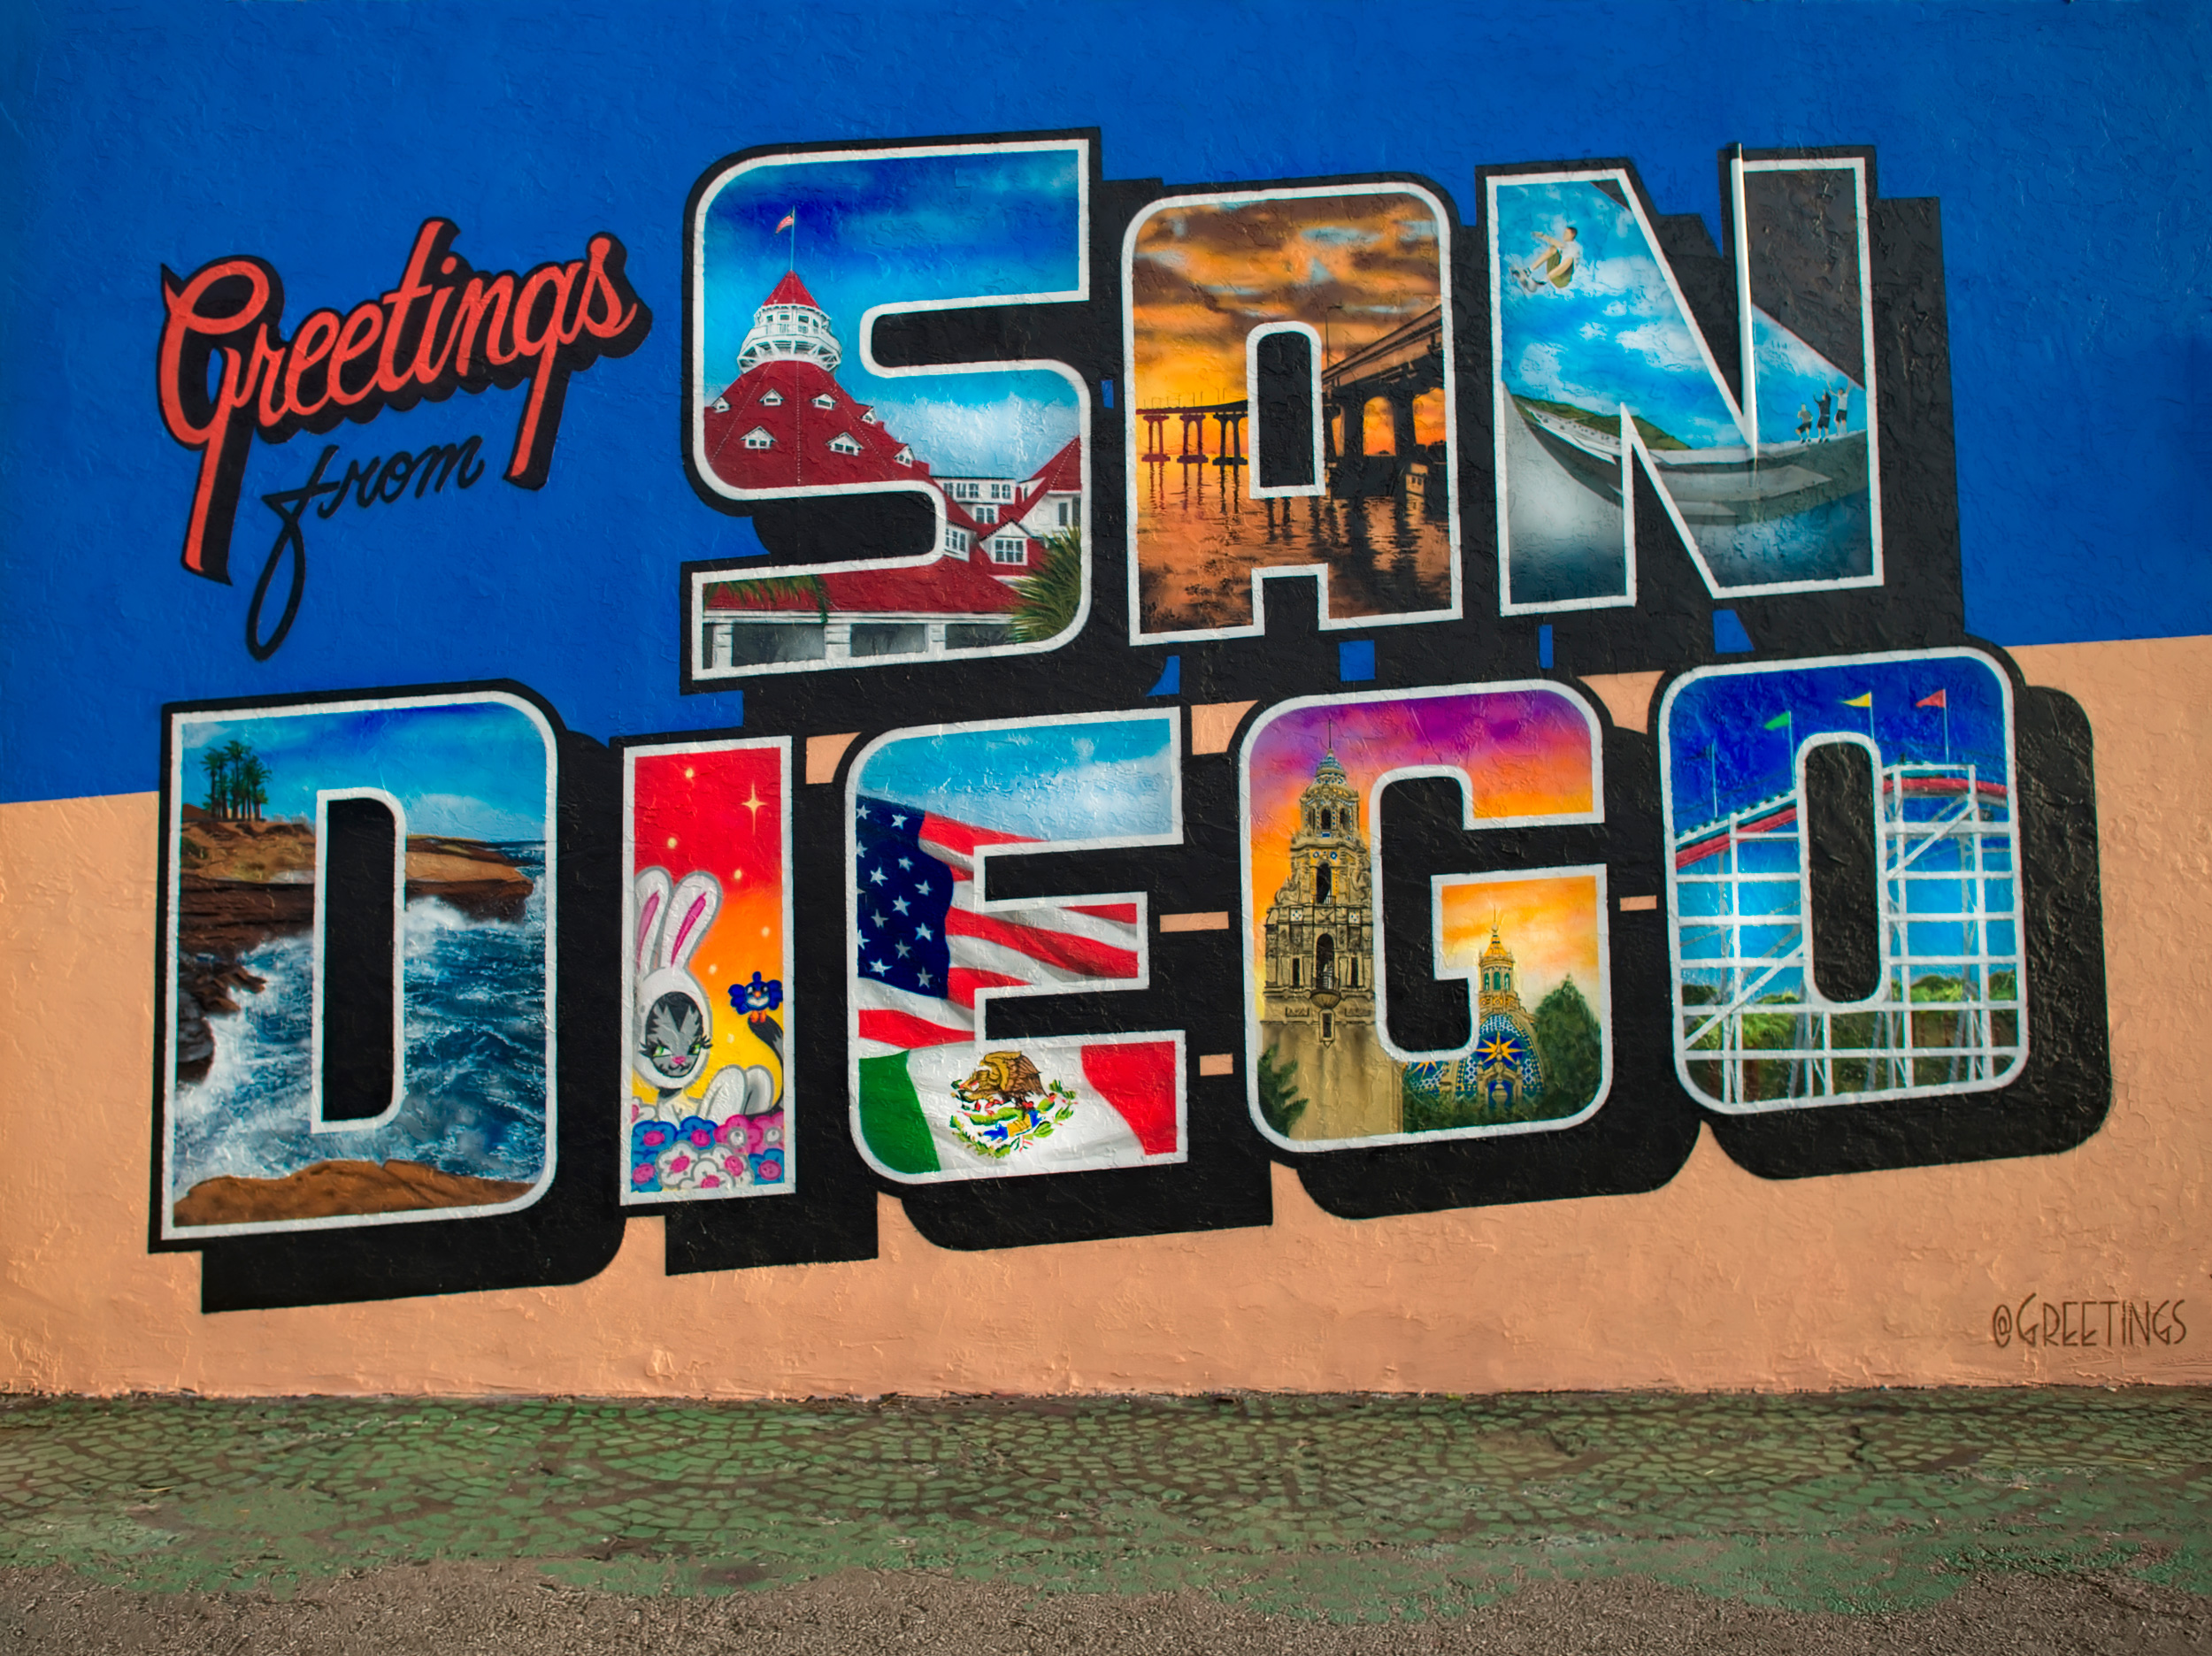
#32 – North Park San Diego (Google Map It)
North Park is San Diego’s coolest neighborhood filled with lots of great restaurants, cafe’s, cool bars and just an all around great place to live the urban lifestyle. There are plenty of cool places to photograph in this neighborhood but my favorite place is the Greetings From San Diego Mural located at 30th and El Cajon Blvd.
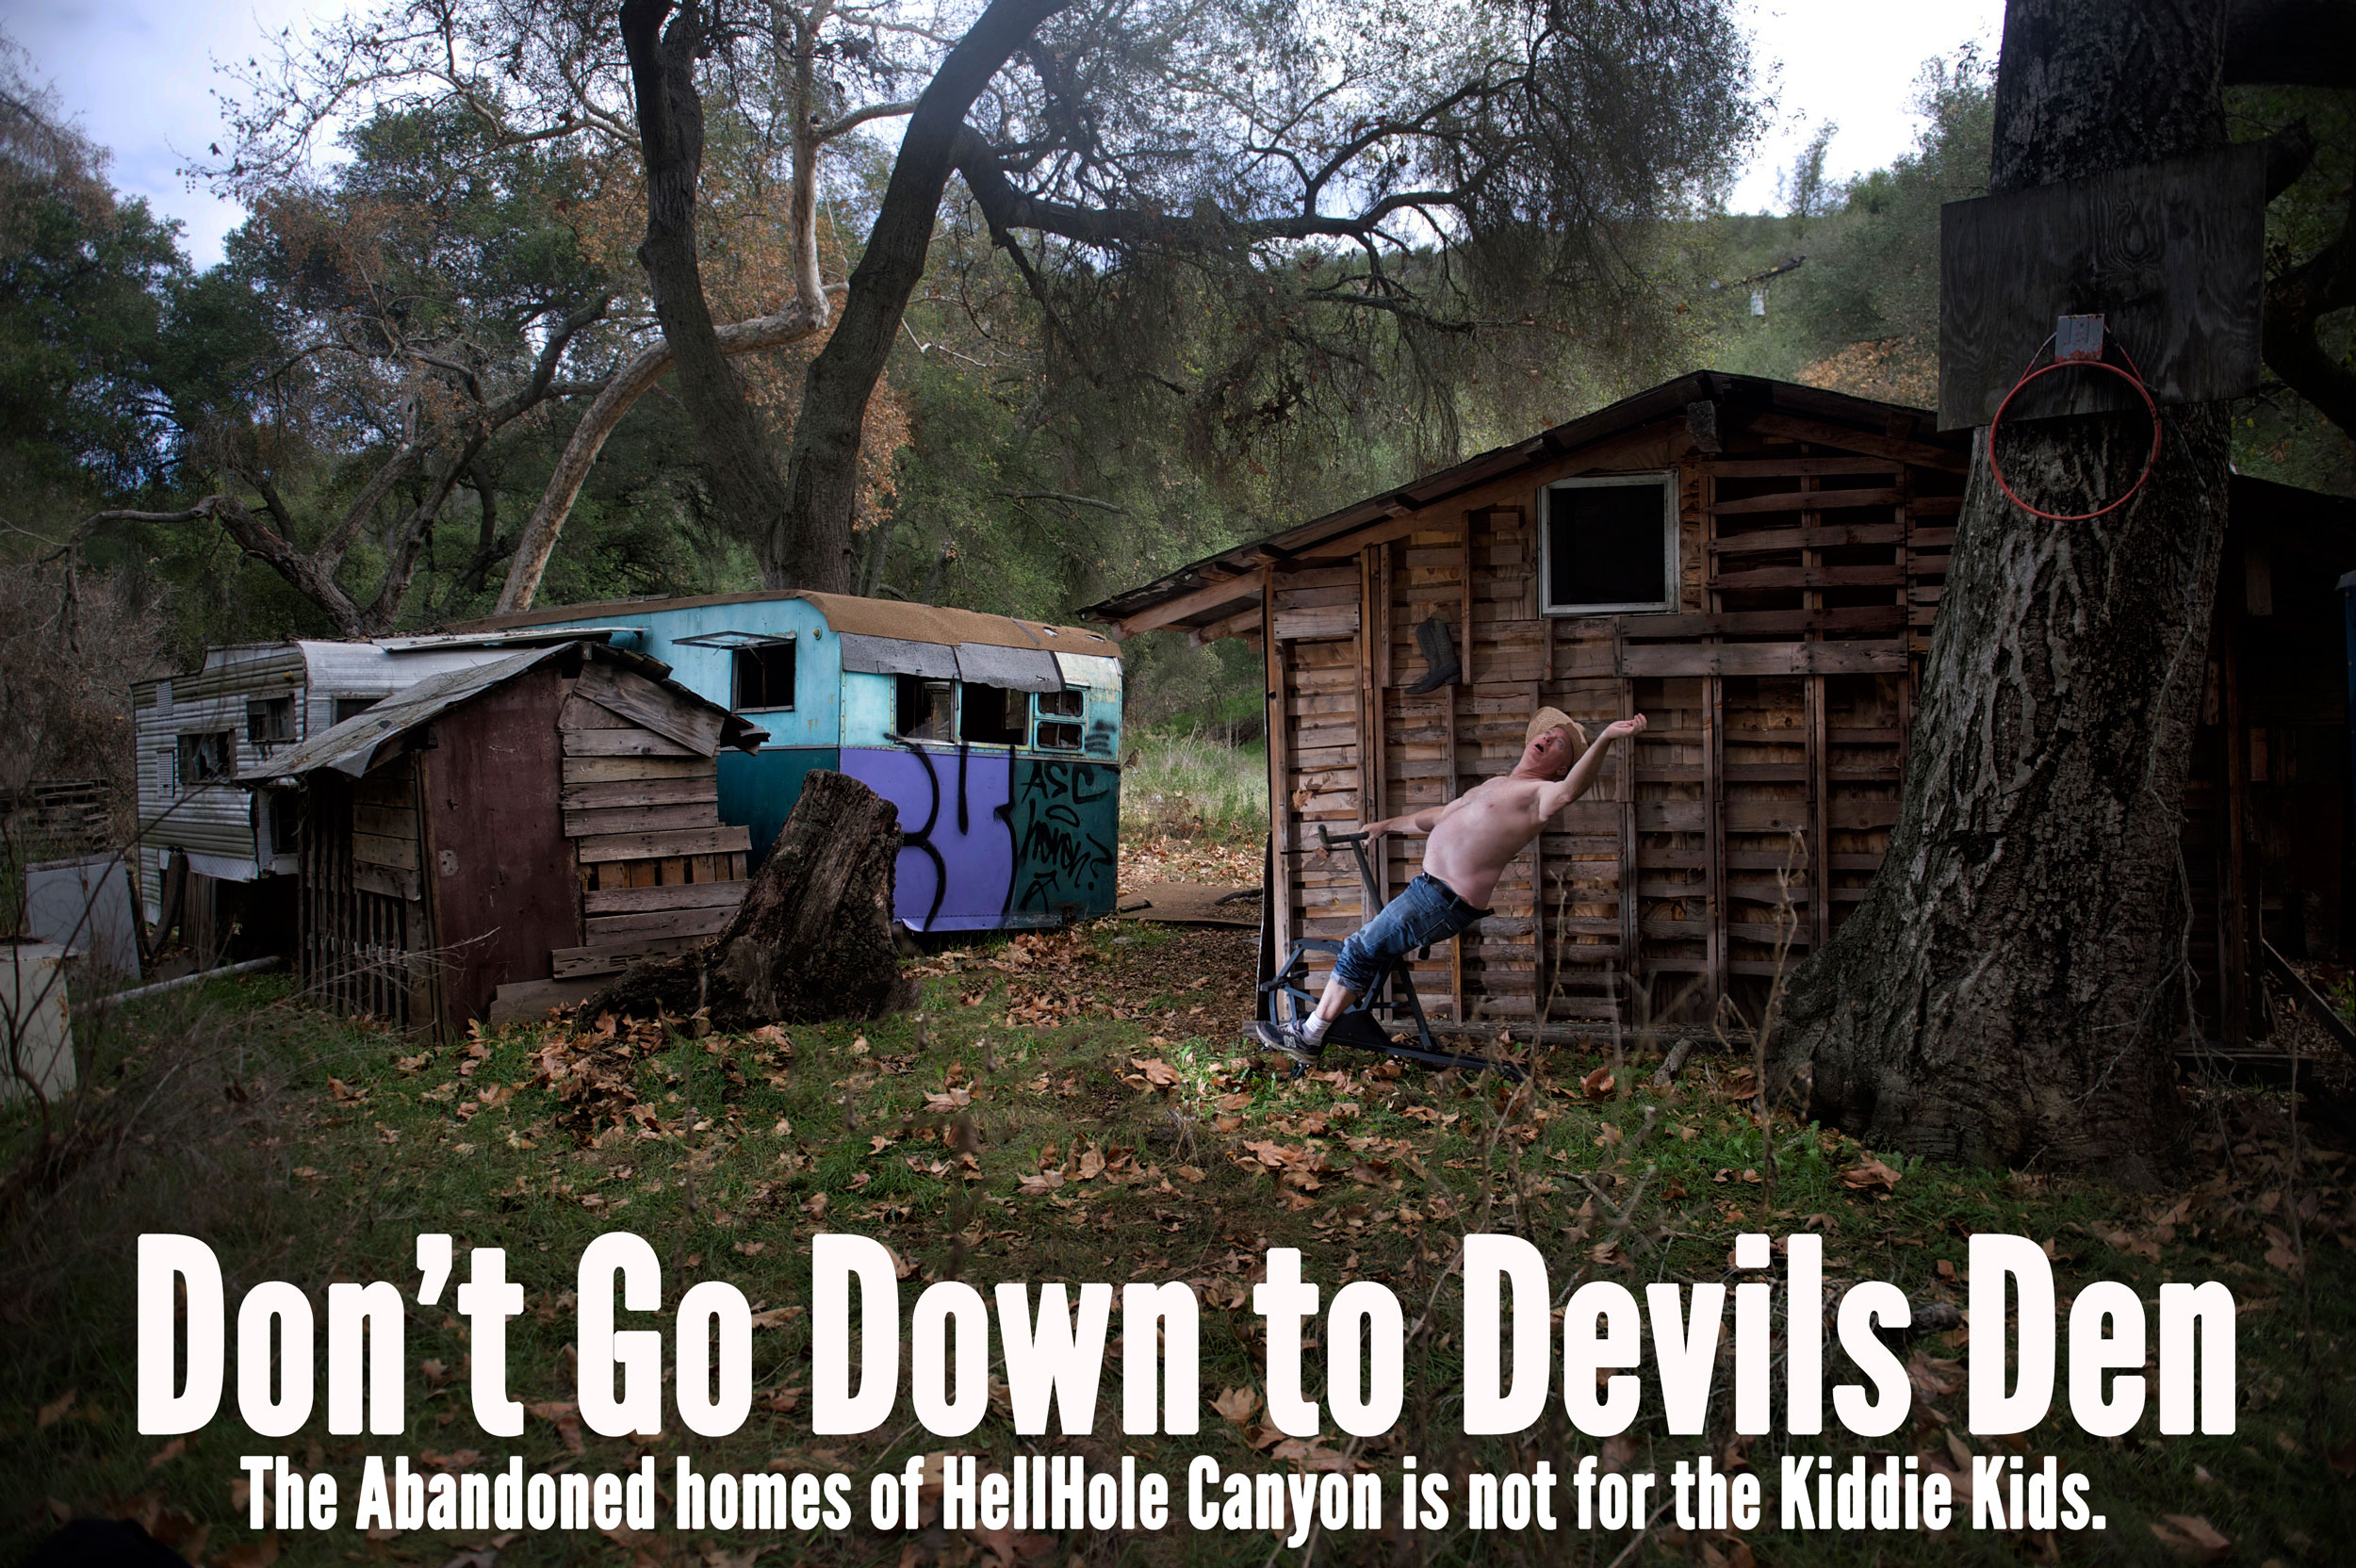
#33 Abandoned Homes of HellHole (The Devils Den)
I just visited there in early 2014 and its pretty cool. You can read about it here. The locals may be against people walking there, I have heard stories about that but have not confirmed – The Abandoned Homes of HellHole Canyon.
#34 Take a Trip to TJ (Google Map it)
TJ is pretty amazing for food and culture. I highly recommend a day in TJ just exploring but remember to bring your Passport. Don’t worry you don’t need to drive. Park your car on the border and head over for some good times and some great street photography.

San Diego is America’s Finest City
Now these are not the only places to photograph in San Diego but they are definitely at the top of my list. I love it. I think you will love it too if you are visiting.
If you’re looking to make a trip through California check out my tips on where to go to get the most amazing pictures – Best Places to Photograph in California. Send me an email at [email protected] if you have any questions.
Try the Jarvie Window – its wow!
Check out this picture. Pretty cool huh?

Well, to make photos like this you can use a special technique. It wasn’t invented by me but Bay Area photographer named Scott Jarvie and it is a pretty eye catching way to take portrait photos. I first stumbled across the Jarview Window technique when I was reading Scott Jarvie’s blog. which you can read here: http://jarviestudios.com/blog/2010/02/the-jarvie-window-experience/ . Scott apparently discovered the new technique himself while wandering around a PhotoWalk event in Utah with a ring flash. Someone lent him a super wide angle lens, he snapped a picture and discovered how awesome the photo came out.
After reading Scott Jarvie’s blog, I wanted to try it out myself so I followed his directions and created my own Jarview Window setup. I will show it to you here, then show you some of the photos that I have been taking with it and tell you what I think of it.
Most photographers are going to have some of the basic things to start using this technique but most will probably have to buy a few things to make it work. You really need 4 things to be able to take these pictures. A DLSR camera, an external flash, a ring flash adapter and a super wide angle lens. If you have those things you are set and can start. Well, I had two of the things – a pretty nice Nikon DLSR camera and a SB700 Nikon Flash but I didn’t have the ring flash adapter and my wide angle lens (14MM Nikon) was just not wide enough to avoid catching the edges of the ring flash adapter. So I had to spend some money to create my rig.
So the flash, which I use which I already have is an SB700 which runs about $300 and is Nikon’s more basic flash. I found it is perfect for all types of flash photography and works particularly well with the Jarview Window technique. You’ll notice that I have it taped around the base. I did that because I needed to raise the flash head about a 1/4 inch with a wedge I created out of paper since the ring flash adapter was weighing it down and causing the bright edges of the ring flash to fall out of view. Some people hold the ring flash while they are taking the pictures but I just prefer to put the wedge in and crudely tape it. Since I have two SB700’s I just decided to dedicate this flash for this purpose.

The next step was getting a ring flash. I decided to use the Ray Flash that was recommended called the Jay Flash and I found it on Amazon.com. It ran me about $150 and you need to get the right size adapter based on the flash you are using since the flash head size and shape is different. The Ray Flash is just an adapter and doesn’t require any batteries since it is basically taking the light from the flash itself and channeling it down a lighted tube to a ring that fits around the lens. It is pretty cool and I find it is fairly robust since I have dropped it about 10 times and doesn’t even have a scratch. That is really key for me is to have camera equipment that can take a beating since I am pretty merciless and clumsy with my stuff.

The next step was to get the right lens. The recommended lens was a Sigma 8mm which is extremely wide angle. When you have an FX format camera such as the D3S that I am using that means that the pictures you take with the lens come out completely round. There is not a lot of functionality with the lens other than taking super strange photos at a very very wide angle. Before buying the lens I tried using my Nikon 10mm lens but I found that it did not work with the technique correctly. The minimal focal length was a 5 inches from the subject and that does not work with this technique as you literally have to be two inches from someone’s face to make this work. So I ordered the Sigma 8mm lens. It was not cheap and ended up costing me about $800. I’ve tried the lens now for two weeks and it is actually super sharp when you are a little over an inch from a subject – amazingly so actually. The problem with the 8mm focal length is that I think it is just a little too wide for an FX camera which makes it not really practical outside of just using for these types of portraits. It’s a great lens though and if your using a Nikon and want to get the same effect for Jarview Windows it’s probably the best choice.

After a week of anxious waiting, the lens had arrived from Amazon and I was able to put the rig together. After getting it altogether I realized this was pretty specialty contraption and if I was going to try to be inconspicuous with this thing that was not going to happen. It’s big, its heavy and it looks futuristic. To top it all off you have to be inches from someones face to get a cool shot. You can probably see why I had to create the wedge on my flash head – the flash ring is pretty big and heavy that it can dip below the lens and not create that perfect ring of light that you are looking for.

After assembling it, the only person around was Maria, the lady that helps me around the house. I was pretty happy with the result and started to practice some of the techniques that I had learned on Jarvie’s blog as well as some of my own trial and error’s with it.

Here are some of the recommendations and ideas for taking great Jarview Window Portraits.
Get Close – You need to get 1 or two inches from your subject to get the best photos. When I stand back the ring flash does not light them up enough, you get too much background distraction and you don’t get that cool 3d effect that the wide angle gives you at super close range. People will think you are crazy when you get that close but you will get a much better result.
Control your Flash – You pretty much need to move your flash to manual settings and then dial back the power. I found that the best power setting given low ISO settings on the camera was between 1/16th and 1/32nd. For a majority of the pictures that I have taken this seems to work much better than trying to use TTL or some of the other settings.
Add Depth with Fingers or Props – One of the first things you see when you are looking at the Jarview Window portraits is that it appears that the subject is looking into a jar that is lighted at the opening. You can really accentuate this effect if you have the person put a finger on the ring flash or hold a prop such as a gun or a stick. If the subject acts like they are looking into the jar that is even better and can make the pictures look pretty fantastic.
Keep Background clean – I found the best photos I took where when the background was a dark or similar color. If there is a lot of light in the background or it is busy, it will distract from the actual subject that you are shooting. Low light and black backgrounds are the absolute best for these pictures.
Shoot single people – I have tried several times to take pictures of multiple people in the shot and they never turn out as good as taking a single person. It pretty much has to do with the fact that light and focal area is so small that you need to have a single subject to focus on to get the best picture.
Coax the subjects to do something different – To take a great Jarview Window portrait your subject needs to be doing something to create a caricature of his or herself. If your subject just stands there without smiling or is not doing something slightly interesting it won’t come out as good. To take the best pictures you have to really interact with the subject and snap them during interesting expressions or actions.
Use with Kids photography – I find that the best subjects with this technique are typically kids since they love to make funny faces or do interesting stuff and they really get a kick out of looking at the pictures on your camera right after you take them. The more silly they look, the more silly they want to look in the picture the next time. It just is a recipe for getting a lot of great shots pretty quickly.
So after using the setup for the last couple of weeks my assessment of it is that it is pretty awesome. It really provides you with a creative way to take portraits in ways that people may have never seen before and it can really surprise them. But there are limitations with it. This is not something you would bring to a party and expect to take every picture with it. This can really only catch close up portraits and is really not ideal for capturing actions, activities or candid shots. You need to take the ring flash and wide angle off and use another lens for that. What I would recommend using this technique for is at parties or events to capture people in a “Photobooth” type of setting. They will love the results and you will capture some memorable photos.
Here are some samples of the pictures that I have taken with the JarView Window but you can also catch the whole gallery which I will be adding to over time on my website. http://www.frankiefoto.com/People/Jarvie-Window-Portraits/23554327_bGWdXK


The Polaroid Project
In about 1963 Polaroid launched a new type of camera that went on to become one of the most popular types of photography during the 1970’s and early 1980’s – instant photography. By creating self developing film that didn’t require photographers to take their pictures into labs to be printed they created the first camera’s that were easy to use and provided instant feedback. In the early 60’s this was a revolution in photography and one that changed photography forever.
By 2008, unfortunately Polaroid announced that they were soon to become defunct and would shut down three of their factories and lay off the last 450 workers in the company. In 2009, one year later they announced that they would be bringing back some limited production of their classic film cameras however Fuji Film remains the only real large provider of instant film left in the US.
Even though Fuji is the largest – another company called the “Impossible Film Project” sprouted up after the closure of the Polaroid Plant in 2008 with the idea of creating instant film for classic Polaroid cameras. The idea was that there was such a large base of photographers that would still want to experience the instant camera and they would need film for their Polaroid cameras. Well I was intrigued by the idea and so last year, I decided to give instant film a chance.
My first step was to go on Ebay and attempt to find a good but inexpensive Polaroid camera that would be good enough to take interesting pictures but not too expensive that it would become costly.

Edwin Land – The Inventor of Polaroid and one of Steve Jobs Heros
I became intrigued with Polaroid photography while going through my old family photos. While we didn’t take a lot of Polaroid pictures because they were expensive, we did have some tucked away in boxes that I found and scanned in my archiving project earlier this year. Something about Polaroid pictures reminded me of being young and the excitement of seeing a picture develop before your eyes. When you took the picture out of the camera it was just blend of dark colors, but slowly the image would come into view as it developed. Sometimes they were great – and other times- maybe not. The pictures were never perfect but there was something about the experience of getting your pictures instantly which was very rewarding. My parents were insurance agents and they relied on the old One 600 in their office to take pictures of the cars that they insured for companies. Without a Polaroid that would have been impossible to do.

My brother Danny circa 1984 in Chula Vista standing in front of an old Pinto holding a Polaroid picture just taken.
I found my camera which I bought for about $40. It was the hugely popular One600 which was one of the last of the cameras released by Edwin Land who worked for the company between 1947 and 1983. He was generally considered the primary inventor of instant film and so this was his final and one of his most popular cameras. Edwin Land was actually one of Steve Job’s biggest hero’s for bringing the revolutionary camera and technology to market. The camera I bought had a sleek blue design, a built in flash and had a space age look to it. A pretty good deal for $40 I must say.

After I received my camera, I needed film. It was then that I realized instant cameras would be very pricey. The film was super expensive. The Impossible Project was the place that I decided I would go to get my film. I tried to buy some old Polaroid Film but the film was super expensive on Ebay and since most of it was aging terribly I felt it would be unreliable. The Impossible Project http://www.the-impossible-project.com/, had a pretty big inventory of both color and black and white film with various sensitivity ranges and color schemes. I decided to primarily shoot in black and white since that seemed to be the safest way to photograph with a camera that I had little experience using. The Impossible Project had some highly rated film that was called Silver Shade. The only issue was that each pack of about 8 exposures ran about $22. So each click of the shutter cost a bit over $2.50. I bought about 4 packs as well as some color shade film determined to try out my new camera and the film. I was mostly interested in experiencing how it might have been to photograph when each click of the shutter mattered financially.

I started shooting at home with the Polaroid at first. I wanted to test it in safe conditions. As soon as I took a shot, I would quickly extract the film, shake the picture and bring it into a dark place and turn it upside down as they instructed. While I was waiting it was always a little exciting to wonder what my creations had looked like.
At first I was disappointed. Most of my shots had this ugly dark underexposed line running right down the middle of the picture. I was upset and wondered if I had purchased a bad camera. Then after awhile I took a few shots that actually turned out pretty clear and looked pretty nice actually. After rolling through the 4 boxes of film at a cost of about $100 after shipping, I had mixed feelings about the project. Sure I had some slightly interesting instant images but I also had to throw away about half of the pictures that I took because they really didn’t even appear keepable. I could not tell if the underexposed lines and blotches on my pictures were a product of the poor camera or poor quality of the film in general. The end result however was that I felt that I could not completely rely on instant cameras as a way to take nice pictures.

About 4 months later after having pretty much given up on the instant camera, I got an email from The Impossible Project saying that they had a clearance on lots of color shade and silver shade film. I guess it was aging. I decided to buy another 6 boxes of the film at a discount. It cost me about another $100 to get the film. The boxes arrived with a big X on them – I believe that was probably to prevent me from returning them and asking for a refund. As they had indicated the film was aging and might not be completely reliable but that is why they were offering a 20% discount on the price of the film. I was determined to make another go of it with this film.

I took three of the boxes out and used them the same weekend. I tried them at various events that we were going to see if I could take some good pictures. I found myself even more disappointed this go around then I was the first. Now the Impossible Project warned me before I made the purchase that the film might be unreliable but it turned out that it was an understatement. Almost every picture I took was un-useable. Nothing was turning out. After 24 exposures, I only was able to keep one of the pictures and it was not even something I was that happy with. I was disappointed with another lackluster result.
While researching Polaroid Cameras to see if I could be doing something better, I came across a interesting and intriguing alternative to Polaroid – it’s called Poladroid and it can take your digital images and turn them into Polaroid images instantly. http://www.poladroid.net/. The application is quite similar to instagram but something that you can download right to your computer. You can drag any image into the Poladroid and it will make it look like you took the picture on a Polaroid. I downloaded and tested the software and simulates the Polaroid experience quite well actually. When you drag an image onto the camera – it clicks the image out just like a real Polaroid camera and you need to wait 3 minutes or so while the image slowly develops before your eyes. You can even shake the image to make it develop faster – just like you do with a real Polaroid picture. And to top it all off, you can import the images into Photoshop and even do more cool effects on them through some simple post processing. I put some sample images that I took here. While the images were nice – it did feel a little like cheating, and it definitely is not the real Polaroid experience.
 The Poladroid pictures turned out pretty nice and I liked the Vignetting and coloration that they adjusted the pictures with. They look pretty authentic.
I can’t help but feel that part of the problem was the camera that I was using and maybe not completely on the film. I could have purchased a newer camera and probably got more reliable Fuji Film from CVS or something like that but I really wanted that 1970 retro Polaroid experience that I remember my parents and their friends having when they took pictures. I guess in the end it was a great project and I can’t say I am not completely bummed with the result. I mean in all I ended up with a pretty cool camera that everyone wants to try out when I take it somewhere. I got a handful of some pretty nice pictures that I stick up in my studio and I learned a lot about Polaroid – the good and the bad. I am keeping my Polaroid Camera – I might upgrade actually and get something that allows me to control the light a bit more so I get a better result with the Impossible Project Film – but I am a believer in Polaroid – definitely.

The 35mm lens. Simplicity. Perfection.
After two years of testing, renting, buying and selling just about every level of Nikon and Canon lenses and cameras I have learned quite a bit about what works and what doesn’t. Pretty much you can’t go wrong with Canon or Nikon and just about everything they make is top notch. You can buy one or the other and in the end you’ll have a great product even though I give Nikon a slight advantage in most categories. One thing I have learned is that the more you spend the better the quality of the lens, the camera and the final pictures you take. Well, that is until this week. This week I discovered the Nikkor 35MM Manual Focus lens. This lens has been around so long that it has reached legendary status (I believe it has been around since 1982 which is amazing considering how much technology and cameras have evolved from that point). The lens was originally created for press photography and is one of the fastest wide angle lenses that you can buy even to this day. This lens has one of the most superior color renditions of any lens I have used and creates great contrasty images with amazing depth of field when you dial the aperture to its lowest levels.
For years I have tried different focal lengths on lenses from super wide angle and fisheye to super 500MM zoom to find the perfect picture. Even though I tried them all, I never had a 35mm lens. I was convinced that the best focal lengths for portraits was my trusted 85mm lens and the best focal length for landscapes was my 16mm to 35mm lens. I had 50mm lenses and almost everything in between but never a 35mm lens. Now that I have one, I am surprised at what I was missing and I have changed my mind. 35MM lenses are a must have in my opinion for any photographer and videographer. I have a variety of reasons for saying that, and if you are looking for a great 35mm lens, I think the Nikkor 35mm AIS is as fine as any lens out there even more expensive ones. Here are some of the reasons I am a big believer in 35mm lens photography.
Focal Length – In terms of composition, the 35mm lens is the closest to the focal composition of the human eye. That is why it is used so often in movies because it gives a much more realistic vantage point for the viewer. In terms of photography using a fixed 35mm lens requires you to get creative in terms of how you move your body around to get the right composition. You can’t be lazy but when you catch a shot with a 35mm lens it has a more artistic look to it than any other lens that I have tried.
Versatility – The 35mm lens can be used for almost anything: Landscapes, portraits, travel shots, macro photography, street photography, real estate photography, product photography – just about everything. The 35mm I use allows me to get great close up images but also allows me to get pretty decent wide angle shots. Many photographers refer to the 35mm as the wedding photography lens because of its versatility indoors and outdoors.
Video – I originally purchased the Nikkor 35mm lens exclusively for creating videos with my D3S. I had read a few articles on the fact that it was the best lens for videography for a variety of reasons. All of those reasons were spot on and I could see the difference I snapped the lens on the camera. The focal length was wide enough where I virtually had no camera shake but not so wide that I could not focus on my subject. I could walk a foot away and get great close-ups and the video had an almost cinematic quality when you dialed in the aperture to its lowest levels. I attached a test video to the end of this entry. In short the video is just beautiful with a lens in this focal length. If you use a DLSR for your video you know that the autofocus feature is nearly useless and will cause your videos to go in and out of focus quickly. The fact that this 35mm lens only provides manual focus and no autofocus engine is not a problem since I rarely use the autofocus feature for my videos anyway.
Best Capture of Subject and Environment – One of the best features of a 35mm lens is that it allows you to capture your subject relative to their environment. I think this is another reason that it is used so broadly in film – it helps you tell a story with your video or your photograph. I brought the 35mm lens to a show I went to for my brothers band. I was positive that I would not use it since the music was fast and I was positive I could never dial in the right focus to capture what was happening since autofocus was not on the lens. When I got home I was amazed since my best pictures of the night came out of the lens. The reason was that I was able to capture the subject and what was happening around them to the perfect degree.
Forced Interaction – You can always tell from someone’s photos if they were passively or actively engaged with there surroundings. The best photos I see is where the photographer is actively involved in their environment – not changing the scene but involved in it somehow by getting in the middle of the action. Zoom lenses can make a photographer a little lazy since they can zoom into their subject from far away and not get in the middle the action. The 35mm is a lens really requires you to get in the middle of a situation to get a good photograph. If you stand far away from your subject it won’t work since the angle is pretty wide and you won’t have a real subject in the end photo. I find that the 35mm is perfect since it requires you to jump right in to find the perfect picture.
Low Light Performance – I am referring in particular to the Nikkor 35MM AIS when I refer to the stunning speed and low light performance of the 35mm lens. I find that the combination of my D3S and 35MM lens which can be dialed back to 1.4 aperture level provides me with unreal low light performance. I can take pictures in near dark rooms and the photos appear that they have been taken in great lighting conditions. This is beneficial not only for photography but videography as well. I find that the videos taken with the 35mm lens have far less noise and are far less grainy than pictures taken with my other lenses.
Small, light and compact – When I put the 35mm lens on my camera it makes my camera feel small and light. When I compare that to my more expensive prime lenses which make my camera feel about twice the weight it is really an added bonus to this lens. Since the lens is so light, compact and versatile it makes the perfect walk around lens for taking street photography or any type of photography when you are traveling. Sure you might be tempted to break out your fish eye or zoom but this lens will force you to deal with your situation and take the best picture possible with what you have. I find that always makes for more interesting photography.
Wide angle with constraint – I was editing pictures once and a friend of mine advised that I turn the contrast up to exactly where I wanted it and then to dial it back slightly. Constraint is ultimately very important in photography and is what differentiates an average picture from a great picture. The 35mm lens is considered the very beginning of wide angle lenses. It is the most subtle wide angle on the market and that is why it consistently delivers great shots. It is certainly not fish eye, certainly not super wide angle, but it is wide enough to capture a subject interacting with their environment. I am often tempted to use a wide angle lens. The 35mm lens is analogous to slightly dialing back the level of contrast that I feel is appropriate. The 35mm keeps my wide angle nature in check.

